Easy Crockpot Beef Enchilada Bake
There’s just something about a warm, cheesy beef enchilada that instantly transports me back to Sunday nights at my grandma’s house. The smell of seasoned meat mingling with melting cheese and that touch of smoky chili sauce — it’s pure comfort. Honestly, I could eat these every week and never get tired. What’s funny is, I used to think making enchiladas was a huge production, but I’ve found ways to make it surprisingly easy and totally foolproof. My kids actually ask for seconds — sometimes thirds! — which is the ultimate compliment in my book. If you’re like me and love a dish that’s cozy, flavorful, and quick enough to whip up after a busy day, then you’re in the right place. Trust me, once you try this beef enchilada recipe, it’ll become a regular in your dinner rotation. Plus, it’s great for leftovers — perfect for that next-day lunch or even midnight snack when you’re craving something tasty and satisfying.
What is Beef Enchilada?
Think of beef enchiladas as a stuffed tortilla wrapped around a savory meat filling, topped with gooey cheese and smothered in a rich chili sauce. It’s essentially Mexico’s version of a rolled-up, cheesy casserole — kind of like a comfort-food hug in every bite. The name “enchilada” comes from the Spanish word “enchilar,” meaning “to season with chili,” which makes sense because chili sauce is the star of this dish. The beauty of a beef enchilada is how customizable it is; you can jazz up the filling with beans, corn, or even extra veggies, but I always keep it simple with seasoned ground beef. When you bake it all together, the flavors meld beautifully, and that cheesy, slightly crispy top is just unbeatable. It’s the kind of dish that looks fancy but is actually one of the easiest things you can throw together, especially when you’re short on time but want that satisfying, homemade taste.
Why you’ll love this recipe?
What I love most about this beef enchilada recipe is how it hits all the right notes — bold flavor, comforting warmth, and an effortless prep. The seasoned beef is juicy and flavorful, thanks to a little cumin, chili powder, and even a pinch of smoked paprika for depth. The tortillas soften perfectly as they bake, transforming into a tender, flavorful bundle. Plus, the cheese — I prefer melty Monterey Jack but feel free to mix in some cheddar or pepper jack for extra kick — forms a bubbly crust that’s irresistible. And it’s surprisingly simple to make. I always do this when I want a cozy family dinner on a weeknight or a potluck dish that everyone raves about. It’s budget-friendly, too. I usually keep the ingredients pantry-staple-friendly, so I can whip it up without a special trip to the store. If you love Mexican flavors but want something a bit more hearty and filling, these beef enchiladas are definitely a win. And what’s more satisfying than assembling, baking, and then sharing a big plate of cheesy, meaty goodness with your favorite people?
How do you make enchiladas?
Quick Overview
This beef enchilada recipe has a few simple components: seasoned ground beef, soft tortillas, a quick chili sauce, and plenty of cheese. You’ll start by browning the beef with spices, then filling warm tortillas with the meat mixture. Roll them up, place in a baking dish, pour over a smoky sauce, sprinkle cheese on top, and bake until bubbly. The best part? You can prepare these ahead of time — just cover and pop in the fridge until you’re ready to bake. They’re great for busy weeknights because the assembly is quick, and the oven does most of the work. Trust me, once your house starts smelling like chili and melted cheese, everyone’s going to be eager to dig in.
Ingredients
For the Filling:
– 1 pound (450g) Ground beef — I prefer lean for less grease, but you can use ground turkey or chicken too.
– 1 small onion, diced
– 2 cloves garlic, minced
– 1 tsp cumin
– 1 tsp chili powder
– ½ tsp smoked paprika (or regular paprika)
– Salt and pepper to taste
– ½ cup tomato sauce or crushed tomatoes (for extra flavor)
– Optional: ¼ cup chopped cilantro or green onions for freshness
For the Tortillas:
– 8-10 medium flour tortillas — I like soft, store-bought ones, but homemade work too if you’re feeling ambitious.
For the Chili Sauce:
– 1 can (10 oz) enchilada sauce — my go-to is a mild smoky one, but feel free to spice it up.
For the Topping:
– 1 ½ cups shredded cheese (Monterey Jack, cheddar, or a blend)
– Fresh cilantro or sliced jalapeños for garnish (optional)
Step-by-Step Instructions
Step 1: Preheat & Prep Pan
Start by heating your oven to 375°F (190°C). Lightly grease a 9×13-inch baking dish with a bit of oil or non-stick spray. This makes cleanup easier and prevents sticking — trust me, it’s worth it.
Step 2: Mix Dry Ingredients
In a small bowl, combine the cumin, chili powder, smoked paprika, salt, and pepper. I always do this first so I can add the spices directly to the meat while cooking, ensuring everything is evenly seasoned. It’s a simple step but makes a big difference!
Step 3: Mix Wet Ingredients
Nothing fancy here — just have your tomato sauce ready, along with any extra herbs or seasonings you might want to add later. I like to keep it simple, letting the spices do their magic.
Step 4: Combine
Heat a skillet over medium heat, add the beef, and cook until browned, breaking it apart with a spatula. Once nearly cooked through, add the diced onion and garlic, cooking until fragrant — about 2-3 minutes. Sprinkle the spice mixture over everything and stir to combine. Add the tomato sauce and simmer just a couple of minutes until thickened slightly. Your kitchen will start smelling amazing — that’s when you know you’ve nailed the flavor.
Step 5: Prepare Filling
Let the beef mixture cool just slightly so it’s easier to handle. If you’re adding cilantro or green onions, fold them in now. This filling should be moist but not watery — if it feels too juicy, just give it a minute to evaporate a little or drain excess liquid.
Step 6: Layer & Swirl
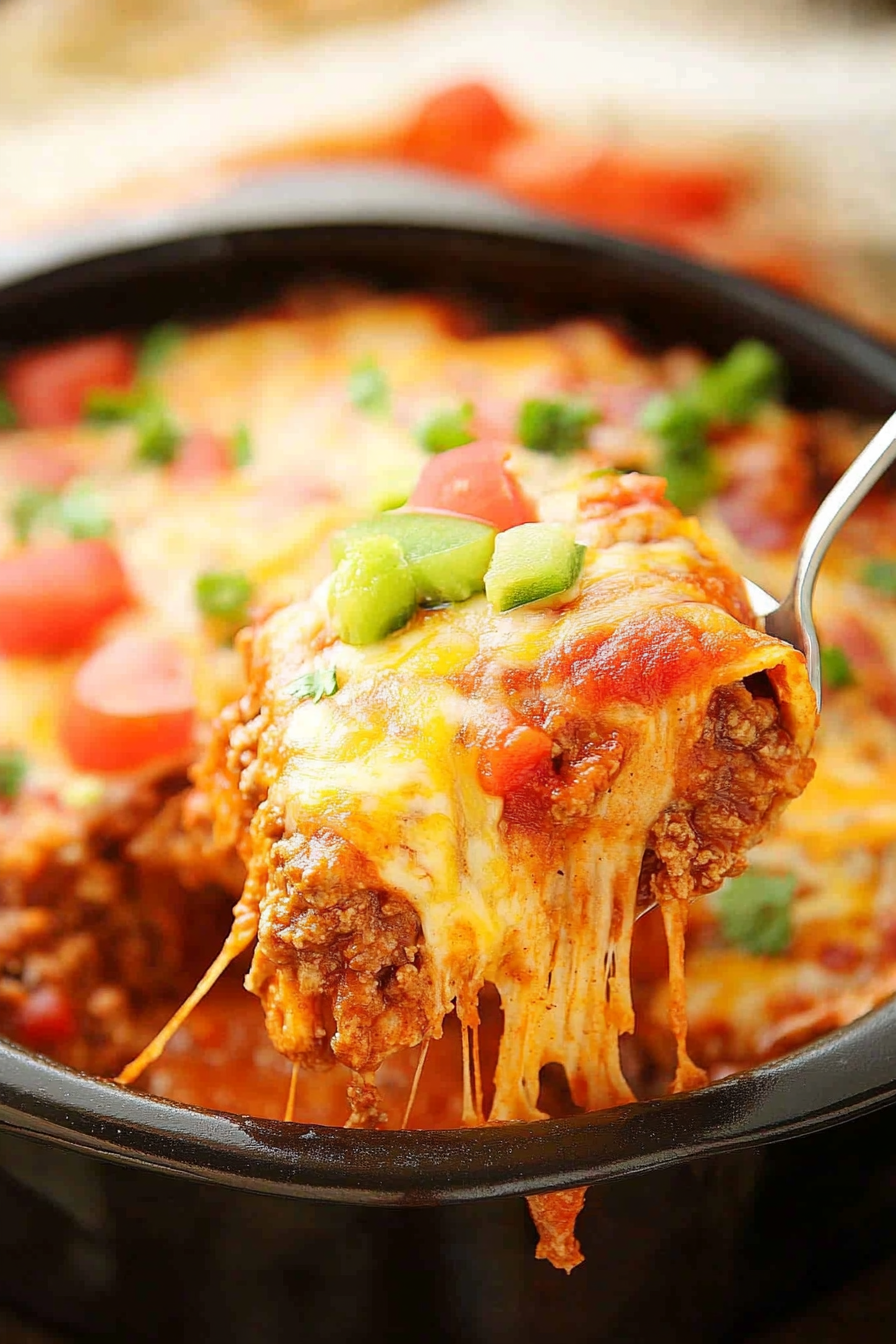
Lay out a tortilla on a clean surface, spoon about 2-3 tablespoons of the beef mixture at one end, then roll it up tightly. Place seam-side down in your baking dish. Repeat with remaining tortillas, arranging them snugly in the dish. Once all are rolled, pour the enchilada sauce evenly over the top and sprinkle with shredded cheese. You can get creative here — some like a sprinkle of chopped green onions or extra cheese on top for that cheesy crust.
Step 7: Bake
Pop the dish into your preheated oven and bake for about 20-25 minutes, until bubbly and golden on top. Keep an eye toward the end — you want the cheese melted and slightly crispy around the edges. If you love a really crispy top, turn on the broiler for the last 2 minutes, but watch it carefully so it doesn’t burn.
Step 8: Cool & Glaze
Let the enchiladas rest for about 5 minutes before serving — this helps everything settle and makes slicing easier. Garnish with fresh cilantro or jalapeños if you like a little extra brightness and heat. If you’re feeling adventurous, a drizzle of sour cream or a side of guacamole never hurts.
Step 9: Slice & Serve
Use a sharp knife to cut the enchiladas into even squares or dramatic wedges. Serve hot, with a side of rice or a crisp salad, and prepare to hear rave reviews. I swear, the smell alone will have everyone lining up at the table.
What to Serve It With
This dish is so versatile, you can dress it up or keep it casual. I love serving it with a fresh side salad and some Mexican-style rice — both homemade or store-bought. For a lighter option, a quick cabbage slaw with a squeeze of lime refreshes the palate. On weekends, I’ll add some homemade pico de gallo or a side of queso dip to make it a fiesta. For breakfast or brunch, leftovers work surprisingly well — just reheat and top with a dollop of sour cream or a fried egg if you’re feeling fancy. My family’s favorite way to enjoy these is with a cold margarita or a refreshing iced tea — it feels like a little vacation every time. Whether dinner, lunch, or a potluck dish, this beef enchilada always earns a happy crowd.
Top Tips for Perfecting Your Beef Enchiladas
Let me share some tricks I’ve picked up over the years. First, drain excess fat from your cooked beef if it feels greasy — it helps keep the filling from becoming soggy. When filling the tortillas, don’t overstuff — a couple of spoonfuls is plenty; overstuffed tortillas tend to tear, and nobody wants that mess. For even distribution of flavors, I sometimes mix a splash of lime juice or a dash of hot sauce into the meat — trust me, it brightens everything up.
If you want a spicier kick, add chopped jalapeños to the filling or sprinkle crushed red pepper flakes over the top before baking. For a creamier, richer enchilada sauce, I tested using a splash of sour cream stirred into the sauce—worked beautifully! And if you’re gluten-free, just swap out the flour tortillas for corn ones, but be careful not to over-soak them in sauce, or they might fall apart. When baking, positioning the dish closer to the center of the oven ensures even heat, giving your cheese that perfect bubbly, golden finish. And don’t forget, if you want extra flair, sprinkle some chopped fresh cilantro just before serving — it adds a burst of freshness.
Storing and Reheating Tips
This dish keeps really well for a couple of days — I often make a batch on Sunday and enjoy leftovers through the week. Let the leftovers cool completely before transferring to an airtight container. If you’re refrigerating, cover tightly with foil or plastic wrap — it’ll stay fresh for about 3-4 days. To freeze, wrap the dish tightly with foil, then place in a freezer-safe container for up to 3 months. Thaw overnight in the fridge, then reheat in the oven at 350°F (175°C) uncovered until heated through and bubbly — usually about 20-25 minutes. I prefer reheating leftovers in the oven rather than microwave, as it helps maintain that crispy top and prevents sogginess. If you like a fresh topping every time, add the cheese or fresh herbs just before serving again. A quick tip: if the enchiladas seem dry after reheating, a spoonful of extra enchilada sauce or a splash of broth can revive them without sacrificing flavor or texture.
Frequently Asked Questions
Final Thoughts
If you’re on the hunt for a cozy, flavorful dish that’s as straightforward as it is satisfying, this beef enchilada recipe is your new best friend. It’s the kind of meal that feels like a warm hug — full of smoky, cheesy goodness with that just-right kick of spice. Over the years, I’ve tinkered with different fillings and toppings, but this version always wins at my house. It’s perfect for a weeknight dinner, a casual gathering, or even meal prep — because leftovers taste just as good, if not better, the next day. I love how adaptable it is too; add your favorite veggies, swap the cheese, or spice it up to match your mood. Honestly, these are one of those recipes I keep coming back to because they remind me of family dinners, laughter, and good times around the table. So go ahead, gather your ingredients, and let these cozy beef enchiladas bring a little extra warmth and flavor into your home. I can’t wait to hear how yours turn out — happy baking!
Speedy Beef Enchiladas
Ingredients
Method
- In a large skillet over medium heat, spray with cooking spray and add the ground beef. Cook until browned and crumbled.
- Add diced onions and cook for 2 to 4 minutes until softened. Stir in salsa, green chilies, and taco seasoning. Remove from heat.
- Spray a 9x13 inch baking dish with cooking spray. Spread a thin layer of enchilada sauce on the bottom.
- Place 4 tortillas in the dish, tearing if necessary to fit. Layer with ⅓ of the beef mixture, ⅓ of the enchilada sauce, and ⅓ of the cheese. Repeat layers twice.
- Cover with foil and bake at 375°F for 25-30 minutes until bubbly.
- Remove foil, sprinkle remaining cheese on top, and bake uncovered for an additional 10 minutes until melted.
- Allow to rest for 5 minutes before serving. Garnish with chopped cilantro if desired.