Easy Baked Bean Casserole Recipe
There’s something about a good bean casserole that just hits the spot, isn’t there? I remember my grandma making hers on chilly Sunday afternoons—filling the house with a cozy, savory aroma that made everyone gather ‘round the table. It’s one of those recipes that’s so unpretentious but delivers on flavor in a way that surprises you every single time. Honestly, I’ve made countless versions of this dish, tweaking ingredients here and there, but the core—those tender beans layered with cheesy, crispy goodness—remains a family favorite. It’s perfect on a busy weeknight when you want something hearty without spending hours in the kitchen. The best part? It’s insanely forgiving—adjust ingredients to what you have, and it still turns out delicious. Trust me, this bean casserole disappeared in minutes at my house, and my kids ask for seconds—what more could I ask for? So, grab your favorite baking dish, and let’s dive into making this comfort food that’s become a real staple in my kitchen.
What is a bean casserole?
Think of a bean casserole as a cozy, layered dish made primarily with beans and a few simple ingredients that come together into something extraordinary. It’s essentially a hearty bake that combines cooked beans—think black beans, kidney beans, or even chickpeas—with flavorful spices, vegetables, and plenty of melted cheese. Sometimes, I toss in a touch of smoky bacon or chorizo for that irresistible savory punch. The name “casserole” comes from the fact that it’s baked in one dish—making for an easy-cleanup, no fuss, no mess. It’s a dish that ‘sits’ comfortably on the dinner table, whether you’re serving it as a quick weeknight meal or a family-friendly crowd-pleaser. What I love most is the way it’s so adaptable—you can make it vegetarian, add a pop of spice, or keep it super simple with just a few pantry staples. It’s one of those recipes I turn to when I want something that’s both nourishing and overflowing with flavor. Think of it as the ultimate hug in a pie plate.
Why you’ll love this recipe?
There are plenty of reasons why I keep coming back to this bean casserole, but I’ll start with the flavor—rich, savory, and with just the right hint of seasoning. The smell alone when it’s baking is enough to make everyone in the house come running—my kids actually ask for seconds before I even get the dish out of the oven! Beyond taste, what I really love about this dish is how easy it is to put together. You don’t need fancy ingredients or complicated techniques—just some beans, cheese, and a few pantry staples, thrown into one baking dish. It’s budget-friendly, too; I often use dried beans I keep on hand, which cost a fraction of canned ones and taste even better. Another bonus? It’s incredibly versatile. Want to make it vegan? Use plant-based cheese and milk. Need to stretch it for a larger crowd? Double the recipe and still rely on those simple ingredients. Plus, it’s so forgiving—you can play around with flavors, add extra veggies, or tweak the spice level. It’s one of those recipes that’s become a family classic, and honestly, I think it’ll be yours, too! It’s comforting, satisfying, and best of all, it tastes like a warm hug from your own kitchen.
How do I make a bean casserole?
Quick Overview
This bean casserole is a breeze to whip up and perfect for busy nights. The process involves preparing hearty beans—either canned or from scratch—layering them with savory fillings, then topping everything with cheese before baking until bubbly and golden. Honestly, the hardest part is waiting for it to cool enough to slice! What makes this method special is how flexible it is—you can prep everything ahead, assemble it, and bake later. The smell alone will draw everyone to the table. With just a handful of ingredients, some simple mixing, and about 30-40 minutes in the oven, you’ve got a dish that’s bound to become a new family favorite.
Ingredients
For the Main Layers:
- 2 cans (15 oz each) of beans (black, kidney, pinto, or chickpeas) — I like to combine a few for complexity, but use what you love.
- 1 cup cooked rice or quinoa (optional, for extra heartiness)
- 1 small onion, diced — I always do this when I want that sweet, caramelized flavor
- 2 cloves garlic, minced — fresh garlic makes the biggest difference
- 1 teaspoon smoked paprika — ah, the smoky depth
- Salt and pepper to taste
For the Filling:
- 1 cup shredded cheese (cheddar, mozzarella, or a blend) — I usually grab a block and shred it myself, because it melts so much better.
- ½ cup sour cream or Greek yogurt — for creaminess and tang
- ½ teaspoon chili powder or cumin (optional, for a little heat)
For the Topping/Glaze:
- ½ cup shredded cheese (more on top)
- ½ cup panko crumbs or crushed tortilla chips — for crunch
- 1 tablespoon butter, melted — to help the topping crisp up
Step-by-Step Instructions
Step 1: Preheat & Prep Pan
Set your oven to 375°F (190°C). Lightly grease a 9×13-inch baking dish—trust me, a little butter or olive oil goes a long way to prevent sticking. I like to line the dish with parchment paper if I want super easy cleanup, but it’s optional.
Step 2: Mix Dry Ingredients
If you’re using dried beans, soak and cook them ahead of time—otherwise, canned beans are your friends here. Rinse and drain well. In a large bowl, toss the beans with diced onion, garlic, smoked paprika, salt, and pepper. The idea is to flavor the beans themselves, so give everything a good stir, making sure those spices are evenly distributed.
Step 3: Mix Wet Ingredients
In another smaller bowl, stir together your shredded cheese, sour cream, and optional chili powder. This mixture adds creaminess and flavor inside and on top of your casserole. I sometimes add a splash of hot sauce if I want a little extra kick. Just toss it until smooth and combined.
Step 4: Combine
Add the cheese mixture to the beans and fold gently. Be careful not to overmix—you want a nice, rustic texture, not a pureed mess. If the mixture feels too thick, a splash of milk (dairy or plant-based) can loosen it up a bit.
Step 5: Prepare Filling
If you like, layer some cooked rice or quinoa at the bottom of your dish for extra substance. Then, spread half of your bean mixture evenly into the dish. Layer some additional cheese on top if you want that cheesy gooeyness. Repeat with remaining beans and cheese.
Step 6: Layer & Swirl
For a pretty marbled look, drop spoonfuls of some extra cheese or sauce on top and swirl lightly with a skewer or knife. This creates those tempting marbled patterns you see in restaurant casseroles, and my kids love spotting the cheese ‘swirls’ in every bite.
Step 7: Bake
Pop it into the oven and bake uncovered for about 30-35 minutes, or until bubbling and golden around the edges. Keep an eye on it after 25 minutes—if the top gets too dark, cover loosely with foil. The smell of melted cheese and toasted crumbs will fill your kitchen, I promise.
Step 8: Cool & Glaze
Let it cool for at least 10 minutes—this helps it set so it doesn’t fall apart when you serve. For the topping, mix your panko crumbs with melted butter, sprinkle evenly over the casserole, and bake for another 5-7 minutes until crispy. If you prefer skipping the topping, just skip this step or add it right at the end for crunch.
Step 9: Slice & Serve
Use a sharp serrated knife to cut clean slices. Serve hot, with a side of fresh salad or crusty bread. I love adding a dollop of sour cream or a splash of hot sauce on top. This casserole looks and smells so inviting—your house will smell like love and comfort.
What to Serve It With
This bean casserole can be a star on its own or just part of a bigger meal. For breakfast, hot with eggs on the side—hello, morning comfort! At brunch, pair it with a fresh green salad and maybe some fresh fruit or mimosas. As a dinner side, serve it alongside grilled chicken or fish, and if you’re feeling extra indulgent, a dollop of sour cream or salsa on top just takes it to another level.
But honestly? My family loves this as a main course, especially on chilly nights—it’s filling and makes us feel good inside. I usually set the leftovers in the fridge, and the next day, I reheat it with a drizzle of extra cheese on top. It re-heats great, and I’ve even been known to crumble some taco chips over it for a crunch boost. Or, turned into a little casserole hash with fried eggs on top? Perfection. The versatility is endless, and that’s what makes this recipe so fun to keep coming back to.
Top Tips for Perfecting Your Bean Casserole
Getting the perfect casserole isn’t as complicated as it might seem—just a few tricks up my sleeve. First, if you’re using dried beans, take the time to soak them overnight—this makes them cook faster and become extra tender. I’ve learned that undercooked beans can ruin the texture, so don’t skip the boiling step. When mixing the cheese and sour cream, aim for a smooth, creamy mixture—that’s what gives it that luscious, gooey feel. I tested this with a combo of half sharp cheddar and a sprinkle of Monterey Jack, and let me tell you, the flavor was next-level. For the swirl effect, I like to add a spoonful of salsa or even some chopped fresh herbs around the edges before swirling—makes it look pretty and tastes even better.
Trick Number one: don’t overmix the filling, or you’ll get a dense casserole. Fold gently and let the texture stay rustic. For the topping, I prefer panko crumbs mixed with a little paprika and garlic powder—adds flavor and crunch. You can swap the panko for crushed tortilla chips, which brings a nice corn flavor. Oh, and be sure to bake it uncovered the last 10 minutes—this helps the top crisp up beautifully. I’ve also tried using a bit of hot sauce in the filling for an extra kick—trust me on this one, it makes a big difference. Lastly, don’t rush the cooling—waiting those extra minutes helps it hold together when sliced and served. Master these little tips, and you’ll find your casserole becomes even more irresistible!
Storing and Reheating Tips
Leftovers? Absolutely! Store your bean casserole in an airtight container in the refrigerator—they’ll last about 3 to 4 days. For best results, let it cool completely before popping it in; this keeps it fresh and avoids condensation. To reheat, I find the microwave works well—just cover it with a damp paper towel and heat in short bursts so it doesn’t dry out. If you’re reheating a large portion, the oven is your friend—cover with foil, bake at 350°F, and check every 10 minutes until warmed through. Want to keep the top crispy? Remove the foil and sprinkle some fresh cheese or panko on top during reheating. For longer storage, you can always freeze individual portions—just wrap tightly in plastic wrap and then in foil, and it’ll hold for up to 3 months. Thaw overnight in the fridge and reheat as above. I tested this with some leftover casserole that I froze last month—still just as delicious, if not more! The key is not over-reheating, which can turn the cheese rubbery or the topping soggy. Reheating slowly at moderate heat preserves that satisfying textural contrast and flavor boost.
Frequently Asked Questions
Final Thoughts
This bean casserole has become one of those dishes I turn to when I want comfort, flavor, and something that makes everyone feel a little warmer inside. It’s a dish I’ve perfected over the years—getting the balance of creamy, cheesy, and crispy just right—and I promise, it’s a crowd-pleaser no matter who’s at your table. Whether you’re making it for a weeknight dinner, a potluck, or just because you need a little extra coziness, you can’t go wrong with this recipe. I encourage you to experiment with your favorite beans, cheeses, and spice levels—make it your own! And honestly, the best part? Seeing the smiles around the table when it’s served hot and bubbling. I’d love to hear how yours turns out, so don’t forget to leave a comment or share your variations. Happy baking, and may your kitchen always smell like home!
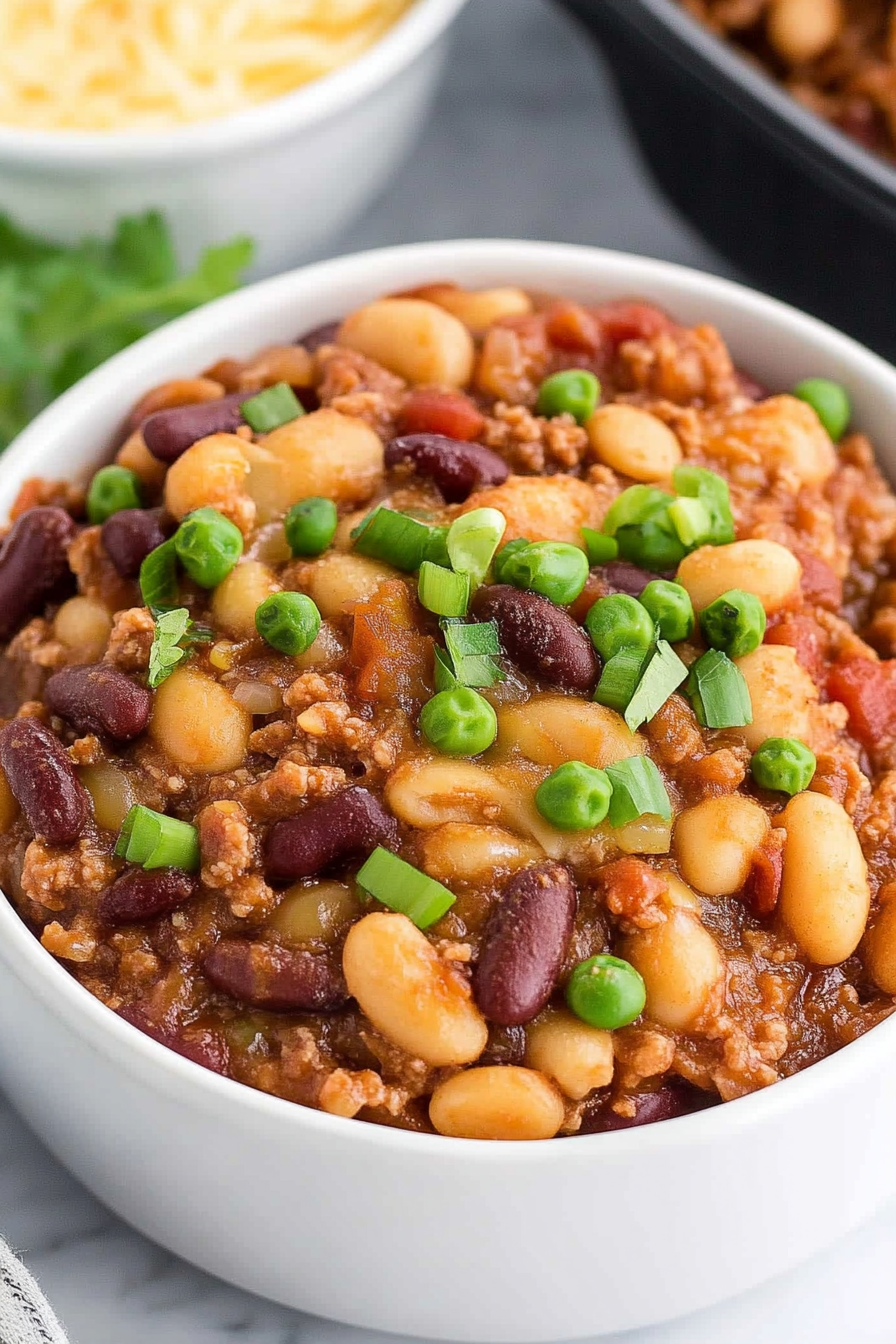
Hearty Bean Casserole
Ingredients
Method
- Preheat oven to 350°F.
- In a large pot over medium-high heat, cook bacon, hamburger, onions, and ketchup until meat is cooked and onions are softened.
- Stir in brown sugar, mustard, vinegar, pork and beans, red kidney beans, white kidney beans, salt, and pepper to taste.
- Put mixture into a 9×13 inch casserole dish and bake for 30 minutes. Serve hot. Sprinkle on green onions if desired.