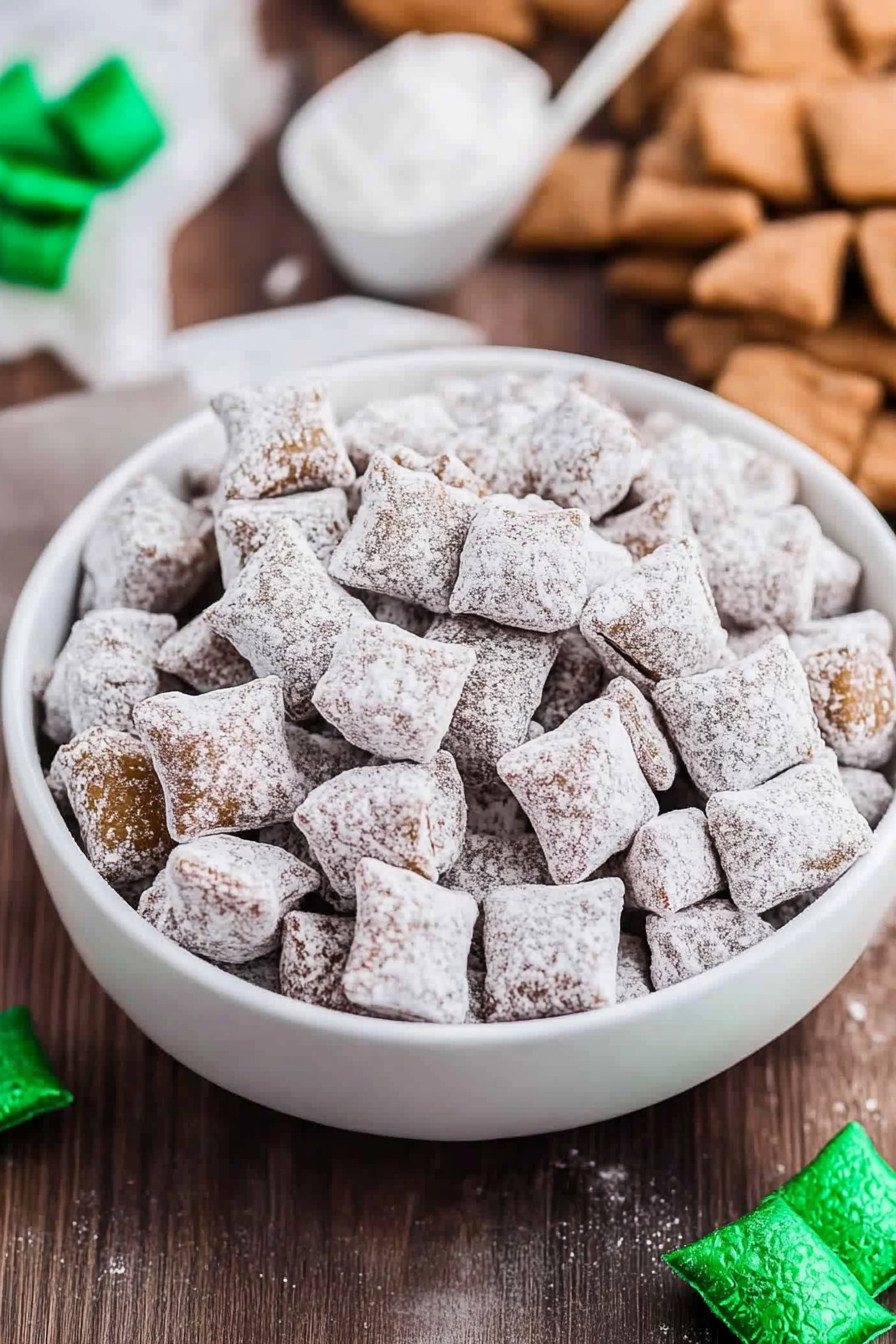
Minty Puppy Chow Recipe: Easy Sweet Treat
You know those recipes that just instantly transport you back to childhood? The ones that smell like pure happiness and make your whole house feel cozy? For me, that’s hands-down Puppy Chow. If you’ve never had it, imagine a sweet, chocolatey, peanut buttery, ridiculously addictive cereal treat coated in powdered sugar. It’s basically magic in a bowl, and way simpler to make than you might think! It’s the kind of snack that’s perfect for movie nights, a quick sweet fix, or even stashed away for when company pops over unexpectedly. Honestly, it’s a lifesaver when you need a crowd-pleaser that doesn’t involve hours in the kitchen. Forget those fancy desserts sometimes; this humble Puppy Chow is pure comfort food, and it’s one of those things my family always asks for!
What is a puppy chow?
So, what exactly is Puppy Chow? Well, it’s not actually made for puppies, despite the name! It’s a beloved sweet snack mix made primarily from cereal (usually Chex), coated in a warm mixture of chocolate, peanut butter, and butter, and then tumbled in powdered sugar. Some people also call it Muddy Buddies, and honestly, both names fit! It’s essentially a no-bake cereal treat, but with a flavor profile that’s way more decadent than your average Rice Krispie treat. The beauty of it lies in its simplicity and its utterly irresistible texture – it’s crunchy from the cereal, gooey from the melted coating, and then that smooth, sweet dust of powdered sugar. It’s a textural dream, and the combination of chocolate and peanut butter is just a classic for a reason, right?
Why you’ll love this recipe?
There are so many reasons why I think you’re going to fall head over heels for this Puppy Chow recipe, just like I have. First off, the flavor is just out of this world. It hits all the right notes: rich chocolate, creamy peanut butter, a touch of buttery sweetness, all clinging to that satisfying crunch of the cereal. It’s not overly sweet, which I appreciate, but it’s definitely a decadent treat. Then there’s the simplicity. Seriously, if you can melt some things in a pot and stir, you can make this. It takes maybe 15 minutes of active time, and the rest is just waiting for it to set. It’s the perfect recipe for when you’re short on time but craving something truly delicious. And the cost-efficiency! The ingredients are pretty basic pantry staples, so you won’t break the bank making a huge batch. Plus, it’s so versatile! You can add a drizzle of white chocolate, toss in some sprinkles, or even mix in different types of cereal. What I love most about this recipe, though, is the pure joy it brings. It’s a nostalgic treat that always sparks smiles, and honestly, it makes me feel like a kid again every time I make it. It’s so much better than store-bought, and you can control exactly what goes into it.
How do I make a Puppy Chow?
Quick Overview
Making this Puppy Chow is honestly a breeze. You’ll basically melt together chocolate chips, peanut butter, and butter, then stir in some vanilla. This warm, gooey mixture gets tossed with your favorite cereal until every piece is coated. The magic happens when you then tumble this coated cereal in a big bag with powdered sugar until it’s perfectly dusted. It’s quick, requires minimal equipment, and the result is an incredibly satisfying, sweet, crunchy snack. It’s the kind of recipe that’s perfect for beginners and seasoned bakers alike because it’s foolproof and always a winner.
Ingredients
For the Main Batter:
6 cups Chex cereal (I usually go with a mix of Rice and Corn Chex, but Wheat Chex works too! Just make sure it’s plain, not flavored.)
1 cup semi-sweet chocolate chips (Good quality chips make a difference, trust me!)
½ cup creamy peanut butter (I prefer the standard Jif or Skippy for this; natural peanut butter can sometimes be a bit oily.)
¼ cup unsalted butter (Using unsalted butter lets you control the saltiness better.)
1 teaspoon vanilla extract (Pure vanilla extract adds so much more flavor than imitation.)
For the Coating:
1 ½ cups powdered sugar (Also known as confectioners’ sugar. Make sure it’s sifted if it’s clumpy.)
Step-by-Step Instructions
Step 1: Preheat & Prep Pan
This step is more about preparation than actual cooking. You don’t need to preheat an oven for Puppy Chow! What you do need is a large baking sheet or a large platter. Line it with parchment paper or wax paper if you have it – it makes cleanup a dream! If you don’t have parchment, just make sure the sheet is clean. You’ll need this space to spread out the coated cereal later.
Step 2: Mix Dry Ingredients
Grab a very large bowl. This is where you’ll do most of your mixing for the cereal itself. Pour your 6 cups of Chex cereal into the bowl. That’s it for this step! We’re just getting the base ready for its delicious coating.
Step 3: Mix Wet Ingredients
In a microwave-safe bowl (or a saucepan on the stovetop if you prefer), combine the chocolate chips, peanut butter, and butter. Microwave in 30-second intervals, stirring well after each, until everything is melted and smooth. It usually takes about 1.5 to 2 minutes total. Alternatively, you can melt them gently in a double boiler over low heat. Once smooth, stir in the vanilla extract. Give it a good whisk until it’s all one beautifully homogenous mixture.
Step 4: Combine
Now for the fun part! Pour that warm, chocolatey, peanut buttery mixture over the cereal in the big bowl. Using a rubber spatula or a large spoon, gently stir and fold everything together. You want to make sure every single piece of cereal gets a good coating. Be gentle though, you don’t want to crush the cereal too much!
Step 5: Prepare Filling
This step is actually about preparing the coating for the cereal, which is the powdered sugar! Take a large resealable plastic bag (a gallon size is perfect) and pour the 1 ½ cups of powdered sugar into it. If your powdered sugar is a bit clumpy, it’s a good idea to give it a quick sift beforehand, but it’s not strictly necessary for this recipe. It just ensures an even coating.
Step 6: Layer & Swirl
Carefully add the chocolate-coated cereal into the bag with the powdered sugar. Seal the bag tightly, making sure to press out as much air as possible. Now, get ready for some serious fun! Shake, tumble, and toss the bag until the cereal is completely and evenly coated in powdered sugar. It’s like a fun little workout, and you’ll see it transform into that classic Puppy Chow look right before your eyes.
Step 7: Bake
Okay, so there’s no actual baking involved here! Once the cereal is coated in powdered sugar, you’ll empty the contents of the bag onto your prepared baking sheet from Step 1. Spread it out in a single layer so it can cool down and set. The goal is for the coating to dry a bit and not stick together in one big clump. You can let it sit at room temperature for about 15-20 minutes, or if you’re impatient like me, pop it in the fridge for about 10 minutes to speed things up. This helps it firm up just enough.
Step 8: Cool & Glaze
Your Puppy Chow has already “set” in the cooling stage, so the “glaze” is actually the powdered sugar coating we added in Step 6. Once it has firmed up a bit on the baking sheet, it’s ready to go. You don’t need an extra glaze like you would for a cake. The powdered sugar mixture is the “glaze” in this case!
Step 9: Slice & Serve
Once it’s set and no longer sticky, you can break apart any larger clumps and serve! It’s best served at room temperature. You can just scoop it into bowls, or if you’re feeling fancy, put some into little individual treat bags for parties or gifts. It’s meant to be eaten by the handful, so don’t overthink the serving!
What to Serve It With
Puppy Chow is a star all on its own, but here are some ideas for how to serve it up for different occasions:
For Breakfast: While it’s definitely a sweet treat, a small handful can be a fun addition to a more substantial breakfast. Think of it as a celebratory topping! Serve it alongside some scrambled eggs and fresh fruit. It’s a playful way to start the day, especially for kids. Or, if you’re feeling really adventurous, you could even sprinkle a little on top of some yogurt for a textural contrast.
For Brunch: This is where Puppy Chow really shines as a sweet finisher. You can serve it in cute little ramekins or a decorative bowl as part of a dessert station. It pairs wonderfully with coffee or a mimosa. For a more elegant presentation, try drizzling a little melted white chocolate over the top after it’s set. It looks so pretty!
As Dessert: Absolutely! It’s a perfect no-bake dessert for potlucks or casual get-togethers. Serve it alongside a rich chocolate cake or a fruit tart for a fun, interactive element. Kids and adults alike will be digging into the bowl!
For Cozy Snacks: This is probably my favorite way to enjoy it. Make a big batch, curl up on the couch with a good book or a movie, and just dig in. It’s the ultimate comfort snack. It’s also fantastic for a road trip or a picnic. Just pack it in an airtight container, and you’ve got instant happy food on the go. I often pack this for my kids’ school lunches, and it’s always a huge hit!
Top Tips for Perfecting Your Puppy Chow
I’ve made this Puppy Chow more times than I can count, and over the years, I’ve picked up a few tricks that really help make it absolutely perfect every single time. Here are some of my go-to tips:
Cereal Choice: While Chex is the classic, don’t be afraid to experiment! A mix of cereal types can add interesting texture. Just ensure they aren’t heavily sweetened or flavored, as that can throw off the balance. Also, make sure your cereal is fresh! Stale cereal just won’t have that satisfying crispness.
Mixing Advice: When you’re tossing the cereal with the chocolate mixture, be gentle! If you stir too vigorously, you’ll end up with a lot of broken cereal pieces, and nobody wants cereal dust. Use a large bowl and a flexible spatula to gently fold the coating over the cereal. If it seems too thick, a few extra seconds in the microwave for the chocolate mixture can help thin it out slightly. Conversely, if it’s too thin, just let it cool for another 30 seconds before stirring.
Powdered Sugar Coating: This is where the magic really happens. Make sure the bag is well-sealed before you start shaking. If you have a particularly large batch, you might even want to divide it between two bags to ensure even coating. Shake it like you mean it! Get all sides coated. If you find there are still dry spots, you can always add another tablespoon or two of powdered sugar and give it another shake.
Ingredient Swaps: While the classic is chocolate and peanut butter, feel free to get creative! You can swap out the semi-sweet chocolate chips for milk chocolate or dark chocolate. If you’re not a peanut butter fan, almond butter or even sunflower seed butter works, though peanut butter provides a distinct flavor profile that’s hard to beat. For a richer flavor, a tablespoon of cocoa powder can be added to the melted chocolate mixture. I’ve even heard of people adding a tiny pinch of cinnamon for a warm spice note!
Baking Tips: As I mentioned, there’s no actual baking! The key is the cooling. Spreading the coated cereal in a single layer on parchment paper is crucial. It allows the coating to set and prevents the pieces from clumping together. If it’s a humid day, it might take a little longer to set, and popping it in the fridge can definitely speed things up. Don’t try to rush it by microwaving it again after it’s coated, as this can make the coating melt or become greasy.
Glaze Variations: While the powdered sugar is the “glaze,” you can add other elements. Once the Puppy Chow is set, a drizzle of melted white chocolate over the top adds a beautiful visual appeal and another layer of flavor. You can also mix in some colorful sprinkles after the powdered sugar coating for a festive touch, especially around holidays. For a more gourmet feel, a sprinkle of flaky sea salt over the top after coating can be amazing!
Storing and Reheating Tips
Proper storage is key to keeping your delicious Puppy Chow fresh and perfectly crunchy. I’ve learned a thing or two about this over the years, especially when I try (and usually fail!) to keep it around for more than a day.
Room Temperature: This is the best way to store your Puppy Chow if you plan on eating it within a few days. Once it’s completely cooled and set, transfer it to an airtight container. It will stay fresh and retain its crunch for about 3-5 days. Make sure the container is truly airtight, as exposure to air is the quickest way to make it lose its crispness. I usually just use a sturdy plastic container with a good lid. If you’re making a big batch and can’t fit it all in one container, you can stack layers with wax paper in between, but try to keep it in as few layers as possible for optimal crispness.
Refrigerator Storage: While not ideal for maintaining maximum crunch, you *can* store Puppy Chow in the refrigerator if it’s very hot or humid where you live. Place it in an airtight container, and it should be good for up to a week. However, I’ve found that refrigeration can sometimes make the coating a bit softer. If you do refrigerate it, let it sit at room temperature for about 15-20 minutes before serving to help it regain some of its crispness.
Freezer Instructions: If you want to make a huge batch and save some for later, freezing is a viable option, though it’s best for preserving the flavor more than the texture. Allow the Puppy Chow to cool completely and the coating to be firm. Then, wrap it tightly in a layer of plastic wrap, followed by a layer of aluminum foil, or place it in a heavy-duty freezer-safe bag, pressing out as much air as possible. It can be stored in the freezer for up to 2-3 months. When you’re ready to eat it, thaw it overnight in the refrigerator, then let it come to room temperature for at least an hour before serving to help it crisp up.
Glaze Timing Advice: The “glaze” in this recipe is the powdered sugar coating, which sets up as it cools. For the best texture, you want this coating to be fully set before storing. Whether you’re storing at room temperature, in the fridge, or freezing, always ensure the Puppy Chow is completely cool and the coating isn’t sticky or wet. If you added any optional extras like a white chocolate drizzle, make sure that has also set completely before packaging it away.
Frequently Asked Questions
Final Thoughts
Honestly, this Puppy Chow recipe is one of those absolute gems that I keep coming back to. It’s more than just a snack; it’s a little burst of joy, a taste of happy memories, and a surefire way to impress anyone without breaking a sweat in the kitchen. The combination of chocolate, peanut butter, and crunchy cereal coated in sweet powdered sugar is simply irresistible, and the fact that it’s so easy to make makes it even better. It’s perfect for parties, a cozy night in, or just when that craving for something sweet hits hard. If you loved this recipe, you might also enjoy my No-Bake Chocolate Oatmeal Cookies or my Classic Peanut Butter Blossoms. They’re all part of that wonderful world of simple, delicious treats that bring people together. So please, give this Puppy Chow a try! I can’t wait to hear how yours turns out in the comments below. Don’t forget to share your own tips or variations – I love learning new ways to enjoy this classic! Happy snacking!
Mint Chocolate Puppy Chow
Ingredients
Method
- In microwave, melt chocolate wafers with mint candy together for 1 minute, stir, and continue melting in 30 second intervals until smooth (about 2 minutes total).
- In a large mixing bowl, combine cereal with melted chocolate. Fold with a large wooden spoon until all cereal is coated evenly.
- In a large gallon-sized Ziploc bag, add powdered sugar. Spoon in chocolate-coated cereal. Seal and shake until coated. Pour onto wax paper and let chocolate set for about 20 minutes. Mix in M&M candies and store in an airtight container.