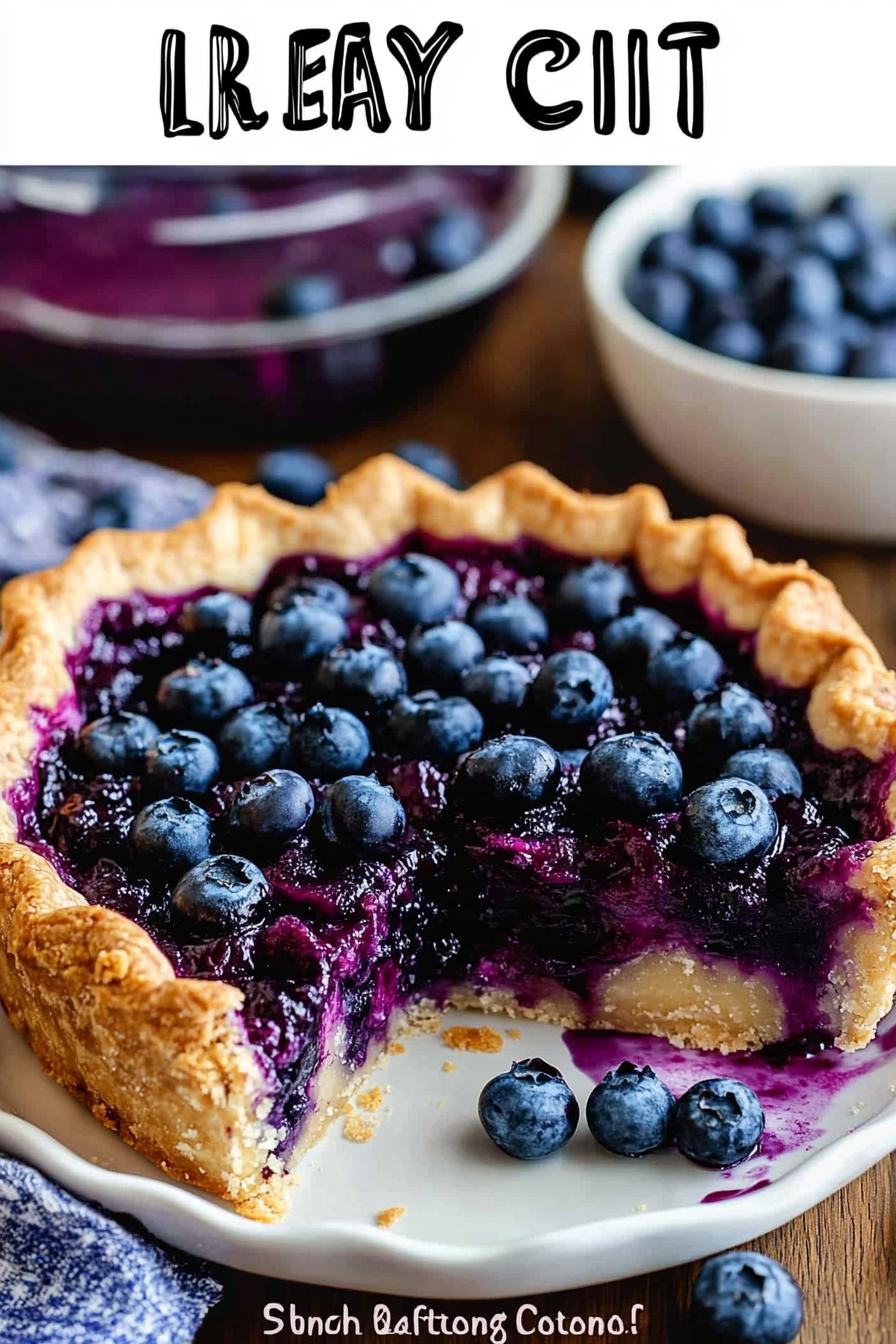
Blueberry Cream Cheese Pie: How to Bake Bliss
If there’s one thing I’ll always be craving during the warmer months, it’s a ripe, juicy blueberry pie. The smell alone when it’s baking—sweet, that hint of toasted crust—takes me right back to lazy afternoons on my grandma’s porch, blueberries bursting in every bite and making the whole house smell like fruit and sunshine. Honestly, this blueberry pie isn’t some fancy bakery masterpiece; it’s a simple, honest-to-goodness treat that I’ve made countless times, and it never fails to bring smiles around the table. It’s one of those recipes that feels like a warm hug—perfect after a day of gardening, or when midnight sweet cravings hit and I don’t wanna turn on the oven for a big cake. I’ve tested this with different types of blueberries, even some frozen varieties, and trust me—this pie always turns out delicious, flaky, and bursting with flavor!
What is blueberry pie?
Think of blueberry pie as the classic American dessert you turn to when summer’s best berries are in season. It’s essentially a buttery, flaky crust filled with plump, sweet blueberries mixed with just enough sugar and lemon zest to elevate their natural brightness. The name says it all: it’s a pie that celebrates blueberries, those tiny, humble fruits packed with antioxidants and sweetness. It’s like a slice of sunshine—crisp on the outside with a juicy, berry-filled middle. Its origins go way back, but honestly, it’s one of those recipes that feels timeless, like something your grandma made or you’d find on a cozy picnic blanket. Think of it as the dessert equivalent of a warm hug—familiar, comforting, and impossible to resist.
Why you’ll love this recipe?
What I love most about this blueberry pie is how approachable it is—no fancy ingredients, no complicated techniques, just good, honest baking. The flavor? Oh, it’s incredible. The blueberries create a sweet-tart ripple of freshness that pairs perfectly with the buttery, flaky crust. I’ve made countless versions, and I swear, the secret is in the simplicity—trust me on this one, a good crust, ripe berries, and a splash of lemon juice do all the magic. Plus, it’s budget-friendly. You don’t need fancy berries or exotic ingredients; supermarket blueberries do just fine—especially if you buy a little extra for snacking while baking! This pie also plays nicely with so many variations. Sometimes I add a hint of cinnamon or a sprinkle of sugar on top for some extra crunch. It’s versatile, and what’s better than that? Whether you’re serving it at a holiday dinner, a weekend brunch, or just because you deserve something sweet after a long day, this blueberry pie truly is a crowd-pleaser. My kids ask for it all the time—especially when I send them off to school with a slice tucked in their lunchbox. It’s one of those recipes I keep in my back pocket—reliable, delicious, and always a hit.
How do I make blueberry pie?
Quick Overview
Making this blueberry pie is surprisingly simple. It all starts with a tender, buttery crust that’s easy to mix together—no fuss. While the crust chills in the fridge, you’ll prepare the filling by tossing fresh (or frozen) blueberries with sugar, lemon zest, and a bit of cornstarch to thicken it up. Once your crust is ready, roll it out, fill it with that juicy blue mixture, and then layer on a top crust or lattice for a charming, rustic look. A quick brush of egg wash or milk gives it that shiny, golden finish before popping it into a preheated oven. The baking? It takes around 45 minutes, but I recommend keeping a close eye to catch that perfect golden-brown crust. After a brief cooling period, you’ll get to slice into a beautiful, bubbling slice of blueberry heaven. Honestly, the whole process is straightforward enough for a weekend project, and the results? Well worth every minute in the kitchen.
Ingredients
For the Main Crust:
– 2 1/2 cups all-purpose flour (I always use unbleached for a richer flavor)
– 1 teaspoon salt
– 1 teaspoon sugar (optional, for a touch of sweetness in the crust)
– 1 cup unsalted butter cold, cut into small cubes
– 4-6 tablespoons ice water
For the Filling:
– 4 cups fresh blueberries (or frozen, thawed and drained)
– 3/4 cup granulated sugar (adjust based on berry sweetness)
– Zest of one lemon (trust me, it brightens everything!)
– 1 tablespoon lemon juice
– 2 tablespoons cornstarch (to thicken the filling)
– Pinch of salt
For the Glaze:
– 1 egg beaten with a splash of water for an egg wash (or milk)
– Optional: coarse sugar for sprinkling on top
Step-by-Step Instructions
Step 1: Preheat & Prep Pan
Set your oven to 375°F (190°C) and line a 9-inch pie dish with parchment or butter it generously. While it’s warming up, make sure all your ingredients are ready—cold butter helps create a flaky crust, so keep it in the fridge until you’re ready to go.
Step 2: Mix Dry Ingredients
In a big mixing bowl, whisk together the flour, salt, and sugar. This ensures everything gets evenly distributed. I always do this first—it’s the foundation of a good crust and prevents clumps or uneven bites.
Step 3: Mix Wet Ingredients
Take the cold butter and add it to your flour mixture. Using a pastry cutter or your fingertips (trust me, it’s more fun), cut in the butter until the mixture resembles coarse crumbs with pea-sized bits of butter still visible. These little chunks will melt in the oven, creating that flaky magic.
Step 4: Combine
Gradually add ice water, one tablespoon at a time, mixing gently with a fork. Stop when the dough just comes together—don’t overwork it or your crust will turn tough. You want it to be crumbly but able to hold together when pressed. Divide the dough into two halves, form each into a disk, wrap in plastic, and chill in the fridge for at least 30 minutes.
Step 5: Prepare Filling
While the dough chills, combine blueberries, sugar, lemon zest, lemon juice, cornstarch, and a pinch of salt in a bowl. Toss gently—make sure every berry gets coated. The cornstarch will help thicken the juices as it bakes, giving you that perfect, slightly gooey filling.
Step 6: Layer & Swirl
Roll out one dough disk on a lightly floured surface into a 12-inch circle. Fold it loosely onto your rolling pin and transfer to your pie dish. Spoon the blueberry filling into the crust, spreading it out evenly. For a beautiful rustic look, you can layer strips of dough in a lattice or just cover the whole thing with the second rolled-out crust. If you’re feeling fancy, cut out some shapes from the leftover dough and place them on top.
Step 7: Bake
Brush the top crust with beaten egg or milk—it’ll help it brown beautifully. Sprinkle with coarse sugar if you’re feeling sweet and sparkly. Bake for about 45-50 minutes, or until the crust is golden and the filling is bubbling around the edges. Keep an eye out—every oven is a little different, and you don’t want that crust to burn.
Step 8: Cool & Glaze
Let the pie rest for at least 2 hours after baking. This helps the filling set properly, so slicing is easier and cleaner. If you’re a glaze person, brush a little warm apricot jam or honey on top once it’s cool, or just leave it as it is—fresh and simple is best.
Step 9: Slice & Serve
Use a sharp knife and a gentle sawing motion to cut perfect slices. Serve warm or at room temperature, perhaps with a dollop of whipped cream or a scoop of vanilla ice cream. My family loves it served just slightly warm with a cold glass of milk—it’s comfort food at its finest.
What to Serve It With
This blueberry pie is honestly delicious on its own, but a few extra touches can elevate it even more. For breakfast or brunch, pair it with a dollop of Greek yogurt or a splash of cream and a hot cup of coffee—trust me, the slightly tangy yogurt balances the sweetness perfectly. I’ve also loved serving it during a casual family brunch with some fresh berries on the side and a glass of sparkling water infused with lemon and mint.
As dessert, I usually set it on the table with a scoop of vanilla ice cream melting into that warm, fruity filling or a drizzle of thick cream. Once cooled, it’s just as good, if not better—think of it as a pie that gets more flavorful as it sits.
And for those times when you’re craving something comforting and handheld, this blueberry pie slices easily and makes a lovely snack with a cup of tea or milk. I even freeze a couple of slices for those busy days when I need a sweet pick-me-up—just thaw at room temperature or warm gently in the oven.
Top Tips for Perfecting Your Blueberry Pie
Over the years, I’ve learned a few tricks to really elevate this humble pie into something spectacular. For instance, always use fresh, ripe blueberries when possible—they’re so much juicier and sweeter, but frozen berries work just fine if you thaw and drain them well. Moisture is the enemy of a flaky crust, so I’ve learned to gently pat berries dry if they seem extra juicy. Trust me, excess juice in the filling can make your crust soggy, and nobody wants that.
When mixing the filling, I sample a berry or two—nothing beats tasting as you go, especially to adjust sugar levels. Some berries can be more tart than others, so tweaking the sugar here and there is totally normal.
For the crust, I swear by chilling the dough thoroughly—it makes it easier to roll out without tearing and results in that melt-in-your-mouth flakiness. If your dough cracks or tears, don’t worry—just patch it up with extra dough scraps. A little imperfection adds charm, right?
I’ve tried different toppings, like sprinkling chopped almonds or a streusel crust, but honestly, a simple lattice with a shiny egg wash is my favorite look—classic and homey. The egg wash gives that luxurious shine that makes the pie irresistible on the table.
Baking at the right temperature is key—start high (about 400°F) for 15 minutes, then lower to 375°F for the rest of the baking time. This helps set a golden crust and bubble the filling without over-baking the crust. Keep an eye on it! The aroma will tell you when it’s done.
If you want to switch things up, try swapping some of the sugar for honey or maple syrup (reduce liquid a bit to compensate). A splash of vanilla in the filling is a lovely twist, too. Overall, don’t be afraid to experiment—at the end of the day, it’s about what tastes best to you.
Storing and Reheating Tips
This pie keeps pretty well for a couple of days—if you can resist it! Cover it loosely with foil or a clean kitchen towel to avoid sogginess. If you need to store it longer, pop it in an airtight container and refrigerate for up to 3 days. The flavors actually deepen overnight, so it’s perfect for make-ahead weekend baking. To reheat, just pop slices in a 250°F oven for 10-15 minutes until warm. Avoid the microwave unless you want soggy crust—it’s not a good look!
If you want to freeze a whole pie, wrap it tightly in plastic wrap and foil, then stash it for up to 3 months. When ready to enjoy, thaw in the fridge overnight and warm in the oven before serving. Just remember, the filling may be a little softer after freezing, but it still tastes fantastic.
Adding the glaze or extra sugar? It’s best to do that just before serving if you want a glossy, crispy top. Reheating can soften the glaze, but a quick brush of jam or honey can bring back some sparkle and moisture.
Frequently Asked Questions
Final Thoughts
Honestly, this blueberry pie is one of those recipes that feels like a warm hug in pie form. Its blend of simple ingredients, comforting aroma, and fresh, sweet berries make it a go-to for any occasion—whether it’s a family dinner, a summer picnic, or just a cozy night in. Over the years, I’ve tweaked a few things—testing different berries, adjusting sugar levels, experimenting with toppings—but the core has stayed the same because it’s just that good. Plus, baking it reminds me of lazy Sundays at Grandma’s house—laughter, flour dust, and that irresistible smell wafting through the kitchen. I hope you try it and love it as much as my family does. Feel free to come back and tell me how it turned out, or share your own twists—I’d love to hear! Happy baking!
Blueberry Cream Cheese Pie
Ingredients
Method
- Stir together graham cracker crumbs and sugar in a medium bowl. Add melted butter and stir with a fork until sandy. Press into the bottom and up the sides of a 9-inch pie plate. Chill while preparing filling.
- Place cream cheese in a large bowl. Mix with a hand or stand mixer until smooth, then mix in powdered sugar and vanilla.
- While mixing on low speed, add the heavy whipping cream slowly, then turn the mixer up to high speed and mix until stiff peaks form.
- Spread cheesecake mixture into crust. Chill at least one hour before topping and serving.
- Before serving, top with blueberry pie filling.
- Serve with whipped cream or plain. Store leftovers loosely covered in the refrigerator for up to 3 days.