Savory Mac and Cheese with Gouda and Bacon
There’s nothing quite like the smell of bubbling, cheesy goodness wafting through the house on a chilly evening. I still remember as a kid how my mom would whip up her secret mac and cheese, making the whole kitchen feel warm and cozy. Now, I’ve perfected my own version—creamy, cheesy, with just enough kick—and I promise, it’s honestly effortless. My kids ask for this all the time, and I’ve learned a few tricks along the way to make it even better. Trust me, when you’re craving something indulgent but don’t want to spend hours in the kitchen, this recipe is a total lifesaver. It’s incredibly flexible, so you can tweak it to suit whatever cheese you have on hand. Plus, it’s just plain delicious—think of it as a saucy, cheesy hug in a bowl. Whether it’s weeknight comfort or a casual weekend dinner, this mac and cheese always hits the spot.
What is Mac and Cheese?
Mac and cheese, at its core, is just a cozy combo of pasta smothered in a rich, cheesy sauce. Think of it as the ultimate comfort food—simple, satisfying, and loaded with flavor. The name comes from “macaroni,” the pasta of choice, and “cheese,” the star ingredient that ties it all together. It’s a dish that’s been around forever, with roots in various cultures’ comfort-food tradition, but what makes it so special is how versatile and forgiving it is. You can make it pure and classic, or bump it up with gourmet cheeses, crispy toppings, or even veggies for some added texture. I love that it’s one of those dishes everyone seems to crave at some point—my kids request it at least once a week, and I’m totally fine with that. It’s essentially a blank canvas, so feel free to get creative, but at its heart, it’s just pure, cheesy happiness in bowl form.
Why you’ll love this recipe?
What I love most about this mac and cheese is how it hits all those nostalgic notes—crave-worthy taste, creamy texture, and that irresistible cheesy pull. It’s honestly comfort food at its finest, but what makes it even better is how easy it is to whip up, especially on those busy nights when time’s slipping away faster than you’d like. The ingredients are simple and budget-friendly—you probably already have everything you need in your pantry and fridge. Plus, this recipe is super versatile. Want to make it a little healthier? Toss in some cooked spinach or cauliflower. Looking for more flavor? Add a splash of hot sauce or a sprinkle of smoked paprika. I’ve tested this with different cheeses, like sharp cheddar, Gruyère, and even a bit of Parmesan, and each version turns out amazing. Honestly, what I love most about this dish is how forgiving it is—you can customize it endlessly, and it always turns out creamy, cheesy, and just plain delicious. It’s a crowd-pleaser, a family favorite, and a dish I always keep in my back pocket for comfort and ease.
How do I make mac and cheese?
Quick Overview
The beauty of this mac and cheese is how straightforward it is: cook the pasta until al dente, make a simple cheese sauce with butter, milk, and cheese, then mix everything together. I love to stir in a little Dijon mustard or a touch of garlic for depth, but honestly, it’s great as-is. The key is to melt the cheese slowly so it stays silky, not stringy or grainy. Once everything’s mixed and creamy, I pour it into a baking dish, pop it in the oven for a golden, crispy top, and boom—deliciously cheesy perfection in about 30 minutes. This method keeps the cheese beautifully smooth and ensures each bite is bursting with flavor. Plus, the steps are so minimal that you can almost make it with your eyes closed after a couple of tries. It’s perfect when you want comfort without fuss—trust me on this one.
Ingredients
For the main pasta and sauce: For the sauce: For the sauce: For the sauce: For the sauce: For the sauce: For the sauce:
- 1 pound (450g) elbow macaroni or any pasta of your choice—trust me, sturdy shapes hold up better in cheese sauce
- 4 tablespoons unsalted butter—use good quality for richness
- 3 tablespoons all-purpose flour—helps thicken that dreamy cheese sauce
- 2 cups whole milk—or even half-and-half for extra creaminess
- 1 cup heavy cream—optional but adds a luxurious touch
- 2 cups shredded sharp cheddar cheese—my go-to for flavor, but you can mix in others like Gruyère or Monterey Jack
- Salt and freshly ground black pepper—adjust to taste
- Pinch of nutmeg—just a tiny bit for warmth and depth
For the Topping (optional but highly recommended):
- 1/2 cup panko breadcrumbs—what’s better than a crispy topping?
- 2 tablespoons melted butter—helps them get golden and crunchy
- 1/4 cup grated Parmesan—adds a nutty flavor
- Optional herbs: chopped parsley or thyme for freshness
Step-by-Step Instructions
Step 1: Preheat & Prep Pan
Preheat your oven to 375°F (190°C). Grease a baking dish or cast iron skillet with butter or non-stick spray. While it heats, cook your pasta in salted boiling water until just al dente—remember, it will cook a little more in the oven, so don’t overdo it. Drain and set aside.
Step 2: Make the Roux
In a large saucepan, melt the butter over medium heat. Once melted, whisk in the flour and cook for about a minute until it turns lightly golden—that’s your roux, which thickens the sauce and prevents clumping. Whisk constantly to keep it smooth. Trust me, this step makes all the difference in that velvety texture.
Step 3: Add Milk & Cream
Slowly pour in the milk and cream, whisking constantly to combine. Keep stirring until the mixture thickens slightly—about 3-5 minutes. It should be silky and smooth, like a warm, cheesy velvet.
Step 4: Incorporate Cheese
Lower the heat and gradually add the shredded cheese, stirring until melted and smooth. Don’t rush this step; slow melting ensures no graininess. Taste and season with salt, pepper, and a pinch of nutmeg. This is where the magic happens—smell that cheesy aroma?
Step 5: Combine Pasta & Sauce
Add your cooked pasta to the cheese sauce, stirring gently to coat each piece thoroughly. If it seems a bit thick, a splash of warm milk can loosen it up. At this stage, you can add extras like cooked bacon or sautéed onions if you’re feeling fancy.
Step 6: Prepare the Topping
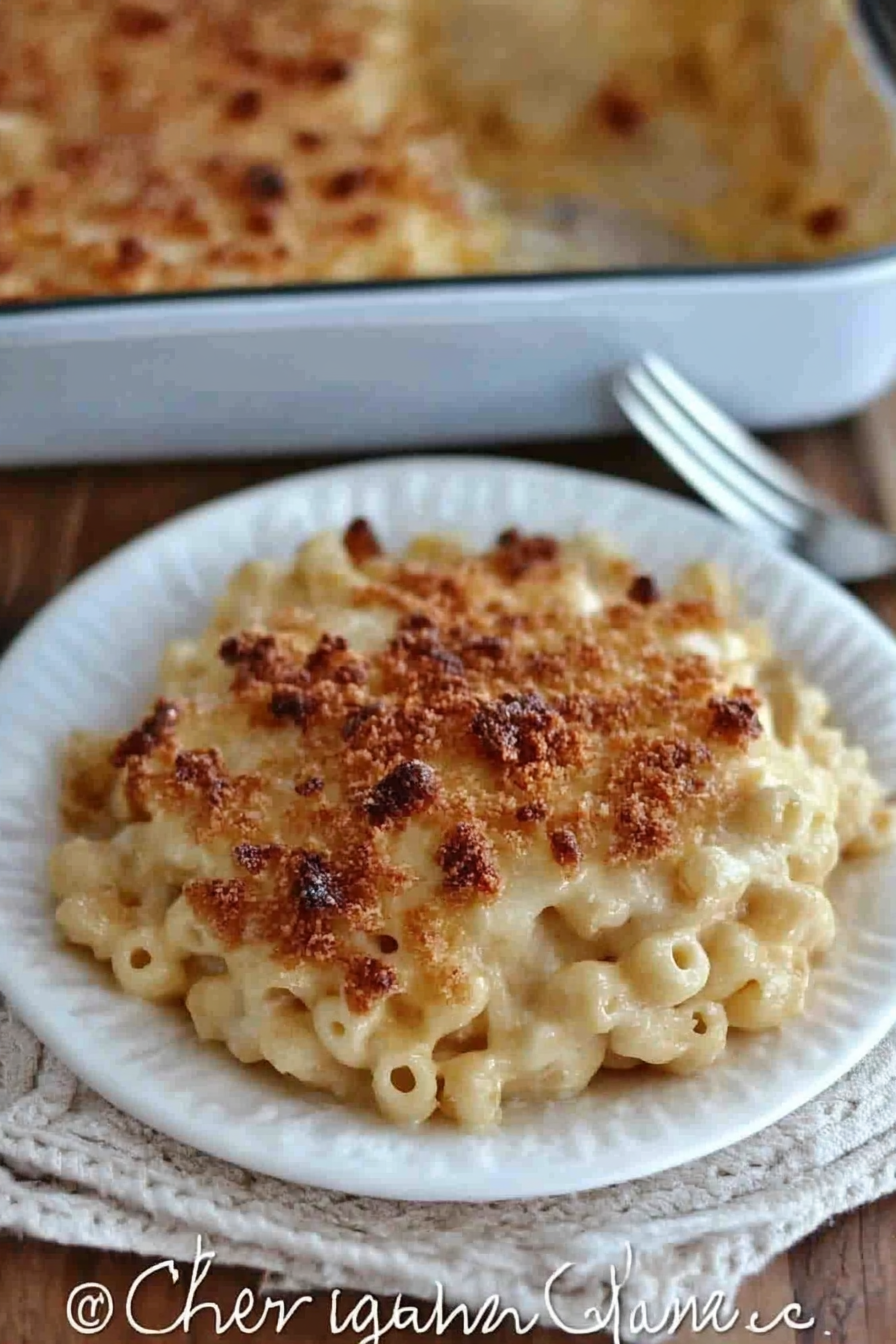
Mix panko breadcrumbs with melted butter, Parmesan, and herbs. Sprinkle evenly over the pasta in your baking dish. I always do this last because it creates that irresistible golden crust.
Step 7: Bake
Pop it into the oven for about 15-20 minutes, or until the top is bubbling and golden brown. Keep an eye on it—you want that crispy topping but not burnt edges. If you want extra crunch, broil it for the last 2 minutes, but watch closely!
Step 8: Cool & Serve
Let it sit for just a few minutes so everything settles. Serve hot, with a sprinkle of fresh herbs if you like. A green salad on the side balances the richness perfectly. Trust me, this dish disappears in minutes at my house!
Step 9: The Best Part—Enjoy!
Dive right in with a big spoonful, and watch the cheesy strings pull as you scoop. It’s honestly pure comfort, and I can’t wait for you to try this. Every bite’s a little hug from my kitchen to yours.
What to Serve It With
This mac and cheese is pretty much a meal itself, but it pairs beautifully with a crisp green salad tossed with vinaigrette—light enough to balance the richness. For a more indulgent brunch, add crispy bacon or sautéed mushrooms on top. I also love serving it alongside roasted veggies or even some spicy fried chicken for a full-on comfort feast. If I’m feeling nostalgic, I’ll dollop a little extra ketchup or hot sauce on the side—because who says cheese can’t handle a little heat? When my family has friends over, I might make some garlic bread or a simple fruit salad for contrast. Truly, it’s one of those dishes that plays well with just about anything, and my kids think it’s magic when I break out the secret breadcrumb topping. Trust me, once you’ve tried this, it’ll become your go-to for cozy nights and casual get-togethers.
Top Tips for Perfecting Your Mac and Cheese
I’ve made this countless times, and the key to perfection always lies in a few simple tricks. First, don’t overcook your pasta—that’s the biggest rookie mistake; you want it just shy of fully done because it’ll cook a bit more in the oven. The sauce is all about patience—melting the cheese slowly prevents that greasy, grainy texture. I always shred my own cheese rather than buying pre-shredded bags—freshly shredded melts much better and tastes even richer. When it comes to cheese choices, I love to mix sharp cheddar with a bit of Gruyère or fontina for depth. Also, if you want a hint of smoky flavor, toss in some smoked paprika or a dash of hot sauce into the sauce. The topping is just as important as the base—spending a little extra on quality breadcrumbs makes a noticeable difference in crunch. Finally, don’t forget to let it rest for 5 minutes after baking; it firms up beautifully and makes serving way easier. One thing I learned is that a little patience in the cheese-melting stage goes a long way—you get that silky, luxurious sauce every time. Oh, and don’t stress if your sauce looks a little thick when you first mix it; it loosens perfectly when baked or when you stir in a splash of warm milk. This dish is a forever favorite in my house, and I truly hope it becomes yours too.
Storing and Reheating Tips
If you happen to have leftovers (which is rare at my house!), you’ll want to store it properly to keep that cheesy goodness intact. Let the mac and cheese cool completely before transferring it to an airtight container. In the fridge, it’ll stay good for about 3-4 days. Reheat gently in the microwave or oven—if microwaving, cover with a damp paper towel to keep it from drying out. I like to add a splash of milk or a tiny bit of butter before reheating to bring back the creaminess. For longer storage, freeze individual portions wrapped tightly in plastic wrap and then foil—defrost in the fridge overnight before reheating. As for the topping—if you prefer your breadcrumb crunch crispy, sprinkle a little extra on top when reheating and broil until golden. I’ve tested freezing this twice and can say it still tastes almost freshly made when reheated. The key is gentle reheating—cheese tends to get grainy when overheated, so low and slow is best.
Frequently Asked Questions
Final Thoughts
There’s honestly nothing quite like a warm, cheesy plate of homemade mac and cheese. It’s the kind of dish that instantly makes everyone feel at home—whether you’re cozying up on a cold night or serving a casual weekend dinner. Over the years, I’ve made my fair share of versions, but this one’s the keeper. I love how forgiving and adaptable it is—plus, it’s just so satisfying to pull that bubbling dish out of the oven and watch everyone’s eyes light up. I hope you give this recipe a try and find it as comforting and fun to make as I do. Feel free to tweak the cheeses, toppings, and add-ins—you can truly make it your own. Remember, the secret’s in slow melting that cheese for that perfectly silky sauce. Happy baking, and I can’t wait to hear how yours turns out! Don’t forget to leave a comment or share your variations—I love hearing from fellow cheese lovers.

Classic Mac and Cheese
Ingredients
Method
- Prepare macaroni according to package directions. Set aside.
- In large pot, melt butter over medium-high heat. Add milk and bring to near boiling. Reduce heat to medium and sprinkle in flour. Whisk vigorously for 1-2 minutes until thick and boiling. Slowly add cream, whisking constantly. Stir in salt, pepper, mustard, and Worcestershire sauce. Reduce heat to low and cook for about 5 minutes.
- Shred gouda and cheddar cheeses. Add to sauce and stir until fully melted and combined.
- Add cooked macaroni to cheese sauce. Transfer to a 13x9 inch baking dish.
- In food processor, process bread slices into fine crumbs. Mix with melted butter. Sprinkle over macaroni and top with crumbled bacon.
- Bake uncovered at 375°F for 25-30 minutes until top is golden and bubbly. Serve hot.