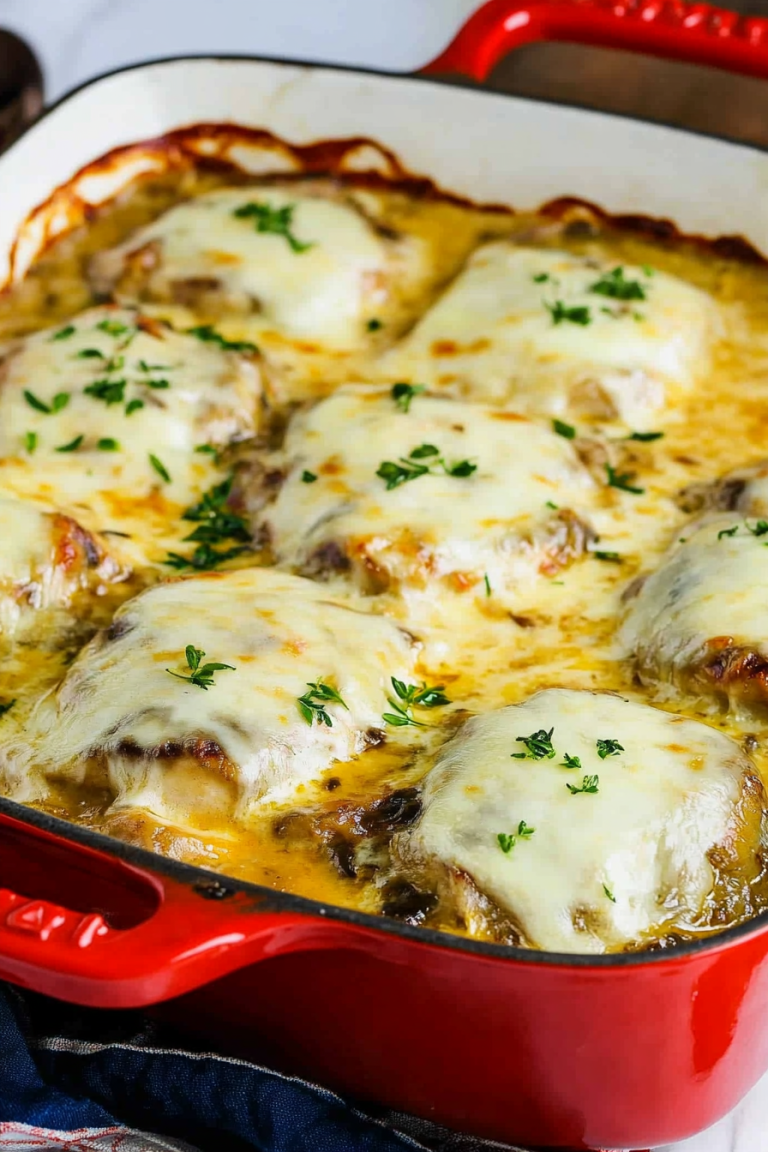
Easy Chicken Cordon Bleu Recipe
If you’ve ever watched a cooking show and drooled over that perfectly crispy, golden exterior stuffed with melty cheese and tender ham, then you already know the magic of chicken cordon bleu. I remember the first time I made this dish—my kitchen smelled like heaven, and my family couldn’t get enough. This recipe has become a staple in my home, especially on busy weeknights when I want something impressive but easy enough to throw together without hours in the kitchen. It’s honestly one of the most satisfying comfort foods, yet it feels fancy enough for a special dinner. Trust me, once you get the hang of it, it’s gonna be your go-to. My kids ask for this all the time, and I love how versatile it is—you can serve it with everything from a simple green salad to buttery mashed potatoes. Plus, it’s a dish I’ve tested so many times, tweaking and perfecting it, so I promise it’s foolproof. Let me walk you through how I make my favorite chicken cordon bleu — I bet you’ll want to try this one ASAP!
What is chicken cordon bleu?
Think of chicken cordon bleu as the fancy cousin of your typical breaded chicken. The name “cordon bleu” literally means “blue ribbon” in French, which hints at how refined this dish feels. It’s essentially a chicken breast rolled or layered with slices of ham and cheese, then breaded and baked or fried until crispy. The magic here is in the layers of flavor—melty cheese melting into tender chicken, paired with savory ham, all wrapped up in a crunchy breadcrumb coating. It’s one of those comfort foods that looks elegant on your plate but really isn’t complicated to make at home. The idea started in France as a way to showcase high-quality ingredients wrapped in a crispy shell—yet today, it’s a beloved classic worldwide, especially in the U.S. where it’s often served with a creamy mustard sauce or simple lemon wedges. I like to think of it as a fancy, cozy dish that makes every dinner feel like a special occasion—even if it’s just a weeknight.
Why you’ll love this recipe?
What I love most about this chicken cordon bleu is how it hits all the right notes—crisp on the outside, juicy and flavorful on the inside, with oozing cheese that makes everyone swoon. The best part? It’s surprisingly simple to pull off. Once you’ve got your ingredients prepped, the rest is just assembly and baking, which makes it great for even beginner cooks. And trust me, I’ve made many versions—sometimes I throw in a slice of Swiss or Gruyère, other times I prefer a smoky ham—endless customization options! It’s also a real money-saver because you can use everyday chicken breasts, and you probably already have everything else in your fridge or pantry. Plus, this dish is super versatile—you can serve it as a main for family dinners, impress guests at weekend gatherings, or even slice it up for an elegant appetizer. What’s more, the flavors really are timeless—rich cheese, salty ham, tender chicken—and I swear, the crispy breadcrumb coating is my ultimate comfort. I’ve made this countless times, and each time, it disappears in minutes at my house. Honestly, it’s a lifesaver on busy nights or when you want something homely yet special. And secretly, I think everyone loves a dish with that perfect crispy crunch and cheesy pull!
How do I make chicken cordon bleue?
Quick Overview
This dish is so straightforward: you’ll pound the chicken breasts thin, layer on ham and cheese, then roll, dip in egg wash, coat in breadcrumbs, and bake. The real trick is not overstuffing so it stays neat and cooked through without bursting. Once it’s baked, you just slice and serve—crispy, melty, and utterly delicious. The best part? It comes together quickly, especially if you prep your ingredients ahead of time. I always do this when I want dinner that feels luxe but doesn’t take all evening. The oven does its thing, and before you know it, you’re sitting down with a plate that looks like something from a fancy bistro but tastes like home.
Ingredients
For the Main:
– 4 boneless, skinless chicken breasts (buy local or organic if you can) (they’re juicier)
– 8 slices of good-quality ham (Swiss or Black Forest work beautifully)
– 1 cup shredded Swiss or Gruyère cheese (or whatever cheese melts well and you love)
– Salt and pepper to taste
– Toothpicks (to keep everything together if needed)
For the Breading:
– 1 cup all-purpose flour (or gluten-free flour if needed)
– 2 large eggs, beaten
– 1 ½ cups panko breadcrumbs (for that extra crunch)
– ½ cup grated Parmesan cheese (adds a savory kick)
– 1 teaspoon garlic powder
– 1 teaspoon paprika (optional, for color and flavor)
– Salt and pepper to taste
For the Glaze (optional but recommended):
– 2 tablespoons Dijon mustard mixed with 1 tablespoon honey (sweet and tangy glaze)
– Or try melting a little butter with garlic and herbs for a different flair
Step-by-Step Instructions
Step 1: Preheat & Prep Pan
Set your oven to 375°F (190°C). Line a baking sheet with parchment paper or lightly grease it to keep things from sticking. If you want that beautiful golden crust, a wire rack on top of the baking sheet is perfect because it lets air circulate — everyone loves extra crispiness!
Step 2: Mix Dry Ingredients
In a shallow dish, combine panko breadcrumbs, Parmesan, garlic powder, paprika, salt, and pepper. Mix well. This is your crunchy coating, so make sure it’s evenly seasoned. I’ve learned the hard way that uneven seasoning leads to bland spots—trust me on this one.
Step 3: Mix Wet Ingredients
In a separate bowl, beat your eggs with a pinch of salt. You want this mixture to be smooth but not frothy. It’s the glue that helps the breadcrumbs stick and creates that perfect crust.
Step 4: Combine
Now, flatten each chicken breast to about ½-inch thickness. I do this with a meat mallet or rolling pin—make sure to put the chicken between plastic wrap or in a large zip-top bag so it doesn’t make a mess. Season with salt and pepper. Lay a slice of ham on each breast, then sprinkle or lay cheese on top. Roll tightly from one end to the other—secure with toothpicks if needed, but be gentle so you don’t tear the meat.
Step 5: Prepare Filling
If you want extra flavor, you can add a sprinkle of chopped herbs or a dash of Dijon on the ham before adding the cheese. For a fun twist, try experimenting with smoked bacon or different cheeses—just remember, the thinner the roll, the easier it is to handle and cook evenly.
Step 6: Layer & Swirl
Dip each rolled chicken first in the flour, then in the egg mixture, and finally coat thoroughly in the breadcrumb mixture. For that lovely swirl effect, I usually press the breadcrumbs lightly into the rolls and even sprinkle some on top for an extra crunchy crust.
Step 7: Bake
Place the coated chicken on your prepared baking sheet. Brush the tops with a little melted butter or your glaze of choice—this gives a beautiful shine. Bake for about 25-30 minutes, or until the internal temp hits 165°F (74°C) and the crust is golden brown. Every oven is different, so start checking at 23 minutes if you’re anxious. The smell alone when it’s baking will have everyone in the house drooling!
Step 8: Cool & Glaze
Once out of the oven, let them rest for 5 minutes. This helps everything settle so the cheese doesn’t ooze out wildly. Then, you can brush on your favorite glaze or serve plain with a squeeze of lemon for brightness. I love a simple mustard-y glaze, but a splash of balsamic vinegar can also elevate it beautifully.
Step 9: Slice & Serve
Use a sharp knife to slice through the rolls gently—look at that melt! Serve hot, with all your favorite sides. I like to drizzle a little extra sauce on top and garnish with fresh herbs. Honestly, the presentation isn’t much, but it’s the first bite that will blow everyone away.
What to Serve It With
This dish is so flexible. For a cozy family dinner, I love pairing it with buttery mashed potatoes or garlic roasted green beans. A fresh mixed salad with tangy vinaigrette cuts through the richness, making every bite balanced. If I’m feeling fancy, I’ll serve it with a delicate white wine and a crusty baguette—because, why not indulge a bit?
For brunch, slice it up and make a sort of croque monsieur vibe—add a fried egg on top, maybe a splash of mornay sauce. And honestly, leftovers make **amazing** sandwiches the next day—just warm it up and stuff it in a crusty roll with a smear of mustard.
When craving comfort in the evening, I toss together some roasted vegetables or a simple risotto blast of flavor—this dish is truly versatile. Plus, I’ve learned that it’s a hit at parties or potlucks because everyone loves crispy, cheesy, savory bites. My family’s forever asking me to double the recipe—it really is that good.
Top Tips for Perfecting Your Chicken Cordon Bleu
Over the years, I’ve picked up a few tricks I want to share. For one, pounding down the chicken to even thickness is key because it helps everything cook uniformly. I always use plastic wrap under the meat—no mess, no fuss. When rolling, be gentle—you don’t want to tear the meat, but if you do get a small hole, just patch it up with a bit of filling or extra breadcrumbs.
Regarding cheese, I tested with different types, and melted cheese is king—Swiss and Gruyère melt beautifully and have that nutty flavor. If you want to make this gluten-free, swap panko for crushed almonds or gluten-free breadcrumbs, and it still turns out crispy and delicious.
For baking, I recommend using a wire rack on your baking sheet if you want extra crispiness. If your oven runs hot, reduce the temperature slightly after the first 15 minutes—trust me, burnt breadcrumbs are no fun. To customize the filling, try adding a layer of sautéed spinach or a few slices of pickle for a tangy punch. Ongoing, I learned that brushing with butter or oil before baking really makes a difference—glossy, golden-brown crust is worth the extra minute!
My secret is to keep an eye on the oven and test the internal temperature—done when it hits 165°F. And don’t skip the resting time; it makes slicing much easier and keeps all that cheesy goodness inside.
Storing and Reheating Tips
If you have leftovers (which I doubt!), store them in an airtight container in the fridge for up to 3 days. To reheat, I prefer the oven—toss them back on a baking sheet at 350°F for about 10 minutes until crispy and hot through. Microwave works in a pinch, but you might lose that crunch, so if you do, give the leftovers a quick broil or toaster oven blast afterward.
Frozen chicken cordon bleu is also totally possible—just freeze before baking, wrap tightly, and bake from frozen, adding about 10 extra minutes. Thaw in the fridge overnight for best results. If you want to add the glaze later, do it after reheating to keep it shiny and fresh-looking.
Frequently Asked Questions
Final Thoughts
Honestly, chicken cordon bleu has become one of those dishes I turn to whenever I want to impress but don’t want to spend hours fussing in the kitchen. Its warmth, crispy crunch, and gooey cheese feel like a hug on a plate. I’ve shared this recipe with friends and family countless times, each time tweaking it just enough to make it even better. It’s one of those timeless recipes I know I’ll keep coming back to—perfect for family dinners, special occasions, or just when you need a little comfort. If you give it a try, I’d love to hear how it turns out for you—trust me, your taste buds are in for a real treat! Happy baking and indulging in cheesy, crispy goodness—your family’s going to thank you for this one.

Baked Chicken Cordon Bleu
Ingredients
Method
- Preheat oven to 450°F. Spray a baking sheet with cooking spray.
- Pound chicken breasts to an even thickness and season with salt and pepper.
- Place a slice of ham on each chicken breast, then top with a slice of cheese, and roll up, seam side down.
- Whisk eggs and water in a bowl. In another bowl, combine breadcrumbs and parmesan cheese.
- Dip each chicken roll in the egg wash, then coat with breadcrumb mixture.
- Place chicken on the prepared baking sheet, spray the tops with cooking spray, and bake for 25 minutes until golden and cooked through.