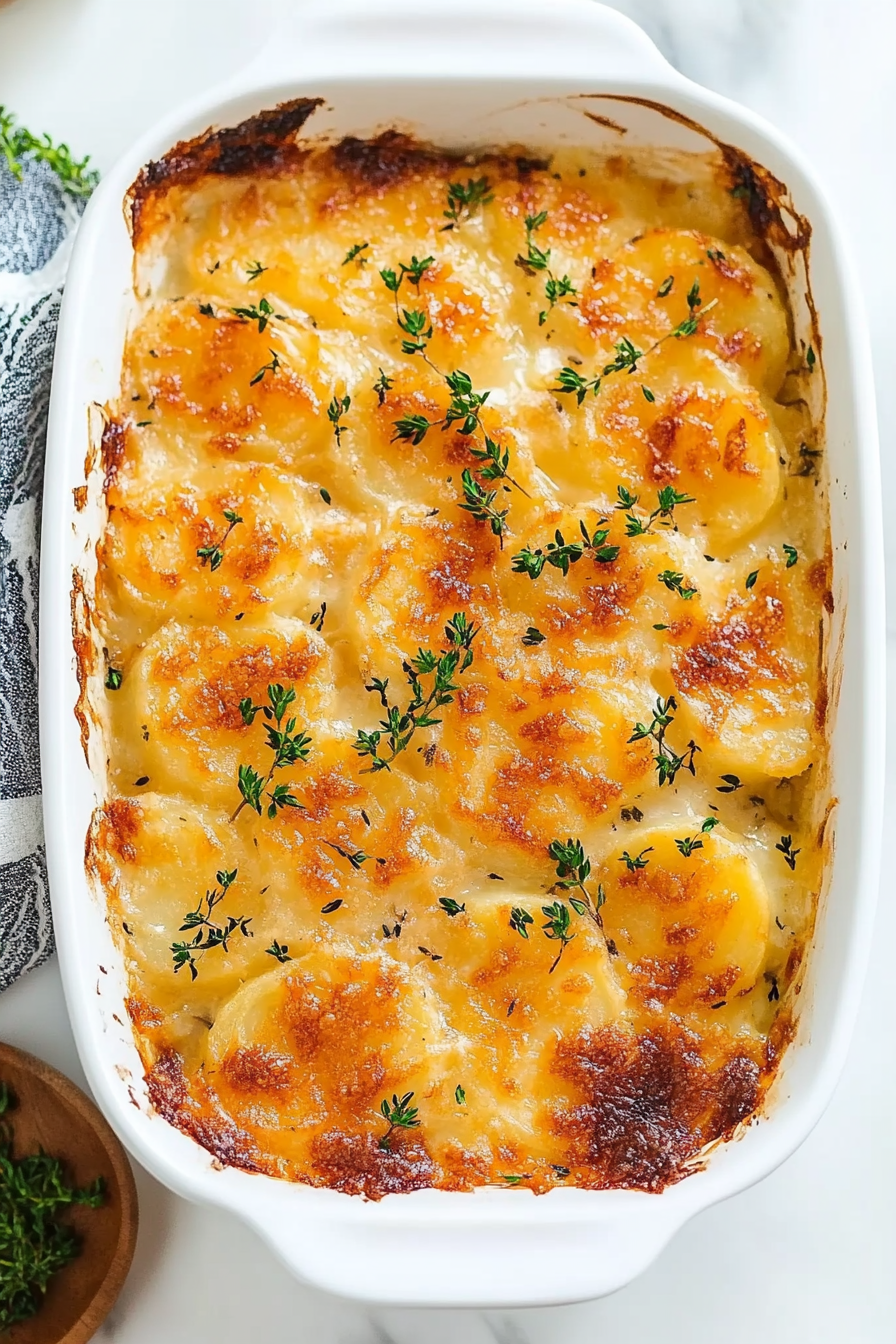
Layered Potatoes Gratin A Simple Delight
Oh, I’m so thrilled you’re here! If there’s one side dish that has the power to turn any meal into a celebration, it’s got to be a perfectly baked pan of scalloped potatoes. You know the kind – golden brown on top, bubbling around the edges, with layers of tender potato swimming in the most luscious, creamy sauce. It’s pure comfort food, the kind that makes you feel warm and fuzzy from the inside out. I remember my grandma making these for Sunday dinners, and the aroma alone would have us kids practically glued to the kitchen door, just waiting for our turn at the golden, cheesy goodness. While other recipes might try to reinvent the wheel, this one? This is my tried-and-true, absolutely perfect version of classic scalloped potatoes. It’s what I grew up on, and honestly, it’s what my own kids beg for the most. It’s the ultimate crowd-pleaser, and surprisingly, not as intimidating as you might think!
What is a scalloped potato?
So, what exactly *are* scalloped potatoes? At its heart, it’s a dish of thinly sliced potatoes baked in a creamy sauce, often with cheese. Think of it as the comforting hug of the potato world. The name “scalloped” comes from the way the potatoes are sliced and layered, resembling the ruffles of a scallop shell. It’s not just boiled potatoes tossed in sauce; it’s about creating layers of tender potato that absorb all that deliciousness as they bake. It’s humble, really – just potatoes, a few dairy staples, and a little bit of magic. It’s the kind of dish that feels fancy enough for a holiday but is so comforting and easy, you’ll want to make it for a Tuesday night dinner too. It’s one of those dishes that transcends trends because its simple goodness is timeless.
Why you’ll love this recipe?
Let me tell you why this scalloped potatoes recipe is my absolute go-to, and why I just know you’re going to adore it too. First off, the flavor is just out of this world. We’re talking about potatoes that are tender enough to melt in your mouth, enveloped in a rich, velvety sauce that has just the right hint of savory goodness. It’s not just plain potato and milk; there’s a depth of flavor here that comes from a few simple additions that make all the difference. And the texture? Oh, the glorious texture! Crispy, slightly browned edges giving way to impossibly creamy, soft potato slices within. What I love most is that despite tasting like it came from a gourmet restaurant, it’s surprisingly simple to whip up. The ingredients are pretty standard, things you likely already have in your pantry or can grab easily at any grocery store. This makes it incredibly budget-friendly, which is always a win in my book! Plus, it’s incredibly versatile. Serve it alongside a juicy steak, roast chicken, or even a hearty vegetarian main. It’s the ultimate comforting side dish. This isn’t just *a* recipe for scalloped potatoes; it’s *the* recipe that has never failed me, always gets rave reviews, and frankly, just makes me happy every time I make it.
How do you make a Scalloped Potato?
Quick Overview
Making these incredible scalloped potatoes is a straightforward process that requires minimal fuss but delivers maximum flavor. You’ll simply slice your potatoes thinly, prepare a luscious sauce, layer everything into a baking dish, and let the oven do the rest. The key is in the layering and the gentle cooking, which allows the potatoes to become perfectly tender and absorb all that creamy goodness. It’s really that easy – simple ingredients, straightforward steps, and an absolutely divine result that will have everyone asking for seconds. Trust me, this method is a lifesaver on busy nights when you want something truly special without a lot of stress.
Ingredients
For the Main Batter:
2 ½ pounds Yukon Gold potatoes (about 4-5 medium), peeled and thinly sliced (about 1/8 inch thick)
1 teaspoon salt, plus more to taste
½ teaspoon black pepper, freshly ground
For the Filling:
2 tablespoons unsalted butter
2 tablespoons all-purpose flour
2 cups whole milk, warmed
1 cup heavy cream
1 cup shredded Gruyere cheese (about 4 ounces), plus more for topping
½ teaspoon garlic powder
Pinch of nutmeg (optional, but highly recommended!)
For the Glaze:
(This recipe doesn’t technically have a separate glaze in the traditional sense, as the creamy sauce bakes right into the potatoes. The “glaze” effect comes from the cheese topping and the richness of the sauce.)
Step-by-Step Instructions
Step 1: Preheat & Prep Pan
First things first, let’s get that oven preheated to 375°F (190°C). While it’s heating up, grab a 9×13 inch baking dish. I like to give it a light greasing with a bit of butter or cooking spray. This just helps ensure everything slides out beautifully later on, preventing any sticking disasters. You want your dish ready to go so you can move swiftly through the layering process.
Step 2: Mix Dry Ingredients
Now, grab your thinly sliced potatoes. I’ve found that using Yukon Golds gives the best creamy texture, but russets can work in a pinch. You’ll want to give them a quick rinse under cold water to get rid of any excess starch – this helps prevent them from getting too gummy. Pat them thoroughly dry with paper towels; moisture is the enemy of a good sauce, and we want tender potatoes, not watery ones! In a large bowl, toss the dried potato slices with 1 teaspoon of salt and ½ teaspoon of freshly ground black pepper. Just a gentle toss to ensure they’re evenly seasoned. This step is simple, but it makes a difference in the overall flavor!
Step 3: Mix Wet Ingredients
Time to make that glorious sauce! In a medium saucepan, melt the 2 tablespoons of butter over medium heat. Once it’s shimmering, whisk in the 2 tablespoons of all-purpose flour. Keep whisking for about a minute – this is your roux, and cooking it for a bit helps get rid of that raw flour taste and creates a wonderfully smooth base. Gradually, and I mean *gradually*, whisk in the warmed whole milk. Keep whisking constantly to prevent any lumps from forming. Once the milk is incorporated and the sauce is starting to thicken, stir in the heavy cream. Now for the flavor boosters: add in the garlic powder and that pinch of nutmeg if you’re using it. Nutmeg might sound a bit unusual in potatoes, but trust me, it adds a subtle warmth that’s just divine. Continue to cook, stirring, until the sauce is nice and thick, coating the back of a spoon. This usually takes about 5-7 minutes. Remove it from the heat.
Step 4: Combine
Now that your sauce is looking rich and delicious, it’s time to stir in that beautiful shredded Gruyere cheese. Keep stirring until it’s completely melted and the sauce is velvety smooth. Gruyere is my absolute favorite for its nutty, slightly sweet flavor that melts like a dream, but a good sharp cheddar or even a blend of cheeses would work well too. Taste the sauce and add a little more salt and pepper if you think it needs it. Remember, the potatoes themselves are seasoned, so you don’t want to go overboard here.
Step 5: Prepare Filling
(This section has been integrated into Step 4, as the sauce is essentially the filling and gets combined with the cheese in that step. No separate filling preparation needed for this particular recipe structure.)
Step 6: Layer & Swirl
Now for the fun part: assembly! Take about half of your seasoned potato slices and arrange them in an even layer in your prepared baking dish. Pour about half of the cheesy sauce mixture over the potatoes. Try to get it as evenly distributed as possible. Now, repeat with the remaining potato slices, creating a second layer. Pour the rest of the sauce over the top, making sure to cover all the potatoes. You can give the dish a gentle shimmy to help the sauce settle into all those nooks and crannies. Finally, sprinkle a little extra shredded Gruyere cheese over the top. This is what gives you that glorious golden, bubbly crust we all love!
Step 7: Bake
Pop that gorgeous dish into your preheated oven. Bake for about 45-55 minutes, or until the potatoes are tender when pierced with a fork and the top is beautifully golden brown and bubbly. If you notice the top browning too quickly before the potatoes are tender, you can always loosely tent it with aluminum foil for the last 15-20 minutes of baking. The smell that will fill your kitchen during this time is absolutely heavenly, I promise!
Step 8: Cool & Glaze
Once it’s out of the oven and looking absolutely perfect, let it rest for about 10-15 minutes before serving. This is *crucial*. It might be tempting to dive right in, but allowing it to rest lets the sauce thicken up a bit more and makes it easier to serve neat slices. The cheese topping will also set slightly, creating that lovely crust. Don’t worry about adding a separate glaze; the magic of this dish is in the creamy sauce that bakes right into the potatoes.
Step 9: Slice & Serve
After its short rest, use a sharp knife or spatula to cut generous portions. Serve piping hot and watch the delight on everyone’s faces. The creamy interior, the tender potatoes, and that slightly crispy, cheesy top – it’s a symphony of textures and flavors. It pairs so wonderfully with almost anything!
What to Serve It With
This scalloped potato dish is so versatile, it truly elevates any meal. For a classic Sunday brunch, I love serving it alongside crispy bacon, fluffy scrambled eggs, and a fresh fruit salad. The richness of the potatoes is the perfect counterpoint to the lighter elements. If you’re planning a more elegant dinner party, this is a fantastic accompaniment to roasted prime rib, pan-seared salmon, or even a herb-roasted chicken. The creamy potatoes make everything feel a bit more special. On a cozy weeknight, when you just want something comforting, this is perfect with a simple grilled pork chop or a thick, juicy burger. It’s also surprisingly delicious served as a hearty appetizer with a dollop of sour cream and chives on top! My family also loves it as a side to a big green salad and some crusty bread for a satisfying, lighter meal. You can’t go wrong!
Top Tips for Perfecting Your Scalloped Potatoes
Over the years, I’ve picked up a few little tricks that make my scalloped potatoes truly shine, and I’m happy to share them with you! First, about the potatoes themselves: I swear by Yukon Golds for their creamy texture and buttery flavor. When slicing, aim for consistency – about 1/8 inch thick. A mandoline slicer is your best friend here if you have one, as it ensures even thickness, which means even cooking. If you’re hand-slicing, take your time! Patting those slices completely dry is a game-changer. Seriously, don’t skip this step. Excess water in the potatoes can lead to a watery sauce, and we want creamy perfection. When making the sauce, warming your milk is important. Adding cold milk to a hot roux can shock it and lead to lumps. Whisking constantly as you add it also helps create that silky-smooth texture. For the cheese, Gruyere is my top pick, but don’t be afraid to experiment! A sharp cheddar offers a bolder flavor, and a blend of cheddar and Monterey Jack can be extra melty. Just make sure you’re shredding your own cheese from a block; pre-shredded cheese often has anti-caking agents that can make your sauce a little less smooth. Regarding the baking, ensure your oven is accurately preheated. A consistent temperature is key for even cooking. And that resting period after baking? It’s not just a suggestion; it’s vital for the sauce to set up properly. If you slice too soon, you’ll have a delightful potato soup rather than beautifully formed slices. Lastly, don’t be afraid to taste and adjust seasonings throughout the process. Your palate is your best guide!
Storing and Reheating Tips
One of the best things about this scalloped potato recipe is that it holds up beautifully, making it perfect for leftovers! If you have any (and that’s a big ‘if’ in my house!), store them in an airtight container in the refrigerator for up to 3-4 days. The potatoes will continue to absorb some of the sauce as they sit, making them even more flavorful. When it comes to reheating, my preferred method is in the oven. Transfer the leftovers to an oven-safe dish, add a splash of milk or cream to loosen up the sauce, and cover loosely with foil. Reheat at around 325°F (160°C) for about 20-30 minutes, or until heated through. This method helps retain that wonderful creamy texture. If you’re in a real hurry, you can reheat individual portions in the microwave, but I find the oven gives a much better result. For reheating, I wouldn’t add the glaze *after* it’s been stored; the built-in cheesy topping is usually sufficient. Freezing is also an option, though the texture might change slightly upon thawing, becoming a bit softer. If you do freeze it, wrap it very tightly in plastic wrap and then in foil. Thaw overnight in the refrigerator before reheating as described above. The key is to add a little liquid when reheating to bring that creaminess back.
Frequently Asked Questions
Final Thoughts
So there you have it – my beloved scalloped potatoes recipe! This dish is so much more than just a side; it’s a little bit of comfort, a whole lot of flavor, and a guaranteed way to bring smiles to the table. I genuinely believe that everyone deserves to have a go-to recipe for something this deliciously satisfying, and I truly hope this becomes that recipe for you too. It’s a testament to how simple, honest ingredients can create something truly magical. If you’re already a fan of potatoes, you’ll love how these turn out. If you’re looking for a new comfort food staple, this is it! I’d be absolutely delighted to hear how your scalloped potatoes turn out, or if you have any special twists you like to add. Feel free to share your thoughts and pictures in the comments below – I love seeing your culinary creations! Happy baking, and enjoy every creamy, dreamy bite!
Creamy Scalloped Potatoes
Ingredients
Method
- Preheat oven to 425°F. Spray a 9x13 inch baking dish with cooking spray.
- Thinly slice potatoes using a mandoline or sharp knife. In a large bowl, combine sliced potatoes, melted butter, garlic powder, thyme, salt, and pepper.
- Arrange half of the potato slices in the baking dish. Sprinkle with 1/4 cup shredded Cheddar cheese. Repeat with remaining potatoes and cheese.
- In a small saucepan, bring milk, bay leaf, and nutmeg to a boil. Remove bay leaf and pour the mixture evenly over the layered potatoes.
- Sprinkle remaining Cheddar cheese on top. Cover with foil and bake for 45 minutes. Remove foil and bake for an additional 15 minutes until golden and bubbly.