Effortless Cheesecake Delight How to Make It
There’s something irresistibly cozy about a no bake cheesecake, don’t you think? I remember the first time I tried making one when I was desperate for a sweet treat during a crazy week. I was exhausted but craving something creamy and indulgent—something I could whip up in no time. My kids devoured it faster than I could say “dessert,” and I knew I’d found a new family favorite. It’s honestly one of those recipes that feels almost foolproof—perfect for those nights when the oven’s busy, or when I just don’t want to turn on the stove. I always do this when I need a crowd-pleaser or a dessert that’s a little impressive but super simple. Trust me, this no bake cheesecake is a lifesaver on busy nights or when you’re craving something sweet at 10 p.m. but don’t want to bake a giant cake. Plus, it’s so versatile—you can dress it up with fruit, swirl in chocolate, or keep it classic. I’ll show you how I make mine, share a few tips, and maybe even inspire you to tweak it just the way you love.
What is no bake cheesecake?
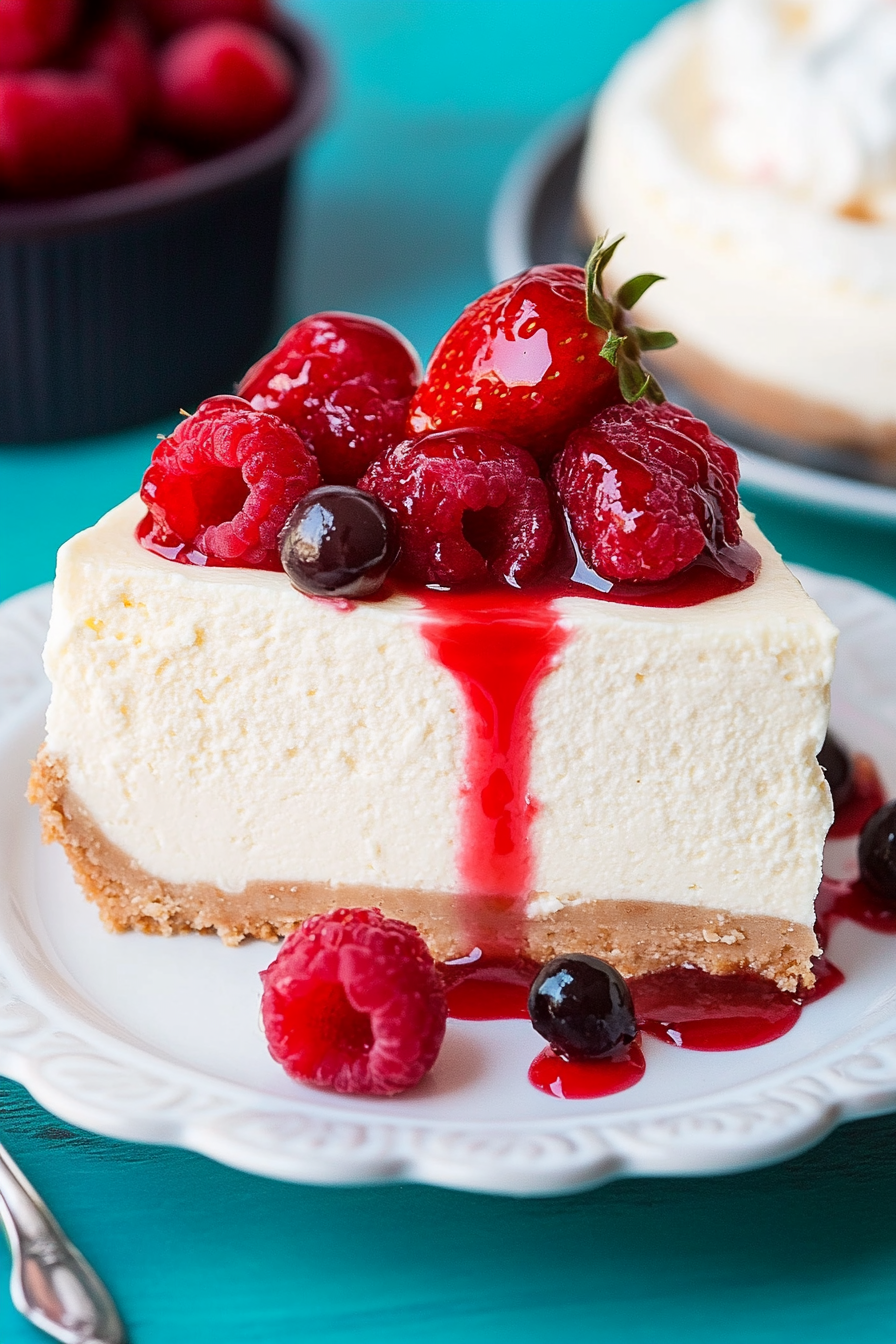
Think of a no bake cheesecake as the laid-back cousin of the traditional baked kind. It’s essentially a creamy, tangy filling made from cream cheese, sugar, and often some whipped cream or mascarpone, all nestled on a crisp cookie or biscuit crust. The “no bake” part means you don’t have to fuss over the oven—this dessert sets in the fridge, and the magic happens through chilling and setting. The name says it all: no baking required! Its origin isn’t precisely documented, but recipes like this have been beloved for generations—probably because they’re so quick and fuss-free. It’s kind of like the cool, clever cousin who always arrives with a smile and a shortcut. And honestly, the taste? Just as luscious as the baked version, with that perfect tanginess balanced by a buttery crust. It’s the kind of thing I’ll whip up for family gatherings, potlucks, or even just because I deserve a little reward after a long day.
Why you’ll love this recipe?
What I love most about this no bake cheesecake is how truly easy it is—and how it never, ever fails me. It’s a dessert that looks fancy enough for guests but is so simple I can make it last-minute. The flavor is rich and tangy—think smooth cream cheese with a hint of vanilla and just enough sweetness—nothing overpowering, just perfect bite after perfect bite. The best part? No baking means no oven heat, which is a blessing during hot summer days or when your kitchen is already full of chaos. Budget-wise, it’s a steal—you mostly need pantry staples like cookies, cream cheese, and sugar, and you probably already have some of those hanging out in your fridge or cupboard. Plus, it’s so versatile—you can swap in different toppings, add fruit swirls, or even stir in melted chocolate to make it your own. It’s a real crowd-pleaser—my kids ask for this all the time and it’s become a staple at holiday gatherings, brunches, and casual dinners alike. Honestly, once you try it, you’ll wonder why you ever baked a classic cheesecake at all. It’s got that perfect creamy texture that just melts in your mouth, and it’s so satisfying to know you didn’t need an oven or a complicated recipe to get to this luscious, show-stopping dessert.
How do I make no bake cheesecake?
Quick Overview
If you’ve never made a no bake cheesecake before, don’t worry—it’s easier than boiling water. Basically, you start by preparing a simple cookie crust, then mix up the creamy filling with just a handful of ingredients. Pour the filling into your crust, swirl in fruit or chocolate if you like, and then pop it in the fridge for a few hours. The magic is in the chilling—once it’s set, you get a gorgeous, silky cheesecake that’s perfect for slicing and serving. This method is fantastic because it’s quick, doesn’t heat up the kitchen, and makes for an incredibly creamy, satisfying dessert. Plus, it can be customized endlessly, so you can make it suit whatever mood or occasion you’re planning for.
Ingredients
For the Main Crust:
– 200g (about 1 ½ cups) digestive biscuits, graham crackers, or graham-style cookies—crushed finely
– ½ cup unsalted butter, melted
For the Filling:
– 16 oz (about 450g) cream cheese, softened (full-fat for best creaminess)
– ½ cup granulated sugar
– 1 teaspoon vanilla extract
– 1 cup heavy cream or whipping cream, whipped to soft peaks
– Optional: 2 tablespoons lemon juice or zest for extra tang
For the Glaze or Topping:
– Fresh berries, fruit compote, chocolate sauce, or caramel drizzle—whatever you love!
– Additional whipped cream or shaved chocolate for garnish
Step-by-Step Instructions
Step 1: Preheat & Prep Pan
No oven preheat needed here! Simply line a 9-inch springform pan with parchment paper or lightly grease it. Prepare your crust by crushing the cookies until they’re fine crumbs—you can use a food processor or just put them in a sealed bag and crush with a rolling pin. Mix the crumbs with the melted butter until evenly coated. Press this mixture firmly into the bottom of your pan to create a solid, even crust. Pop it in the fridge while you make the filling, so it firms up a bit.
Step 2: Mix Dry Ingredients
In a large bowl, beat the softened cream cheese until smooth and creamy—this is key to avoiding lumps. Add your sugar and vanilla, mixing until well combined. It’s tempting to rush this step, but take your time. A fluffy, smooth base makes all the difference for that silky texture we’re aiming for.
Step 3: Mix Wet Ingredients
Whip the heavy cream until soft peaks form—this is where a mixer really makes this recipe shine. Gently fold the whipped cream into the cream cheese mixture. I’ve tested this many times, and folding gently preserves that airy, light texture. It’s like magic watching it turn into a luscious, mousse-like filling.
Step 4: Combine
Now, fold the whipped cream into the cream cheese mixture in batches—be gentle! Overmixing can make it runny, so stop once it’s just combined. The filling should be smooth, thick, and fluffy. If you want to add a swirl of fruit or chocolate, now’s the time—just gently fold it in to create pretty marbled patterns.
Step 5: Prepare Filling
Pour the filling over your chilled crust, smoothing out the top with a spatula. If you’re adding fruit or toppings, sprinkle or swirl them on top. Trust me, a little swirl looks so pretty and adds a layer of flavor. I like adding sliced strawberries or a drizzle of dark chocolate here—it’s decadence in every bite.
Step 6: Layer & Swirl
If you’re doing layered flavors or swirling in fruit preserves, do it now. Use a toothpick or skewer to swirl gently, creating marbling patterns. Think of it as painting with flavors—just don’t overdo it or it’ll get too mixed.
Step 7: Bake
You actually don’t bake this one! Instead, cover the pan with plastic wrap or a loose lid and pop it into the fridge for at least 4 hours, ideally overnight. This allows the flavors to meld and the filling to firm up just right. The longer, the better—it’s worth the wait!
Step 8: Cool & Glaze
Once set, remove from the fridge and add your finishing touches. If you’re using a glaze or fresh fruit, do it just before serving to keep everything looking fresh and vibrant. If you made a fruit topping, spoon it on now and garnish with a sprig of mint or extra whipped cream.
Step 9: Slice & Serve
Use a hot, clean knife to make clean slices—dip it in hot water and wipe between cuts for neat, beautiful pieces. Serve chilled, and watch how everyone asks for seconds!
What to Serve It With
A no bake cheesecake is so versatile—it’s a natural fit for a variety of occasions. For breakfast or brunch, serve it with fresh berries and a strong coffee, or drizzle some honey on top. It’s equally stunning as a casual weekend dessert or a fancy finish to a dinner party. I love pairing it with a sparkling Moscato or a milky coffee for a cozy vibe. During holidays, I like topping it with seasonal fruit—think figs, pomegranate, or a splash of berry compote. My kids ask for this all the time after school, especially when I swirl in bits of chocolate or chopped nuts. It’s also fantastic as part of a dessert bar—set up a little assortment of toppings and let everyone customize their slice. Honestly, there’s something about the creamy, tangy filling against the crunchy crust that’s just pure happiness in a forkful. Plus, it’s so quick to put together that I often make it last-minute, knowing it’ll still look like I spent hours in the kitchen.
Top Tips for Perfecting Your No Bake Cheesecake
After making this countless times, I’ve picked up a few tricks that make all the difference. First, for that perfect crust, don’t rush the pressing—use the back of a sturdy spoon or the bottom of a glass to really pack it down. If your filling seems a bit runny, check your cream cheese—let it soften properly, and make sure you don’t overmix the whipped cream, which can deflate the fluffiness. When swirling in fruit or chocolate, use a light touch—overmix and you’ll lose the marbled effect. I’ve tried swapping sour cream or Greek yogurt for part of the cream cheese, and honestly, it adds a nice tang and makes it even creamier. Just keep the ratios in check so it doesn’t become too loose. As for baking tips—since it’s no bake, the key is patience. The longer it chills, the better the texture. Don’t skip the fridge—it’s what makes this dessert so deliciously firm and sliceable. Experiment with flavors by adding lemon zest, almond extract, or even a splash of liqueur. Oh, and the glaze—if you want a shiny finish, warm it slightly so it’s pourable but not hot. Personal tip: I love drizzling warm caramel right before serving for that sweet, buttery hit.
Storing and Reheating Tips
This cheesecake keeps beautifully in the fridge for up to 3 days—perfect for making ahead. Cover it tightly with plastic wrap or store in an airtight container to prevent it from absorbing fridge odors. If you want to keep it longer, it freezes well—wrap it tightly in plastic and then foil, and store for up to a month. To serve again, thaw it overnight in the fridge, then add fresh toppings if needed. I’ve found that the flavor stays intact, and it still slices beautifully. A note about glaze or fruit toppings: add these just before serving for the best appearance. If you plan to reheat slices—well, this one’s best served cold or slightly chilled; reheating might melt the filling, which isn’t exactly what we want here. Also, avoid leaving it out at room temperature for too long—nobody wants a soggy crust or a compromised texture. Keep it refrigerated, and you’ll have a show-stopping dessert ready to enjoy whenever the craving hits.
Frequently Asked Questions
Final Thoughts
Honestly, this no bake cheesecake has become a staple in my kitchen because it’s so forgiving, customizable, and downright delicious. It’s one of those desserts that makes you look like a pro—without breaking a sweat. Whether I’m hosting friends, craving something sweet after dinner, or just celebrating a quiet weekend, it always hits the spot. The best part is how happy everyone gets when I bring this out—they can’t believe how simple and fresh it tastes. Plus, it’s a relief to have a dessert that’s quick to prepare but feels totally indulgent. I encourage you to try different toppings or flavor twists—think lemon, coffee, or peanut butter—because once you’ve got the base down, the possibilities are endless. Happy baking—or, well, no baking!—and I can’t wait to hear how yours turns out. Drop me a comment or share your own spin on this beloved recipe. Food’s always better when shared, right?
No-Bake Lemon Cheesecake
Ingredients
Method
- Combine graham cracker crumbs and melted butter in a bowl and mix until well combined. Press the mixture into the bottom of a 9-inch springform pan to form the crust. Chill in the refrigerator for 15 minutes.
- In a large mixing bowl, beat the softened cream cheese until smooth. Add powdered sugar, sour cream, lemon juice, and vanilla extract; mix until creamy and well combined.
- Gently fold in the thawed Cool Whip until fully incorporated and the mixture is smooth.
- Pour the filling over the prepared crust in the springform pan. Smooth the top with a spatula.
- Cover the cheesecake with plastic wrap and refrigerate for at least 4 hours or until set.
- Garnish with lemon slices or candied lemon peel before serving, if desired.