Joyful Birthday Cake Recipe Simple & Sweet
You know those days when you’re craving something sweet, colorful, and just a little bit joyful? That’s exactly what this Funfetti Cake does for me. There’s something about those tiny sprinkles scattered throughout that instantly lifts my spirits — I swear it’s like edible happiness! I have vivid memories of baking this with my grandma, who always said, “A little bit of sprinkles makes everything better.” Honestly, it’s become a family favorite because it’s so simple, so pretty, and honestly, it tastes like childhood in every bite. And trust me, this isn’t just a kids’ party cake — I’ve made it countless times for friends’ birthdays, casual brunches, or even just a spontaneous late-night treat when I want something bright and fun. Plus, it’s so easy to whip up with ingredients you probably already have in your pantry. I always do this when I want a good ol’ nostalgic bake that doesn’t require hours or fancy skills. Spoiler alert: It disappears pretty fast around here!
What is Funfetti Cake?
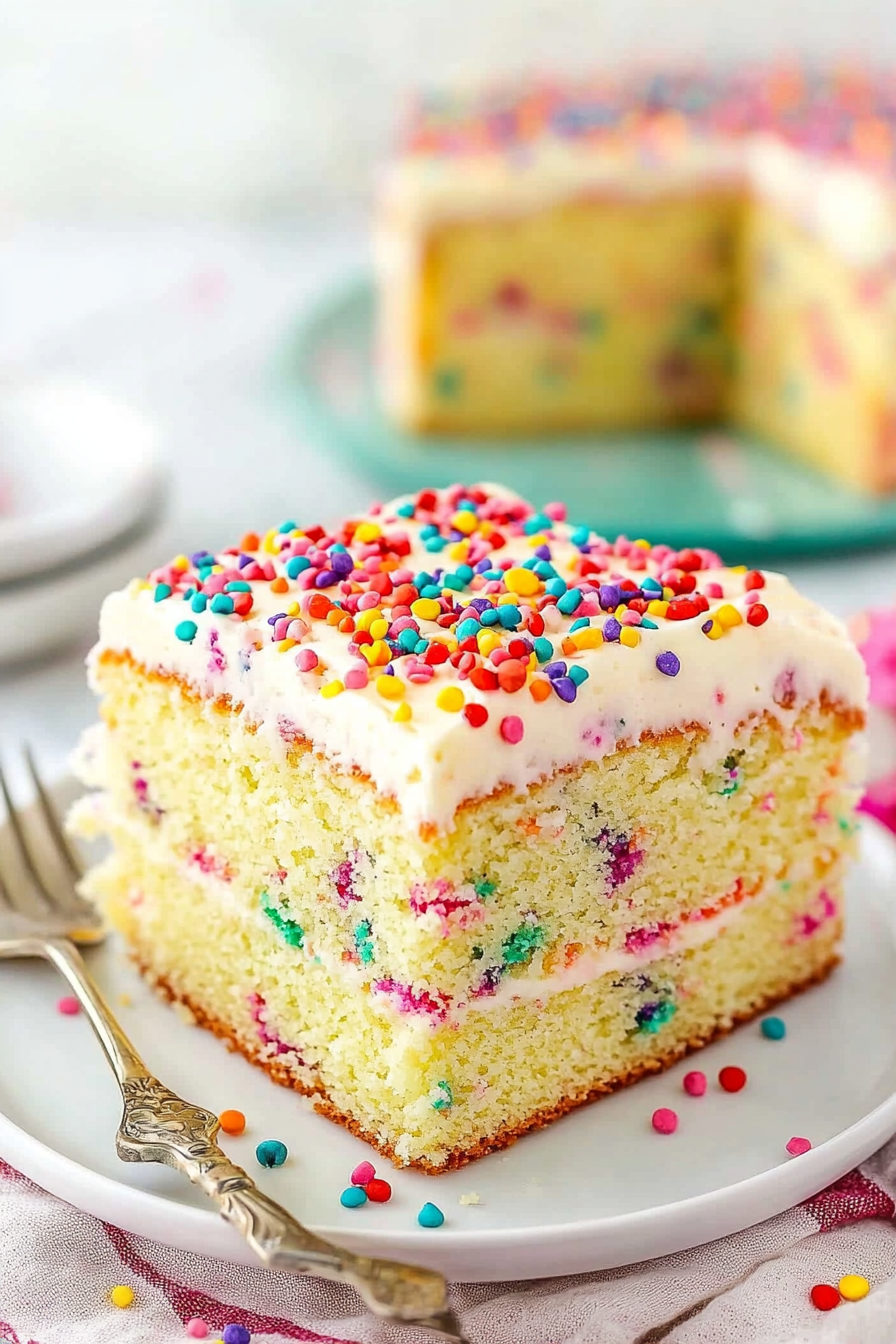
Think of Funfetti Cake as the ultimate celebration in cake form — it’s essentially a fluffy vanilla sponge studded with sprinkles, making every forkful a colorful surprise. The name “Funfetti” actually comes from a popular brand of rainbow sprinkles, but over the years, it’s become a generic term folks use for any vanilla cake with sprinkles. It’s akin to vanilla’s lively, party-loving cousin. The magic happens because the sprinkles stay vibrant even after baking, adding a pop of color that looks just as cheerful as it tastes. At its core, this cake is simple, approachable, and perfect for whenever you want a dessert that’s as joyful to look at as it is to eat. Think of it as an easy way to turn a simple vanilla cake into a party on a plate — no fancy tricks needed, just good old-fashioned fun.
Why you’ll love this recipe?
What I love most about this Funfetti Cake is how it instantly brightens up everyone’s day. The flavor is classic vanilla, but combined with those adorable rainbow sprinkles, it feels like a celebration every time you cut into it. The smell alone — sweet, buttery, with just a hint of vanilla — brings everyone to the kitchen. And honestly, it’s so easy to make, I’ve whipped this up on busy weeknights or last-minute get-togethers without breaking a sweat. The ingredients are budget-friendly: basic pantry staples like flour, sugar, eggs, and butter, plus a handful of sprinkles that transform the entire experience. One thing I also love is how versatile it is — you can serve it as-is, or dress it up with frosting or a dusting of powdered sugar for a prettier presentation. Plus, it adapts well for birthdays, casual celebrations, or even when you need a comforting treat after a long day. If you’re craving something sweet but don’t want the fuss of complicated recipes, this one’s a lifesaver on busy nights!
How do I make Funfetti Cake?
Quick Overview
Making this Funfetti Cake is shockingly simple. You basically mix together your dry ingredients in one bowl, wet ingredients in another, then gently combine everything without overmixing — that’s how you get that nice, tender crumb. Fold in the sprinkles toward the end, pour it into your prepared pan, and bake. The magic is that the sprinkles stay bright and colorful, even after baking. Once out of the oven, I like to let it cool completely before adding a simple glaze or frosting if I want to fancy it up. This cake is perfect when you’re short on time or if you’re new to baking because it’s almost impossible to mess up. The batter comes together in about 10 minutes, and your house will smell so delicious, everyone will start asking when it’s ready. Trust me, once you’ve tried this once, it’ll become your go-to for any celebration — or just because.
Ingredients
For the Main Batter:
– 2 12 cups all-purpose flour (I always use unbleached for a bit more flavor)
– 1 ¾ cups granulated sugar
– 1 tablespoon baking powder
– ½ teaspoon salt
– ¾ cup unsalted butter, softened (trust me, don’t skip this step or it’ll be dense!)
– 1 cup whole milk (or almond milk for a dairy-free spin)
– 3 large eggs
– 1 tablespoon pure vanilla extract (always use real vanilla if you can)
– ½ cup rainbow sprinkles (the tiny, jimmies type work best for baking)
For the Filling (Optional):
– Cream cheese or butter-based frosting, if you want to frost it
– Extra sprinkles for topping
For the Glaze (Optional but fun):
– 1 cup powdered sugar
– 2-3 tablespoons milk or lemon juice
– Optional food coloring or more sprinkles for decoration
Step-by-Step Instructions
Step 1: Preheat & Prep Pan
Set your oven to 350°F (175°C) and grease your 9-inch round cake pan with butter or non-stick spray. I like to line the bottom with parchment paper for extra easy removal. A quick spray and a dusting of flour or sugar, and you’re all set. This step is crucial because you want that cake to come out smoothly—no sticking or tearing!
Step 2: Mix Dry Ingredients
In a large bowl, whisk together the flour, sugar, baking powder, and salt. I always do this first to make sure everything’s evenly distributed. It’s amazing how much fluffier your cake turns out when the dry ingredients are combined well—trust me, don’t skip this step!
Step 3: Mix Wet Ingredients
In another bowl, beat the softened butter until creamy. Then add in the eggs, one at a time, mixing well after each. Pour in the vanilla and milk, and keep whisking until everything’s smooth and slightly frothy—that’s when you know you’re ready to combine.
Step 4: Combine
Gradually add the wet ingredients into the dry, mixing on low speed or using a spatula. Be careful not to overmix—that’s how you get a dense cake. Mix just until no streaks of flour remain — little lumps are okay, they’ll smooth out during baking.
Step 5: Prepare Filling
If you’re frosting, whip up your favorite frosting now or use store-bought. For a simple, fun twist, I like mixing in a handful of sprinkles right into the frosting for extra color and texture.
Step 6: Layer & Swirl
Pour half the batter into your pan. Drop spoonfuls of the filling or more sprinkles, then add the rest of the batter on top. If you want that marbled look, use a toothpick or skewer to swirl through the layers gently — think of it as a calm, artistic dance.
Step 7: Bake
Place the pan in the oven and bake for about 30-35 minutes. To check if it’s done, insert a toothpick into the center; if it comes out clean, you’re golden. Honestly, every oven is slightly different, so start checking around 30 minutes. The cake should be golden on top and spring back when gently pressed.
Step 8: Cool & Glaze
Let your cake cool in the pan for about 15 minutes, then transfer it to a wire rack. Wait until it’s completely cool before adding a glaze or frosting—that way, it won’t melt or slide off. I love drizzling a simple powdered sugar glaze, but you can also go wild with whipped cream or even cream cheese frosting.
Step 9: Slice & Serve
Use a serrated knife to cut clean slices, wiping it clean between cuts for neatness. Serve it at room temperature, maybe with a splash of milk or a cup of coffee — it’s just heaven. My kids ask for this all the time, and I often serve it with a few extra sprinkles on top to make it look super festive.
What to Serve It With
This Funfetti Cake is incredibly versatile. For a bright and cheerful breakfast, load a slice with fresh berries and a dollop of whipped cream. It’s perfect for brunch, paired with a mimosa or a hot cup of coffee — the vanilla and sprinkles just scream celebration! When it’s dinner time, it makes a lovely dessert alongside a scoop of vanilla or strawberry ice cream; the cool, creamy contrast pairs beautifully with the moist, vanilla cake with sprinkles. And honestly, on cozy nights, I love just having a slice with a hot cocoa — the sprinkle bits crunch just a little, adding that kidlike joy to every bite. This cake has a way of bringing everyone together, whether it’s a birthday bash or a simple “treat yourself” moment. I often sneak a piece with my morning coffee and pretend I’m at a bakery in Paris. It’s just that good, and the best part? It’s so easy to customize with your favorite toppings or fillings.
Top Tips for Perfecting Your Funfetti Cake
Over the years of baking this, I’ve learned a few tricks to make it even better. First, when preparing your sprinkles, I always recommend adding them gently at the very end of mixing — too much stirring and they tend to bleed their colors into the batter, turning it slightly rainbow-smeared. To prevent this, toss the sprinkles lightly with a tablespoon of flour before folding into the batter; it helps keep their vibrant hues intact. Trust me on this one! When mixing your wet and dry ingredients, avoid overmixing; a few lumps are totally fine because overmixing can cause the cake to turn out dense and chewy, not tender. Also, for a super moist cake, I tested this with a splash of sour cream or yogurt in the batter, which made it even creamier and more tender — give it a try if you’re feeling adventurous.
When it comes to baking, positioning the rack in the middle is key for even heat distribution. And don’t forget to do the toothpick test at around 30 minutes, because every oven is different. As for the glaze, adding a tiny splash of lemon juice brightens it, but you can also add a few drops of vanilla extract or food coloring for fun effects. I’ve even made a chocolate drizzle for a more decadent twist. The biggest lesson I’ve learned is that patience is key — wait until the cake is fully cooled before frosting or glazing. Otherwise, everything melts into a gooey mess. Once cooled, a light dusting of powdered sugar or more sprinkles on top makes it look super festive and irresistible.
Storing and Reheating Tips
This cake is best enjoyed fresh, but it keeps surprisingly well. I store leftovers in an airtight container at room temperature for up to two days — just cover it lightly with foil or a cake dome. If you want to keep it longer, pop it in the fridge — it stays moist and fresh for up to five days. Just be sure to bring it back to room temp before slicing for the best texture. For longer storage, the freezer is your friend. Wrap the cake tightly in plastic wrap, then foil, and freeze for up to three months. Thaw overnight in the fridge or at room temperature. Keep in mind, the sprinkles might soften slightly after freezing, but it’s still delicious. If you’re planning to glaze or frost after freezing, I suggest doing that once it’s completely thawed to ensure the smoothest finish. When it’s time to reheat, I recommend just popping individual slices in the microwave for about 10-15 seconds to warm through — that’s the perfect size for a cozy treat without drying out.
Frequently Asked Questions
Final Thoughts
Honestly, this Funfetti Cake has become my go-to when I need a little celebration in a bite. It’s the kind of dessert that instantly brings smiles around the table — bright, cheerful, and so easy to throw together. I love how it’s perfect for birthdays, casual get-togethers, or just a cozy night in when I want something sweet and nostalgic. Every time I bake it, I’m reminded of the simple joys of childhood, the magic of sprinkles, and the warmth of sharing a homemade treat with loved ones. Plus, it’s endlessly customizable — adding a splash of lemon zest, mixing in chocolate chips, or even swapping the vanilla for almond extract. No matter how you tweak it, I promise it’ll disappear in minutes. So grab that box of sprinkles and let’s make some happy, colorful memories together. Happy baking! And I’d love to hear how yours turns out — share your twists and photos in the comments below!
Homemade Rainbow Funfetti Cake
Ingredients
Method
- Preheat oven to 325°F. Prepare a 9x13 inch baking pan by spraying with baking spray.
- Toss the rainbow sprinkles with half a tablespoon of flour to prevent sinking, then set aside.
- Mix remaining flour, baking powder, baking soda, and salt in a bowl and set aside.
- Beat butter, sugar, oil, and vanilla until fluffy, about 3 minutes.
- Add eggs one at a time, mixing well after each addition. Scrape down sides of bowl.
- Alternately add dry ingredients and milk to the batter, starting and ending with dry ingredients. Mix until just combined.
- Fold in sour cream and the sprinkles coated with flour.
- Pour batter into prepared pan and bake for 40-45 minutes. Cool completely before frosting.
- Make the frosting: Beat butter until smooth, then gradually add powdered sugar, vanilla, and cream until desired consistency. Add salt to taste.
- Spread frosting over cooled cake and decorate with additional sprinkles if desired.