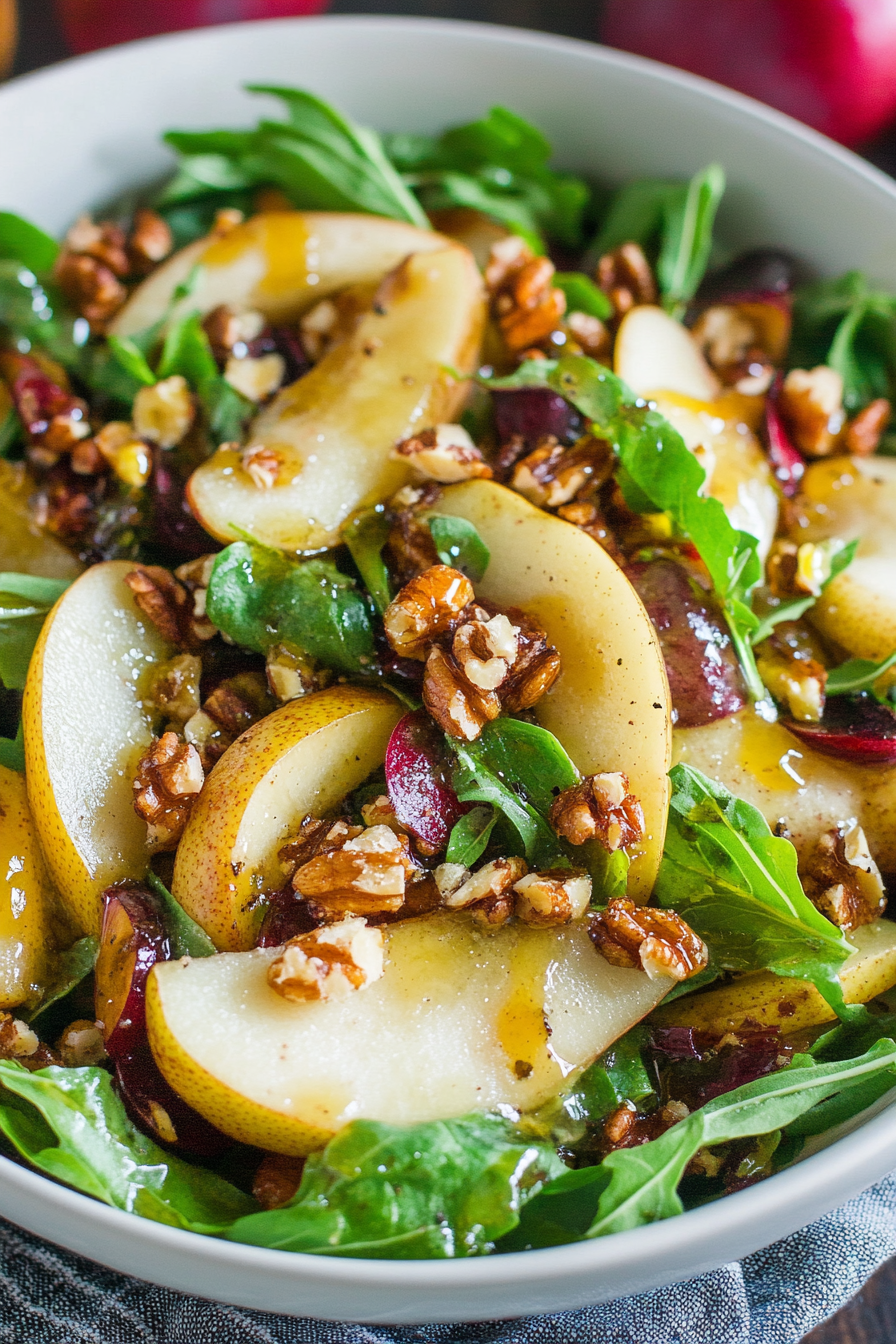
Harvest Pear Salad With Balsamic Dressing
There’s something so magical about a salad that feels more like a treats than just leaves and veggies, don’t you think? I remember those warm summer afternoons at my grandma’s house, where she’d always have a bowl of bright, juicy pears tucked into her salad. The way the sweet aroma mingled with fresh herbs, it was like a burst of sunshine on a plate. It’s honestly such a simple dish, but one that’s made my family’s mealtimes a little more special—my kids ask for this pear salad all the time! It’s perfect for when I want something light, refreshing, and a little bit fancy, without any fuss. Trust me, this one’s a lifesaver on busy nights or when I’m craving something sweet but don’t want to bake a whole dessert. Every time I serve it, I get that satisfied “Wow, this is so good!” from everyone. It’s fresh, vibrant, and tastes as good as it looks—fancy enough for guests, easy enough for every week. You’re going to love how simple it is to whip up too!
What is a pear salad?
Think of pear salad as a celebration of contrasts—sweet and savory, crunchy and tender, simple but sophisticated. It’s essentially a mix of ripe pears, fresh greens, maybe some nuts or cheese, topped with a bright dressing. The name’s pretty straightforward; it’s a salad featuring pears, but what’s special is how the pears bring a juicy sweetness that perfectly balances out salty or tangy ingredients. Sometimes I call it my “dessert salad” because it’s just sweet enough to feel indulgent, but it’s still healthy and fresh. The beauty of this dish? It’s flexible! You can swap ingredients to match what’s in your pantry or what mood you’re in. It’s like a blank canvas—ready for you to personalize. Served chilled, it’s an ideal summer starter or a quick lunch. Think of it as a grown-up fruit salad that works beautifully as a main or side dish. No matter how you serve it, I promise, everyone will ask for seconds!
Why you’ll love this recipe?
What I love most about this pear salad is how it elevates something as simple as fruit into a full-flavored, satisfying dish. The balance of sweetness from the pears with the slight tang of vinaigrette hits just right—kind of like a fresh, fruity version of the classic French salade de fruits, but with a twist. And honestly, it’s so easy to throw together that I always do this when I want something healthy but still crave a little treat. Plus, it’s budget-friendly—most of us have the ingredients in the fridge already. I’ve made this for everything from casual weeknights to fancy dinner parties, and it always gets rave reviews. It’s versatile, too! I’ve added crunchy walnuts, creamy goat cheese, even a sprinkle of dried cranberries when I want more tartness. If you’re someone who loves salads that taste like a guilty pleasure, this pear salad will quickly become a go-to, especially for those days when you want something fresh and lively. And if you’re cooking for kids? My little one calls it “the yummy fruit salad,” and he’s super picky about his greens. That’s a win in my book!
How do I make a pear salad?
Quick Overview
This pear salad comes together in minutes—literally! You start by slicing ripe but firm pears, tossing them with some fresh greens like arugula or baby spinach, and adding your favorite nuts and cheese. The dressing is a quick toss of olive oil, honey, lemon juice, and Dijon—super simple but packed with flavor. Mix everything, give it a gentle toss, and serve chilled. It’s so straightforward, yet every bite feels like a special treat. The secret is using good-quality pears and a balanced dressing to make everything shine. What makes this method special? It’s all about keeping the ingredients fresh and crisp, so don’t overthink it—just toss and enjoy!
Ingredients
For the Salad:
- 4 ripe but firm pears, preferably Bosc or Bartlett—think juicy and fragrant.
- 4 cups fresh greens—arugula, spinach, or mixed lettuce work beautifully
- ½ cup crumbled goat cheese or feta (optional but adds richness)
- ½ cup toasted walnuts or pecans (for crunch and flavor)
- ¼ cup dried cranberries or sliced fresh berries (optional, for a little tartness)
For the Dressing:
- 3 tablespoons extra virgin olive oil
- 2 tablespoons honey or maple syrup
- Juice of one lemon or orange (freshly squeezed)
- 1 teaspoon Dijon mustard (for a subtle tang)
- Salt and freshly cracked black pepper to taste
Step-by-Step Instructions
Step 1: Preheat & Prep Pan
No need to preheat the oven for this salad! Just grab your cutting board and make sure your pears are washed. If you’re toasting nuts, I usually do that now in a dry skillet over medium heat for about 5 minutes—trust me, it makes all the difference in flavor and crunch. Keep an eye on them so they don’t burn!
Step 2: Mix Dry Ingredients
Gather your greens, cheese, nuts, and dried fruit. Give everything a gentle rinse if needed, and dry thoroughly—I find that crisp greens and crunchy nuts make this salad really shine. If you want to switch things up, try adding some thinly sliced radishes or a handful of herbs.
Step 3: Mix Wet Ingredients
In a small bowl, whisk together olive oil, honey, lemon juice, Dijon, salt, and pepper. Taste it! I learned this trick after years of over- or under-seasoning—adjust the honey or lemon according to your sweetness or acidity preference. It should be bright and harmonious, not overpowering.
Step 4: Combine
Add the pears to the greens, drizzle with your dressing, and toss gently. Use tongs or two forks—be careful not to mash the pears! If you’re prepping ahead, hold off on adding the dressing until just before serving so everything stays crisp and fresh.
Step 5: Prepare Filling
If you’re adding cheese or dried fruit, sprinkle at this stage. I like the cheese crumbled over the top for that salty richness. Want a little more texture? Toss in some toasted nuts now. For a real flavor punch, I sometimes sprinkle with a tiny pinch of smoked paprika—trust me on this one, it’s a game changer.
Step 6: Layer & Swirl
Arrange everything beautifully on a platter or in a large bowl. For that perfect marbled effect, alternate layers of pears and greens, then gently swirl with your dressing. This makes it look as good as it tastes! If you like more visual interest, create concentric rings or just rustic toss for a casual vibe.
Step 7: Bake
No baking here, but the salad tastes even better after chilling for about 15-20 minutes in the fridge. If you’re roasting the nuts before adding, do that now and sprinkle over the top once cooled—perfection in every bite.
Step 8: Cool & Glaze
If you’re using a glaze (like honey or balsamic reduction), drizzle just before serving for a shiny finish. I often skip this step for a pure, fresh flavor—your choice!
Step 9: Slice & Serve
Serve it straight from the fridge or give it a quick toss right before plating. I love plating it on a beautiful wooden board or a big flat platter, garnished with extra nuts or herbs for color. It’s pretty enough to stand alone or with a side of crusty bread.
What to Serve It With
This pear salad fits just as well with brunch as it does with dinner. At my house, I often serve it alongside grilled chicken or seafood—think lemony shrimp or a tender roast. It’s also a showstopper at summer barbecues or picnics—pair it with a chilled white wine or sparkling water infused with citrus for maximum refreshment. For breakfast, I love a big bowl with granola and a dollop of Greek yogurt. It’s nice enough for guests but easy enough to make when I just want something healthy and quick to pull together. My kids love it as a side with grilled cheese or even as a snack straight from the fridge. Seriously, this salad is a chameleon—fancy enough to impress and simple enough to make on a weekday!
Top Tips for Perfecting Your Pear Salad
Over the years, I’ve learned a few tricks to elevate this dish every time:
- Zucchini Prep: Not needed here, but you can add julienned zucchini for extra crunch. Keep it crisp by salting and draining the slices beforehand if using raw—like you do with eggplant.
- Mixing Advice: Always toss in stages—start with the greens and pears, then gently add nuts and cheese. Overmixing can mess up the delicate balance of flavors and textures.
- Swirl Customization: For a more artistic look, try layering ingredients or swirling the dressing with a toothpick for a marbled effect. It makes it feel fancy even when you’re in a hurry.
- Ingredient Swaps: No walnuts? Use almonds or even sunflower seeds. Want more sweetness? Add honey-glazed cranberries. Love cheese? Feta, ricotta, or burrata all add an extra dimension.
- Baking Tips: If toasting nuts, do it in a dry skillet over medium heat until fragrant—about 5 minutes. Keep an eye on them because burnt nuts ruin the vibe. For the pears, I prefer slightly underripe ones so they’re firm enough to hold their shape but ripe enough to be juicy.
- Glaze Variations: For a balsamic glaze, simmer balsamic vinegar with a touch of honey until thickened—drizzle sparingly, as it’s potent and sweet.
Personally, I’ve experimented endlessly—adding a splash of balsamic vinegar to the dressing, swapping honey with agave, or even sprinkling a little brown sugar before serving. It’s all about what you love, and honestly, this salad’s forgiving and adaptable. Get creative and let your taste buds lead the way!
Storing and Reheating Tips
Freshness is key here. Keep leftovers in an airtight container in the fridge and aim to eat within a day or two for the best texture. If you’ve already added the dressing, cover tightly—salad greens will wilt over time, but the pears stay juicy if stored properly. I usually toss in the dressing just before serving, so everything looks crisp and vibrant. Want to make it ahead? Prepare all ingredients separately, combine right before eating, and drizzle the dressing at that stage. The nuts and cheese keep well, but avoid mixing with the greens too early, or they’d turn soggy. If you want to reheat your leftovers (say, if you decide to turn it into a warm salad), just let it sit at room temperature for 10 minutes first—warm pears are lovely, but greens definitely aren’t! For the glaze or any toppings, add those fresh just before serving. Trust me, freshness makes all the difference.
Frequently Asked Questions
Final Thoughts
If you’re searching for a salad that surprises and delights every time, this pear salad definitely ticks all the boxes. I love how it combines fresh, juicy fruit with crunchy nuts and creamy cheese, all tied together with a tangy dressing. It’s one of those recipes that makes me feel like a hero in the kitchen because it looks so elegant but couldn’t be easier to throw together. Plus, it’s endlessly customizable—I’ve made it with different kinds of cheese, nuts, and even adding herbs for a flavor boost. Honestly, whenever I serve this, I get nothing but praise—and the best part? It disappears in minutes at my house! If you give it a try, I’d love to hear what variations you come up with or what you pair it with. Happy baking, or should I say, happy assembling! This salad is one of those small joys that makes everyday meals feel special. Enjoy!
Fresh Pear Salad with Balsamic Dressing
Ingredients
Method
- To a blender, add olive oil, balsamic vinegar, honey, dijon mustard, diced shallot and season with salt and pepper to taste. Blend until well emulsified.
- Melt butter along with brown sugar in a medium skillet over medium heat. Add walnuts and cook, stirring constantly until caramelized, about 2 minutes. Transfer to a plate to cool.
- Layer greens and sliced pears in a large bowl, toss with the vinaigrette, then top with shaved parmesan, cranberries, and candied walnuts. Serve immediately.