Golden Pineapple Treats How to Make Them
There’s something about the burst of sweet, tangy juice in a tiny, perfectly rounded bite that just makes my heart happy. Growing up, my mom would whip up these pineapple balls whenever we had friends over or during holiday gatherings. I swear, the aroma alone—those warm hints of pineapple, coconut, and a touch of vanilla—could bring everyone to the table in minutes. This recipe is a little treasure I keep coming back to, especially on busy nights when I need something quick and satisfying. My kids ask for these all the time—sometimes I think they’d prefer these over cookies! And honestly, I can’t blame them. They’re so easy to make and taste like a tropical vacation in every bite. Trust me, once you try this, it’s going to become a regular in your house too. Plus, it’s a fantastic way to use up that weird leftover pineapple from last week’s smoothie. So, get ready to indulge—these pineapple balls are the sweetest little treat, and I can’t wait to share how I make them!
What are pineapple balls?
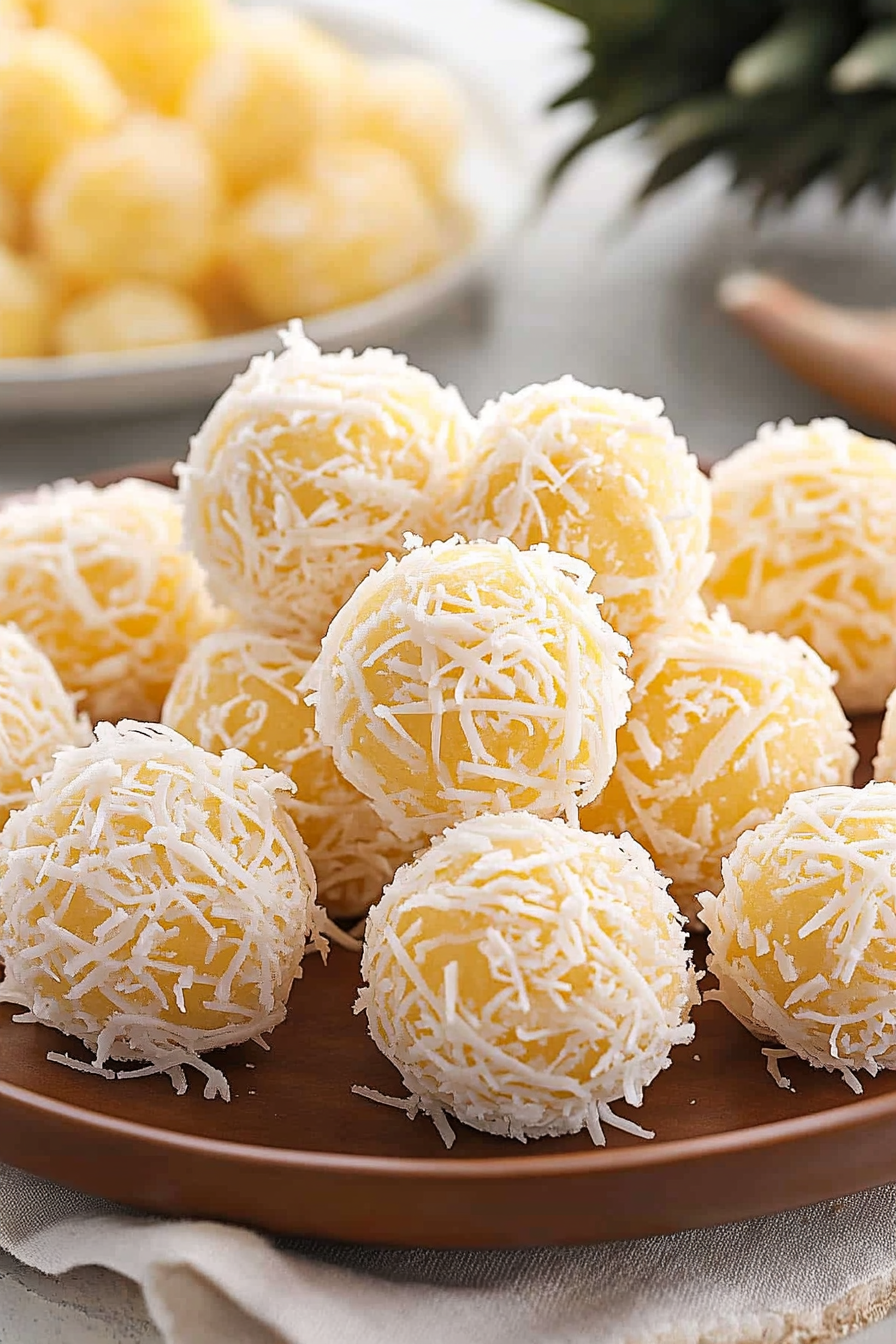
Think of pineapple balls as tiny, luscious bites of pineapple-flavored goodness rolled into a smooth, creamy mixture. The name probably comes from their shape—small, round, like little balls you pop in your mouth—and their main ingredient, pineapple, which brings that tropical zing. It’s essentially a no-bake treat, often combined with coconut, cream cheese, or condensed milk, then rolled in shredded coconut or crushed nuts. They’re a popular favorite in many cuisines, especially in tropical regions, but honestly, they’re such a versatile sweet that everyone can enjoy them. My version is a little simplified but just as flavorful—perfect for when you want something sweet but don’t feel like turning on the oven. Whether you call them pineapple delights or pineapple truffles, these little bites are a delightful way to enjoy fresh pineapple in a dessert form that’s both fun and sophisticated. They’re truly like a mini, edible vacation!
Why you’ll love this recipe?
What I love most about these pineapple balls is how they combine simplicity with such bright, tropical flavor. I mean, they’re practically foolproof—no baking, no complicated ingredients, just a quick mix and roll. This makes them perfect for last-minute gatherings or when you’re craving something sweet but don’t want to fuss in the kitchen. Plus, they’re incredibly budget-friendly. Most ingredients are staples—canned pineapple, shredded coconut, cream cheese—that you probably already have lying around. And the best part? You can customize them so easily. Want a more pronounced coconut flavor? Roll them in toasted coconut. Prefer a richer bite? Dip them in chocolate. I’ve even experimented with adding a dash of rum or pineapple juice for extra punch. Honestly, these pineapple balls are a lifesaver on busy nights or when I need a little dose of sunshine. My kids ask for them constantly, and they love helping roll the balls—making it a fun family activity too. It’s the kind of recipe that reminds me how simple ingredients can create pure happiness.
How do I make Pineapple Balls?
Quick Overview
This recipe couldn’t be easier. You blend together pineapple with cream cheese and some shredded coconut, then roll the mixture into small balls. Chill them for a bit so they firm up, then roll in your favorite coating—coconut, nuts, or even sprinkles for a fun touch. The whole process takes about 20 minutes, plus chilling time. It’s the perfect no-bake treat that’s light, flavorful, and totally customizable. Whether you’re making these for a party or just a quick snack, I promise they’ll disappear in minutes.
Ingredients
For the main mixture:
- 1 can (about 20 oz) crushed pineapple in juice — I like the crushed version because it’s easier to blend, but you can also chop fresh pineapple really finely.
- 8 oz cream cheese — softened, so it mixes smoothly. Trust me, this is what gives them that creamy, dreamy texture.
- 1 cup shredded coconut — unsweetened or sweetened, depending on your preference. Toasted coconut is a delicious option for extra flavor.
- 2 tbsp sugar or honey — optional, if you like a touch more sweetness.
For the Coating:
- Additional shredded coconut or chopped nuts — for rolling the balls in.
- Chocolate chips or melts — melted, for a decadent dip or drizzle.
- Sprinkles, crushed cookies, or cocoa powder — fun alternatives for coating.
Step-by-Step Instructions
Step 1: Preheat & Prep Pan
Since these are no-bake, there’s no oven preheating required, but I always line a baking sheet with parchment paper. It makes rolling and chilling so much easier. Just get everything within reach because once you start, time moves fast!
Step 2: Mix Dry Ingredients
In a large bowl, combine the shredded coconut and sugar if using. This layer helps add texture and ensures your coating sticks well. Toasting the shredded coconut beforehand is optional but adds a lovely nutty aroma that enhances the flavor.
Step 3: Mix Wet Ingredients
In another bowl, beat the softened cream cheese until smooth. Drain the crushed pineapple (save some juice if you want a slightly more moisture-rich mixture or for adjusting consistency), then fold it into the cream cheese along with the coconut and sweetener. Mix until fully combined—smooth and slightly sticky is perfect.
Step 4: Combine
Using your hands or a small spoon, scoop out about a tablespoon of the mixture and roll into a ball. If the mixture feels too sticky, refrigerate it for 10-15 minutes—it makes shaping so much easier. Trust me, overmixing can make the mixture too loose, so handle it just enough to combine everything evenly.
Step 5: Prepare Filling
If you’re adding extra flavor, like a dollop of jam or a tiny piece of pineapple in the center, do it now. But honestly, these are best enjoyed just as they are—sweet, tangy, and creamy in every bite.
Step 6: Layer & Swirl
Roll each ball in your coated mixture—coconut, nuts, or chocolate—to cover it thoroughly. For a pretty swirl, I sometimes dip half the ball in melted chocolate and then sprinkle with coconut, creating a beautiful two-tone effect. The visual appeal makes these stand out on any plate!
Step 7: Bake
No baking involved! Just place the balls on your prepared baking sheet and refrigerate for at least 30 minutes—longer if you want them extra firm. This step is crucial because it helps all that creamy goodness set into the perfect bite.
Step 8: Cool & Glaze
If you’re using a chocolate glaze, melt some chocolate chips, then dip or drizzle over the chilled balls. Let the chocolate set at room temperature or in the fridge—either way, it’s delightful once firm.
Step 9: Slice & Serve
For these little gems, slicing isn’t necessary—they’re meant to be enjoyed whole. But if you want to serve them sliced for presentation, pop them in the fridge until firm, then cut with a sharp knife for clean edges. Serve chilled, and watch how quickly they disappear!
What to Serve It With
While these pineapple balls are a star on their own, they’re also incredibly versatile. For breakfast, pair them with a strong coffee or a tropical fruit salad—think mango and kiwi to echo the pineapple vibe. If you’re hosting brunch, serve them alongside flaky croissants or a yogurt parfait because they add that sweet burst of flavor that livens up any spread. As an end-of-meal dessert, they’re perfect paired with a scoop of vanilla ice cream or a drizzle of pineapple syrup—I swear, it’s like a vacation in your mouth. And for a cozy snack, I love setting them out with a cup of herbal tea or a sparkling soda. My family enjoys making a little “tropical platter” with these, some fresh fruit, and maybe a splash of rum in the mix for the grown-ups. They’re just downright fun to share and customize for each occasion!
Top Tips for Perfecting Your Pineapple Balls
Over the years, I’ve picked up a few tricks to ensure these turn out fabulous every time. First, make sure your pineapple is well-drained—extra juice can make the mixture too loose, and then you’ll be frustrated trying to roll perfect balls. I always drain it in a sieve and even pat it dry with paper towels if it seems extra wet. When mixing the cream cheese, handle it gently—overmixing can make them dense instead of light. If you want a more vibrant color, add a few drops of pineapple or banana extract, but I prefer keeping it natural. As for coating, toasted coconut not only adds flavor but also helps prevent sticking, so don’t skip it if you can. You can also experiment with alternative coatings like crushed graham crackers or dipped chocolate for variety. I’ve found that chilling the mixture before rolling makes all the difference—no sticky mess, just perfectly shaped balls. For baking or refrigerating, always do so for enough time to let everything set—trust me, patience creates that tender, bite-worthy texture. Also, don’t be afraid to add a pinch of salt or a splash of vanilla; it balances the flavors beautifully. Every batch I make is a little different, but the key is enjoying the process and tasting as you go—you’ll get perfect pineapple balls every time!
Storing and Reheating Tips
Leftover pineapple balls are always a hit at my house, and I’ve picked up some handy tricks to keep them fresh. If you plan to enjoy them within a day or two, store them in an airtight container in the refrigerator—that’s where they stay firm and fresh for about 3-4 days. I recommend placing them between sheets of parchment paper so they don’t stick together. For longer storage, you can freeze them—wrap each ball tightly in plastic wrap, then pop them in a freezer bag for up to a month. To reheat, I prefer just letting them thaw in the fridge, then serving them chilled or at room temperature. If coated with chocolate that’s been refrigerated, give them a few minutes at room temperature to soften slightly for the best bite. Sometimes, I drizzle fresh melted chocolate over them after freezing to refresh the coating—it’s a little trick I tested that works great. In summer heat, keeping them cold is best, so enjoy them straight from the fridge or freezer for that ultimate refreshing treat. Honestly, they hold up well and taste just as good after storage, especially when served chilled. Freshness is key, but a little planning makes these always ready to enjoy!
Frequently Asked Questions
Final Thoughts
Honestly, these pineapple balls have become my go-to sweet treat, especially when I want something quick, cute, and bursting with flavor. They remind me of lazy summer afternoons, tropical vacations, and carefree family gatherings. And the best part? They’re endlessly customizable—add nuts, switch up the coatings, or toss in some chia seeds for extra health benefits. Every time I make a batch, I get that warm feeling knowing I’m sharing something I genuinely love. So, give these a try! I’d love to hear how yours turn out or if you add your own twist. Happy baking, friends—here’s to sweet moments and tropical delights—right in your own kitchen!
Pineapple Balls
Ingredients
Method
- Use a fine mesh sieve to drain as much liquid from the canned crushed pineapple as possible.
- Add the softened cream cheese to a medium size mixing bowl.
- Use a handheld mixer to beat the cream cheese on medium speed for about 1 minute, or until smooth and no lumps remain.
- Sprinkle the pineapple flavored gelatin over the cream cheese and continue to mix on medium speed just until combined.
- Stir in the crushed graham cracker crumbs and the well drained pineapple, until all of the ingredients are well incorporated.
- Cover the bowl tightly with plastic wrap and chill in the refrigerator for 2 hours. This will allow the mixture to firm up and make scooping and rolling easier.
- Line a baking sheet with parchment paper.
- Add the unsweetened coconut flakes to a shallow bowl.
- Remove the pineapple cream cheese mixture from the refrigerator. Scoop out the mixture with a 1 tablespoon cookie scoop, and roll into a ball.
- Roll the balls in the unsweetened coconut flakes and place on the prepared baking sheet. Keep refrigerated until ready to serve.