Golden Pineapple Treats How to Make Them
There’s something about the smell of sweet, ripe pineapple that instantly transports me back to summer days at my grandma’s house, sitting on the porch and popping these pineapple balls into my mouth like they were a secret treasure. I remember how I’d eagerly wait for her to say, “Okay, try these,” with that mischievous grin. They’re a little bite of sunshine, and honestly, this recipe has become my go-to when I want a quick, satisfying treat that’s both totally addictive and so darn simple to make. Plus, it’s one of those desserts my kids ask for all the time — they call them “pineapple magic” and believe me, that nickname fits. If you’re craving something tropical, fruity, and just the right amount of sweet, you’re gonna love making these pineapple balls at home. They’re perfect for snack attacks, parties, or even just when the craving hits late at night—no baking, no fuss, just the pure joy of pineapple in every bite.
What are pineapple balls?
Pineapple balls are essentially little bite-sized treats made with fresh pineapple, coated in sweet, crispy coating, and often finished with a glaze or dusting of sugar. Think of it as a more playful, fun version of candied pineapple, but packed into adorable round shapes that make everything more festive and appealing. The name ‘pineapple balls’ is pretty straightforward—they’re just small, round, pineapple-flavored bites that look like cute little orbs of sunshine. The concept is simple: you dice up ripe pineapple, mix it with a few pantry staples, form into balls, and give them a quick dip or glaze. It’s a tropical twist on the classic sweet treat, and what I love most about these is how flexible they are. You can add a touch of coconut, roll them in toasted coconut flakes, or drizzle chocolate on top if you’re feeling fancy. Think of it as a fun pop of fruit flavor that never fails to make everyone smile.
Why you’ll love this recipe?
There’s honestly so much to love about these pineapple balls. First off, the flavor—sweet, tangy, with that unmistakable tropical zing that just lifts your mood instantly. It’s like a mini vacation in your mouth! These are completely foolproof; I’ve made them at the last minute with stuff I already had in the pantry, and they turn out perfect every single time. No fancy equipment needed, just some chopping, mixing, and a quick bake or chill. Plus, they’re budget-friendly since most of the ingredients are pantry staples—fresh pineapple, sugar, maybe a little coconut or chocolate if you’re feeling extra. They’re also super versatile—I’ve served these as an after-dinner dessert, hidden them in lunch boxes, and even brought them to summer barbecues. My favorite part? How quickly they disappear at my house. My kids just can’t get enough of these little bites. This recipe has become a household staple because it’s simple, delightful, and such a crowd-pleaser. Trust me, once you try these, they’ll become your family’s new favorite too.
How do I make Pineapple Balls?
Quick Overview
Making pineapple balls is honestly one of the easiest desserts you can whip up in under 30 minutes. It’s a no-fuss process: dice fresh pineapple, mix it with sweetening agents and a few pantry staples, shape into small rounds, and then bake or chill. The magic is in the combination of the juicy pineapple inside and the crisp exterior—either coated with a glaze, sugar, or toasted coconut. They’re a great make-ahead treat, so you can prepare them in the morning and have a batch ready for your evening gathering. I love that this recipe adapts well—you can add a pinch of vanilla or a splash of rum to give it a grown-up twist. And if time’s tight, you can even skip the oven and turn these into no-bake bites. They’re perfect for all seasons and occasions, and honestly, I always do this when I want something refreshing but quick. Trust me on this—once you get the hang of shaping and glazing, they come together so fast, and the results are always delightful.
Ingredients
For the Main Batter:
– 2 cups of finely chopped fresh pineapple (make sure it’s ripe and sweet for maximum flavor!)
– 1 cup sweetened shredded coconut (optional, but adds great flavor and texture)
– ½ cup granulated sugar (adjust based on pineapple sweetness)
– 1 teaspoon vanilla extract (optional but adds a lovely depth)
– 1 cup condensed milk or coconut milk (for binding and creaminess)
– 1 ½ cups glutinous rice flour or plain all-purpose flour (to help shape and bind)
For the Filling (Optional):
– Cream cheese or mascarpone for a richer center
– Chopped nuts or dried fruits for variation
– A tiny pinch of chili powder for a spicy twist
For the Glaze:
– ½ cup pineapple juice
– 2 tablespoons honey or maple syrup
– 1 teaspoon lemon juice (for brightness)
– Optional: melted dark chocolate or white chocolate for drizzling
– Sprinkles of shredded coconut or crushed nuts for garnish
Step-by-Step Instructions
Step 1: Preheat & Prep Pan
If you’re baking these pineapple balls, preheat your oven to 350°F (175°C). Line a baking sheet with parchment paper or a silicone mat. If you’re opting for a no-bake version, you can chill them in the fridge—no oven needed! Just make sure your hands are clean and dry for shaping the mixture.
Step 2: Mix Dry Ingredients
In a large bowl, whisk together the rice flour and sugar. This gives the batter a lovely even texture and helps it hold together later. I like to sift the flour to prevent lumps, especially if I’m using regular flour—trust me, it makes a difference!
Step 3: Mix Wet Ingredients
In a separate bowl, combine the chopped pineapple, condensed milk, vanilla, and shredded coconut if using. Mash everything together with a fork or a spatula until well combined. The pineapple should be juicy and fragrant, and the mixture should be moist but not runny. If it feels too sticky, add a little more flour, but if it’s too dry, splash in more condensed milk or pineapple juice.
Step 4: Combine
Pour the wet mixture into the dry ingredients and stir gently until just combined. The goal here is to avoid overmixing—if you overdo it, the batter can become dense. You want the mixture to be moist enough to roll into balls easily but not so sticky that it’s a nightmare to handle. If it’s sticky, pop it in the fridge for 15 minutes to firm up.
Step 5: Prepare Filling (Optional)
If you’re adding a creamy center, scoop out small portions of the mixture, flatten slightly, and put a little dollop of cream cheese or chopped nuts in the middle. Cover the filling with more pineapple mixture and roll into smooth balls. That’s my kids’ favorite part—they love unwrapping the surprise center!
Step 6: Layer & Swirl
If you want a pretty marble effect or a swirl, start by placing some pineapple mixture in your hands, add a few drops of food coloring or a drizzle of melted chocolate (if you like), then gently roll and swirl to get the pattern you love. This step is totally optional but really fun for presentation.
Step 7: Bake
Place the balls on your prepared baking sheet. Bake in the preheated oven for about 15-20 minutes or until they turn golden and firm to the touch. If you prefer no-bake, just pop them in the fridge for at least 30 minutes to set. Either way, the smell alone will have everyone coming to the kitchen.
Step 8: Cool & Glaze
Let the pineapple balls cool on a wire rack. Once cooled, you can drizzle them with your choice of glaze or melted chocolate. A quick brush with pineapple juice and a little honey makes them extra shiny and delicious. If you like toasted coconut or chopped nuts, sprinkle them on top for texture and extra flavor.
Step 9: Slice & Serve
Serve these pineapple balls at room temperature for the best flavor—though they’re equally good chilled if you prefer a firmer bite. I like using a sharp knife dipped in hot water for clean cuts—trust me, it makes a difference! Arrange them on a pretty plate, add a sprig of mint or a wedge of pineapple for a gorgeous finish, and watch them disappear in minutes.
What to Serve It With
This treat is incredibly versatile, so they fit into just about any occasion. For breakfast, serve them alongside a cup of coffee or tea—think of it as a fruity muffin in miniature. They also shine at brunch, especially with a side of fresh fruit salad or a tropical smoothie. As a dessert, they pair beautifully with a scoop of vanilla ice cream or a dollop of whipped cream. My family loves topping them with a drizzle of dark chocolate or sprinkled coconut for extra flair. When I want a cozy snack, I often just put them on a plate with a cup of hot tea or fresh pineapple juice. They turn any simple afternoon into a celebration with their burst of flavor and fun presentation. You can even make a platter for a kids’ birthday or a summer picnic—they’re so colorful and inviting. Honestly, I’ve made these dozens of times, and they’re always met with happy smiles and plenty of “Can I have seconds?”
Top Tips for Perfecting Your Pineapple Balls
If you want to make these even better, just a few little tips help. First, always use ripe pineapple—it’s the biggest flavor booster. I find that the juiceiness really makes a difference, so don’t skimp on quality. When you chop the pineapple, try to get small, uniform pieces so they cook or set evenly. I once made the mistake of leaving big chunks, which made the balls fall apart a bit—lesson learned! For the coating, toasted shredded coconut adds a gorgeous crunch and aroma; I always do this in a dry skillet until golden. When mixing the batter, be gentle—you don’t want it overworked, or it can turn dense. Personally, I like to add a splash of rum or orange liqueur if I want a more adult twist — it’s like a tropical cocktail in a bite! Adjust sugar levels based on the sweetness of your pineapple; I test a tiny scoop and taste. When baking, I rotate the tray halfway through to get even coloring, especially if your oven has hot spots. For glazing, a quick simmer of pineapple juice with a bit of honey thickens beautifully into a shiny, sticky glaze. Remember, the key is patience—let the treats cool fully before glazing or serving to get that perfect texture. I’ve tested online tips and found that adding a bit of cornstarch can help if your mixture is too sticky, but I prefer natural ingredients. Don’t be afraid to experiment—you might find a favorite twist that becomes your signature style!
Storing and Reheating Tips
Once you’ve made these delicious pineapple balls, you’ll want to keep them fresh for later. If you’re planning to enjoy them within a day or two, just store them in an airtight container at room temperature—covered loosely, so they don’t get soggy. They’re best enjoyed within 24 hours, but if you want them to last a little longer, pop them in the refrigerator. In the fridge, I keep them in a sealed container—just make sure the glaze or coating is completely dry before storing to prevent stickiness. They’ll stay fresh for about 3-4 days this way. To reheat, simply warm them gently in a low oven (around 300°F) for 5-8 minutes or microwave on low for 30 seconds; be careful not to overdo it or they might turn soggy. If you’ve added chocolate glaze, it’s best to reheat carefully so the coating doesn’t melt away. For freezing, wrap each pineapple ball tightly in plastic wrap and place them in a freezer-safe bag. They hold up well for up to 2 months—just thaw in the fridge overnight before serving. If you want to add a fresh glaze after thawing, give your pineapple balls a quick brush or drizzle to bring back that nice sheen and flavor boost.
Frequently Asked Questions
Final Thoughts
If you’ve ever wanted a quick, tropical-inspired treat that’s almost too easy to be true, these pineapple balls are your new best friend. I’ve made them countless times and each time, I’m reminded how simple ingredients can turn into something that feels special—and always disappears faster than I expect. Whether you’re hosting a summer cookout, craving a sweet snack, or just want a little slice of sunshine on your plate, these bites deliver. They’re fun to customize, incredibly forgiving, and full of that vibrant pineapple flavor that just makes everything better. Honestly, I love sharing this recipe because it’s become a little family tradition—everyone loves the surprise inside, the way they sparkle with glaze, and how they’re perfect for any occasion. So go ahead, try them out, and don’t be surprised if they become your new go-to treat too. Happy baking, and I can’t wait to hear how yours turn out!
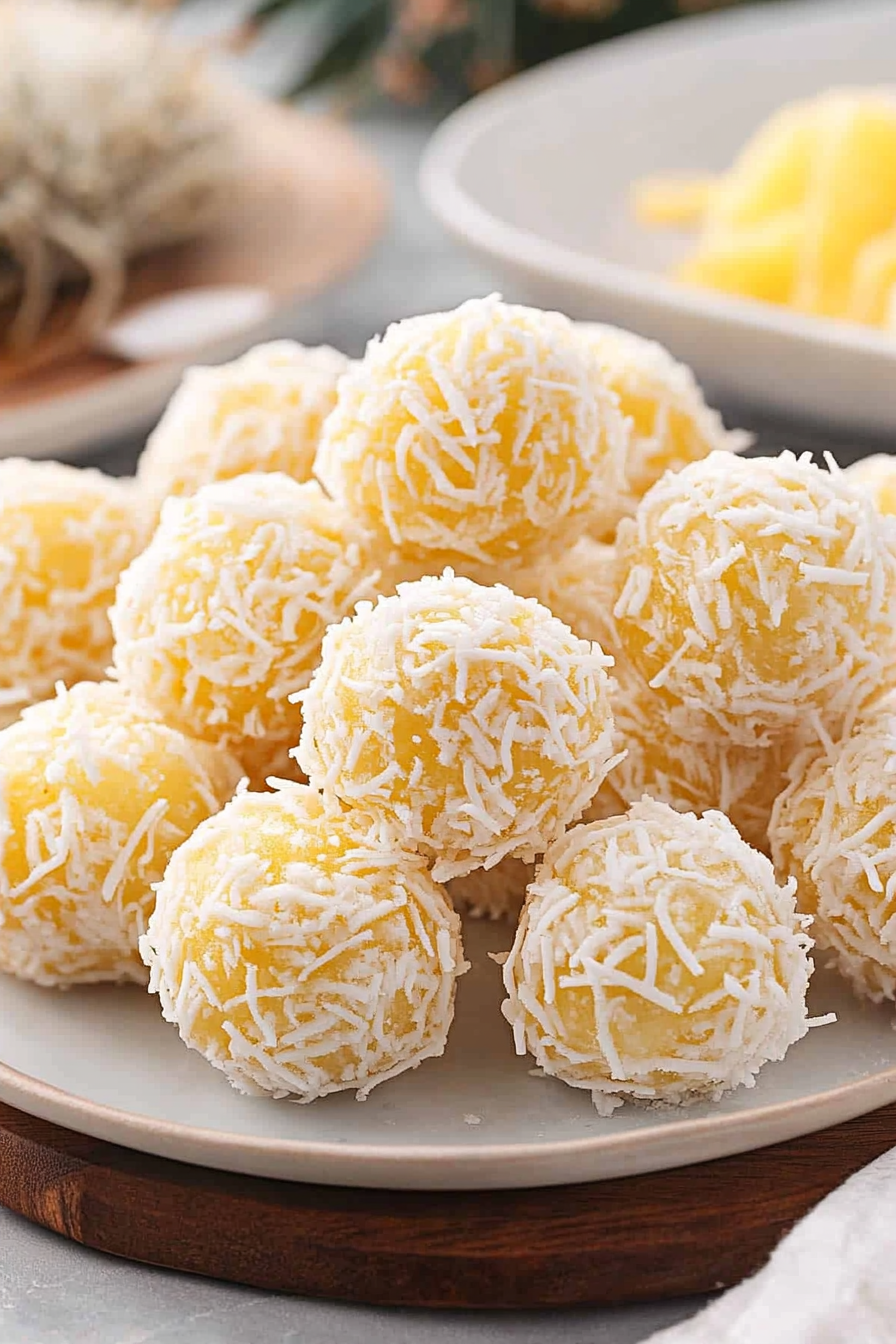
Tropical Pineapple Balls
Ingredients
Method
- Use a fine mesh sieve to drain as much liquid from the canned crushed pineapple as possible.
- Add the softened cream cheese to a medium size mixing bowl.
- Use a handheld mixer to beat the cream cheese on medium speed for about 1 minute, or until smooth and no lumps remain.
- Sprinkle the pineapple flavored gelatin over the cream cheese and continue to mix on medium speed just until combined.
- Stir in the crushed graham cracker crumbs and the well drained pineapple, until all of the ingredients are well incorporated.
- Cover the bowl tightly with plastic wrap and chill in the refrigerator for 2 hours. (This will allow the mixture to firm up and make scooping and rolling easier).
- Line a baking sheet with parchment paper.
- Add the unsweetened coconut flakes to a shallow bowl.
- Remove the pineapple cream cheese mixture from the refrigerator. Scoop out the mixture with a 1 tablespoon cookie scoop, and roll into a ball.
- Roll the balls in the unsweetened coconut flakes and place on the prepared baking sheet. Keep refrigerated until ready to serve.