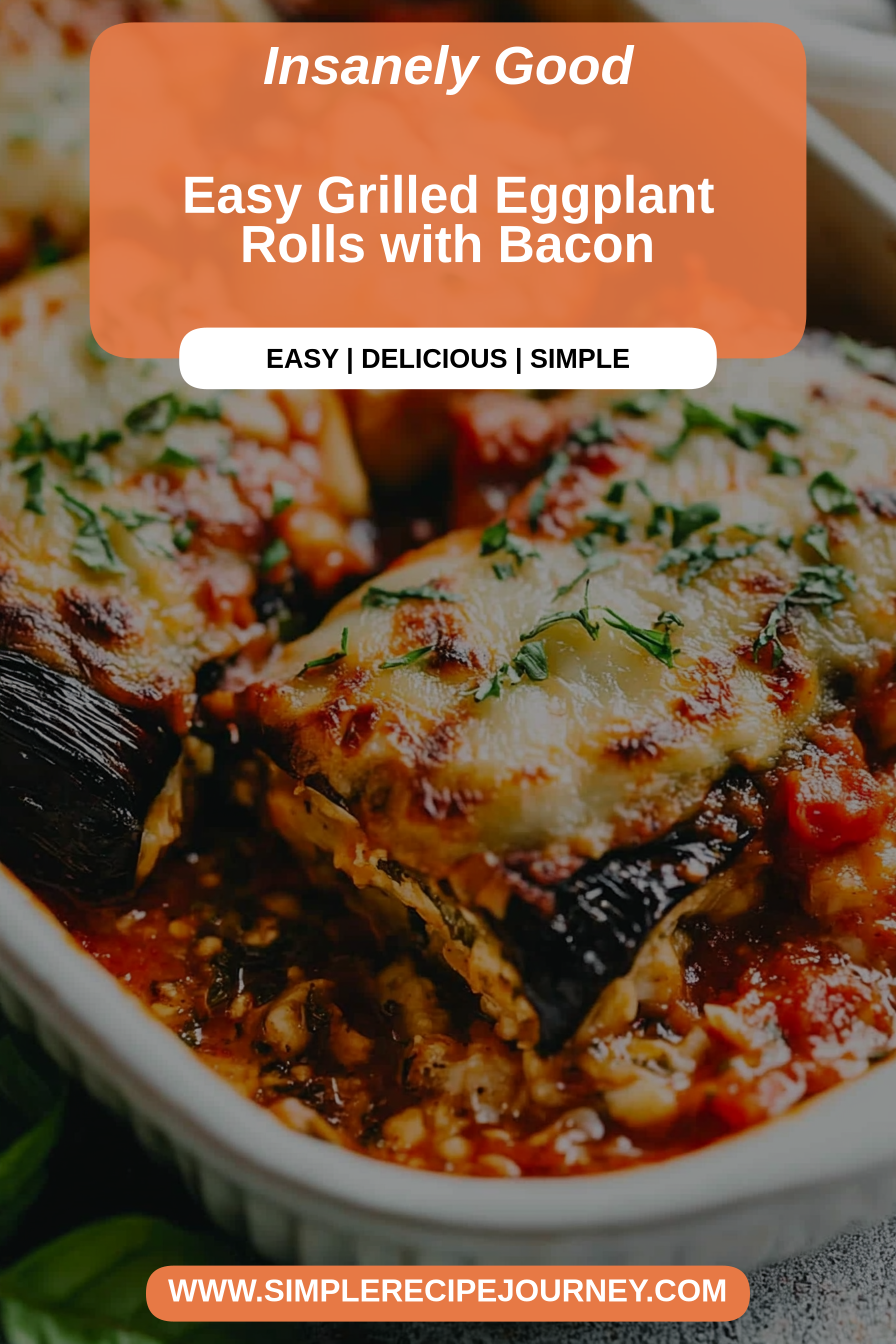
Easy Grilled Eggplant Rolls with Bacon
If you’ve ever wandered into your kitchen craving something hearty yet elegant, this recipe for eggplant rolls might just be the comforting surprise you didn’t know you needed. I remember the first time I made these—it was a busy weeknight, and I wanted something nourishing that didn’t require fancy ingredients or extra trips to the store. These eggplant rolls are one of those dishes that feel fancy but are actually super simple to put together. The smell alone, bubbling away in the oven, will fill your whole house with warmth and nostalgia. Plus, my kids love how fun they are to eat—little rolls packed with flavor. Trust me, once you try making these, they’ll become a regular in your meal rotation. They’re surprisingly versatile, too—perfect served warm from the oven or at room temp for picnics or potlucks. So, grab that eggplant—and let’s turn this humble vegetable into something truly special!
What is an eggplant roll?
Think of eggplant rolls as a cozy twist on classic stuffed vegetables—kind of like the lovechild of a veggie lasagna and a rolled-up savory pancake. It’s essentially slices of eggplant that are cooked until tender, then spread with a flavorful filling, rolled up, and baked until golden perfection. The name “eggplant rolls” is pretty straightforward—because, well, you’re rolling up slices of eggplant with a tasty stuffing inside. It’s a dish that’s been around in various cultures, from Mediterranean to Middle Eastern cuisine, but I’ve put my own little spin on it. What I love most about it? It’s a perfect way to enjoy eggplant if you’re not a fan of it roasted or grilled on its own. The filling — usually a mix of cheeses, herbs, and sometimes spinach or tomato — transforms the eggplant into something rich and satisfying. Think of it as a cozy, handheld dinner that’s just as pretty on the table as it is delicious on the fork!
Why you’ll love this recipe?
Honestly, I keep coming back to these eggplant rolls because they tick so many boxes for me. First off, the flavor is incredible—smoky, cheesy, with just a hint of herbs that make each bite feel like a warm hug. My favorite part? The process is surprisingly simple. I’ll admit, I used to shy away from eggplant because I thought it would be a lot of work or too bitter, but grilling or baking slices to soft perfection really transforms it into something tender and sweet. And cost-wise, it’s a budget-friendly dish—eggplants are affordable, especially when you catch them in season. Plus, the ingredients are versatile. You can swap in goat cheese, ricotta, spinach, or even crumbled feta—whatever floats your boat! This dish is also so flexible—I’ve served it as a main course with a side salad, or as a classy appetizer at dinner parties. What I love most about this is how it makes potential leftovers feel special. They reheat beautifully, and I’ve even frozen some for a quick lunch later. It’s honestly a lifesaver on busy nights when I want something homemade, satisfying, and a little fancy. Trust me, once you make these a few times, they’ll be a staple in your house, too.
How do I make Eggplant Rolls?
Quick Overview
This recipe is all about layering flavors without fuss. You’ll lightly brush eggplant slices with olive oil, then bake or grill them until soft. While that’s happening, whip up your filling—think cheeses, herbs, maybe some spinach or sun-dried tomatoes. Spread a generous scoop of filling onto each eggplant slice, then carefully roll them up. Pop everything into the oven to bake for just about 20-25 minutes, until bubbling and golden. The best part? The whole process takes under an hour, and the end results look downright impressive. Plus, this method allows the flavors to meld beautifully, giving you a dish that’s fancy enough for guests but simple enough for a weeknight. My secret tip: don’t skip the salting step on the eggplant—it really cuts any bitterness, making everything taste fresh and vibrant. Once they’re out of the oven, I like to drizzle a bit of balsamic glaze or sprinkle fresh herbs on top—wow! You’ll wonder why you didn’t make these sooner.
Ingredients
For the main batter (if you opt for a light batter):
2 medium eggplants, sliced lengthwise into thin sheets
Olive oil, for brushing
Salt and pepper, to taste
For the Filling:
1 cup ricotta cheese (or vegan alternative)
1 cup shredded mozzarella or other melting cheese
1/2 cup grated Parmesan (or nutritional yeast for a dairy-free version)
A handful of chopped fresh basil or parsley
2 cloves garlic, minced
Salt and black pepper, to taste
For the Glaze (optional but recommended):
Balsamic glaze or reduction
Fresh herbs for garnish (basil, parsley, or thyme)
Step-by-Step Instructions
Step 1: Preheat & Prep Pan
Set your oven to 400°F (200°C). Line a baking sheet with parchment paper or a silicone mat. Brushing the eggplant slices with olive oil and sprinkling a little salt helps them caramelize beautifully. I always do this when I want a nicely browned, tender result—trust me, it makes all the difference.
Step 2: Mix Dry Ingredients
In a bowl, combine your shredded cheeses, herbs, garlic, salt, and pepper. This patty of flavor is what turns simple eggplant into a show-stopping dish. I like to taste the mixture first—make sure it’s flavorful enough since the eggplant itself can be quite mild.
Step 3: Mix Wet Ingredients (if using a batter)
If you prefer a lighter, more breaded texture—somewhat like eggplant Parmesan—whisk together an egg (or aquafaba for vegan) and a splash of milk or plant-based milk. I tested this with almond milk once, and it actually made the filling even creamier!
Step 4: Combine
Spread the mixture evenly over each eggplant slice. Alternatively, if you’re using a batter, dunk the slices quickly before placing them on the baking sheet. Be gentle so they don’t break apart. Overmixing the filling can make it gluey, so I always fold in ingredients gently to keep it fluffy.
Step 5: Prepare Filling
Once your filling is ready, spoon or spread a generous amount over each slice. Feel free to customize—like adding chopped sun-dried tomatoes or chopped spinach for extra flavor and color. My kids love when I sneak in a handful of spinach—looks green but melts right in and adds a boost of nutrients.
Step 6: Layer & Swirl
Lay out your eggplant slices, spread with filling, then roll ’em up tightly. I like to give them a gentle press to seal the edges. If you’re feeling fancy, swirl a bit of tomato sauce or pesto inside before rolling—makes each bite even more flavorful!
Step 7: Bake
Place the rolls seam-side down on your prepared baking sheet. Bake for 20-25 minutes or until they’re bubbly and golden brown. Check at the 20-minute mark—every oven is different, and you want the cheese inside melted and the eggplant nicely roasted.
Step 8: Cool & Glaze
Once out of the oven, I like to let them rest for about five minutes. Drizzle with balsamic glaze or sprinkle fresh herbs — it adds a lovely brightness. If you want a crispy top, broil them for an extra minute, but keep an eye on things so they don’t burn.
Step 9: Slice & Serve
Use a sharp knife to cut through the rolls gently, revealing layers of cheesy goodness inside. Serve warm or at room temperature. They look stunning on a plate with a scattering of herbs and a drizzle of extra balsamic. These are perfect with a side of roasted veggies or a fresh salad.
What to Serve It With
Oh, the options are endless! For breakfast, pair these eggplant rolls with a fresh coffee and maybe a sliced fruit bowl—think of them as a veggie breakfast burrito in disguise! You could also serve them as a lovely brunch centerpiece, accompanied by a sparkling water or a light white wine. As an elegant appetizer, arrange these on a platter with some olives and crusty bread, and I promise they’ll impress even the pickiest guests.
When I want something more casual, I warm them up and serve them alongside a big green salad—maybe with a lemon vinaigrette—and some crusty French bread on the side. And if I have leftovers, they reheat beautifully in the oven, keeping that melty cheese and tender eggplant intact. Honestly, my family often asks for seconds—it’s become a staple in our house.
Top Tips for Perfecting Your Eggplant Rolls
Few things can go wrong with this recipe if you keep a few tricks in mind. First, don’t skip the salting step. I learned this after making a batch that tasted too bitter—salting and waiting for about 10 minutes really drew out excess moisture and bitterness. Then, pat them dry before baking—wet slices won’t brown properly. When it comes to assembling, don’t be shy with the filling! I always mound a little extra on each slice—more cheese equals more yum.
For the swirling or layering, take your time. A neat twist makes the presentation shine, but honestly, even rustic rolls will taste just as good. If you want crunch, sprinkle some breadcrumbs over the top before baking or broil for a minute at the end. As for ingredient swaps, I’ve tried goat cheese, feta, and even ricotta mixed with herbs—each one adds a different personality. My personal favorite? The classic combination of mozzarella and basil—it’s simple but always hits the spot.
Oven temp is key: start with 400°F, but if your rolls browns too quickly, turn down to 375°F next time. The goal? Melted cheese, tender eggplant, and a little crispy edge. For the glaze, high-quality balsamic really makes the dish shine—don’t skimp! And remember, practice makes perfect; don’t be discouraged if your first batch isn’t picture-perfect. The taste will still steal the show.
Storing and Reheating Tips
Leftovers? I’ve got you covered. These eggplant rolls keep well in the fridge for up to 3 days, stored covered in airtight containers. To reheat, I like to pop them in a 350°F oven for about 10 minutes. Microwaving is quicker but can soften the cheese more than I like, so oven is better if you want that crispy top. If you want to freeze them, place the rolls in a single layer on a tray until frozen, then transfer to a zip-top bag. They’ll stay good for about 2 months. Thaw in the fridge overnight, then reheat as suggested.
If you’re using the glaze, I recommend adding it after reheating—this keeps the shine and flavor fresh. Warm all the way through, and they’ll taste almost as good as day one. I’ve tested this with different fillings and toppings, so feel free to get creative with what you store and serve!
Frequently Asked Questions
Final Thoughts
This dish has become a go-to at my house because it’s an elegant, flavorful way to enjoy eggplant without all the fuss. Every time I make these eggplant rolls, I’m reminded how a handful of simple ingredients—eggplant, cheese, herbs—can transform into something truly special. They’re perfect for making ahead, serving at gatherings, or just treating yourself to a cozy dinner. I love how customizable they are—mix up the cheeses, add your favorite herbs, or sneak in some veg for extra nutrition. If you’re new to cooking eggplant, these rolls will give you the confidence to experiment with other stuffed vegetables, too. I can’t wait to hear how yours turn out—so don’t forget to leave a comment or share your own twists! Happy baking, and may your kitchen always smell like home and happiness.
Eggplant Rollups with Ricotta and Marinara
Ingredients
Method
- Preheat oven to 400°F and lightly grease a baking dish.
- Slice eggplants into 1/4-inch thick slices. Salt and let sit for 10 minutes, then pat dry.
- Brush slices with olive oil and roast for 8 minutes, flip, then roast for another 5 minutes until tender. Cool.
- In a bowl, mix ricotta, feta, mozzarella, Parmesan, garlic, eggs, salt, and pepper.
- Spread marinara on the bottom of the dish. Divide cheese mixture among eggplant slices and roll up, placing seam side down in the dish.
- Top with remaining marinara sauce and sprinkle with remaining mozzarella and Parmesan.
- Cover with foil and bake for 30 minutes. Remove foil and bake another 15 minutes until bubbly and browned.
- Let stand for 10 minutes before serving.