Easy Oven-Baked Pancakes Recipe
There’s this magical thing I do every weekend that instantly takes me back to my childhood — I whip up a batch of Dutch baby pancakes. My mom used to make these on lazy Sunday mornings, filling the house with that warm, buttery aroma that just makes everyone’s stomach rumble in anticipation. Honestly, it’s the kind of dish that feels fancy enough for weekend guests but is so easy you can throw it together on a hurried weekday too. My kids ask for this all the time, especially when we’re craving something sweet but don’t want to fuss with complicated recipes. The best part? It’s a showstopper, all puffed up and golden in the oven, yet it’s built on simple ingredients you probably already have in your pantry. I always do this when I want comfort food that feels special — trust me, once you try it, it’s going to be your go-to too. And no, it’s not a pancake in the traditional sense — think of it as a baked pancake that wears a crispy edge like a crown and gives you more than enough for everyone around the table.
What is Dutch Baby Pancakes?
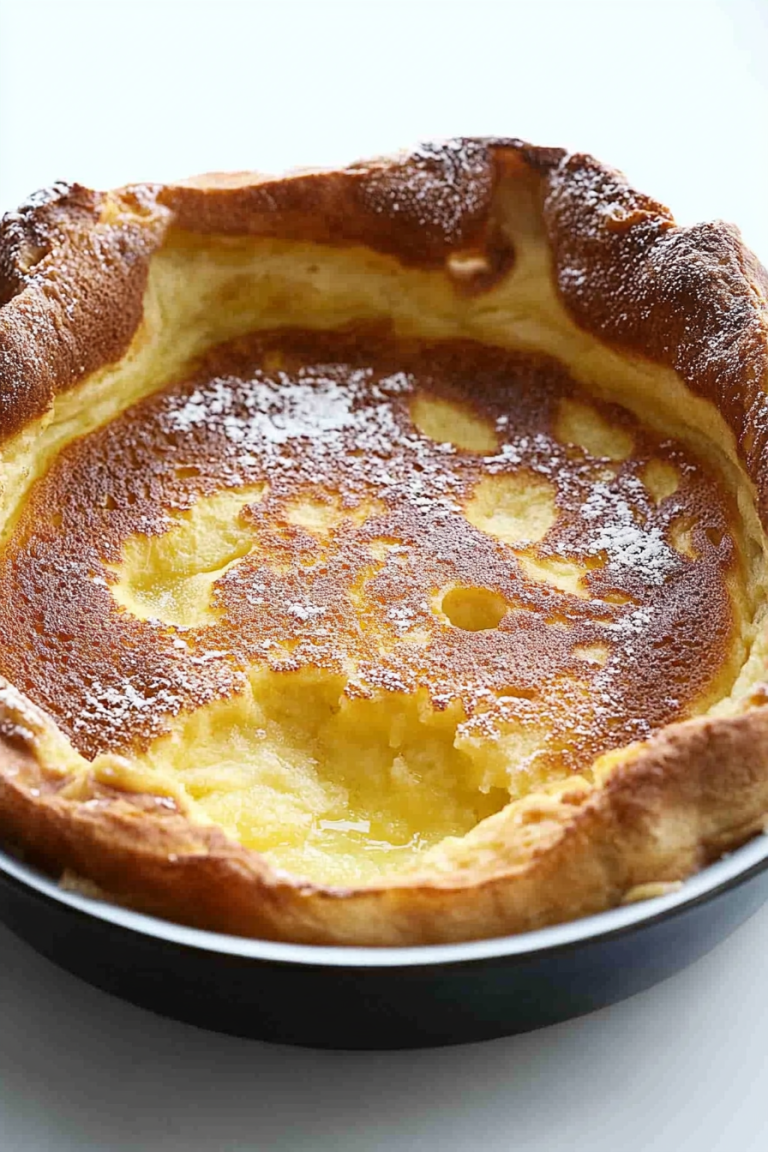
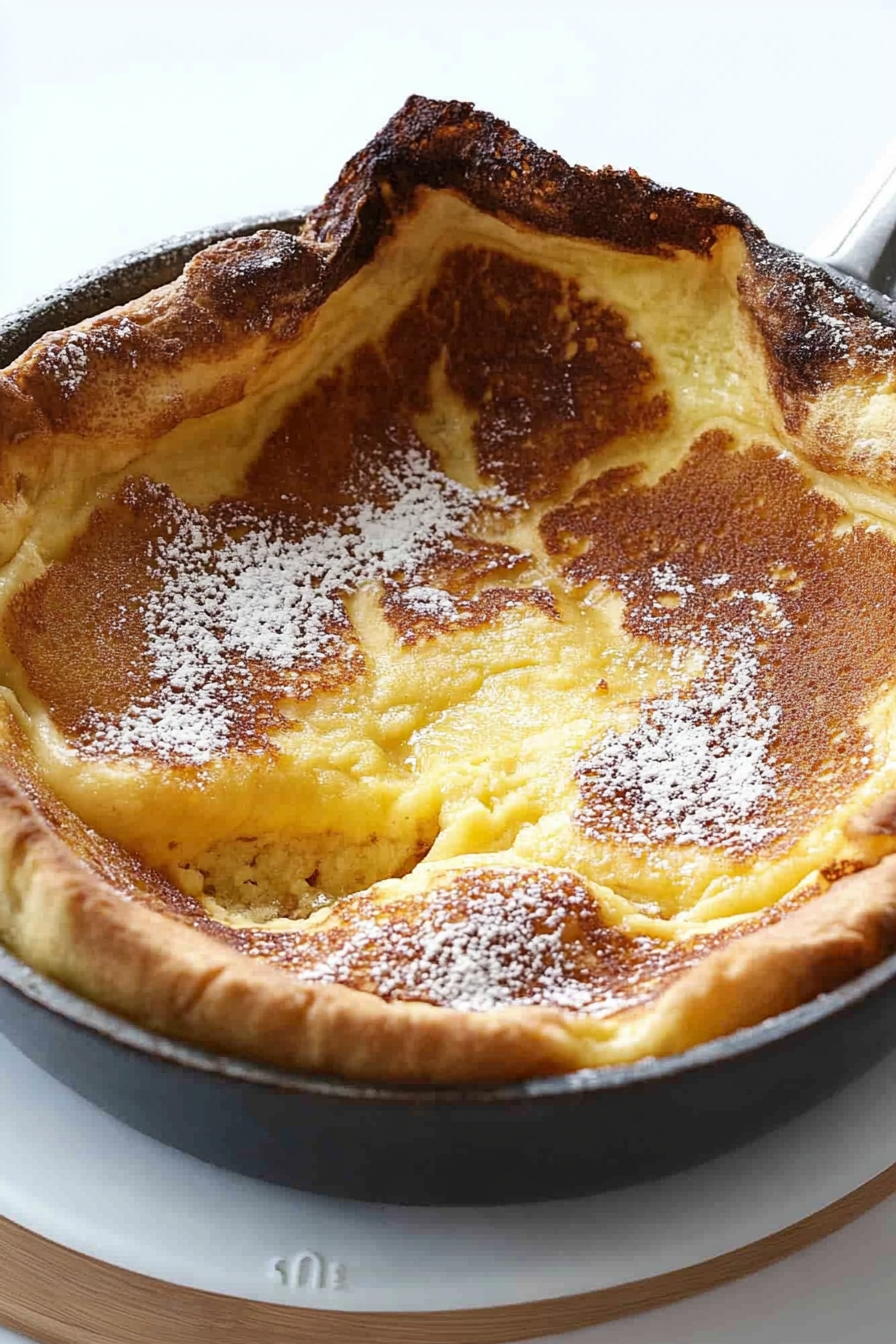
Think of Dutch baby pancakes as a cross between a fluffy popover and a thin, crispy-edged pancake. It’s essentially a large, oven-baked pancake that puffs up dramatically as it bakes, then settles into a tender, custardy center. The name “Dutch baby” is a bit of a mystery — some folks say it’s because of its German roots, while others believe it’s just a fun marketing name from the early 20th century. Whatever its origins, it’s become a beloved brunch classic, loved for its impressive rise and versatile toppings. The batter is straightforward — a simple mix of flour, eggs, milk, and a little sugar, with a generous pinch of salt. Once it hits the hot oven, magic happens: the heat causes the batter to rise and puff, creating that cloud-like appearance that makes everyone stare in awe. It’s fun to watch, and even more fun to eat, especially when topped with fresh berries, a drizzle of syrup, or a dusting of powdered sugar.
Why you’ll love this recipe?
What I love most about Dutch baby pancakes is how they manage to be both indulgent and effortless. The flavor? Oh, they’re buttery, slightly sweet, with that rich eggy custard inside. And the texture — crispy around the edges and soft in the middle — is just heaven. This dish is a real crowd-pleaser; my family always asks for seconds, and friends are always impressed when I serve it up hot out of the oven. Plus, it’s incredibly versatile: you can add fruit, chocolate, lemon zest, or even savory toppings like cheese and herbs for a twist. What’s more, it’s budget-friendly and uses pantry staples, so I can whip one up on a lazy weekend or a busy weekday morning without much fuss. Honestly, this dish never fails — it’s a bit of a “kitchen magic” moment every time. It’s perfect if you want to impress with minimal effort or just treat yourself to something special without spending hours at the stove. It’s one of those recipes where I know I can rely on the outcome every single time, which makes it a true kitchen favorite.
How do I make Dutch Pancakes?
Quick Overview
This recipe is all about simplicity and wow factor. You blend some basic ingredients into a smooth batter, pour it into a hot, buttered skillet, then bake until it’s puffed and golden. The trick is making sure your oven and skillet are preheated so that the batter hits that blazing hot surface and rises like a dream. Once baked, you top it with whatever your heart desires — ripe berries, a squeeze of lemon, a sprinkle of cinnamon, or a drizzle of maple syrup. It’s so easy, yet it looks impressive enough to serve to friends or family on a lazy Sunday morning. Plus, cleanup is a breeze — just one pan, one bowl, and you’re done. What makes this method special is that it’s largely hands-off once it’s in the oven, leaving you free to enjoy your coffee, set the table, or chase after a little one while it bakes to perfection.
Ingredients
For the Main Batter:
– 3 large eggs (preferably farm fresh for richness)
– ¾ cup all-purpose flour (or a gluten-free blend, see tips)
– ¾ cup milk (whole milk gives the best creaminess, but I’ve tested with almond milk and it’s just as good!)
– 2 tablespoons sugar (optional but adds nice sweetness)
– ½ teaspoon vanilla extract (for that warm aroma)
– A pinch of salt
For the Filling:
– Fresh berries (blueberries, strawberries, or raspberries)
– Sliced bananas or peaches
– Nutella or jam for a decadent twist
– Whipped cream or yogurt — optional but worth aiming for!
For the Glaze:
– Powdered sugar mixed with a little milk or lemon juice
– Pure maple syrup or honey
– Cinnamon-sugar for a crunchy finish
Step-by-Step Instructions
Step 1: Preheat & Prep Pan
Start by heating your oven to 425°F (220°C). While it warms up, place a large, oven-safe skillet (cast iron works beautifully) in the oven to get hot. Once the oven hits temp, carefully remove the hot skillet and add a tablespoon of butter, letting it melt and foam. Swirl it around to coat the bottom and sides — this will help the pancake puff up and brown beautifully.
Step 2: Mix Dry Ingredients
In a small bowl, whisk together the flour, sugar (if using), and salt. This ensures the dry ingredients are evenly combined, which helps avoid clumps in your batter. It’s a tiny step that makes a big difference for that smooth, silky texture.
Step 3: Mix Wet Ingredients
In another bowl, beat the eggs until they’re a little frothy, then add the milk, vanilla, and any other flavorings. I always do this by hand or with a whisk — you want everything to be well blended and frothy, like a light custard.
Step 4: Combine
Pour the wet mixture into the dry ingredients, then gently stir until just combined. Don’t overmix — a few lumps are fine. Overmixing can make the pancake dense instead of airy, and overload the gluten.
Step 5: Prepare Filling
If you’re adding fruit or other fillings, prep them now. Sliced berries or bananas work great. For a more decadent flavor, smear a little Nutella or jam in the batter before baking, so it creates pockets of sweet goodness inside.
Step 6: Layer & Swirl
Once your skillet is nice and hot, pour the batter in. If you want a marbled look with fruit, add spoonfuls of filling on top and swirl with a toothpick or skewer. This creates a beautiful pattern and ensures every bite has a bit of flavor.
Step 7: Bake
Slide your skillet into the oven and bake for about 20-25 minutes. You’ll know it’s done when it’s puffed up, golden brown around the edges, and a toothpick inserted in the center comes out clean. Keep an eye out for those beautiful cracks and the irresistible aroma—trust me, your whole house will smell like breakfast heaven.
Step 8: Cool & Glaze
Let it sit for a minute or two after baking — it will settle slightly. Then, sprinkle with powdered sugar or drizzle with syrup while it’s still warm. If you prefer a crunchier top, add your glaze after cooling a bit. I love letting it rest just enough so the inside stays tender and custardy.
Step 9: Slice & Serve
It’s easiest to slice into wedges with a sharp knife. Serve directly from the skillet for a rustic look, or carefully transfer to a platter. Add extra toppings like whipped cream, fresh fruit, or a drizzle of honey. And don’t forget to take a moment to enjoy that first, steamy, bubbling bite — it’s pure comfort in every forkful.
What to Serve It With
This dish is pretty versatile, so I’ve got a few favorites. For breakfast, it pairs perfectly with a strong cup of coffee or a glass of fresh orange juice — it’s like a warm hug to start the day. My kids love it with a sprinkle of powdered sugar and extra syrup, sitting around the table in pajamas, still half-asleep but happy. When it’s brunch time, I like to add a dollop of Greek yogurt and some extra berries, maybe a squeeze of lemon for a bit of zing. For dessert, it’s fantastic topped with whipped cream and toasted almonds, or even a dusting of cinnamon sugar for a cozy touch. Sometimes, I serve slices with a scoop of vanilla ice cream — it’s seriously decadent and makes for a memorable treat. And honestly, it’s a lifesaver on busy nights when you want something warm and satisfying without turning on your whole stove — just reheat gently and add your toppings.
Top Tips for Perfecting Your Dutch Baby Pancakes
After making these dozens of times, I’ve picked up a few tricks to get them just right every time. First, make sure your skillet is *really* hot before pouring in the batter — that’s what gives it those gorgeous, crispy edges and that impressive rise. I learned this the hard way, trying to bake it in a slightly cooler oven and ending up with a flatter pancake. For the batter, I always sift the flour into the wet mixture to avoid lumps and keep it silky smooth. If you want to make it gluten-free, I suggest a 1:1 gluten-free flour blend — it works well, but just know the texture may be slightly different. When layering fillings, avoid overloading the batter — a few spoonfuls strategically placed give a more elegant look and evenly distributed flavor. Finally, don’t open the oven door during the first 15 minutes — sudden temperature drops can deflate your puff! For the glaze, I sometimes mix a splash of lemon juice into powdered sugar to give it a tangy twist, or sprinkle cinnamon beforehand for extra warmth. Trust me, a little experimentation with these tips will take your Dutch baby to the next level. The key is patience and a little bit of love — results are almost always spectacular.
Storing and Reheating Tips
If you happen to have leftovers (though honestly, it’s rare at my house), store any cooled slices in an airtight container in the fridge for up to two days. Reheat in the oven at 350°F for about 10 minutes until warm and crispy around the edges. Microwaving works in a pinch but can make it soggy, so I prefer the oven or toaster oven. If you want to save the batter for later, you can keep it in a sealed jar in the fridge for up to 24 hours, giving it a quick stir before pouring into the skillet. For frozen leftovers, wrap slices tightly, then freeze for up to a month. Thaw overnight in the fridge, then reheat in the oven. Just remember to top with fresh fruit or a drizzle of syrup once reheated — it’s amazing how even day-old Dutch baby can taste just as delightful with a few fresh touches. I’ve tested different storage methods, and the key is preventing moisture loss — keeping it covered is a game-changer. The flavor sometimes deepens overnight, too, making it a nice future snack or breakfast with minimal fuss.
Frequently Asked Questions
Final Thoughts
There’s just something endlessly charming about a Dutch baby pancake bubbling up in the oven, filling your home with irresistible smells. It’s the kind of dish that always makes me pause and smile — a little bit of surprise, a lot of comfort, and endless possibilities for toppings and flavors. Once you’ve made it a few times, you’ll see how forgiving and adaptable it is. I love experimenting with fruit, spices, or even savory ingredients to keep things interesting. It’s also a wonderful way to turn an ordinary morning into a special occasion, or to impress guests with minimal effort. If you haven’t tried making one yet, I urge you — do it this weekend. The first puff is always a thrill, and I promise it will disappear off the plate in minutes at my house. Happy baking! Can’t wait to hear how yours turns out — and don’t forget to leave a comment with your favorite toppings or tweaks. Cheers to cozy mornings and homemade magic!
Dutch Baby Pancakes
Ingredients
Method
- In a blender, combine eggs, milk, flour, sugar, and vanilla. Mix just until all ingredients are incorporated. Let the batter rest as you preheat the oven and heat up the skillet.
- Place a cold, 9-inch oven-safe skillet into the oven. Preheat the oven, with the skillet, to 425°F.
- Once the oven is preheated, carefully remove the hot skillet from the oven and add butter.
- After the butter has melted, pour the batter into the skillet and place it back into the oven to bake for 20 minutes.
- Serve warm, dusted with confectioners' sugar.
- Optional toppings: syrup, fresh fruit, cinnamon, sugar, peanut butter, jams, etc.