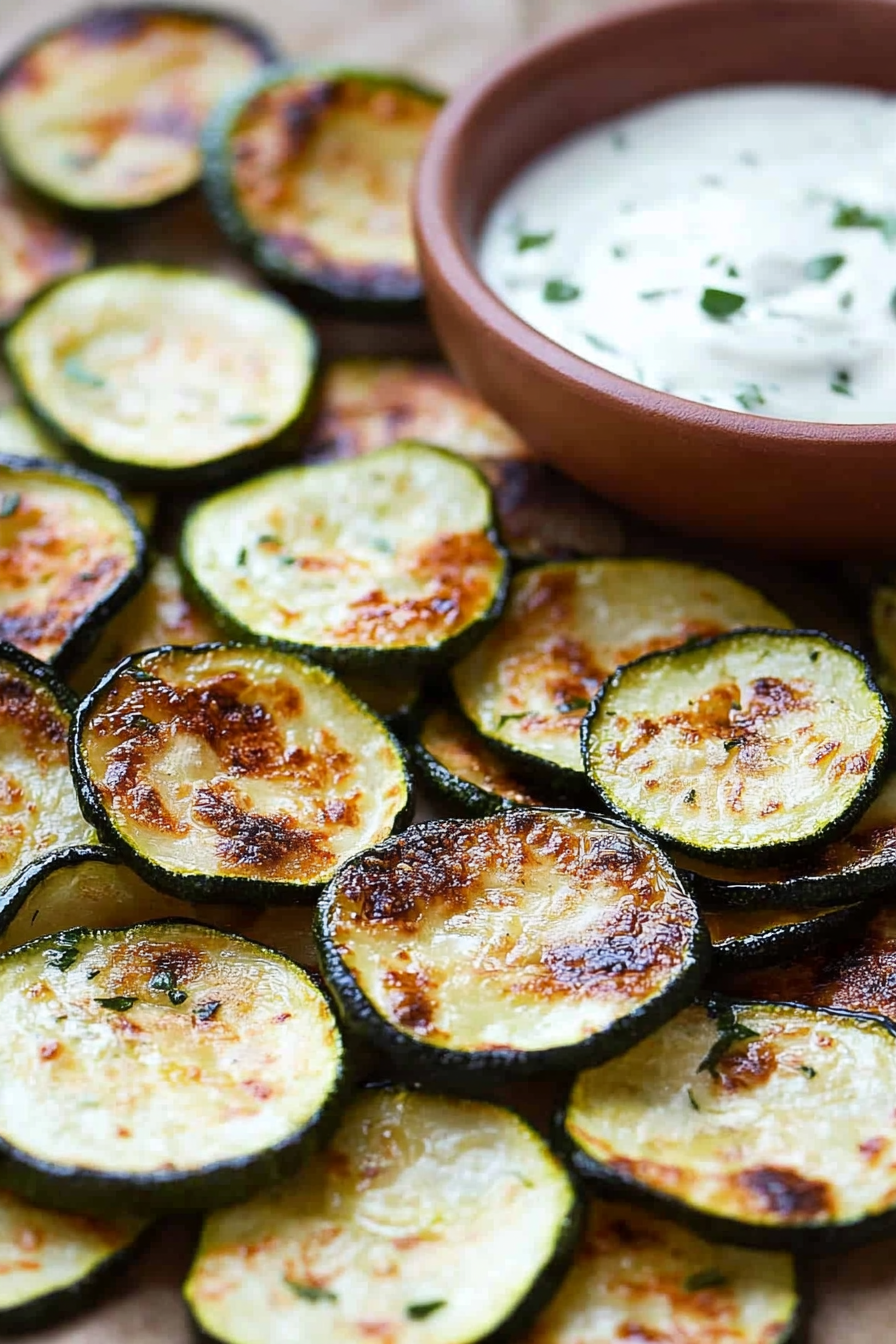
Easy Zucchini Crisps How to Make Them
Growing up, I always remember the smell of crispy snacks baking in the oven on lazy weekend afternoons. My mom would slice up zucchini from our garden, and the whole house would fill with this warm, inviting aroma — savory, slightly cheesy, and just a little addictive. Honestly, I used to think those were the best snacks ever, and even now, years later, whenever I make zucchini chips, I get that same nostalgic feeling. They’re surprisingly simple to whip up, healthy, and totally addictive — I swear, my kids ask for these all the time! It’s funny how something so humble as zucchini can turn into such a crispy, flavorful treat. And trust me, once you get the hang of it, this recipe becomes one of those go-to snacks that’s perfect on busy nights or when you’re craving something crunchy but don’t want to reach for chips. Plus, it’s a sneaky way to get your kids to eat more veggies without them even realizing it. I always do this when I need a quick, satisfying snack, and it never disappoints.
What is Zucchini Chips?
Think of zucchini chips as the healthy, slightly savory cousin of potato chips. They’re thin slices of zucchini that are baked or fried until crispy — crunchy enough to crunch on, but with a tender, slightly chewy interior. The idea is pretty simple: slice fresh zucchinis super thin, season them with a little salt and spice, then bake or fry until golden and crisp. It’s essentially a way to turn zucchini into a satisfying snack, and honestly, once you taste how good they are, you’ll want to make them on repeat! The name “zucchini chips” makes it clear: these are snackable, shareable, and perfect for popping into your mouth with a cold glass of lemonade or your favorite dip. And because they’re baked rather than fried, they’re kind of the guilt-free version of your favorite crunchy snack. What I love most about zucchini chips is how versatile they are — you can go sweet or savory with toppings, spices, or dips, making them suitable for all kinds of tastes and occasions.
Why you’ll love this recipe?
There are so many reasons why zucchini chips have become one of my all-time favorite snacks. First, the flavor — that nutty, slightly sweet zucchini just shines through once it’s baked to perfection, especially when you add a sprinkle of sea salt, cumin, or chili powder. It’s like a clean, fresh kind of crunch that’s seriously addictive. What I love most about this is how incredibly simple it is — you only need a handful of ingredients, and you can have these crispy bites ready in under 30 minutes. Seriously, I’ve made this countless times when I need a quick snack or when I have friends over and want something homemade and impressive. Plus, they’re budget-friendly — zucchinis are usually super cheap, and all you need are some basic spices and a little oil. The versatility is another bonus: you can swap out the seasonings to match your mood, dip them into hummus or sour cream, or even sprinkle with Parmesan if you’re feeling fancy. These make a great appetizer, a side dish, or just a snack for when the kids demand something crunchy after school. What I love most about zucchini chips is how well they fit into healthy eating plans, but without sacrificing flavor or crunch. They’re a perfect guilt-free indulgence that’s easy to make and even easier to enjoy.
How do you make Zucchini Chips?
Quick Overview
Making zucchini chips is blissfully straightforward. You start with fresh zucchinis—preferably organic if you can find them—slice them thin, season them with your favorite spices, and bake until they’re crispy and golden. The key here is thin slicing and even spacing on your baking sheet to ensure they cook evenly. No deep-frying means you get a healthier snack that’s just as satisfying. It’s perfect for when you want something crunchy but don’t want to fuss over complicated ingredients or lengthy prep. Honestly, once you master this simple method, you’ll find yourself reaching for zucchini on your grocery list just to make these snacks on the regular.
Ingredients
For the Main Batter:
– 2 large zucchinis (about 1 pound), sliced into very thin rounds (a mandoline makes this easier!)
– 2 tablespoons olive oil or avocado oil
– 1 teaspoon sea salt
– Optional: ½ teaspoon smoked paprika, chili powder, garlic powder, or your favorite seasoning blend
For the Filling:
– Not necessary for the basic version, but if you want extra flavor, try a sprinkle of grated Parmesan or a dusting of nutritional yeast before baking.
For the Glaze:
– If you like a little sweetness or extra flavor, mix honey, nutritional yeast, or even a splash of lemon juice for a light glaze after baking. This is totally optional and more for inspiration than necessity!
Step-by-Step Instructions
Step 1: Preheat & Prep Pan
Preheat your oven to 375°F (190°C). Line a large baking sheet with parchment paper or a silicone baking mat. This will help keep the zucchini from sticking and make cleanup a breeze. The oven temp isn’t crazy hot, but enough to get a good crunch without burning — trust me, oven timing is everything here!
Step 2: Mix Dry Ingredients
In a small bowl, combine salt, and your chosen spices or seasonings. Mix well so they’re evenly distributed. This way, every bite will have a nice balanced flavor, and it’s especially helpful if you want to customize the seasoning for different moods or occasions.
Step 3: Mix Wet Ingredients
In a larger bowl, toss your sliced zucchini with the oil, making sure every piece is lightly coated. This helps achieve that crispy exterior. Add the seasoning mixture and toss again—don’t be shy, coat each piece evenly. I always do this with my hands, so I can feel if some slices need more oil or seasoning.
Step 4: Combine
Spread the coated zucchini slices in a single layer on your prepared baking sheet. Make sure they don’t overlap — crowding them is a common mistake and can lead to soggy chips. Once layered properly, pop them into the oven. Give them a little shake halfway through baking to encourage even crispiness.
Step 5: Prepare Filling (Optional)
If you want extra flavor, sprinkle grated Parmesan or your favorite cheese substitute on top during the last 5 minutes of baking. This adds an awesome cheesy crunch that’s totally homemade.
Step 6: Layer & Swirl
For a little visual fun, you can swirl a teaspoon of pesto or spices into the slices before baking, creating marbled, flavorful chips. It’s purely optional, but it adds a nice pop of color and flavor, especially for entertaining.
Step 7: Bake
Bake for 15-20 minutes, flipping the slices halfway through so they brown evenly. Keep an eye on the oven — they can go from crispy to burnt in a flash. The chips are done when they’re golden around the edges and feel crispy when you lift them. If they still seem a little soft, give them a few more minutes, but be cautious not to let them overcook.
Step 8: Cool & Glaze
Remove from oven and let the zucchini chips cool on a wire rack for a few minutes. They will crisp up even more as they cool, and this step really makes a difference. If you’re adding a glaze or honey drizzle, do so now — just a light splash or a quick brush, and serve immediately for the best crunch.
Step 9: Slice & Serve
Once cooled and glazed if you wish, slice into smaller pieces if large, or serve whole as a snack. These look lovely stacked on a pretty plate or in a bowl. They’re best enjoyed the day they’re made, but I’ve found they keep pretty well overnight — just store in an airtight container and re-crisp in a warm oven for 5 minutes if needed.
What to Serve It With
Honestly, zucchini chips are such a versatile snack, they go with pretty much everything. Here are some ideas that always work at my house:
- For Breakfast: Pair with scrambled eggs and a dollop of salsa. They add just the right crunch to your morning plate.
- For Brunch: Serve alongside a fresh vegetable frittata and some fruit salad. Sprinkle a few herbs or a drizzle of balsamic for extra flair.
- As Dessert: Believe it or not, a sprinkle of cinnamon sugar transforms these into a sweet treat. Serve them with yogurt or vanilla ice cream for a fun twist.
- For Cozy Snacks: Pair with hummus, guacamole, or a tangy yogurt dip. They’re perfect for movie nights or after-school munching. My family loves these with a cold glass of iced tea or lemonade on the side.
Over time, I’ve experimented with different toppings and dips — a sprinkle of chili lime seasoning, a touch of nutritional yeast, or even a light drizzle of honey. They’re so forgiving and adaptable, which makes them a real staple in my snack arsenal.
Top Tips for Perfecting Your Zucchini Chips
With a little practice, you’ll be turning out perfect, crispy zucchini chips every time. Here are some of my personal lessons learned:
- Zucchini Prep: Always slice as thin as possible — a mandoline slicer makes this so much easier and ensures even cooking. Moisture is the enemy of crispiness, so I always pat the slices dry with a paper towel after slicing. If your zucchinis are extra watery, sprinkle them with a tiny bit of salt and let them sit for 5 minutes, then pat dry again. This step really makes a difference in getting that perfect crunch.
- Mixing Advice: Avoid overmixing your seasoning — just toss gently to coat. Overmixing can lead to soggy chips or uneven seasoning.
- Swirl Customization: For stunning marbling, try swirling small dots of pesto or melted cheese into the slices before baking. It’s a fun way to add flavor and visual appeal.
- Ingredient Swaps: Don’t hesitate to experiment with different spices — cumin, curry powder, smoked paprika, or even nutritional yeast for a cheesy flavor. I’ve tested all these and loved the results!
- Baking Tips: Oven positioning matters — middle rack is best for even heat. Keep a close eye around the 15-minute mark; every oven is a little different. And remember, they continue to crisp as they cool, so don’t overbake!
- Glaze Variations: You can add a teaspoon of honey or lemon juice to your glaze for a subtle sweet and tangy flavor. For a smoky touch, sprinkle smoked paprika just before baking.
This recipe has been a real journey of trial and error for me. I learned to slice thinner, to watch the baking time like a hawk, and to get creative with seasonings. Now, I feel confident I can whip up a batch even on my busiest nights. The key is patience and tasting as you go. Trust me, these are addictive enough to make your house smell amazing and leave everyone asking for seconds.
Storing and Reheating Tips
These zucchini chips are best enjoyed fresh, but if you’ve made extras, here’s how to keep them as crispy as possible:
- Room Temperature: Store in an airtight container for up to 24 hours. Keep in mind they’ll lose some crispness over time, so best enjoyed the same day.
- Refrigerator Storage: Keep in a sealed container for 2-3 days. Reheat in a warm oven or toaster oven for 5 minutes to revive the crunch.
- Freezer Instructions: I don’t recommend freezing baked zucchini chips, as they tend to get soggy upon thawing. Better to make a fresh batch when cravings hit.
- Glaze Timing: If you plan to add a sweet glaze or honey drizzle, do so immediately before serving. This prevents sogginess and keeps the glaze from making the chips sticky.
Honestly, just try to enjoy them within a day or two for the best crunch. And for maximum freshness, avoid stacking them too tightly — give each chip a little space!
Frequently Asked Questions
Final Thoughts
Honestly, I can’t recommend these zucchini chips enough. They’re easy to whip up, totally customizable, and satisfy that craving for something crunchy without any guilt. Over the years, they’ve become a staple in my kitchen for everything from quick snacks to party appetizers. There’s something about slicing zucchini into thin rounds, seasoning them just right, and watching them turn into crispy bites that makes me happy. Plus, they’re an excellent way to sneak more vegetables into your day, especially when you have picky eaters at home — my kids ask for seconds every time! So, if you’re looking for a versatile, healthy, and ridiculously tasty snack, give this recipe a try. And don’t forget to share your variations or tips in the comments; I love hearing how everyone makes their own twist on these. Happy baking — I can’t wait to hear how yours turns out!
Crunchy Zucchini Chips
Ingredients
Method
- Preheat the oven to 425°F. Line a baking sheet with parchment paper.
- Slice the zucchini into 1/8-inch thick rounds and place in a mixing bowl.
- In a small bowl, combine oregano, garlic powder, salt, and black pepper.
- Sprinkle the seasoning mixture over the zucchini slices and toss to coat evenly.
- Place the seasoned zucchini slices in a single layer on the prepared baking sheet.
- Bake for 12-15 minutes, flipping halfway through, until crispy and golden brown.
- Serve immediately as a healthy snack or side dish.