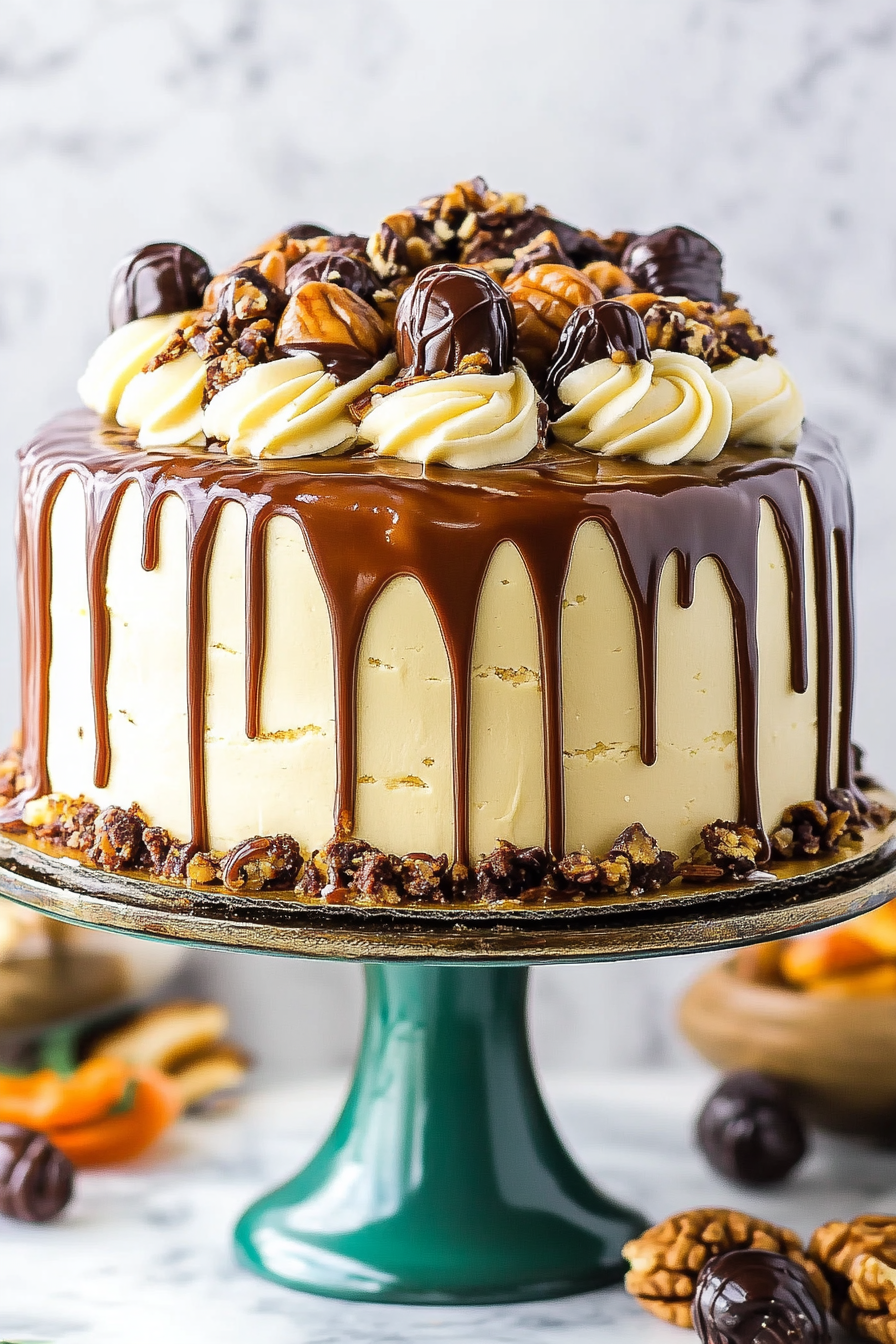
How to Make Caramel Turtle Cake
There’s something about a slice of turtle cake that just melts all the stress away. I remember the first time I tasted one at my aunt’s house—rich, velvety chocolate swirling with caramel and crunchy pecans, all layered into a dreamy dessert that felt as indulgent as a special occasion, but honestly, it’s simple enough to make any weekend. My kids ask for this all the time, especially when I want to surprise them with something special but don’t want to spend hours in the kitchen. The smell alone—deep chocolate and sweet caramel—fills the house and practically calls everyone to the table. It’s one of those recipes that’s become a family favorite, a crowd-pleaser, and a little slice of nostalgia wrapped up in cake form. Trust me on this—once you try this turtle cake, it’ll be your go-to for birthdays, potlucks, or just because you deserve something sweet after a long day. You’ll love how easy it is to whip up and how utterly decadent every bite tastes.
What is a turtle cake?
Think of turtle cake as your favorite candy bar—only in cake form! It’s essentially a luscious chocolate layer cake topped with a caramel-Hazelnut or pecan filling, all finished with a glossy chocolate ganache or drizzle. The name “turtle” comes from the classic turtle candy—those chewy caramel centers, crunchy pecans, and silky chocolate all rolled into one, which perfectly describes this cake’s flavor profile. It’s a dreamy combo of bittersweet chocolate, gooey caramel, and salty nuts—really, what’s not to love? The beauty of turtle cake is how it balances richness with a touch of crunch and sweetness, making every forkful a little celebration. Think of it as the kind of dessert that feels fancy but is actually oh-so-easy to make at home. I love that it’s versatile, too—you can swap out nuts, use different chocolates, or add a splash of sea salt if you’re feeling fancy.
Why you’ll love this recipe?
What I love most about this turtle cake is how every bite combines textures and flavors that make your taste buds sing. The chocolate cake itself is moist and tender—almost like biting into a cloud of chocolate perfection. Then, there’s the caramel layer, which is rich and sticky—like the luscious center of a turtle candy, but better because it’s baked right into your cake. And the crunch of toasted pecans? Absolute perfection. Plus, this recipe is surprisingly simple. No complicated techniques, just a few pantry staples and a bit of assembly, which makes it perfect for busy weeknights or impromptu gatherings. Budget-wise, it’s friendly, too—no fancy ingredients needed. You might already have everything in your kitchen. I’ve made this countless times, and it never fails to impress. I also love how customizable it is—swap out pecans for walnuts or hazelnuts, use dark or milk chocolate, and even experiment with different caramel fillings. This is the kind of dessert that makes everyone coming back for seconds, and honestly, I think it’s a little bit of heaven on a plate.
How do I make a turtle cake?
Quick Overview
This cake is a layered affair—begin with a simple, moist chocolate cake baked in two rounds. Meanwhile, prepare a rich caramel filling with toasted nuts, then spread that between the cake layers. Finish with a shiny chocolate ganache or drizzle on top, and sprinkle with extra pecans for crunch. The process is straightforward: bake, cool, fill, decorate, and enjoy. What makes it special is how each component complements the others—think of it as a layered indulgence that’s easier to make than it looks. Plus, you can make it the day before, which is a lifesaver on busy days.
Ingredients
For the Main Batter:
– 1 34 cups all-purpose flour (I always opt for unbleached for a richer flavor)
– 2 cups granulated sugar (because, sweetness!)
– ¾ cup unsweetened cocoa powder (the good stuff, natural or Dutch-processed)
– 1 ½ teaspoons baking powder
– 1 ½ teaspoons baking soda
– ½ teaspoon salt
– 2 large eggs (or flax eggs for a vegan twist)
– 1 cup whole milk (or almond milk, I sometimes do this and it’s just as creamy!)
– ½ cup vegetable oil
– 2 teaspoons vanilla extract
– 1 cup boiling water (makes the batter incredibly tender and moist)
For the Filling:
– 1 cup caramel sauce (store-bought or homemade; I like to make my own when I have time)
– 1 cup toasted pecans (roughly chopped; I toast them at 350°F for about 8 minutes to amp up the flavor)
– A pinch of sea salt (if you’re using store-bought caramel, just sprinkle a little on top)
For the Glaze:
– 1 cup semi-sweet chocolate chips
– ½ cup heavy cream (or coconut cream for dairy-free)
– Optional: a teaspoon of butter or vanilla for extra shine and flavor
Step-by-Step Instructions
Step 1: Preheat & Prep Pan
Set your oven to 350°F (175°C). Grease two 9-inch round cake pans with butter and lightly dust with cocoa powder or flour. Lining the bottoms with parchment makes it even easier to turn out the cakes later. I always do this because, trust me, it saves a lot of frustration when slicing.
Step 2: Mix Dry Ingredients
In a large bowl, whisk together the flour, sugar, cocoa powder, baking powder, baking soda, and salt. I’ve learned the hard way to sift the cocoa—makes for a smoother batter and avoids lumps. This step gives you a nice, uniform dry mix that’s ready for the wet ingredients.
Step 3: Mix Wet Ingredients
In a separate bowl, whisk together eggs, milk, oil, and vanilla until smooth. I like to do this by hand—no electric mixer needed! Once combined, add the boiling water slowly while stirring. The batter will be thin—that’s exactly what you want for a super moist cake.
Step 4: Combine
Pour the wet into the dry ingredients and gently fold until just combined. Overmixing can make the cake dense, so I do this until I see no dry flour but try not to beat the batter to death. It’s okay if a few lumps remain—that helps keep it tender.
Step 5: Prepare Filling
While the batter’s resting, toast your pecans and prepare your caramel. If you’re using store-bought caramel, just have it warmed or at room temperature. Mix the caramel with the chopped pecans and a tiny pinch of salt if needed. This combo adds that irresistible crunch and gooey sweetness.
Step 6: Layer & Swirl
Divide the batter evenly between the two pans. Bake for about 30-35 minutes, or until a toothpick inserted in the center comes out clean. Let the cakes cool in the pans for 10 minutes, then turn out onto wire racks. Once cooled, spread a generous layer of caramel and pecans on top of one layer, then top with the second cake. If you want a visual swirl, spread the caramel in the middle and gently swirl with a toothpick before adding the top layer.
Step 7: Bake
Baking time can vary slightly based on oven accuracy and pan size. Keep an eye out around the 30-minute mark. The cakes should feel firm on top but still springy. Let them cool completely before frosting or glazing to prevent melting.
Step 8: Cool & Glaze
In a small saucepan, heat the heavy cream until just simmering, then pour over the chocolate chips. Let sit for a minute, then stir until glossy and smooth. Pour or spread this chocolate glaze over the cooled cake, letting it drip down the sides for that irresistible look. Sprinkle with a few leftover pecans on top for extra crunch and visual flair.
Step 9: Slice & Serve
Use a serrated knife to get clean slices—warm water between cuts helps with tidy slices. Best eaten slightly room temperature, so I recommend letting it sit out for about 15 minutes before serving. Perhaps a little extra caramel drizzle on top? Yes, please. This cake looks just as pretty on a platter as it tastes, and trust me, the leftovers (if there are any) stay delicious for a couple of days stored in a covered container.
What to Serve It With
This turtle cake is pretty much a star on its own, but I love pairing it with a scoop of vanilla ice cream or a drizzle of extra caramel syrup for a decadent dessert. For breakfast or brunch, serve a small slice with a cup of strong coffee—it’s rich enough to satisfy that sweet tooth first thing in the morning. My family loves it as a casual weekend treat with a glass of milk, especially when we’re all gathered around the kitchen island. If you’re serving it at a celebration, add a few fresh berries or a dusting of cocoa powder for a touch of elegance. Honestly, I’ve also sliced leftovers into tiny squares for my kids’ lunchboxes; it’s just as delightful cold as when fresh. Whatever the occasion, this cake adds a warm, comforting vibe to any table and makes everything feel just a little more special.
Top Tips for Perfecting Your Turtle Cake
Over the years, I’ve picked up a few tricks that make this cake even better. First, when toasting pecans—spread them evenly and keep an eye on them so they don’t burn; toasted nuts really boost the flavor. I also learned that preparing your caramel in advance saves a lot of stress—store-bought works just fine, but when I make my own caramel, it’s a game-changer. About mixing the batter, I always fold gently—overmixing makes the cake dense, and nobody wants that. For a prettier swirl, I like to dollop the caramel in the center of the batter and use a toothpick to gently swirl outward before baking. If I want a darker, richer chocolate glaze, I add a teaspoon of espresso powder—it deepens the flavor beautifully. When baking, lower oven racks are better for even heat. I’ve learned that the perfect doneness test is to gently press the top: it should spring back, not stay dented. Basically, pay attention to visual cues and don’t rush! And if you’re feeling adventurous, sprinkle a pinch of flaky sea salt on the glaze—it’s like a little explosion of flavor in every bite.
Storing and Reheating Tips
This cake keeps wonderfully if stored properly. If you’re enjoying it within a day or two, just cover it loosely with plastic wrap or store in an airtight container at room temperature—though I find it best within two days for maximum freshness. For longer storage, pop it in the fridge—just give it a gentle cover or you risk the frosting or glaze drying out. It’s best to bring it to room temperature before slicing so the chocolate glaze stays shiny and the cake remains moist. Want to freeze it? Wrap the whole cake tightly with plastic wrap, then foil. It’ll last for up to three months. When you’re ready to enjoy, let it thaw at room temperature for a few hours before serving. A little note about glaze—if it’s set too hard after refrigeration, microwave it for about 10 seconds to loosen it up. Reheated slices can be just as luscious. Honestly, leftovers are rare because it disappears quickly, but knowing how to store it keeps the magic alive for a little longer.
Frequently Asked Questions
Final Thoughts
This turtle cake has become a beloved part of my family’s dessert lineup. Its luscious layers, irresistible crunch, and rich caramel make each slice feel indulgent without being overly complicated to prepare. Over the years, I’ve learned a few tricks to perfect it—like toasting the pecans for mega flavor or adding a pinch of sea salt to the glaze to keep all those sweet and salty notes dancing. What’s great is how adaptable it is; you can play with the nuts, chocolates, or even make individual servings with muffins. Most importantly, it’s a recipe that brings smiles and warm memories, whether I’m baking for a special occasion or just because I deserve a treat. If you give this a try, I’d love to hear how it turns out—grab a fork, enjoy, and celebrate every sweet moment. Happy baking!
Delicious Turtle Cake
Ingredients
Method
- Preheat oven to 350°F. Prepare three 8-inch cake pans with parchment paper and grease the sides.
- Mix together dry ingredients: flour, cocoa powder, baking soda, and salt.
- Add eggs, milk, vegetable oil, and vanilla to the dry ingredients and mix well.
- Gradually add hot water and mix until smooth. Divide batter evenly into prepared pans.
- Bake for 35-40 minutes, or until a toothpick inserted in the center comes out clean. Cool completely.
- Spread caramel sauce between layers along with toasted pecans. Frost with chocolate ganache on the top and sides.
- To prepare ganache, heat heavy cream until just boiling, pour over chocolate chips, let sit for 2 minutes, then whisk smooth.