Easy Snails in Mushroom Caps Recipe
There’s something about a warm slice of snail pastry that instantly transports me back to my grandmother’s kitchen. I can still smell the sweet zest of lemons and buttery scent wafting through the air, making my tummy rumble with excitement. Trust me—this snail recipe isn’t just desserts with fancy French names; it’s a cozy, comfort-food masterpiece I make whenever I want to feel a little indulgent. It’s somewhat like a cinnamon roll but with a brighter, citrusy twist that keeps it feeling fresh and surprisingly simple to whip up. And I promise, it’s one of those recipes that looks impressive but is actually a breeze—perfect for a weekend brunch or a special breakfast for family visitors. Once you try it, I bet you’ll be sneaking bites before it even hits the cooling rack. Honestly, I’ve made this countless times, and every single batch disappears in minutes at my house!
What is a nail recipe?
Think of the snail recipe as a delightful, spiral-shaped pastry filled with a sweet, lemon-infused filling. The name “snail” comes from the shape—the way the dough is rolled and coiled into a little spiral that looks like a tiny snail’s shell. It’s essentially a sweet bread dough, enhanced with fresh lemon zest and sometimes a pop of vanilla or almond extract, then rolled out, spread with the filling, and coiled into that signature spiral. After baking, it emerges golden, fragrant, and irresistible. It’s a cross between a flaky pastry and a cozy bread roll, with a tangy, citrusy punch that keeps things interesting. This dish is completely versatile—try it for brunch, breakfast, or even as an afternoon treat. Honestly, what I love most about this snail recipe is how the aroma alone makes everyone gather around the kitchen, eagerly waiting for their slice.
Why you’ll love this recipe?
First off, the flavor—oh my gosh, the lemon and buttery dough together create this beautiful balance of tart and sweet that just sings in your mouth. The citrus zing cuts through the richness, making every bite feel special without feeling overly heavy. Plus, this recipe is stupid-easy to make. Even if your baking skills are just okay, you’ll find yourself confident because everything comes together smoothly. You can whip up the dough the night before, pop it in the fridge, and bake fresh mornings—talk about convenience! It’s also budget-friendly; most ingredients are pantry staples like flour, sugar, and lemon, which you probably already have. And flexibility? Yes! You can add blueberries, poppy seeds, or even a sprinkle of powdered sugar on top for that extra wow factor. Every time I serve this, my family asks for seconds—and my kids actually ask for this all the time as their weekend treat. It’s cozy, classy, and just downright addictive.
How do I make a snail recipe?
Quick Overview
This snail recipe starts with a simple bread dough that’s tender and slightly sweet. You roll it out, spread a zesty lemon filling, then carefully roll it into a tight coil. After slicing into segments, you arrange the spirals in a baking dish and bake until golden. The magic happens when it’s fresh out of the oven—your whole kitchen fills with that irresistible citrusy aroma. The best part? It’s mostly hands-off once you’ve prepared everything. Because you can make the dough ahead of time and let it rise overnight, this truly becomes a no-stress weekend breakfast or brunch centerpiece. Serve it warm with a dusting of powdered sugar or a drizzle of glaze—either way, it’s a show-stopper!
Ingredients
For the Main Dough:
– 3 ½ cups all-purpose flour (preferably bread flour for extra fluffiness)
– ½ cup granulated sugar
– 1 packet (2 ¼ teaspoons) active dry yeast
– ½ teaspoon salt
– ¾ cup whole milk (or almond milk for a dairy-free option)
– ½ cup unsalted butter, melted
– 2 large eggs
For the Filling:
– 1 cup granulated sugar
– 2-3 lemons (zest and juice)
– 4 tablespoons unsalted butter, softened
– 1 teaspoon vanilla extract (optional, but adds a lovely depth)
– A pinch of salt
For the Glaze (optional but recommended):
– 1 cup powdered sugar
– 2-3 tablespoons fresh lemon juice
– A little lemon zest for garnish
Step-by-Step Instructions
Step 1: Preheat & Prep Pan
Set your oven to 375°F (190°C). Grease a round or square baking dish with butter or non-stick spray—trust me, nothing beats a clean release. If you’re making this in advance, you can also prepare the dish and cover it, then bake later.
Step 2: Mix Dry Ingredients
In a big mixing bowl, whisk together the flour, sugar, yeast, and salt. This helps distribute everything evenly and creates a fluffy dough base. I always do this first so the yeast gets cozy with sugar and flour before the liquids come in.
Step 3: Mix Wet Ingredients
Warm the milk just until it’s lukewarm (about 110°F). Pour it into a bowl, then whisk in the eggs and melted butter. This mixture should be smooth and warm, not hot—hot milk can kill the yeast. I usually do this step while singing my favorite song—it makes the process a little more fun!
Step 4: Combine
Gradually pour the wet into the dry ingredients, mixing gently with a spatula or dough hook if you have a stand mixer. When it starts to come together, knead it by hand for about 5 minutes or until it’s soft, elastic, and slightly sticky but not too wet. Don’t overmix—this keeps the bread light and fluffy.
Step 5: Prepare Filling
While the dough is rising, make your lemon filling. Mix sugar, lemon zest, and softened butter until creamy. Add lemon juice, vanilla if using, and a pinch of salt. You want a spreadable consistency but not runny—like a thick lemon curd.
Step 6: Layer & Swirl
Turn the dough onto a floured surface, roll it into a rectangle about ¼ inch thick. Spread the lemon filling evenly across. Then, roll the dough tightly from the long side into a log. Slice into 1-inch thick pieces, gently place each coil into your prepared baking dish, and give them some space—these will puff up!
Step 7: Bake
Bake in the preheated oven for 25-30 minutes, or until tops are golden and a little caramelized. Keep an eye on it; every oven is different, and I’ve learned to check around the 25-minute mark to prevent over-browning.
Step 8: Cool & Glaze
Cool for about 10 minutes—your patience pays off because handling hot snails isn’t fun. Mix powdered sugar with lemon juice to make your glaze. Drizzle it over while still warm for the best sticky, sweet finish. Sprinkle a little extra lemon zest on top if you’re feeling fancy.
Step 9: Slice & Serve
Use a sharp serrated knife to cut through the spiral cleanly. Serve warm, maybe with a dollop of whipped cream or a splash of fresh berries. Honestly, a cup of tea or coffee really completes this treat. My family loves it on lazy Sunday mornings—sometimes I even reheat slices for a quick breakfast during busy weeks.
What to Serve It With
This snail recipe is practically begging for some good company. For breakfast, I love pairing it with a hot mug of coffee or a frothy latte—trust me, the citrus fragrances will fill your kitchen instantly. If you’re hosting brunch, serve it alongside fresh fruit salad and yogurt, garnished with a sprig of mint. As a dessert, it pairs beautifully with a scoop of vanilla ice cream or a drizzle of caramel sauce. On casual days when I want a little comfort, I toast slices and slather them with butter or lemon curd—delicious! Plus, it’s a hit with kids and adults alike, and I’ve made this for birthday breakfasts that everyone raves about. It’s cozy enough to call “breakfast,” but elegant enough for a special occasion too.
Top Tips for Perfecting Your Snail Recipe
I’ve been making this recipe for years, so I’ve picked up a few tricks that help everything come out just right. First, always use fresh lemons for the zest and juice; that citrus punch makes all the difference in flavor. When making the filling, don’t be shy with the lemon zest—it’s what brightens up the entire dish. I tested using almond extract instead of vanilla once, and wow, it was incredible, so feel free to experiment with that! When rolling out the dough, I find it helpful to work in a lightly floured surface and use a rolling pin with even pressure—this keeps the layers nice and smooth. The filling shouldn’t be too runny or it will ooze out during baking—if yours is, add a little extra flour or powdered sugar to thicken it up. As for baking, always check around the 25-minute mark because oven temps can vary. I like to position my rack in the middle, so the tops bake evenly. When glazing, I’ve tested both lemon glaze and a simple vanilla icing—trust me, the lemon glaze adds such a lovely zing. Also, don’t skip the cooling step; it helps the filling set, making slicing way easier. One last thing, if your kitchen is humid, the dough might be stickier than usual—just give it a quick dusting of flour, and you’ll be fine. These little tips definitely help me produce consistently great results!
Storing and Reheating Tips
This snail is best enjoyed fresh, but I get it—you can’t always eat it all at once. For short-term storage, cover the dish loosely with foil or plastic wrap and keep at room temperature for up to a day. Just note that the glaze might soften a bit, but it still tastes wonderful. If you want it to stay fresh longer, pop it into an airtight container and refrigerate for up to 3 days. To reheat, just warm slices at 350°F (175°C) for about 10 minutes—they’ll regain that cozy, biscuit-like texture. Freezing is also an option—wrap individual slices tightly in plastic wrap, then foil, and freeze for up to 2 months. Thaw in the fridge overnight, then reheat gently in the oven. A tip: if you’ve added glaze and want that shine again, just drizzle a little fresh lemon juice over the slices before reheating. The aroma alone will make your kitchen smell like heaven again, and believe me, microwaving isn’t the best for texture—you’re better off warming in the oven. And if you’re planning to serve the glazed version later, I suggest adding the glaze just before the final serving—this keeps that glossy, delightful finish intact.
Frequently Asked Questions
Final Thoughts
Honestly, I could talk about this lemon drizzle snail recipe forever because it’s kind of my baking love letter. It’s simple enough to make on a lazy Sunday, yet fancy enough to serve to guests. The fresh lemon aroma, the fluffiness of the dough, and the zingy filling make every bite a little celebration. Plus, it’s one of those recipes that’s easy to adapt—add blueberries, swap out the lemon for orange, or jazz up the filling with a splash of liqueur. I’ve tested this over and over, tweaking little steps here and there, and it’s always a hit. Whether you’re making it for family brunch or just craving a sweet treat after a long day, this snail recipe never disappoints. I’d love to hear how yours turns out—share your variations in the comments or tag me on social media! Happy baking, my friends. And trust me, once you try this, it’s going to become a regular in your dessert lineup!

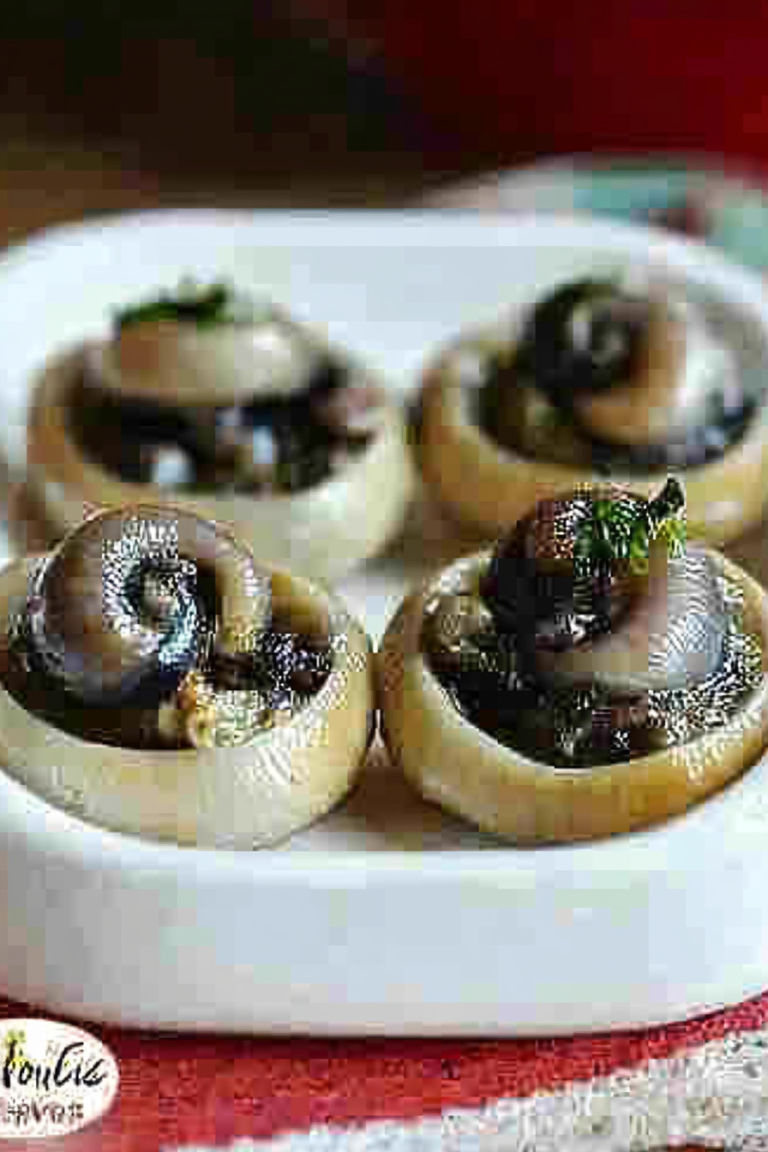
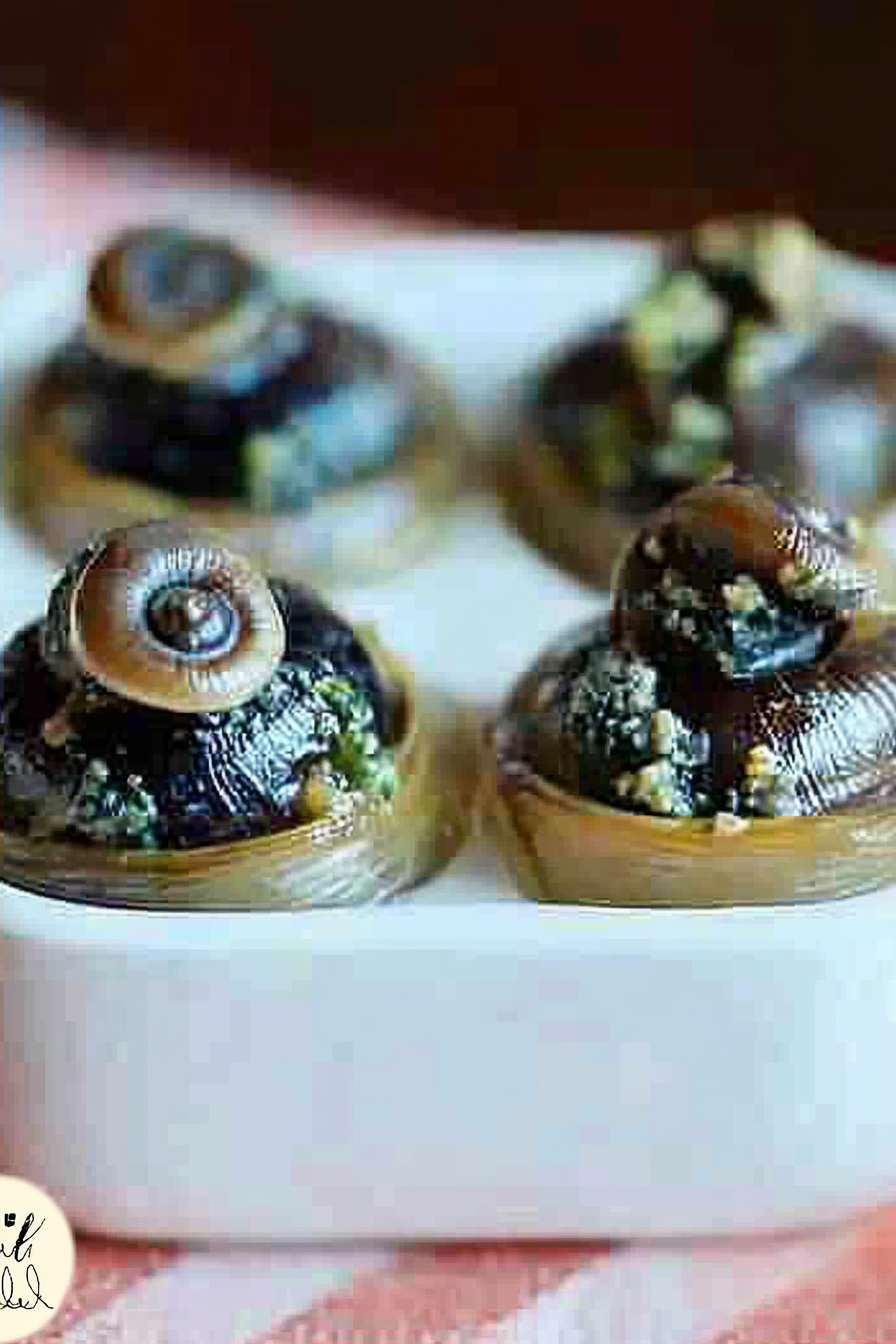
Garlic Butter Escargots in Mushroom Caps
Ingredients
Method
- Place mushroom caps in your mushroom cap dish or in a muffin tin with the stem side up.
- Add one escargot inside each mushroom cap.
- Mix melted butter, garlic, onion powder, and Italian seasoning, then liberally brush over the mushroom caps.
- Bake in a preheated oven at 350°F for 15 to 20 minutes. Serve hot.