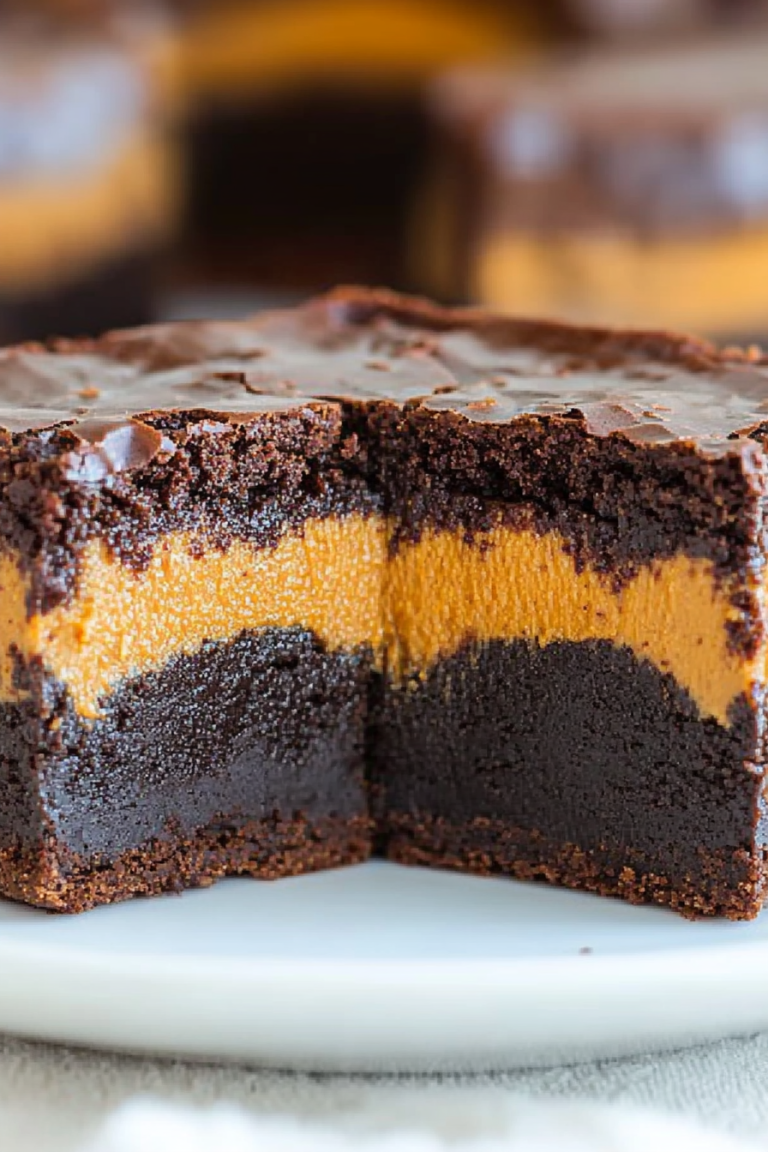
Peanut Butter Cup Pie How to Make It
Have you ever had that moment late at night when you’re craving something really sweet, really indulgent, but don’t want to turn on the oven or fuss with complicated recipes? That’s when I reach for my beloved peanut butter cup pie. It’s honestly like a giant, decadent treat you can whip up in no time — think of it as a rich, creamy cross between a peanut butter cup and your favorite dessert pizza. I always do this when I need a quick “yes, I deserve this” moment, and every single time, it disappears in minutes at my house! My kids ask for it all the time, and honestly, I don’t blame them. It’s that good—smooth, chocolatey, with just the right amount of peanut butter punch. No matter how busy life gets, this pie feels like a warm hug, and I love that I can make it with ingredients I usually keep in my pantry. Trust me, it’s a game-changer for any sweet craving!
What is a peanut butter cup pie?
Think of peanut butter cup pie as a no-bake, effortless dessert that captures the essence of candy lovers’ dreams. It’s essentially a creamy, velvety filling made with peanut butter, whipped cream, and chopped peanut butter cups layered over a crunchy cookie crust. Sometimes, I swap traditional graham crackers for Oreo crumbs—because honestly, the darker chocolate makes it taste even richer. The “cup” part of the name pays homage to those iconic peanut butter cups we all love — the Reese’s, the Hershey’s, whatever your favorite brand. This pie is a little nostalgic, a little decadent, and completely addictive. It’s perfect for when you want something quick but feel like you’ve stepped into a fancy bakery. Think of it as the dessert that feels fancy but practically makes itself. Honestly, it’s become my go-to for gatherings, date nights, or just a little ‘treat myself’ moment on a Tuesday.
Why you’ll love this recipe?
There are so many reasons why peanut butter cup pie holds a special place in my dessert lineup. First off, the flavor—oh boy. It’s a harmonious blend of creamy peanut butter, rich chocolate, and hints of vanilla all in one bite. Every spoonful feels like digging into a Reese’s cup but with a silky texture that melts in your mouth. What I love most about this is how insanely easy it is to make. I’ve tested it with just a handful of ingredients, and yet it feels so impressive. Nothing beats the satisfaction of whipping up a dessert in under 20 minutes, especially when the kids are impatient or friends are dropping by unexpectedly. And let’s not forget the cost—you probably already have everything in your pantry, so it’s budget-friendly too. Plus, the possibilities are endless: you can customize the toppings, add a hint of sea salt, or even throw in some crushed pretzels for a salty contrast. Honestly, this recipe is a total crowd-pleaser — my family, friends, everyone gets excited when I tell them I’m making peanut butter cup pie. It’s comfort food with a fancy twist, and that’s what makes it so special.
How do I make a peanut butter cup pie?
Quick Overview
This pie is all about simplicity. You start with a crunchy cookie crust (no baking required), then whip up a luscious peanut butter filling infused with vanilla and chopped peanut butter cups. Pour the filling over the crust, then top with whipped cream and sprinkle on more chopped peanut butter cups for that perfect finishing touch. It’s a layered dessert that looks fancy but comes together in minutes. I love that you can prepare it ahead of time, letting it chill in the fridge until you’re ready to serve. Easy, no-fuss, and ridiculously delicious—that’s the magic of peanut butter cup pie.
Ingredients
For the Main Crust:
– 1 ½ cups of Oreo cookie crumbs (about 15 cookies, crushed finely)
– ½ cup melted unsalted butter
– 2 tablespoons granulated sugar (optional, for extra sweetness)
For the Filling:
– 1 cup creamy peanut butter (smooth, natural or store-bought)
– 1 cup powdered sugar (sifted for smoothness)
– 1 teaspoon vanilla extract
– 1 cup heavy whipping cream
– 1 cup chopped peanut butter cups (plus extra for topping)
For the Glaze or Topping:
– Whipped cream (for garnish)
– Additional chopped peanut butter cups
– Optional: a drizzle of melted chocolate or caramel for extra flair
Step-by-Step Instructions
Step 1: Preheat & Prep Pan
Since it’s a no-bake pie, you don’t need to turn on the oven. Instead, grab a 9-inch pie dish and line it with parchment paper or give it a light spray of cooking spray. That way, it’ll come out easily once set. If you’re using a springform pan, that works too. Keep the crust ingredients ready because we’re about to get crunchy.
Step 2: Mix Dry Ingredients
In a medium bowl, combine the Oreo crumbs with the melted butter and sugar if you’re using it. Mix until the crumbs are evenly coated and look like wet sand—that’s when you know they’ll hold together nicely when pressed into the pan. This step matters because the crust sets up nicely, providing a perfect base for the creamy filling.
Step 3: Mix Wet Ingredients
In a large mixing bowl, beat the peanut butter, vanilla, and powdered sugar together until smooth and fluffy. I find that using softened peanut butter makes this step easier and smoother. For the whipped cream, I sometimes chill my bowl beforehand—it whips faster and yields fluffier peaks.
Step 4: Combine
Gently fold the whipped cream into the peanut butter mixture, being careful not to deflate that beautiful fluffiness. Once combined, fold in the chopped peanut butter cups, which will add delightful pockets of gooey chocolate in every bite. If your mixture feels too thick, a splash of milk can loosen it up just a tad.
Step 5: Prepare Filling
Spread the peanut butter mixture over your prepared crust evenly. Use a spatula to smooth out the top. Then, sprinkle on a handful of chopped peanut butter cups for that topping crunch. If you love extra chocolate, go ahead and add some mini chocolate chips or drizzle melted chocolate on top now.
Step 6: Layer & Swirl
For a pretty marbled effect, I sometimes drop spoonfuls of additional peanut butter or melted chocolate and swirl them gently with a toothpick or the tip of a knife. This creates irresistible visual appeal and adds depth to the flavor. Don’t overdo it—just a few swirls will do the trick!
Step 7: Bake
Actually, you don’t have to bake this pie! Just pop it in the fridge for at least 4 hours or until it’s firm. I prefer leaving it overnight so the flavors meld beautifully. If you’re short on time, 2-3 hours will still give you a firm set. The fridge is your best friend here.
Step 8: Cool & Glaze
Once set, top with a generous layer of whipped cream, and sprinkle with more chopped peanut butter cups. If you’re feeling fancy, drizzle some melted chocolate or caramel for that glossy finish. Serve chilled for the best texture and flavor—trust me, nothing beats a cold slice on a warm day.
Step 9: Slice & Serve
Use a sharp knife warmed under hot water for clean cuts, especially if your pie is super creamy. Wipe the knife clean between slices for the neatest presentation. This pie looks stunning served in wedges, and if you add a little extra whipped cream and toppings on the plate, it’s showstopper-worthy.
What to Serve It With
This pie is versatile enough to suit any occasion. For breakfast (if you’re into sweet indulgence before your coffee), pair it with a cup of strong black coffee or a frothy cappuccino. It’s just enough sweetness to start your day on a happy note. For brunch outings, serve slices alongside fresh fruit or yogurt parfaits, making it feel a little more sophisticated. As an after-dinner dessert, I love presenting it with a drizzle of chocolate sauce and a sprinkle of chopped nuts—it elevates the whole experience. Or, on cozy evenings, I just scoop a slice straight from the fridge and enjoy with a glass of cold milk. Honestly, my kids think it’s a special treat, but I swear, I sneak a piece for myself more often than I admit! It’s perfect for gatherings because it looks beautiful and tastes even better.
Top Tips for Perfecting Your Peanut Butter Cup Pie
After making this pie countless times, I’ve picked up a few tricks. First, when crushing your Oreos or cookies, I recommend using a resealable bag and a rolling pin—trust me, it’s much faster than a food processor when you just need enough crumbs. For the filling, make sure your whipped cream is really fluffy; I’ve learned that overmixing can make it runny, so fold gently. If you want the swirls to really pop, warm your melted chocolate just slightly—trust me, it’s easier to swirl without it seizing up or setting too quickly. When it comes to ingredient swaps, I tested Greek yogurt mixed into the whipped cream for a tangy twist, and it was surprisingly good—just cut back on the powdered sugar a bit. Baked it a little longer? Be sure to check the edges—you’ll notice them pulling away slightly from the crust when it’s done. For the glaze, I’ve experimented with caramel and butterscotch sauces, which add a sweet, buttery note. My biggest lesson? Chill the pie thoroughly—this isn’t a dessert to serve warm unless you want a chocolate mess! Patience during the chilling process ensures a smooth, clean slice every time. And, if you want to make it even richer, add a pinch of sea salt to balance the sweetness. Trust me, these small tweaks elevate this already delicious pie into pure perfection.
Storing and Reheating Tips
This pie keeps surprisingly well in the fridge, actually tasting better after a day or two as the flavors meld together. Cover it tightly with plastic wrap or pop it into an airtight container—be sure no strong odors sneak in overnight. It’s good for up to 3 days, but honestly, it rarely lasts that long! If you need to store it in the freezer, wrap the entire pie tightly with plastic wrap and foil—just make sure to thaw it in the fridge before slicing. I usually leave it out for about 30 minutes at room temp before serving if I want it to be softer. When reheating, avoid the microwave for the whole pie; instead, just warm individual slices briefly if needed. The glaze or toppings might soften over time, so if you’re making ahead, wait to add whipped cream and toppings until serving for that fresh, luscious look. This pie’s flavor actually deepens after a day in the fridge, so it’s worth planning ahead a little—it’s a dessert that benefits from a little patience.
Frequently Asked Questions
Final Thoughts
Honestly, peanut butter cup pie has become my secret weapon for turning any mundane evening into a mini celebration. Its luscious texture, the burst of chocolate-candy goodness, and how insanely quick it comes together make it one of my favorites. I love experimenting with little tweaks—more salt, extra toppings, a dash of sea salt on top—and each time, it feels like I’ve created something new and special. Plus, it’s a dessert that feels indulgent but doesn’t require a long baking process or fancy ingredients. If you’re anything like me—someone who appreciates comfort, nostalgia, and a little sweetness—this pie is a must-try. I hope you love it as much as I do. Make a big batch, share it with friends, or just enjoy it all to yourself—trust me, you’ll be coming back for seconds. And hey, don’t forget to let me know how it turns out in the comments below or share your fun variations. Happy baking!
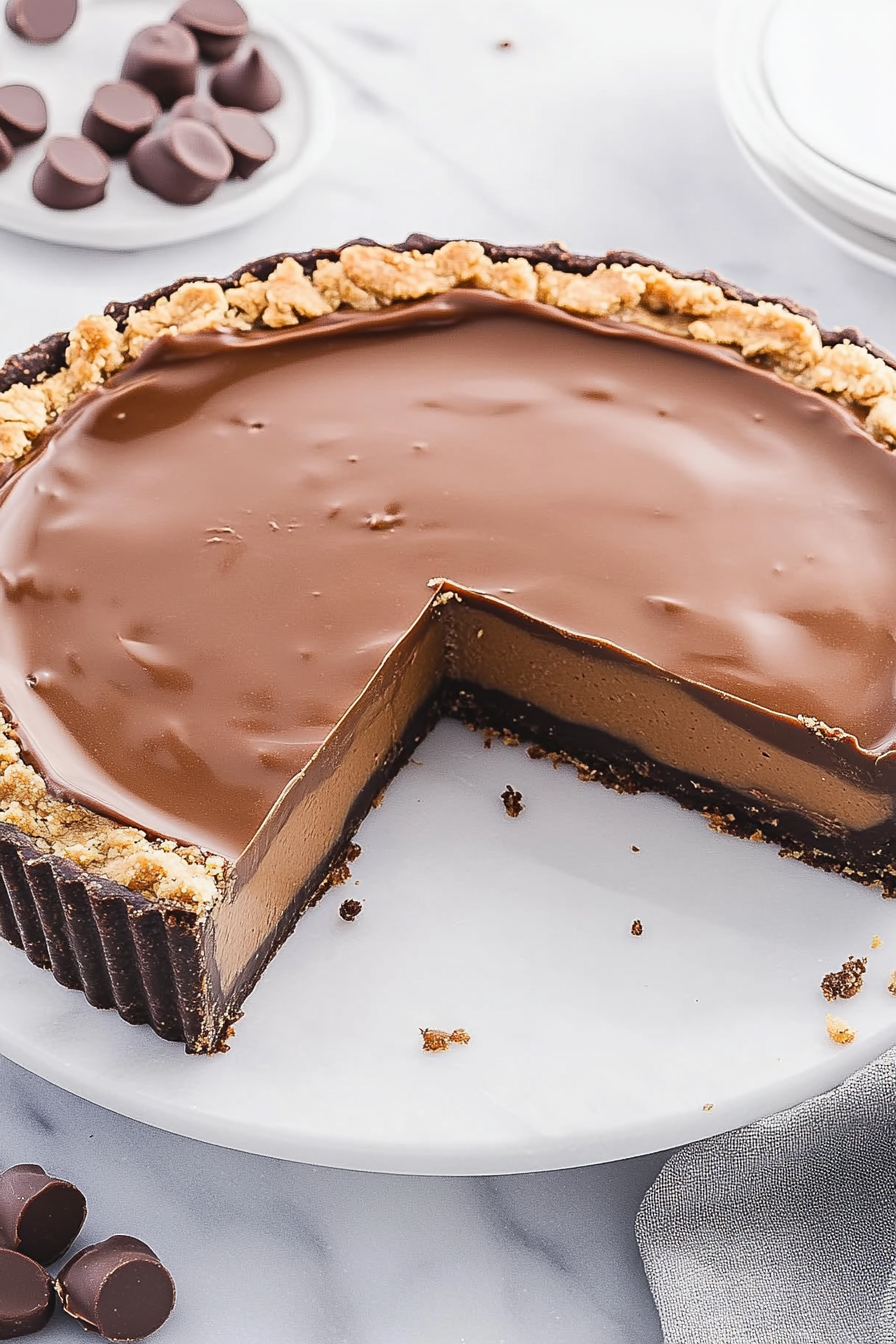
Peanut Butter Cup Pie
Ingredients
Method
- Line the bottom of a 9-inch tart pan with parchment paper and lightly spray it with nonstick spray. Set aside.
- Combine chocolate chips and vegetable oil in a microwave-safe bowl. Microwave for 45-55 seconds, then stir until smooth.
- Pour ½ of the melted chocolate into the prepared tart pan and spread evenly over the bottom and sides. Chill in refrigerator.
- Whisk together powdered sugar and graham cracker crumbs in a large bowl. Set aside.
- Heat peanut butter and butter in the microwave for 45 seconds, then stir to combine.
- Add the peanut butter mixture to the powdered sugar and crumb mixture, and stir until fully incorporated.
- Spread the peanut butter filling into the chilled chocolate shell and smooth the top.
- Pour the remaining melted chocolate over the peanut butter layer and smooth to edges.
- Chill the pie in refrigerator for at least 4 hours or overnight.
- Remove the pie from the fridge, flip upside down on a serving platter, then peel off the parchment paper.
- Slice into wedges and serve.