Effortless Cheese Bread How to Make It
There’s something about bread baking that feels like a warm hug, right? I always get nostalgic thinking about my grandma’s kitchen—her bread was a golden, crusty miracle, but let’s be honest, it took hours of kneading and patience. Well, I’ve discovered a version that’s almost as good, but so much easier: no-knead cheese bread. It’s the kind of recipe you can throw together on a lazy weekend or whip up after a busy day, and still end up with that glorious, cheesy aroma filling your house. Trust me, I’ve tested this so many times—my kids ask for this all the time, and it disappears faster than I want to admit. The best part? It’s just as cozy and satisfying as traditional bread, but without all the fuss. And, oh—popping it into the oven makes your kitchen smell like a bakery. Who needs bakery visits when you’ve got this in your back pocket? Let’s dive in and make some magic together.
What is no-knead cheese bread?
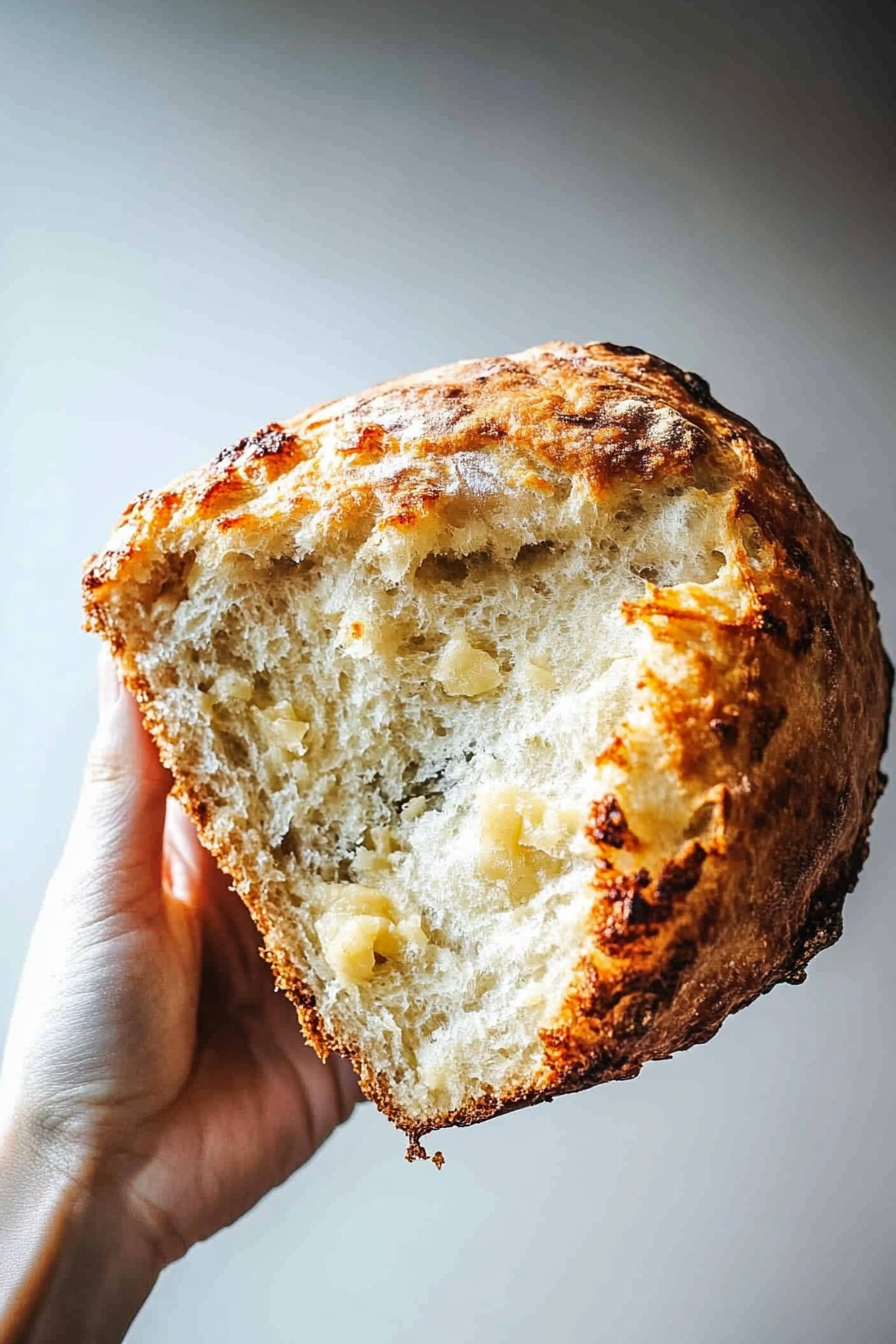
This is basically a simple, rustic bread infused with generous amounts of cheese, baked in a way that doesn’t require any kneading whatsoever. Think of it as the lovechild of a warm loaf and a cheesy comfort food—soft inside, with a glorious, slightly crispy crust. The magic lies in the slow fermentation; you mix a few ingredients, let the dough rest for a few hours, then bake it in a hot oven. The result? An unbelievably airy, cheesy bread that’s perfect for slicing and spreading with butter or tearing apart and dipping into soups and salads. Its name says it all: no kneading needed! It’s essentially a foolproof way to get bakery-quality bread right at home—without any complicated techniques. And because you use cheese, it’s practically a family hug in bread form. Think of it as your new go-to for lazy weekends, casual dinners, or whenever you need a quick yet impressive bake.
Why you’ll love this recipe?
What I love most about this no-knead cheese bread is how it combines simplicity with incredible flavor. The moment it’s out of the oven, the smell alone is worth every minute—gooey cheese melting into warm, fluffy bread. It’s a treat for the senses, and honestly, once you try this, you’ll wonder why you ever made bread the hard way. Plus, it’s budget-friendly—basic pantry staples like flour, yeast, and cheese, and voila! You’ve got yourself a showstopper. The versatility is another big plus: serve it toasted with garlic and herbs for breakfast, pull apart slices at a picnic, or enjoy it as a side with pasta or soup. The kids love it because it’s cheesy and soft, and adults appreciate how fancy it looks, even though it’s super easy. I’ve made this with different cheeses—cheddar, mozzarella, even pepper jack to spice things up—and it’s always a hit. Honestly, what’s not to love about a warm, cheesy loaf that practically makes itself? It’s become a pantry staple in my house, for busy weeknights and relaxed weekends alike.
How do I make no-knead cheese bread?
Quick Overview
This bread starts with a simple dough that you mix in one bowl, then let it rest for about 4-6 hours or overnight. No kneading is involved—just gentle folding if needed. After the dough has risen and bubble up with air, scoop it onto a hot, prepped baking vessel, sprinkle it with more cheese, and bake until crusty and golden. The secret is in the long fermentation, which gives it that airy texture without any laborious kneading. It’s sort of magical how effortless it is—mix, rest, bake, enjoy. What makes this method extra special is that it produces a rustic, artisan look, with crispy edges and a moist, cheesy interior. This is comfort food that’s ready in no time, and trust me, once you try it, it’s going to be your new favorite thing to bake during cozy weekends or whenever you crave cheesy goodness.
Ingredients
For the Main Batter:
- 3 ½ cups all-purpose flour (I like to use bread flour if I have it for a chewier texture)
- 1 ½ teaspoons salt (kosher or flaky salt works great)
- 1 teaspoon instant yeast (no need to proof, just sprinkle and go!)
- 1 ¼ cups warm water (around 110°F, just warm to the touch)
- 1 cup shredded cheese (cheddar, mozzarella, or a mix—use your favorite!)
For the Filling:
- Extra cheese for topping or mixing in—more cheese means more gooey goodness!
- Herbs or spices (parmesan, garlic powder, chopped rosemary—optional but lovely)
For the Glaze:
- 1 beaten egg (for that shiny, golden crust)
- A sprinkle of coarse sea salt or sesame seeds for topping
Step-by-Step Instructions
Step 1: Preheat & Prep Pan
Set your oven to 450°F (230°C). Place a Dutch oven or heavy cast iron pot with a lid inside to heat up for at least 30 minutes—this creates that perfect steaming environment that gives the bread its fantastic crust. Meanwhile, line your work surface with a generous dusting of flour and have your dough ready. If you don’t have a Dutch oven, a heavy oven-safe baking dish with a cover or foil works too.
Step 2: Mix Dry Ingredients
In a big mixing bowl, whisk together the flour, salt, and yeast. It’s like giving your dry ingredients a little pep talk—make sure everything is evenly distributed! This step keeps your bread nice and uniform. No sifting needed, just a quick stir and you’re good.
Step 3: Mix Wet Ingredients
Pour in the warm water, then add the shredded cheese. Mix everything together with a wooden spoon or spatula until it forms a sticky, shaggy dough. It may look rough, but that’s the beauty of no-knead bread. If it’s too dry, add a splash more water. Too wet? Lightly flour your hands and work gently.
Step 4: Combine
Once everything’s mixed, cover the bowl with plastic wrap or a damp towel. Let it rest at room temperature for about 4-6 hours, or overnight if you’re planning ahead. You’ll see the dough bubble up—proof that it’s active and ready to go. Don’t overthink this—just patience!
Step 5: Prepare Filling
If you want extra cheesy swirls or toppings, grate or chop additional cheese and herbs now. You can sprinkle them on top before baking or fold them into the dough gently during the resting phase for that Swirled Cheese effect.
Step 6: Layer & Swirl
When the dough is ready, gently scoop it onto a floured surface. Lightly shape it into a ball—no punching or kneading required! Flatten slightly, sprinkle with your extra cheese or herbs, then fold it over or swirl the cheese inside for a marbled effect. This part is fun—like playing with dough!
Step 7: Bake
Carefully remove your hot Dutch oven from the oven, then transfer the dough into it—be careful, it’s hot! Score the top with a sharp knife or scissors for flair and to help steam escape. Cover it with the lid and bake for about 30-35 minutes. Remove the lid, brush with beaten egg for shine, sprinkle with sea salt or seeds, and bake uncovered for another 10-15 minutes, until deeply golden and crusty.
Step 8: Cool & Glaze
Once baked, transfer the bread onto a wire rack and let it cool for at least 15 minutes—this helps set the crumb inside. If you’re adding a glaze, brush it on while still warm for that shiny, inviting appearance. I love a simple egg wash with a sprinkle of flaky salt for that bakery look and taste.
Step 9: Slice & Serve
Always wait a few minutes before slicing—trust me, hot bread is not your friend, and it’ll give you a cleaner cut. Use a serrated bread knife and serve warm, with plenty of butter or honey. Or just tear it apart and dip it straight into your soup or salad. This bread looks rustic, tastes airline-worthy, and honestly, it’s a total showstopper for debuting in your kitchen.
What to Serve It With
This bread is so versatile that it deserves a star position at any meal. I love slicing it thick and slathering it with good butter and a drizzle of honey in the morning—perfect with my morning coffee. At brunch, I sprinkle it with more herbs and serve alongside eggs and fresh fruit. It’s a favorite for casual dinners too—try tearing warm slices and dipping into a bowl of marinara or creamy spinach dip, and everyone will ask for seconds. My kids go wild over it with just butter and a sprinkle of parmesan, especially when it’s still warm. And I always keep a loaf in the freezer—defrost and warm it up, and it’s like freshly baked. Honestly, this bread has become my secret weapon for quick gatherings or when I want a little baking therapy without the fuss. It’s cozy, cheesy, and so easy it’s now my go-to comfort bread.
Top Tips for Perfecting Your No-Knead Cheese Bread
After making this recipe dozens of times, a few tricks really stand out. First, don’t rush the resting period—it’s key to developing that airy, open crumb. If your kitchen is cold, give it a bit more time; a warm spot helps the yeast do its magic. When mixing, avoid overworking the dough—just combine until everything is moistened. Overmixing can make the bread dense, and ain’t nobody got time for that! For the cheese swirl, I like to fold the cheese into the dough gently—think of it like folding in whipped cream, light and slow. Want extra cheese flavor lurking inside? Mix grated cheese directly into the dough before resting. Tip: always use good quality cheese for the melt and flavor. When baking, I recommend placing a baking stone or inverted baking sheet underneath the Dutch oven to help distribute heat evenly. Oh, and don’t forget to score the top—the cuts help steam escape and give your bread that beautiful artisan look. For variations, try adding some chopped herbs or red pepper flakes into the dough—trust me, they add a special touch. My biggest lesson? Patience pays off. The long rise is what gives it the bread’s signature lightness. Plus, using parchment paper makes transferring the dough easier without messing up that perfect shape.
Storing and Reheating Tips
This bread is best enjoyed fresh but will happily keep for a day or two. Once cooled, store it in a paper bag or wrapped in a clean towel—plastic bag traps moisture and can make the crust soggy. If you’re planning to keep it longer, pop it into an airtight container and stash it in the fridge for up to 3 days. To keep that crust crispy, reheat in a 350°F oven for about 10 minutes—trust me, it revives the magic. For freezer storage, wrap the entire loaf tightly in plastic wrap, then foil, and freeze for up to 3 months. When ready to serve, thaw at room temperature, then warm in the oven to regain that fresh-baked texture. If you like to add the glaze or cheese topping later, do so right before reheating to keep it looking and tasting fresh. This method preserves the bread’s texture and flavor, so every slice feels like the first.
Frequently Asked Questions
Final Thoughts
There’s no denying that no-knead cheese bread has quickly become a household favorite here. It’s simple enough for busy weekdays but fancy enough to impress guests or enjoy as a treat. The best part is how forgiving it is—no intensive kneading, no complicated steps, just honest ingredients and patience. Plus, the cheese adds that irresistible gooey factor that makes every bite a little joy. I love how versatile it is—slice it thick for a hearty snack or serve it alongside a fancy dinner. And believe me, once you master this, you’ll want to make it again and again. It’s become my go-to when I need comfort, a crowd-pleaser, or just a reason to bake a warm loaf. So grab your flour, your cheese, and a little patience—happy baking, and I can’t wait to hear how yours turns out! Don’t forget to leave a comment below sharing your tweaks and your cheesy adventures!
No-Knead Cheese Bread
Ingredients
Method
- In a large mixing bowl, combine the flour, salt, and yeast. Stir in the water and olive oil until a thick dough forms. Add the cheese and mix well.
- Cover the bowl with plastic wrap or a towel and let it rest at room temperature for 12 to 18 hours.
- Preheat the oven to 450°F with a Dutch oven inside for about 30 minutes.
- Gently shape the dough into a ball on a floured surface, place on parchment paper, and carefully transfer into the hot Dutch oven.
- Bake covered for 30 minutes, then uncover and bake for an additional 10 to 15 minutes until golden brown and crispy.
- Remove from the oven and let cool slightly before slicing and serving.