Sweet Caramel Cookie Bars How To Make Them
There’s just something about these caramelitas that always brings a smile to my face. Maybe it’s because my kids ask for them on every special occasion, or maybe it’s how the warm, gooey caramel melds so perfectly with that crunchy crumb topping—like a little bite of heaven in every forkful. I remember the first time I made these; I was craving a sweet treat one busy afternoon, and I realized I had most of the ingredients already tucked away in my pantry. Honestly, I hesitated at first—thinking it might be too complicated or too indulgent—but I was surprised at how straightforward this recipe is. It’s basically a mix-and-bake situation, and that caramel center? It disappears in minutes at my house! If you’re anything like me, you’ll want to keep this recipe handy because it’s a lifesaver on busy nights or when you need a comforting, delicious pick-me-up. Trust me, once you try these caramelitas, they’ll become a regular in your baking rotation, too.
What is Caramelitas?
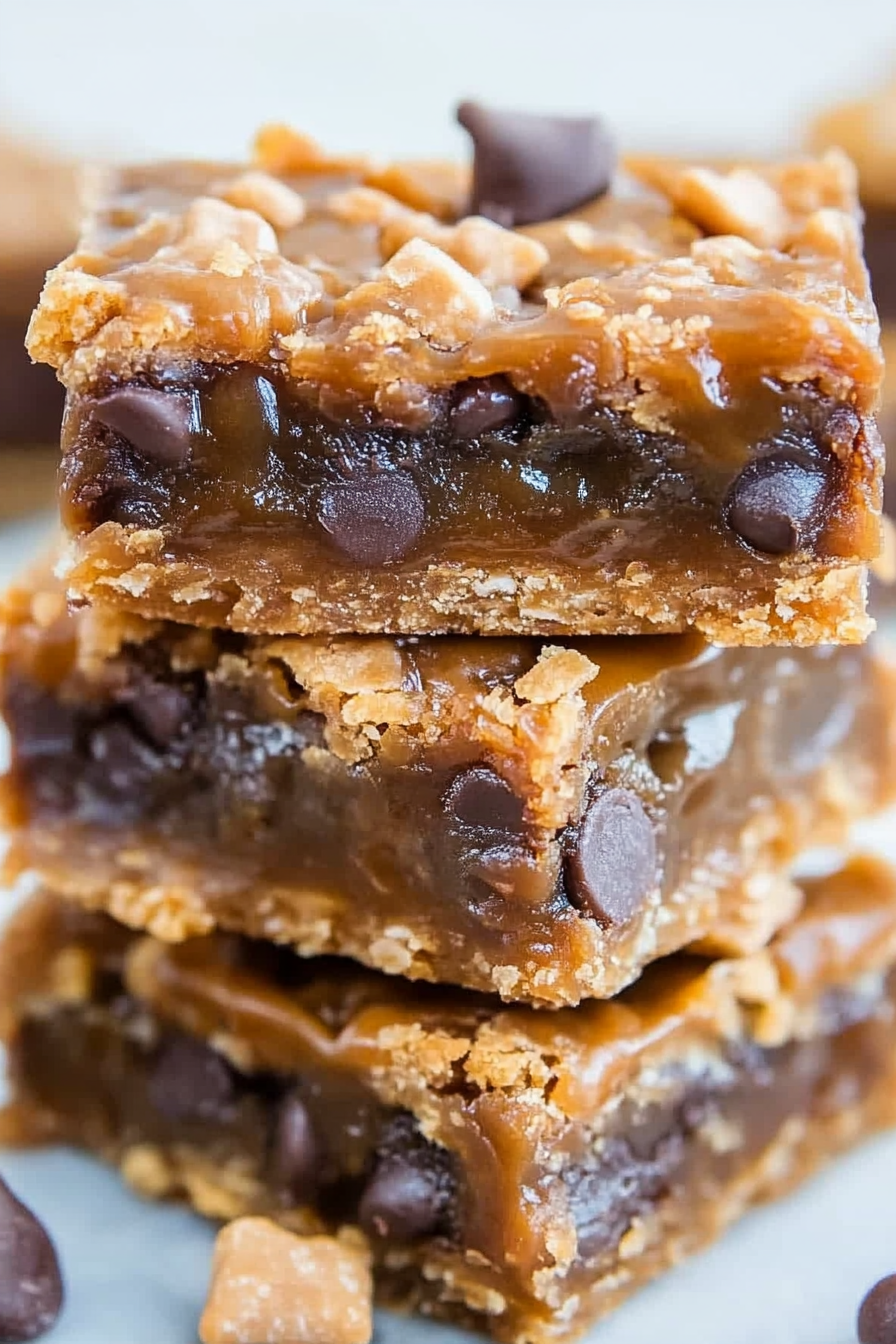
Think of caramelitas as the lovechild of a luscious caramel bar and a crispy cookie crumble. The name itself hints at what’s inside: a Greek-inspired hybrid—think *caramel* meets *gourmet cookie bar*. It’s essentially a chewy, sweet caramel layer nestled on a buttery, crunchy oat crumble. The beauty of these treats is that they’re super approachable—no fancy equipment required—and you can make them in one baking dish, which makes clean-up a breeze. Originally inspired by the idea of a caramel blondie, these caramelitas take it up a notch with that irresistible caramel center, coated with a buttery, toasted oats topping that crumbles perfectly in your mouth. Whether you call them bars or squares, this dish has a nostalgic feel, like something your grandma might have whipped up on a weekend, but honestly, it’s just as good for weeknight dessert when you’re craving something sweet and homely.
Why you’ll love this recipe?
What I love most about these caramelitas is how everything just comes together effortlessly. You don’t need advanced baking skills—seriously, I’ve tested this with my kids underfoot, and they love helping stir and spread. The flavor? Oh, it’s next level. The rich caramel melts in your mouth, balancing out that nutty, toasted oat topping. It’s sweet, but not overpowering, and I promise, one piece is never enough. Plus, they’re budget-friendly since most ingredients are pantry staples—oats, butter, sugar, and a bit of caramel sauce or dulce de leche if you want to cheat a little. And versatility? You can tweak it — maybe add a touch of sea salt or sprinkle your favorite chopped nuts on top. I also like to serve these with a scoop of vanilla ice cream or a drizzle of chocolate—extra indulgence, but hey, life’s too short not to treat yourself.
How do I make Caramelitas?
Quick Overview
This recipe is foolproof: you prepare a buttery oat crumble, press half into your baking dish, spread a layer of caramel or dulce de leche, then top with the remaining crumble. Bake until golden and bubbly, then finish with a drizzle of extra caramel or a dusting of powdered sugar. The magic is in that caramel center, which stays gooey and sweet after baking. It’s perfect for busy days because most of the work is just mixing and pouring. And the best part? You can assemble it ahead of time and pop it in the oven when you’re ready. The smell alone will draw everyone into the kitchen!
Ingredients
For the Main Batter:
– 1 ½ cups old-fashioned oats (trust me on this—don’t swap for quick oats; it messes with the texture)
– 1 cup all-purpose flour
– ¾ cup packed light brown sugar
– ½ teaspoon baking soda
– ¼ teaspoon salt
– ½ cup (1 stick) unsalted butter, melted (go for quality butter—it makes all the difference)
For the Filling:
– 1 cup caramel sauce or dulce de leche
– Optional: a pinch of sea salt or chopped nuts for flavor variation
For the Glaze (optional):
– Extra caramel or chocolate for drizzling
– Powdered sugar for dusting
Step-by-Step Instructions
Step 1: Preheat & Prep Pan
Preheat your oven to 350°F (176°C). Lightly butter or line your 9×13-inch baking dish with parchment paper for easy removal. I always do this—makes cleanup way simpler and helps the caramelitas come out perfectly shaped.
Step 2: Mix Dry Ingredients
In a large bowl, whisk together oats, flour, brown sugar, baking soda, and salt. I like to do this first—gets all the dry bits evenly distributed, so your crumble is consistent and not clumpy.
Step 3: Mix Wet Ingredients
Pour in the melted butter and stir until everything’s nicely combined—you want a crumbly mixture, not a dough. It should hold together when pressed but still crumble easily. I’ve learned the hard way not to overmix here; just enough until it looks like coarse crumbs.
Step 4: Combine
Press half of this mixture firmly into the prepared baking dish. Spread the caramel sauce evenly over the layer, then sprinkle and crumble the remaining oat mixture on top. If you’re feeling fancy, sprinkle a little sea salt or chopped nuts over the caramel before topping with the remaining crumble.
Step 5: Prepare Filling
If you’re using store-bought caramel sauce, just spoon it on carefully—no need to spread too evenly. If you’d rather make your own caramel from scratch, that works too, but honestly, store-bought is a timesaver that tastes just as good.
Step 6: Layer & Swirl
Gently press the remaining crumble on top, then use a knife or skewer to swirl the caramel into the topping if you want that marbled look. It’s a little detail that makes it look even more enticing.
Step 7: Bake
Bake for 25-30 minutes, or until the crumble is golden and the caramel is bubbling around the edges. Keep an eye on it toward the end—nothing beats that perfectly crisp top with a slightly sticky caramel center. If your oven runs hot, rotate the dish halfway through baking.
Step 8: Cool & Glaze
Let it cool in the pan for at least 15 minutes before slicing—this helps everything set up and prevents gooey mess. If you want extra decadence, warm some more caramel or melt a bit of chocolate and drizzle over the top while it’s still warm.
Step 9: Slice & Serve
Use a sharp knife for clean cuts, wiping it in hot water between slices. Serve these warm with a scoop of vanilla ice cream or just as they are—either way, they’re irresistible. I love to dust the top with powdered sugar for a pretty finish.
What to Serve It With
These caramelitas are just begging for a little accomplice. For breakfast or brunch, how about pairing them with a steaming cup of coffee or espresso? My kids love it when I serve a warm square with a glass of cold milk for a cozy afternoon snack. As a dessert, they’re delicious on their own, but adding a scoop of vanilla ice cream or a drizzle of chocolate sauce makes them feel extra special. I also sometimes sprinkle crushed toasted almonds or chopped pecans on top—trust me, the crunchy contrast is a game-changer. If I want to keep it simple, I just dust some powdered sugar over the top, and everyone loves that rustic, homemade look. These caramelitas are perfect for sharing at family gatherings, picnics, or even just movie night. They’re the kind of treat everyone reaches for, and honestly, I keep it in my back pocket for when I need a little sweet comfort.
Top Tips for Perfecting Your Caramelitas
Over the years, I’ve learned a few tricks that help make these even better. First, when you prepare the crumble, make sure to keep some of the mixture slightly crumbly—don’t pack it down too tightly; a loose layer gives a better crunch. If your caramel sauce is a bit thick, warming it slightly makes spreading easier—trust me on this. When swirling the caramel into the topping, use a toothpick or skewer for artistic marbling; it’s prettier and makes each piece feel fancy. For substitutions, I’ve tried coconut oil instead of butter (which adds a nice subtle flavor), and it worked well, but nothing beats good old butter for richness. Baked on the middle rack, these get the perfect golden hue and crispy edges. My biggest lesson? Always let them cool fully before slicing—this keeps everything neatly in place and prevents the caramel from oozing out. And if you’re feeling adventurous, sprinkle a pinch of flaky sea salt on top immediately after baking—that salty-sweet combo really hits the spot. Honestly, baking is as much about instinct as it is about technique, so don’t be shy to experiment and make these your own.
Storing and Reheating Tips
This is a big one because these caramelitas are just as good the next day—if they last that long! Keep leftovers in an airtight container at room temperature for up to 2 days—cover them loosely so they don’t get soggy. If you want to keep them longer, pop them in the fridge for up to a week, but I’d recommend letting them come back to room temp before serving—cold caramel can be a little too firm. For freezing, wrap the whole dish tightly with plastic wrap and foil, then freeze for up to 3 months. Thaw in the fridge overnight and reheat gently in the oven or microwave. If you’ve added a glaze or extra caramel, wait until you reheat to add it—this keeps everything looking fresh and delicious. I like to rewarm slices in the oven at 300°F for 10-15 minutes—it redistributes the warmth and melts any remaining caramel just right. These store well because they’re rich and sticky, but I find heating them just enough makes all the flavors meld again perfectly.
Frequently Asked Questions
Final Thoughts
If you’ve ever wanted a dessert that’s both satisfying and surprisingly easy to make, then these caramelitas are calling your name. With their irresistible combination of buttery crunch, gooey caramel, and just the right hint of sweetness, they’ve become my go-to treat for everything from casual weeknights to holiday gatherings. I love how you can customize them—adding sea salt, nuts, or even a sprinkle of cinnamon—to make them uniquely yours. Plus, they fill the house with the warm, inviting smell of baked goodness, which is honestly my favorite part. After countless batches, I can honestly say that these caramelitas never fail to make everyone smile. So grab your ingredients, get baking, and prepare for some happy moments around the table. And hey, I’d love to hear how yours turn out or any fun twists you try—leave a comment or share your photos! Happy baking!
Delicious Caramel Chocolate Bars
Ingredients
Method
- Preheat oven to 350F. Line an 8x8-inch pan with foil and spray with cooking spray. Set aside.
- In a microwave-safe bowl, melt butter for about 90 seconds.
- Add brown sugar and vanilla, whisk until smooth.
- Stir in flour, oats, baking soda, and salt until mixture is thick.
- Spread half of this mixture into the prepared pan and press flat.
- Bake for 10 minutes while preparing caramel sauce.
- Combine caramel squares and heavy cream in a microwave-safe bowl; melt in 60-second bursts, stirring between each, until smooth.
- Remove baked crust, sprinkle evenly with chocolate chips, pour caramel evenly over chocolate.
- Crumble remaining oat mixture over caramel and bake for an additional 16-18 minutes.
- Cool completely before slicing. Let caramel set for at least 4 hours or overnight.