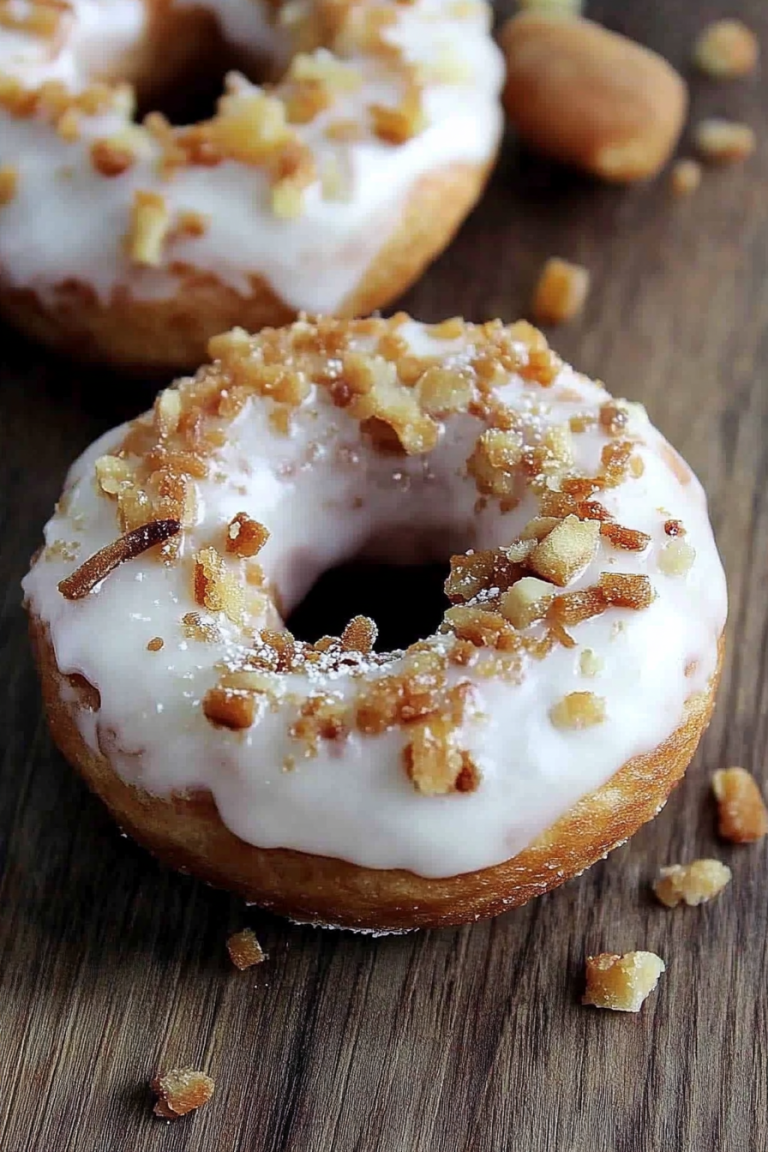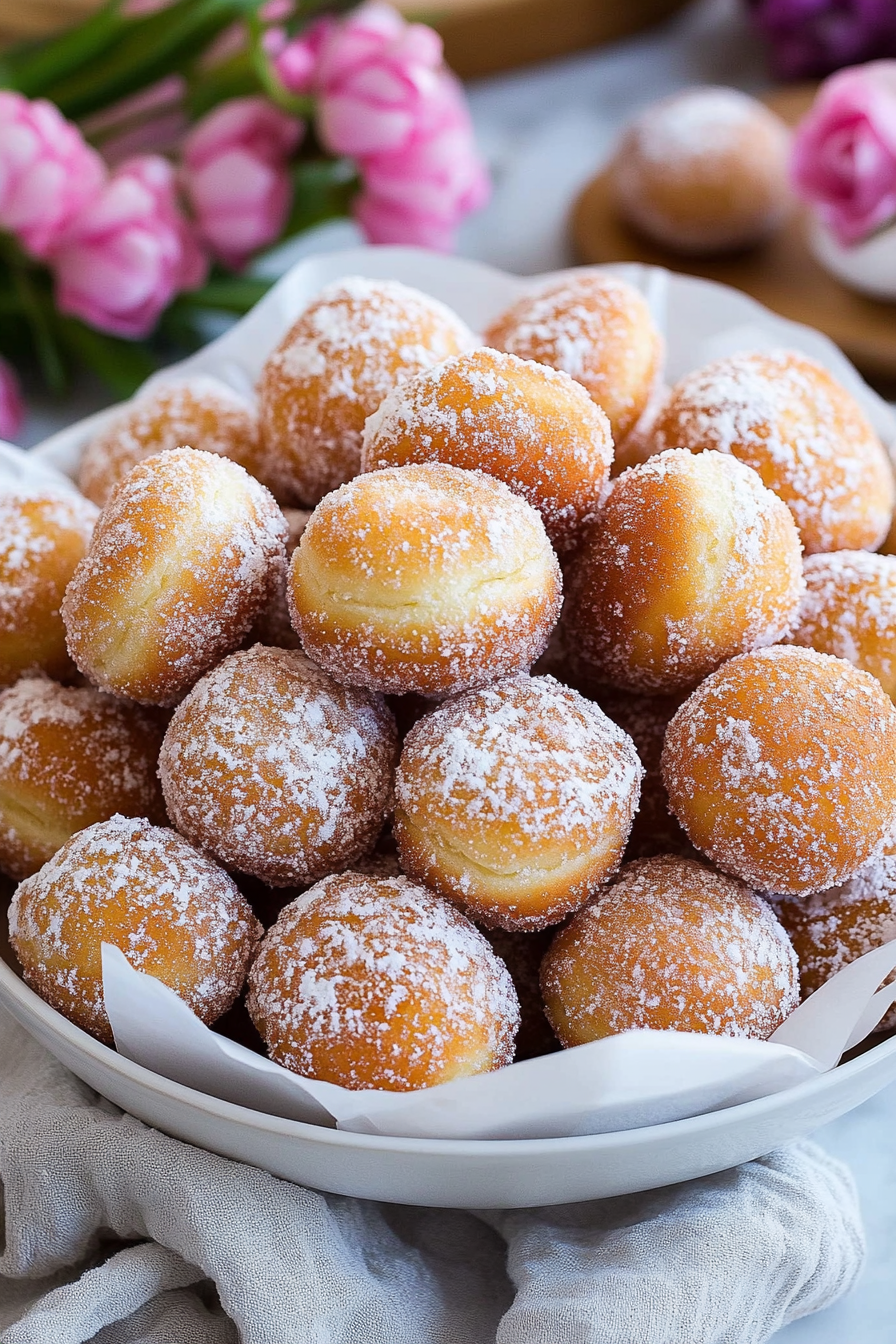
Easy Homemade Donuts in a Hurry
There are certain smells that just instantly transport you back to happy places, aren’t there? For me, it’s the warm, comforting aroma of freshly baked goods, and nothing, absolutely nothing, beats the scent of homemade donuts wafting through the kitchen. I’ve always been a sucker for a good donut – who isn’t? But there’s something about these chocolate swirl donuts that just takes it to a whole new level. They’re not just good; they’re *my* kind of good. Think of them as a little slice of heaven, with a beautiful marbled pattern that makes them as much a treat for the eyes as they are for the taste buds. Forget those dry, overly sweet store-bought versions; these are tender, moist, and packed with that deep chocolate flavor we all crave. If you’re looking for a weekend baking project that will wow your family and friends, or just a way to make a Tuesday feel like a celebration, you’ve found your match. These donuts are a game-changer, a true testament to how simple ingredients can create something truly magical. I’ve tried so many donut recipes over the years, from cake donuts to yeast-raised wonders, but this particular one… well, it holds a special place in my heart (and my recipe box!).
What is chocolate swirl donuts?
So, what exactly are these delightful creations? At their core, these are baked donuts. That’s right, no messy deep-frying involved! This is part of what makes them so appealing to me, especially on those days when time is short or I’m just not in the mood for the whole frying rigmarole. The “swirl” comes from a rich chocolate batter that’s artfully marbled into a classic vanilla or plain donut base. It creates these gorgeous, intricate patterns when you cut into them, making each donut a unique work of art. Imagine a fluffy, tender cake donut with pockets of intense chocolate goodness woven throughout. It’s essentially the best of both worlds: the comforting familiarity of a classic donut and the exciting visual appeal and added flavor dimension of a chocolate swirl. They’re not overly complicated, but they have that “wow” factor that makes people think you spent hours in the kitchen. I often tell people it’s like a chocolate marble cake decided to become a donut, and honestly, that’s not far off!
Why you’ll love this recipe?
What are some of the reasons why I love this recipe for donuts?flavor is out of this world. The combination of the slightly sweet, tender donut base with that punch of rich chocolate is just divine. It’s balanced perfectly, not too sweet, not too bland. And the texture! Oh, the texture is spot on – moist and fluffy, never dry or crumbly. It’s the kind of donut that makes you close your eyes and savor every single bite.
What is the second part of the puzzle?simplicity. As I mentioned, they’re baked, not fried, which cuts down on both the mess and the time. You don’t need any special equipment beyond a donut pan (which are super affordable and readily available). The steps are straightforward, and even if you’re a beginner baker, you can totally nail this. I’ve had my kids help me with this recipe since they were little, and they absolutely love swirling the chocolate in. It’s a fun activity for everyone!
And let’s talk cost-efficiency. The ingredients are all pantry staples, things you likely already have on hand or can pick up without breaking the bank. Compared to buying a dozen fancy donuts from a bakery, making these at home is incredibly budget-friendly. You get so much more bang for your buck, and the satisfaction of making them yourself is priceless.
The versatility is another huge plus. While the chocolate swirl is my personal favorite, you can easily adapt the glaze or even add different extracts to the batter. I’ve made these for birthdays, holidays, or just a spontaneous sweet craving. They’re perfect for a special breakfast, a delightful afternoon treat, or even a unique dessert. They pair wonderfully with a cup of coffee, a glass of milk, or even a scoop of ice cream. If you love my Classic Vanilla Bean Donuts or my Lemon Blueberry Muffins, I have a feeling you’ll be equally smitten with these.
How to Make Chocolate Swirl Donuts
Quick Overview
This recipe is all about creating two simple batters – a classic vanilla and a rich chocolate – and then artfully swirling them together in donut molds before baking. We’ll mix the dry ingredients, then the wet, combine them gently, and finish with a delicious glaze. It’s a process that’s incredibly satisfying and results in a stunning, delicious donut that’s surprisingly easy to achieve. You’ll be amazed at how professional they look!
Ingredients
For the Main Batter:
Here’s what you’ll need for that lovely, tender base. I always use unsalted butter because I like to control the saltiness myself. Make sure your eggs and dairy are at room temperature – this really helps everything emulsify beautifully, giving you a smoother batter.
- 2 cups all-purpose flour
- 1 teaspoon baking soda
- 1/2 teaspoon baking powder
- 1/2 teaspoon salt
- 1 cup granulated sugar
- 1/2 cup unsalted butter, softened
- 2 large eggs, room temperature
- 1 teaspoon vanilla extract
- 1 cup buttermilk, room temperature
For the Filling:
This is where the magic happens! It’s a simple, intensely chocolatey batter that you’ll swirl into the main batter. I like to use good quality cocoa powder here; it really makes a difference in the depth of flavor. If you have Dutch-processed cocoa, that works wonderfully too and gives a slightly deeper color and smoother taste.
- 1/4 cup all-purpose flour
- 1/4 cup unsweetened cocoa powder
- 1/2 cup granulated sugar
- 1/4 cup milk (any kind will do)
- 1 tablespoon vegetable oil
- 1/2 teaspoon vanilla extract
For the Glaze:
A simple glaze really elevates these donuts. It adds a touch of sweetness and a beautiful sheen. You can play around with the consistency by adding more or less powdered sugar or liquid.
- 1 1/2 cups powdered sugar, sifted
- 2-3 tablespoons milk or heavy cream
- 1/2 teaspoon vanilla extract
Step-by-Step Instructions
Step 1: Preheat & Prep Pan
First things first, let’s get your oven ready. Preheat it to 350°F (175°C). Now, grab your donut pan (or pans, if you have them!). You’ll want to generously grease each cavity. I usually use butter or non-stick baking spray. Make sure you get into all the nooks and crannies. This is super important to prevent your beautiful donuts from sticking. If you don’t grease them well, you’ll be left with sad, broken donuts, and nobody wants that!
Step 2: Mix Dry Ingredients
In a medium bowl, whisk together the flour, baking soda, baking powder, salt, and sugar for the main batter. Whisking them together well ensures that all the leavening agents are evenly distributed, which is key for a good rise. You don’t want to bite into a donut and get a pocket of baking soda, trust me. Give it a good whisk until everything looks uniform.
Step 3: Mix Wet Ingredients
In a separate large bowl, cream together the softened butter and eggs until light and fluffy. This might take a minute or two with an electric mixer, or a bit longer by hand. Then, stir in the vanilla extract. Gradually add the buttermilk, mixing until just combined. Don’t worry if it looks a little curdled; that’s normal with buttermilk.
Step 4: Combine
Now, we gently bring the wet and dry ingredients together. Add the dry ingredients to the wet ingredients in two or three additions, mixing on low speed (or by hand) until just combined. The key here is NOT to overmix. Overmixing develops the gluten in the flour, which can lead to tough donuts. Stop as soon as you no longer see streaks of dry flour. A few small lumps are perfectly fine!
Step 5: Prepare Filling
While your main batter is chilling for a moment, let’s whip up the chocolate swirl. In a small bowl, whisk together the flour, cocoa powder, and sugar. Gradually whisk in the milk, vegetable oil, and vanilla extract until you have a smooth, thick, chocolatey mixture. It should be pourable but not too thin. If it seems too thick, add another teaspoon of milk.
Step 6: Layer & Swirl
This is the fun part! Spoon about half of the main batter into your prepared donut cavities, filling them about halfway. Then, carefully spoon about half of the chocolate filling mixture over the top of the batter in each cavity. Now, take a toothpick or a small skewer and gently swirl the chocolate into the batter. Don’t overdo it; just a few passes to create a marbled effect. Then, repeat with the remaining main batter and chocolate filling. Fill the cavities to about three-quarters full – they’ll puff up as they bake!
Step 7: Bake
Bake for 15-20 minutes, or until a toothpick inserted into the center of a donut comes out clean. The baking time can vary depending on your oven and how full you filled the molds, so keep an eye on them. You want them to be golden brown around the edges and spring back lightly when touched.
Step 8: Cool & Glaze
Once baked, let the donuts cool in the pan for about 5-10 minutes. This helps them firm up so they don’t break when you remove them. Then, carefully invert them onto a wire rack to cool completely. While they’re cooling, whisk together the sifted powdered sugar, milk, and vanilla extract for the glaze. Start with 2 tablespoons of milk and add more if needed to reach your desired drizzling consistency. Once the donuts are completely cool, dip the tops into the glaze or drizzle it over them. Let the glaze set for a bit before serving.
Step 9: Slice & Serve
And there you have it! The moment of truth. Once the glaze has set, slice one in half to admire that beautiful swirl. Serve them at room temperature for the best texture and flavor. They’re perfect on their own, but a warm cup of coffee or tea is an absolute must.
What to Serve It With
These chocolate swirl donuts are wonderfully versatile and can be dressed up or down depending on the occasion. They’re a delightful addition to any spread!
For Breakfast: They make a decadent breakfast treat that feels extra special. Serve them alongside a pot of freshly brewed coffee or a tall glass of cold milk. They’re a fantastic alternative to pancakes or waffles, especially when you’re in a bit of a rush. My kids often grab one on their way out the door for school, and it always brightens their morning.
For Brunch: Elevate your brunch table by arranging these on a beautiful platter. They look stunning alongside fresh fruit, yogurt parfaits, and maybe even a savory frittata. For beverages, think mimosas, bellinis, or a creamy latte. The visual appeal of the swirl makes them a perfect centerpiece.
As Dessert: Don’t underestimate these for dessert! Serve them warm with a scoop of vanilla bean ice cream, a drizzle of extra chocolate sauce, or even a dollop of whipped cream. They’re a delightful, lighter alternative to a heavy cake, offering that satisfying sweet finish to a meal.
For Cozy Snacks: On a rainy afternoon or a chilly evening, there’s nothing better than a donut and a hot beverage. I love pairing these with a mug of hot chocolate or a chai latte. They’re perfect for a little pick-me-up or for sharing with friends during a casual get-together. My family often requests these for our Friday night “movie night” treat – it’s become a tradition!
Top Tips for Perfecting Your Chocolate Swirl Donuts
I’ve made these donuts more times than I can count, and over the years, I’ve picked up a few tricks that I think really make a difference. You know how it is when you bake something a lot – you start to notice the little things!
Zucchini Prep: Okay, so this recipe doesn’t actually use zucchini, but I’m so glad you asked! If you were thinking of something else, that’s totally my bad! For *these* donuts, the key is in the batter and the swirl. If you’re looking for a zucchini donut recipe, let me know, I have a fantastic one!
Mixing Advice: Seriously, do not overmix the batter. I know I’ve said it before, but it bears repeating. As soon as you combine the wet and dry ingredients and you don’t see any more dry flour, stop mixing. Overmixing is the enemy of tender baked goods. It’s better to have a few tiny lumps than tough donuts.
Swirl Customization: For the swirl, don’t go crazy. You want distinct ribbons of chocolate, not a muddy mess. A few gentle passes with a toothpick are all you need to get that beautiful marbled effect. Aim for a light hand; you can always add a little more chocolate on top before baking if you want more definition.
Ingredient Swaps: While this recipe is fantastic as is, I’ve experimented a bit! For the buttermilk, you can make a substitute by adding 1 tablespoon of lemon juice or white vinegar to 1 cup of regular milk and letting it sit for 5-10 minutes. For the oil in the chocolate filling, any neutral-flavored oil like canola or sunflower will work. If you don’t have vanilla extract, you could try a dash of almond extract for a different flavor profile, though vanilla is classic for a reason.
Baking Tips: Make sure your oven rack is in the center of the oven. This ensures even heat circulation. Don’t overcrowd your donut pans if you have multiple; baking in batches often yields better results. If you notice your donuts browning too quickly on top before they’re cooked through, you can loosely tent them with aluminum foil for the last few minutes of baking.
Glaze Variations: If you want a thinner glaze, add milk a teaspoon at a time until it’s pourable. For a thicker, more frosting-like glaze, use less milk. You can also add a pinch of salt to the glaze to balance the sweetness or even a bit of cocoa powder for a chocolate glaze!
Storing and Reheating Tips
These donuts are truly best enjoyed the day they are made, but I know sometimes you end up with leftovers, and that’s perfectly fine! They still taste wonderful.
Room Temperature: If you have any leftovers, store them in an airtight container at room temperature. They’ll stay fresh and delicious for about 1-2 days. I like to place a piece of parchment paper between layers if I’m stacking them to prevent the glaze from sticking. They tend to dry out a bit in the fridge, so room temp is usually best for short-term storage.
Refrigerator Storage: If you need to store them for a bit longer, you can keep them in an airtight container in the refrigerator for up to 3-4 days. Just be aware that the texture might become a little firmer. To revive them, you can gently warm them.
Freezer Instructions: For longer storage, these donuts freeze beautifully! Wrap them tightly, unwrapped, in plastic wrap, then place them in a freezer-safe bag or container. They can be stored in the freezer for up to 2 months. To thaw, simply remove them from the freezer and let them come to room temperature on a wire rack. If you plan to glaze them after freezing, it’s best to do so once they’ve thawed.
Glaze Timing Advice: If you’re storing the donuts unfrosted, you can glaze them just before serving. If you’re freezing them, I highly recommend glazing them *after* they’ve thawed and are ready to be eaten. This keeps the glaze looking its best and prevents it from becoming sticky or soft in storage.
Frequently Asked Questions
Final Thoughts
There you have it – my cherished recipe for Chocolate Swirl Donuts. I truly believe this recipe offers that perfect balance of comfort and a little bit of indulgence, all without the fuss of frying. It’s a recipe that brings joy, whether you’re baking it for a special occasion or just to brighten up a regular day. The stunning marbled appearance combined with that incredibly tender, moist texture and rich chocolate flavor is something truly special. I hope you love them as much as my family and I do!
If you enjoyed this recipe, I think you might also like my recipe for Lemon Poppy Seed Muffins or my Classic Banana Bread – they’re other family favorites that are always a hit. Don’t be shy about leaving a comment below to let me know how your donuts turned out, or share any of your own favorite swirling techniques or glaze variations! I love hearing from you all and seeing what delicious creations you come up with. Happy baking, my friends!
Quick Homemade Donuts
Ingredients
Method
- In a large bowl, whisk together flour, baking powder, and salt. In a separate bowl, mix buttermilk and melted butter. Combine wet and dry ingredients just until a dough forms.
- Turn dough onto a lightly floured surface and roll out to about 1/2-inch thickness. Use a donut cutter or a large round cutter with a smaller cutter to make holes.
- Heat vegetable oil in a deep skillet over medium heat to 350°F. Fry the donuts in batches for approximately 2-3 minutes per side until golden brown.
- Remove donuts and drain on paper towels. Toss in granulated sugar while still warm to coat evenly.