Spiced Whiskey Bites How to Make Them
There’s something about little bites that just hit the spot, especially when they’re infused with a bit of heat and a whole lot of flavor. I remember the first time I made these fireball whiskey balls — it was late on a chilly Friday night, and I wanted something sweet with a kick. The smell alone is enough to make everyone gather in the kitchen, curious about what’s baking. These little treats are my go-to on busy nights when I need a quick fix, and honestly, they always disappear faster than I can blink. My kids ask for these all the time, and I’ve tested them with different kinds of whiskey, but trust me — fireball whiskey gives that perfect warming cinnamon kick that keeps everyone coming back for seconds. They’re surprisingly simple to make, and if you love that spicy cinnamon flavor with a boozy twist, you’re in for a real treat. Let’s dive into how you can whip up your own batch of fiery, sweet whiskey balls!
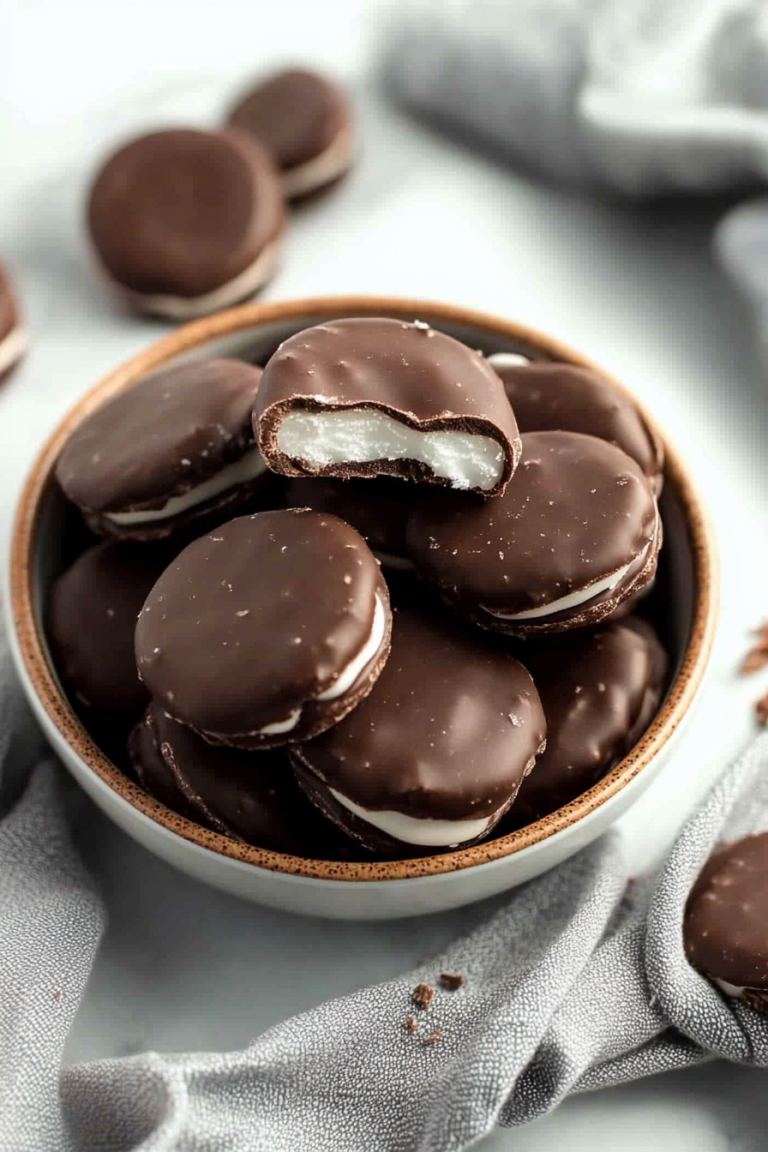
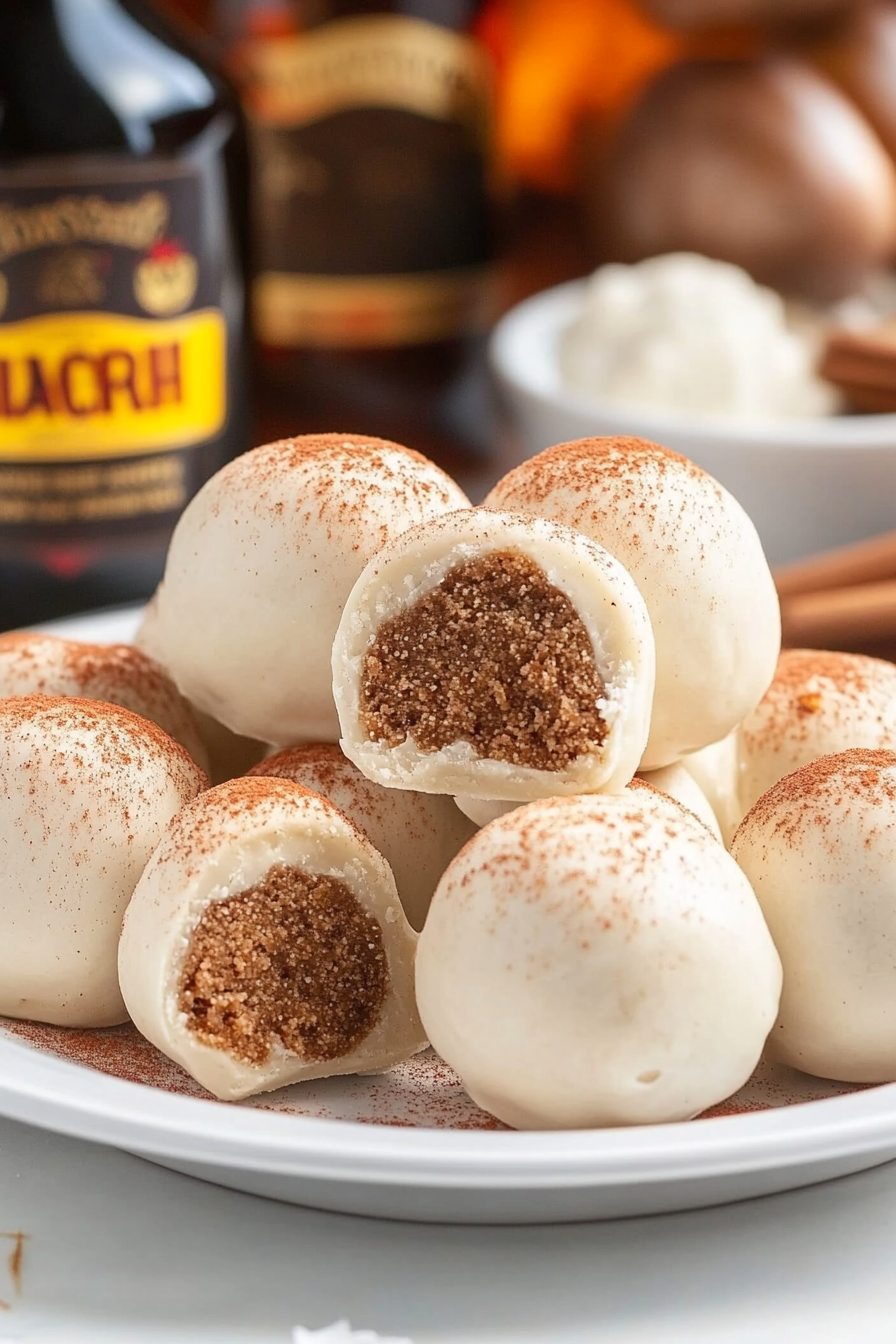
What is Fireball Whiskey Balls?
Think of fireball whiskey balls as a grown-up version of those childhood cookie balls, but with an adult twist. They’re basically sweet, creamy truffles coated in a spicy cinnamon shell, infused with the warmth of fireball whiskey. The name comes from the combination of the fiery cinnamon flavor of the whiskey and the bite-sized shape, making them perfect for popping in your mouth. It’s essentially a no-bake treat, which means you don’t need to fuss with oven timers or complicated techniques. These little bites are like a spicy, boozy serenade to your taste buds — rich, sweet, and spicy all at once. I love how versatile they are: perfect for holiday parties, date nights, or even as a cheeky little after-dinner dessert. And the best part? They only take a few ingredients and about 20 minutes to whip up. Trust me, once you make these, they’ll be on your regular rotation!
Why you’ll love this recipe?
What I love most about fireball whiskey balls is how effortless they are but still manage to look totally fancy on the plate. The flavor profile is a showstopper — warm, spicy, with just enough sweetness to balance out the heat. They’re a crowd-pleaser at parties, but honestly, I keep a batch in the fridge for those nights when I need a little pick-me-up. These are budget-friendly, too — you’re probably already stocked with the ingredients, and you can make a big batch for under $10. Plus, they’re so customizable. Want more cinnamon? Dunk them in extra cinnamon sugar. Prefer a bit of decadence? Toss in some chopped nuts or drizzle chocolate. What I love most about this is how versatile they are; you can make them as spicy or as sweet as you like. They’re also perfect for last-minute get-togethers because there’s no baking — just mix, chill, and coat. Honestly, once you make these, it’s hard to go back to store-bought sweets because these carry that cozy, homemade feel that you can feel good about sharing. I always do this when I need a quick, impressive treat — they never disappoint!
How do I make fireball whiskey balls?
Quick Overview
This recipe is all about mixing up a creamy, boozy filling, forming it into tiny balls, and then coating them in a cinnamon-sugar shell. The toughest part? Waiting for them to chill so they set perfectly. It’s really straightforward and perfect for when you want a sweet treat without turning on the oven. Once you’ve got your ingredients ready, it’s just a matter of folding everything together, rolling balls, and dunking them in cinnamon sugar. They’re great to make ahead, as they only get better after chilling. Plus, the mixture is so forgiving — if it gets a little crumbly, just add a splash more whiskey or a touch of milk. Trust me, this is one of those recipes you’ll want to keep in your back pocket for whenever you need a little spicy-sweet, adult indulgence.
Ingredients
For the Main Batter:
– 1 cup sweetened condensed milk (the key to that creamy, dreamy interior)
– 2 ½ cups vanilla wafers or graham cracker crumbs (crushed finely for that smooth texture)
– ½ cup finely chopped nuts (optional, but adds crunch)
– 1 teaspoon vanilla extract (essence of vanilla helps balance everything out)
– ¾ cup fireball whiskey (the star of the show — start with less if you prefer milder boozy flavor)
For the Filling:
– The mixture you’ll form into tiny balls—easy, right? Keep it chilled for best handling.
For the Glaze:
– ½ cup cinnamon sugar (mix equal parts cinnamon and sugar for that spicy coating)
– Optional: melted chocolate or more cinnamon sugar for drizzling or dipping
Step-by-Step Instructions
Step 1: Preheat & Prep Pan
No oven needed here! Just line a baking sheet with parchment paper or a silicone mat. Get your mixing bowls ready and set aside a small bowl of cinnamon sugar for coating. Chill the baking sheet – it’ll help the balls set faster once coated.
Step 2: Mix Dry Ingredients
Crush your vanilla wafers or graham crackers until fine — I use a food processor, but you can do it in a sealed plastic bag with a rolling pin. Mix these crumbs with chopped nuts if you’re using them, plus the vanilla extract. This ensures everything is evenly distributed before adding the wet ingredients.
Step 3: Mix Wet Ingredients
In another bowl, stir together the sweetened condensed milk and fireball whiskey. The mixture should be smooth, and the whiskey will give it that spicy kick. I’ve tested this with almond milk, and it honestly made it creamy without losing flavor — but water or regular milk works just as well here.
Step 4: Combine
Pour the wet mixture into your dry crumbs and fold gently. It should come together into a dough-like consistency that you can roll into balls. If it’s too crumbly, just add a splash more whiskey or milk until it’s sticky enough to hold together. Be careful not to overmix — you want it just combined.
Step 5: Prepare Filling
Use a teaspoon or your hands to scoop out small portions of the mixture and roll into tiny balls about 1 inch in diameter. Keep them uniform for even coating. Place the formed balls on your prepared baking sheet and pop them in the fridge for at least 30 minutes to firm up. This step is crucial for easy coating later.
Step 6: Layer & Swirl
Once chilled, toss each ball into your cinnamon sugar mixture, rolling gently to coat evenly. I love to give them a little swirl or press to make sure the coating sticks nicely. If you want a layered look, try dipping half in melted chocolate before rolling in cinnamon sugar — divine!
Step 7: Bake
No baking necessary! Just set the coated balls back in the fridge for a few minutes if needed, especially if your kitchen’s warm. They should be firm and slightly chilled, with a crunchy cinnamon exterior and a soft center. If you really want to, you can refrigerate these for up to a week, but they’re best enjoyed fresh.
Step 8: Cool & Glaze
Allow the fireball whiskey balls to come to room temperature before serving. If you’re feeling fancy, drizzle with melted chocolate or a quick glaze made from powdered sugar and a splash of milk. It adds an extra layer of indulgence and looks pretty, too!
Step 9: Slice & Serve
Well, these actually aren’t sliced — they’re popped whole, but trust me, biting into one reveals a little spicy surprise inside. Plate them on a pretty tray with a dusting of cinnamon sugar or a sprig of mint. Serve at room temperature or chilled — whichever you prefer. These make a perfect pairing with a cup of coffee or a glass of milk for the kids, and a shot of whiskey for the grown-ups. Cheers!
What to Serve It With
These fireball whiskey balls are surprisingly versatile, which makes them a favorite around my house. In the morning, I love placing a few on a small plate alongside my coffee — they melt in your mouth and give that spicy kick to start the day. For brunch, serve them on a pretty platter with some fresh fruit and a side of cinnamon-spiced lattes. They’re also an absolute showstopper after dinner, paired with a robust cup of dark roast coffee or a neat shot of whiskey to match the flavor intensity. If you’re just hanging out casual-style, keep them in a jar for easy snacking, or plate them up with some toasted nuts and dried fruit for a cozy, indulgent spread. My family loves these after a holiday meal or on movie nights, where they become the star of the snack table. They’re just that good — foolproof, tasty, and fun to make. You can even get creative with toppings or coatings, like dipping them in white chocolate or sprinkling extra cinnamon sugar for that perfect finishing touch.
Top Tips for Perfecting Your Fireball Whiskey Balls
Over the years, I’ve learned a few tricks to really make these pop. First, don’t skip the refrigeration step! Chilling the balls helps them hold their shape, especially if your mixture is slightly sticky or soft. I once tried to skip this step, and let’s just say, it was a gooey mess — not pretty! For the best coating, roll them quickly in the cinnamon sugar, pressing slightly to ensure it sticks; this technique helps keep everything in place. If you want a more intense spice, add a pinch more cinnamon to your sugar mix or even a sprinkle of cayenne for a fiery surprise. I’ve tested different types of whiskey, and fireball gives that iconic cinnamon flavor, but you could try other cinnamon-flavored liquors for variety. And original or extra dark chocolate drizzles? Yes, please. That little bitter contrast makes these even more addictive. A tip I learned after many batches: bake the mixture gently in your fridge or freezer if it’s too soft, but avoid overworking the dough — overmixing can lead to tough textures. When baking isn’t involved, patience is key; letting them chill longer not only makes them easier to coat but also enhances the flavors. Trust me, once you find your perfect balance, you’ll keep coming back to this recipe time and again. It’s the kind of treat everyone asks for, and it’s surprisingly forgiving — perfect for those chaos nights when you still want something special.
Storing and Reheating Tips
These whiskey balls are best enjoyed fresh, but if you have leftovers — which, let’s be honest, is rare! — proper storage makes all the difference. Keep them in an airtight container at room temperature for up to 24 hours — just be sure they’re covered so they don’t dry out. For longer storage, pop them into a sealed container in the fridge; they’ll stay fresh for about a week. Just know that the coating might get a little sticky if kept in the fridge for too long, so I usually recommend bringing them to room temperature before serving again for maximum crunch. Want to make them ahead? Freeze the baked or coated balls on a tray first, then transfer them into a zip-top bag and freeze for up to two months. Thaw in the fridge or at room temperature for a quick, chilled delight. If you’re planning to add a glaze or drizzle chocolate, do that right before serving to keep everything crisp and glossy. I’ve found that the flavors intensify after a day or two, so if you can wait — do. Trust me, they only get better with a little patience!
Frequently Asked Questions
Final Thoughts
If you’re looking for a fun, foolproof way to add a spicy, boozy twist to your snack game, these fireball whiskey balls are it. They’re nostalgic, a little daring, and so easy to customize. I’ve made these countless times for friends’ gatherings, family dinners, or just a lazy weekend treat — and each time, they get rave reviews. The best part? They come together quickly, so you don’t have to spend hours in the kitchen. Plus, the spicy warmth of the fireball whiskey makes them irresistibly cozy, especially on a cold night. I encourage you to experiment with flavors — maybe add a dash of cayenne, chopped nuts, or even a splash of caramel liqueur. These little bites are just begging to be personalized. Happy baking, friends — I can’t wait to hear how yours turn out! Drop a comment, share your twists, and let’s keep the fun rolling in the kitchen.
Spicy Chicken Tacos
Ingredients
Method
- Cut chicken breasts into thin strips. In a bowl, mix chili powder, cumin, paprika, salt, and pepper. Toss chicken with spice mixture until well coated.
- Heat olive oil in a skillet over medium heat. Add chicken strips and cook for 6-8 minutes until thoroughly cooked and slightly charred.
- Warm the corn tortillas in a dry skillet or microwave. Assemble the tacos by placing cooked chicken onto tortillas and topping with fresh lettuce, diced tomatoes, and shredded cheese.
- Serve immediately with lime wedges and your favorite hot sauce.