How to Make a Luscious Coffee Chocolate Cake
If there’s one thing I’ve learned over the years, it’s that a good coffee cake can make any day brighter. But toss in the rich, velvety flavor of Kahlua, and suddenly this isn’t just any coffee cake—it’s *the* perfect indulgence for when you want something a little special. I remember the first time I made this for a cozy weekend brunch; the smell alone had everyone rushing to the kitchen, and by the time it was out of the oven, there were empty plates and happy faces everywhere. Honestly, this one’s a lifesaver on busy nights when you need a dessert that feels fancy but is actually ridiculously easy to throw together. Plus, it’s a hit with my kids too—what’s better than a dessert that everyone asks for seconds of? So, grab your favorite mug of coffee and settle in—this Kahlua Coffee Cake is about to become your new family favorite!
What is kahlua coffee cake?
Think of Kahlua Coffee Cake as a dreamy blend of moist, tender cake swirled with a sweet, gooey coffee-flavored filling, topped with a luscious glaze that’s just a little boozy (but in the best way). The name comes from the coffee liqueur—Kahlua—that adds that signature deep, caramelized flavor. It’s essentially a coffee-infused dessert that’s perfect for breakfast, brunch, or even an after-dinner treat. What I love most about this cake is how it’s simple enough to whip up on a weekday but impressive enough to serve to guests. The base is a classic buttery vanilla cake, elevated by the richness of Kahlua, and that swirl of cinnamon and sugar in the middle gives it a little spice that warms your soul. It’s got all the comfort of a good coffee cake, but with a grown-up twist—trust me, it’s a total winner.
Why you’ll love this recipe?
There are so many reasons to adore this Kahlua Coffee Cake—where do I even start? First, the flavor is a total knockout. The rich aroma of coffee mixed with a hint of caramel from the Kahlua makes your house smell like heaven. This cake’s got that melt-in-your-mouth texture that’s just perfect—moist, slightly crumbly, with that beautiful swirl of filling that creates a surprise in every bite. What I really appreciate is how quick and straightforward it is to make; I’ve made this countless times and it never fails. Plus, it’s budget-friendly since the ingredients are staples I always have on hand. And here’s a fun bonus—this cake is insanely versatile. Serve it warm with a dollop of whipped cream or ice cream for dessert, or enjoy it as a sweet start to your day with a steaming mug of coffee. What I love most about this is how easily it adapts—sometimes I add a little extra cinnamon, or swap out the glaze for a simple dusting of powdered sugar when I want a lighter finish. Honestly, once you give this a try, it’ll become one of those recipes you turn to again and again—my family asks for it all the time! It’s comfort food with a little extra grown-up flair, and I promise, it disappears in minutes every single time.
How do I make a Kahlua coffee cake?
Quick Overview
This coffee cake comes together pretty quickly—think one bowl for the batter, a quick swirl of filling, and then into the oven it goes. I love how forgiving it is; you don’t need fancy gadgets or complicated steps. The secret is in the swirl of cinnamon sugar and the rich Kahlua, which makes every bite feel indulgent. When baking, keep an eye on it—it’s done when the top is golden and a toothpick poked in the middle comes out clean. Once it’s out, let it cool just enough to glaze, and then you’re ready to indulge in what might just be the best coffee cake you’ve ever had!
Ingredients
For the Main Batter:
– 2 cups all-purpose flour
– 1 ½ teaspoons baking powder
– ½ teaspoon salt
– ½ cup unsalted butter (melted or softened)
– 1 cup granulated sugar
– 2 large eggs
– 1 teaspoon vanilla extract
– ½ cup sour cream or Greek yogurt (for extra moistness)
– ¼ cup Kahlua coffee liqueur
For the Filling:
– ½ cup packed brown sugar
– 1 tablespoon ground cinnamon
– 2 tablespoons butter (melted)
– Optional: ¼ cup chopped nuts or chocolate chips for extra decadence
For the Glaze:
– 1 cup powdered sugar
– 2-3 tablespoons milk or cream
– 1 teaspoon vanilla extract
– Optional: a splash of Kahlua for boozy flavor
Step-by-Step Instructions
Step 1: Preheat & Prep Pan
Set your oven to 350°F (175°C). Grease a 9-inch round or square baking dish generously with butter or non-stick spray. You can also line it with parchment paper if you prefer easier cleanup. The key here is making sure nothing sticks or the cake falls apart when you try to slice it later. I do this step first so everything’s ready when I’m mixing—the smell of the butter and flour already starts wafting around, building anticipation.
Step 2: Mix Dry Ingredients
In a medium bowl, whisk together the flour, baking powder, and salt. This ensures an even distribution so your cake rises beautifully and doesn’t get dense. I always do this first to prevent overmixing later, which can make the cake crumbly instead of tender. Pro tip: Sifting isn’t necessary but definitely helpful if your flour isn’t fresh!
Step 3: Mix Wet Ingredients
In a large bowl, beat the melted butter and sugar until they’re well combined and a little fluffy (about 2 minutes). Then, add the eggs one at a time, beating well after each addition. Stir in the vanilla and Kahlua—trust me, that’s what gives it that irresistible coffee flavor. The batter will look a little thick but smooth. If it’s too stiff, just give it a splash of milk or a bit more Kahlua to loosen it up.
Step 4: Combine
Gradually add the dry ingredients into the wet, mixing just until combined. Do not overmix—this is my golden rule because overmixing can lead to a tough cake. Fold gently with a spatula if needed. Seeing the batter come together smoothly is such a good feeling—kind of like a little victory in the kitchen.
Step 5: Prepare Filling
Mix the brown sugar, cinnamon, and melted butter in a small bowl. If you’re feeling adventurous, toss in nuts, chocolate chips, or even a sprinkle of sea salt for contrast. This filling is what makes the swirl so delightful; I always taste a little to make sure the cinnamon-to-sugar ratio is just right. Sometimes I add an extra pinch of cinnamon if I want it even spicier.
Step 6: Layer & Swirl
Pour half of the batter into your prepared pan, then evenly sprinkle the cinnamon mixture over the top. Pour the remaining batter on top and use a skewer or knife to gently swirl the filling into the batter—think of it as creating beautiful marbled art. Don’t overdo it—just enough to see lovely streaks when you cut into it later. My trick is to do a few gentle figure-eights, making sure the filling stays in the middle and creates that gorgeous marbling effect.
Step 7: Bake
Pop it into the oven and bake for about 40-45 minutes. Start checking around 38 minutes; the top should be golden, and a toothpick inserted in the center should come out clean. If it starts to brown too quickly, tent with foil for the last 10 minutes. This is the part where the smell fills your kitchen and makes everyone’s belly rumble. Patience is key—the wait is so worth it!
Step 8: Cool & Glaze
Let the cake cool in the pan for about 15 minutes to set the filling and prevent sticking. While it’s cooling, whisk together your glaze ingredients until smooth—thick enough to coat but fluid enough to drip nicely. Drizzle generously over the warm cake, allowing the glaze to soak into all the nooks and crannies. The aroma of vanilla, coffee, and just a whisper of Kahlua will make you wish you could eat the whole thing right now.
Step 9: Slice & Serve
When it’s cooled just enough to handle but still warm, cut into slices. I like to use a serrated knife for the cleanest cut and serve each piece with a big mug of coffee or a scoop of vanilla ice cream for extra indulgence. I swear, this cake tastes like a little slice of coffeehouse heaven. Trust me on this one—warm, sweet, boozy, and sinful in the best possible way.
What to Serve It With
This cake is one of those all-occasion treats. For breakfast or brunch, pair it with a robust cup of dark roast coffee or an extra shot of espresso. It’s gorgeous plated with fresh berries or a dusting of powdered sugar if you’re feeling fancy. As dessert, a scoop of vanilla ice cream or a dollop of whipped cream makes every bite even better—my kids actually ask for seconds every time I make it. When I serve it at family gatherings, I love offering a variety of toppings—maybe a drizzle of caramel or chocolate sauce for an extra decadence. For casual snacking, it’s perfect just as it is—warm and comforting with a little mug of coffee on the side. Over the years, I’ve seen this cake disappear in minutes at my house, and I hope it becomes a special part of yours, too.
Top Tips for Perfecting Your Kahlua Coffee Cake
Perfecting this cake is about balancing flavors and paying attention to the little details. Here are some tips I’ve learned from making this countless times:
- Zucchini Prep: Not applicable here, but if you want to add a vegetable component for moisture, shred and squeeze out excess water—this keeps it tender without sogginess.
- Mixing Advice: Avoid overmixing once your dry and wet ingredients come together. I’ve found that a gentle fold with a spatula creates the best, fluffy crumb.
- Swirl Customization: Play with the swirl pattern—try making small circles or figure-eights for artistic presentation. The more marbled the better!
- Ingredient Swaps: No Greek yogurt? Heavy cream works great. Want a dairy-free version? Coconut yogurt or almond milk can substitute.
- Baking Tips: Keep an eye on your cake after 40 minutes—ovens can vary. If the top gets too brown but the center isn’t cooked, tent with foil and bake a little longer.
- Glaze Variations: For a tangy twist, add a splash of lemon juice or almond extract. Adjust the powdered sugar for a thicker or thinner glaze depending on your preference.
Over the years, I’ve tried a bunch of tweaks—adding a splash more Kahlua or less sugar—and honestly, the core is all about that lovely swirl and rich aroma. The key is to keep it simple, use good quality ingredients, and enjoy the process. Trust me—your kitchen will smell incredible, and every slice will remind you why homemade is always better.
Storing and Reheating Tips
This cake keeps surprisingly well. Store leftovers in an airtight container at room temperature for up to 2 days—that’s if it lasts that long! After that, I recommend refrigerating it if you want it to stay fresh longer. Wrap it tightly with foil or use a cake carrier—whatever keeps it from drying out. It’s best enjoyed within 3 days, but it also freezes beautifully. Wrap slices individually in plastic wrap, then pop them into a zip-top bag and freeze for up to 2 months. Thaw at room temperature or warm in the oven for a few minutes if you want to revive that just-baked feel. When reheating, skip the microwave if you can—it can make the cake a little rubbery. Instead, warm slices gently in the oven at 325°F for about 10 minutes, and then glaze once more for that fresh-from-the-oven look and feel. If it’s glazed, add the glaze fresh when serving—this keeps that glossy, inviting shine.
Frequently Asked Questions
Final Thoughts
Honestly, there’s something magical about a slice of Kahlua Coffee Cake. It’s cozy and indulgent, yet straightforward enough that I don’t feel overwhelmed—my kids ask for it on lazy weekend mornings, and friends always ask for the recipe. The blend of coffee, caramel, and cinnamon creates an irresistible aroma—trust me, your house will smell incredible. I love how adaptable it is, whether I sprinkle in extra nuts or swap the glaze for a simple dusting of powdered sugar. Once you’ve made this a few times, you’ll see how forgiving and versatile it is—perfect for all occasions, from breakfast to dessert. I hope you make it soon and fall in love with every bite. Feel free to come back and share your variations—I’d love to hear how yours turns out! Happy baking!
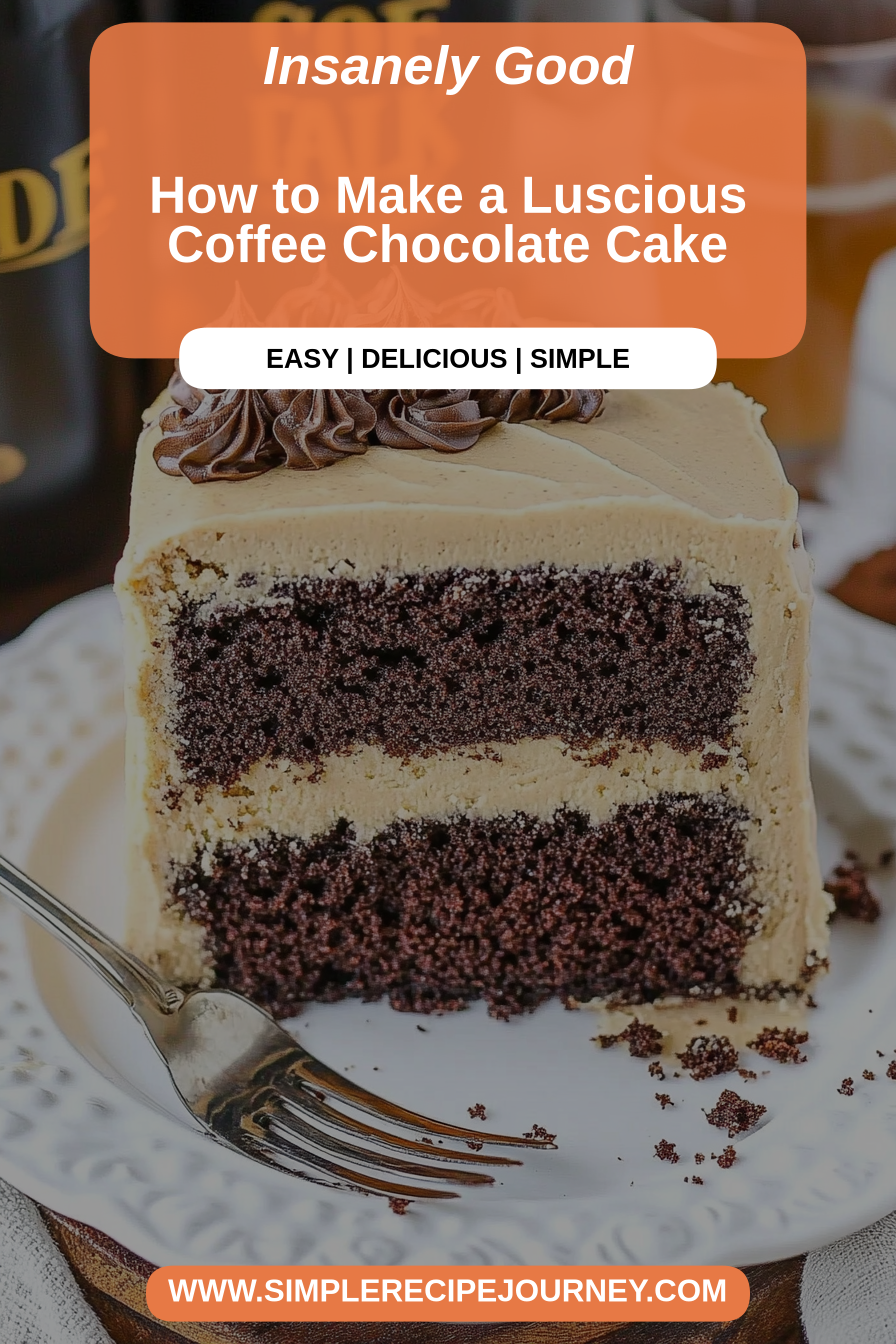
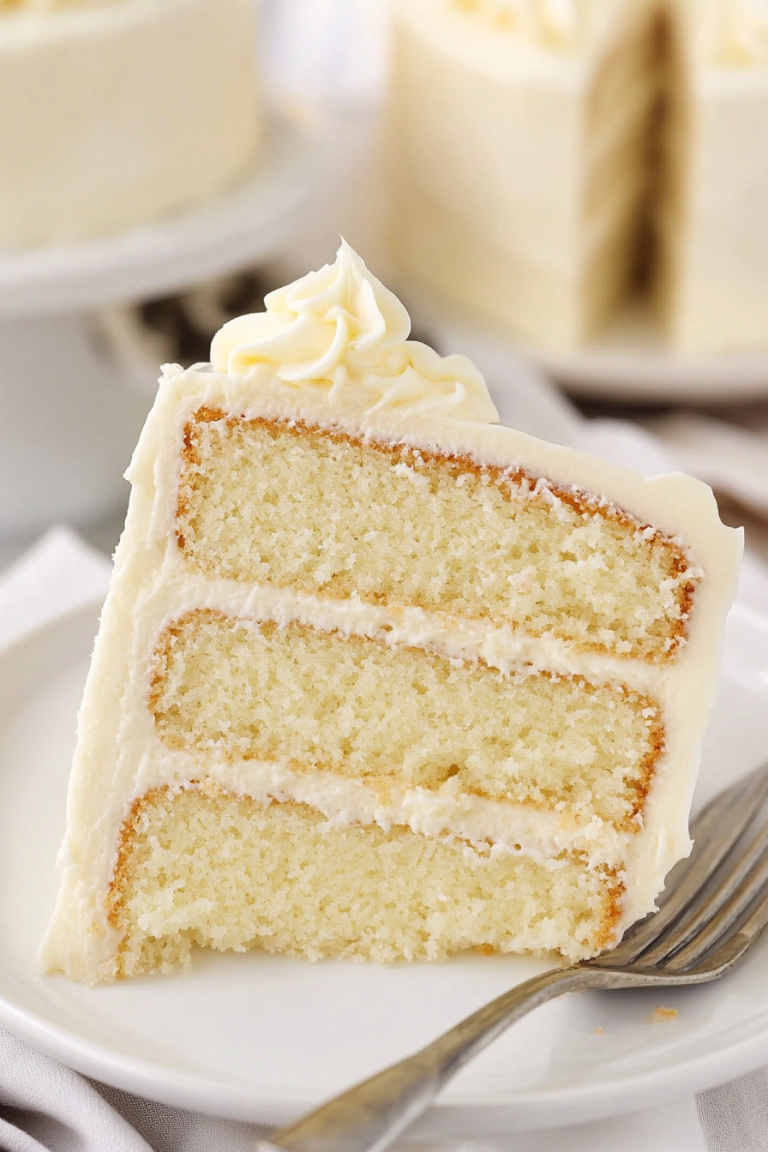
Kahlua Coffee & Chocolate Layer Cake
Ingredients
Method
- Preheat oven to 300°F. Prepare three 8-inch cake pans with parchment paper and grease the sides.
- In a large bowl, combine flour, sugar, cocoa powder, baking soda, and salt.
- Add eggs, milk, vegetable oil, Kahlua, and vanilla extract to the dry ingredients; mix well.
- Stir in hot coffee and remaining Kahlua; batter will be thin.
- Divide batter among pans and bake for 32-35 minutes, until a toothpick comes out clean.
- Cool the cakes completely on wire racks.
- Make frosting: Heat Kahlua to boiling, then add espresso powder and stir.
- Beat butter and shortening until smooth. Gradually add powdered sugar and Kahlua mixture, beating until smooth and fluffy.
- Assemble the cake: level the cakes if needed, layer with frosting, and cover the outside with remaining frosting.
- Decorate with sprinkles around the sides and top edges. Slice and serve.