Brookies Your Easy Chocolate Chip Cookie Brownie Fusion
You know those days, right? The ones where you’re staring into the abyss of your pantry, feeling that undeniable craving for something sweet, something that hits all the right notes – gooey, rich, a little bit chewy, a little bit fudgy. I’ve been there more times than I can count, and more often than not, my brain goes straight to one magical creation: the brookie. It’s the best of both worlds, a delicious mashup of a classic chocolate chip cookie and a decadent fudgy brownie, all baked into one glorious treat. My kids practically beg for these on a weekly basis, and honestly, I can’t blame them. This brookie recipe isn’t just a recipe for me; it’s a memory, a shortcut to instant happiness, and a surefire way to impress anyone, even if you’ve only got 30 minutes to whip it up. If you’ve ever debated between baking cookies or brownies, this brookie recipe is your answer. Trust me, it’s a game-changer!
What is Brookie?
So, what exactly is this glorious hybrid we call a brookie? Think of it like this: it’s not just a cookie on top of a brownie, or vice versa. It’s a harmonious blend where the chewy, slightly crisp edges of a perfect chocolate chip cookie meet the dense, fudgy center of a rich brownie. We’re talking about layers of pure bliss. The name itself, brookie, is a fun portmanteau of “brownie” and “cookie,” and it perfectly captures the essence of this dessert. It’s essentially two beloved treats doing a delicious dance together, creating a flavor and texture experience that’s more than the sum of its parts. It’s the ultimate crowd-pleaser, often fooling people into thinking it took way more effort than it actually does. This brookie recipe makes it accessible for everyone to enjoy this delightful fusion.
Why you’ll love this recipe?
There are so many reasons why this brookie recipe has earned a permanent spot in my recipe binder, and I know you’re going to love it just as much. First and foremost, the flavor explosion is just insane. You get that comforting, buttery sweetness from the cookie layer, studded with melty chocolate chips, and then that deep, dark chocolate richness from the brownie layer that’s just melt-in-your-mouth good. It’s a flavor profile that satisfies every single sweet tooth. And let’s talk about simplicity. I’ve worked hard to streamline this brookie recipe so it’s genuinely easy to make, even on a weeknight. You don’t need fancy equipment or a culinary degree. Plus, it’s surprisingly cost-effective! You probably already have most of the pantry staples on hand, making it a budget-friendly indulgence. What I love most about this brookie recipe, though, is its sheer versatility. You can customize it endlessly! Add nuts, different kinds of chocolate, a swirl of peanut butter – the possibilities are truly endless. It’s perfect for bake sales, potlucks, or just because you deserve a little treat. If you’ve ever enjoyed my Classic Fudgy Brownies. or my Chewy Chocolate Chip Cookies. Chewy Chocolate Chip Cookies., you’re going to be absolutely obsessed with this brookie recipe because it combines the very best elements of both!
How to Make Brookies
Quick Overview
This brookie recipe is all about creating two distinct batters and then layering them to bake into one incredible treat. You’ll whip up a simple brownie batter and a classic chocolate chip cookie dough, then carefully spoon and swirl them together in your baking pan. The magic happens in the oven as these two worlds collide, creating a texture and flavor combination that’s truly unforgettable. It’s straightforward, requires minimal fuss, and the payoff is immense. You’ll be amazed at how quickly this comes together, especially considering how impressive the final result is!
Ingredients
For the Brownie Batter:
Here’s what you’ll need for that intensely chocolatey base. I always opt for good quality cocoa powder; it really makes a difference in the depth of flavor. Using unsalted butter gives you more control over the saltiness, which is crucial for balancing the sweetness. You’ll need:
- 1/2 cup (1 stick) unsalted butter, melted
- 1 cup granulated sugar
- 2 large eggs
- 1 teaspoon vanilla extract
- 1/2 cup all-purpose flour
- 1/3 cup unsweetened cocoa powder (Dutch-processed for a richer flavor)
- 1/4 teaspoon baking soda
- 1/4 teaspoon salt
- 1/2 cup chocolate chips (semi-sweet or dark are my favorites here)
For the Cookie Dough:
This is your classic, comforting chocolate chip cookie dough, with just a few tweaks to ensure it bakes up perfectly alongside the brownie layer. Using brown sugar gives that wonderful chewiness and caramel notes.
- 1/2 cup (1 stick) unsalted butter, softened
- 1/2 cup packed light brown sugar
- 1/4 cup granulated sugar
- 1 large egg
- 1 teaspoon vanilla extract
- 1 1/4 cups all-purpose flour
- 1/2 teaspoon baking soda
- 1/4 teaspoon salt
- 1 cup chocolate chips (a mix of semi-sweet and milk chocolate is divine!)
For Optional Drizzle (if you want to go extra decadent!):
This is purely optional, but oh-so-worth-it if you’re a chocolate lover.
- 1/4 cup chocolate chips
- 1 teaspoon coconut oil (optional, for glossiness)
Step-by-Step Instructions
Step 1: Preheat & Prep Pan
First things first, get your oven preheating to 350°F (175°C). This is super important for even baking, so don’t skip it! Then, grab an 8×8 inch baking pan. I like to line mine with parchment paper, leaving an overhang on the sides. This makes lifting the brookie out a breeze later, preventing any sticky situations. Make sure the parchment lines the bottom and the sides well; it’s a lifesaver when it comes time to cut and serve.
Step 2: Mix Dry Ingredients
For the brownie batter, in a medium bowl, whisk together the flour, cocoa powder, baking soda, and salt. Whisking them together now ensures that everything is evenly distributed, so you don’t end up with pockets of flour or baking soda in your finished brookie. You want everything to be nicely combined and lump-free. Give it a good whisk!
Step 3: Mix Wet Ingredients
In a separate, larger bowl, combine the melted butter and granulated sugar for the brownie batter. Whisk until they’re well incorporated. Then, beat in the eggs one at a time, followed by the vanilla extract. Keep whisking until the mixture is smooth and glossy. This is where the richness starts to build!
Step 4: Combine
Now, pour the dry ingredients into the wet ingredients for the brownie batter. Fold them together gently with a spatula or wooden spoon until just combined. Don’t overmix! Overmixing can lead to tough brownies, and we definitely don’t want that. Stir in the 1/2 cup of chocolate chips for the brownie layer. The batter should be thick and fudgy-looking. Set this aside for a moment.
Step 5: Prepare Filling
Time for the cookie dough! In another bowl (or the bowl of your stand mixer), cream together the softened butter, light brown sugar, and granulated sugar until light and fluffy. This aerates the dough and is key to that perfect cookie texture. Beat in the egg and vanilla extract until smooth. In a separate small bowl, whisk together the flour, baking soda, and salt. Gradually add the dry ingredients to the wet, mixing on low speed (or by hand) until just combined. Be careful not to overmix here either! Finally, stir in the 1 cup of chocolate chips for the cookie dough. You should have a lovely, scoopable cookie dough.
Step 6: Layer & Swirl
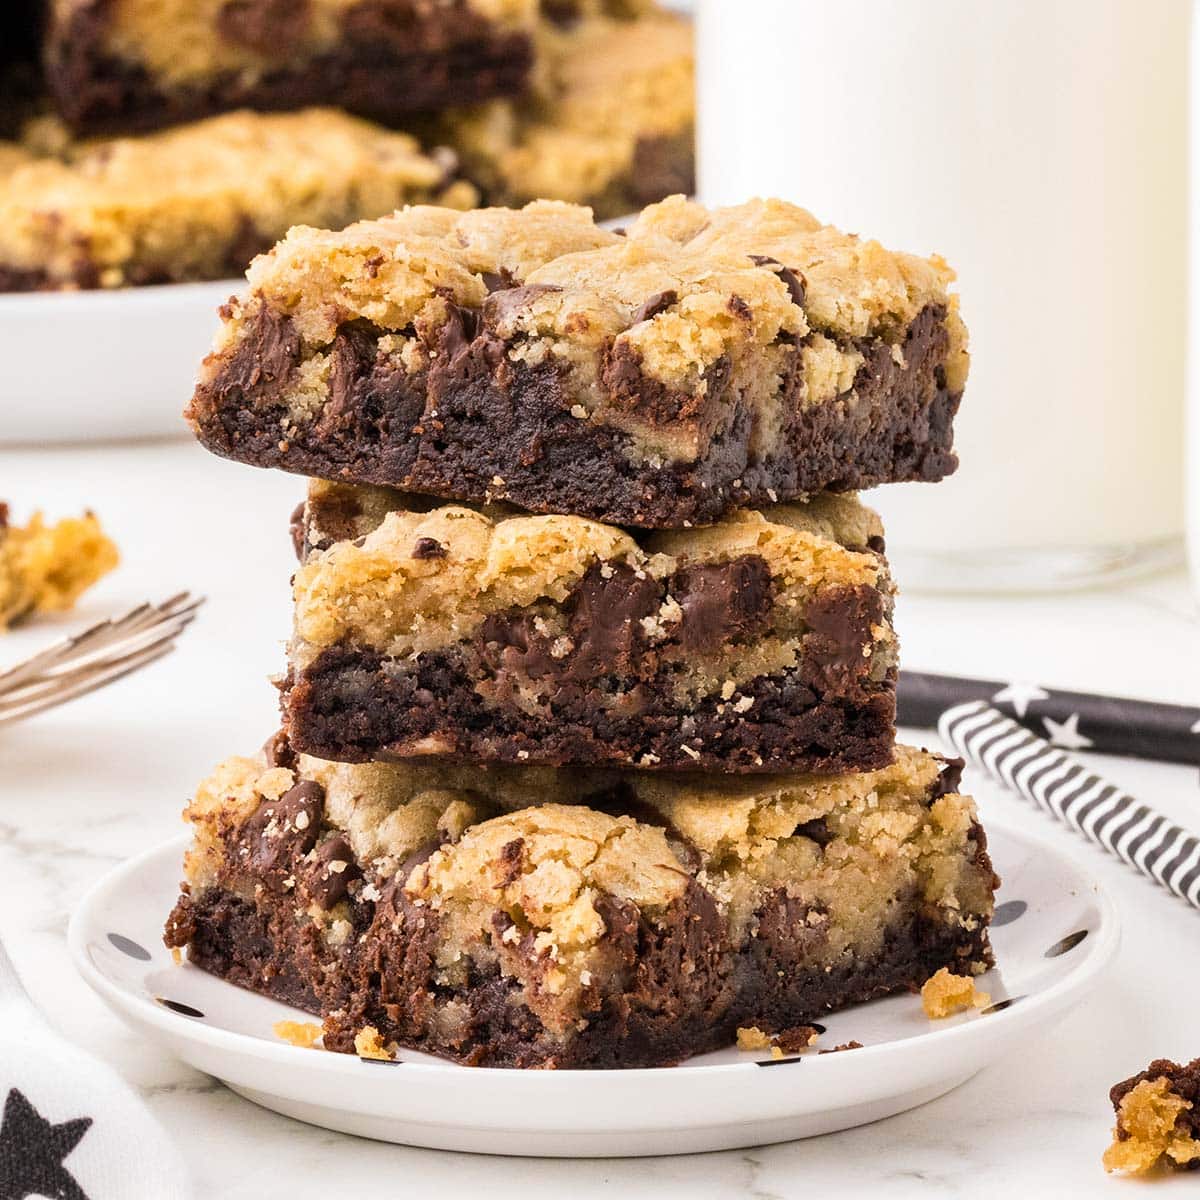
This is the fun part where the magic happens! Spoon about half of the brownie batter into your prepared baking pan, spreading it out evenly as much as you can. It might be a little thick, so don’t worry if it’s not perfect. Then, drop spoonfuls of the cookie dough evenly over the brownie batter. Don’t worry about covering it entirely; there will be gaps. Now, take the remaining brownie batter and dollop it over the cookie dough. At this point, you can gently swirl the two batters together using a knife or a skewer. Don’t go crazy; just a few swirls to create that beautiful marbled effect. You want distinct layers, but with some beautiful marbling!
Step 7: Bake
Pop that pan into your preheated oven. Bake for 25-35 minutes. The exact time will depend on your oven, but you’re looking for the edges to be set and a toothpick inserted into the brownie section to come out with moist crumbs attached, not wet batter. The cookie dough portion should look baked but still soft. Overbaking is the enemy of fudgy brownies and chewy cookies, so keep an eye on it!
Step 8: Cool & Glaze
Once they’re out of the oven, resist the urge to cut them immediately! Let them cool in the pan on a wire rack for at least 30 minutes. This allows them to set up properly. If you’re adding the optional drizzle, melt the chocolate chips with the coconut oil (if using) in a microwave-safe bowl in 30-second intervals, stirring in between, until smooth. Drizzle this over the slightly cooled brookie. Let it set completely before slicing.
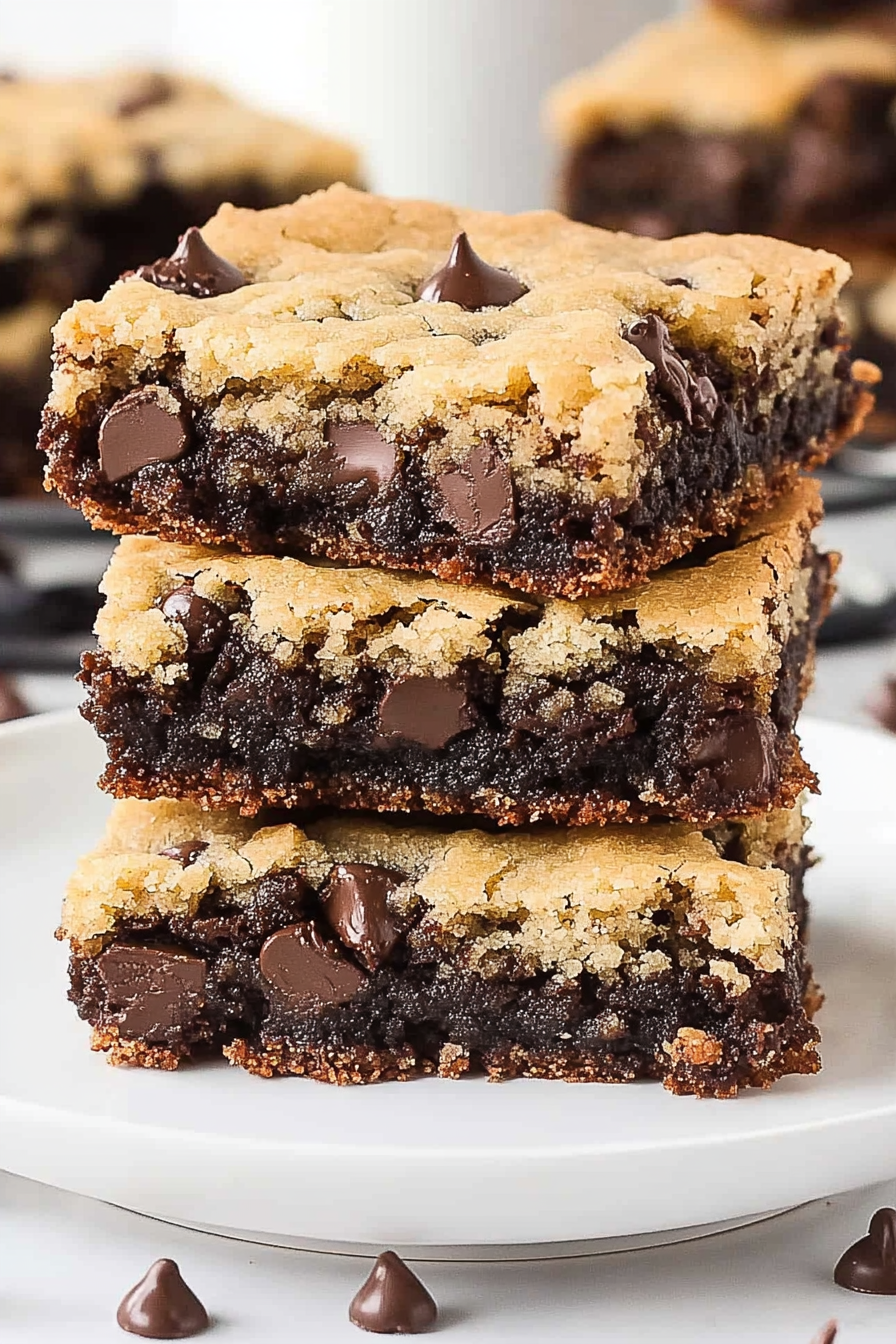
Step 9: Slice & Serve
Once cooled (and the drizzle is set, if you added it), use the parchment paper overhang to lift the entire brookie slab out of the pan. Transfer it to a cutting board. For the cleanest slices, use a sharp knife and wipe it clean between each cut. Serve them at room temperature for the best texture. You’ll get about 16 squares from an 8×8 pan, but honestly, who’s counting?
What to Serve It With
These brookies are practically a meal in themselves, but they also play wonderfully with a few friends. For a cozy breakfast treat, I love pairing a warm brookie square with a strong cup of black coffee or a creamy latte. The bitterness of the coffee really cuts through the sweetness beautifully. If you’re serving these for brunch, they’re gorgeous presented on a tiered stand with some fresh berries on the side – the tartness of the raspberries is a lovely contrast. For a true dessert experience, warm them up slightly and serve with a scoop of vanilla bean ice cream or a dollop of whipped cream. The contrast of warm brookie and cold ice cream is pure heaven! And for those late-night, comfort-food cravings, a simple glass of cold milk is all you need. My family also loves them crumbled over yogurt for a decadent parfait. It’s amazing how versatile these are!
Top Tips for Perfecting Your Brookies
I’ve made this brookie recipe more times than I can count, and along the way, I’ve picked up a few tricks that I think will help you achieve brookie perfection every single time. For the brownie batter, using good quality cocoa powder is a non-negotiable for me. It really amplifies that deep chocolate flavor that makes brownies so irresistible. Don’t be afraid to use Dutch-processed cocoa if you can find it; it yields a darker color and a smoother, less acidic chocolate taste. When it comes to mixing, remember that overmixing is the enemy of both tender brownies and chewy cookies. Stir just until the ingredients are combined, especially after adding the flour. A few streaks of flour are better than developing too much gluten, which leads to a tough texture. For that beautiful marbled effect, don’t go overboard with the swirling. Gentle swirls with a knife or skewer are all you need to create visual interest without muddying the distinct flavors of the brownie and cookie layers. I’ve tried adding different chocolate chip varieties – using a mix of semi-sweet, milk, and even dark chocolate chips in both layers really adds complexity and keeps things interesting with every bite. When it comes to baking, ovens can be so temperamental! My biggest piece of advice is to watch them closely during the last 10 minutes of baking. A toothpick test in the brownie portion is your best friend; you want moist crumbs, not a clean plate (which means overbaked) or wet batter. If your oven tends to bake hotter on one side, rotate the pan halfway through. And if you’re feeling extra fancy, the optional chocolate drizzle isn’t just for show; it adds another layer of chocolatey goodness and a beautiful glossy finish that makes them look bakery-bought. Experiment with different swirl patterns too – sometimes I do more of a figure-eight motion, other times just a few zigzags. It’s all about what looks appealing to you!
Storing and Reheating Tips
One of the best things about this brookie recipe is how well they store, making them perfect for having a treat on hand. At room temperature, they’ll stay fresh for about 2-3 days if stored in an airtight container. I usually just keep them in the pan, covered tightly with plastic wrap, or transfer them to a good quality container once they’ve completely cooled. If they’re not completely cooled before you cover them, you risk condensation, which can make them a bit soggy. For longer storage, pop them in the refrigerator. In the fridge, they’ll last for about a week. They’ll firm up a bit more in the fridge, which some people actually prefer! When you’re ready to enjoy a chilled brookie, I recommend letting it sit at room temperature for about 15-20 minutes to soften slightly, or you can pop it in the microwave for just 10-15 seconds – just enough to take the chill off and bring back some of that fudgy texture. Freezing is also an option for longer-term storage. Once they’re completely cooled, wrap individual squares tightly in plastic wrap, then place them in a freezer-safe bag or container. They should keep well for up to 2-3 months. To thaw, simply unwrap them and let them come to room temperature, or use the microwave trick. I usually wait to add the chocolate drizzle until after they’ve cooled and I’m ready to serve them, as the drizzle can sometimes soften or melt during refrigeration or freezing.
Frequently Asked Questions
Final Thoughts
So there you have it – my absolute favorite brookie recipe! I really hope you give this a try. It’s more than just a dessert; it’s that perfect balance of two beloved classics, bringing together the chewy comfort of a chocolate chip cookie with the rich decadence of a fudgy brownie. It’s a recipe that consistently brings smiles to my family’s faces, and I’m confident it will do the same for yours. Whether you’re looking for a treat to impress, a comforting bake for a rainy day, or just a delicious way to satisfy a sweet craving, this brookie recipe is an absolute winner. If you love this, you might also enjoy my Salted Caramel Brownies or my Double Chocolate Chunk Cookies for more delightful baking adventures. I can’t wait to hear how your brookies turn out! Don’t be shy – leave a comment below with your thoughts, your ratings, or any fun variations you tried. Happy baking, my friends!
Decadent Brookies
Ingredients
Method
- Preheat the oven to 325° F. Line a straight sided metal 9x13 baking pan with parchment paper and lightly spray with non-stick baker’s spray. Be sure to use a piece of parchment paper that is large enough to allow for some overhang on the sides. This will make it easier to lift the solid baked brookie from the baking pan to slice and serve. Set aside.
- To make the brownie layer, add to a large mixing bowl the ingredients called for (eggs, water and vegetable oil) on the box of fudgy brownie mix. Stir to combine according to package directions.
- Pour the boxed fudge brownie batter into the prepared baking pan, spread to an even layer and set aside.
- To make the cookie layer, add to a separate large mixing bowl the unsalted butter, light brown sugar and granulated sugar. Using a handheld mixer on medium speed, beat the sugars and melted butter until fully combined.
- Add the whole egg, egg yolk and vanilla extract. Beat on medium speed again to combine all the ingredients until you get a smooth mixture.
- To the bowl of wet ingredients, add the all-purpose flour, cornstarch, baking soda and salt. Mix on low speed until no dry streaks of flour remain.
- Add the semi-sweet chocolate chips to the cookie batter and, using a rubber spatula or wooden spoon, fold them into the batter until they are evenly distributed.
- Using two spoons, carefully scoop and drop small dollops of the cookie dough evenly over the surface of the brownie batter. You want to make sure that you distribute the cookie dough as evenly as possible over the brownie batter to ensure even baking of both the brownie and cookie layers of the brookie.
- Bake the brookie for 20 minutes covered with a piece of aluminum foil then remove the aluminum for and bake uncovered for an additional 15-20 minutes or until a toothpick inserted into the center comes out clean or with just a few moist brownie crumbs on it. Your cookie layer should be golden brown and fully set in the center. Covering the pan with aluminum foil for the last 15-20 minutes of baking time ensures that both layers cook completely without burning the cookie dough layer.
- Remove the brookie from the oven and allow it to cool completely on the counter, at room temperature.
- When the brookie has cooled completely, use the overhanging parchment paper to carefully lift it out of the pan. Place the whole brookie onto a large cutting board and slice into 12 large, or 24 small, servings.