Easy Thumbprint Cookies A Delicious Treat
There are some recipes that just feel like home, you know? Like a warm hug in cookie form. For me, that’s these thumbprint cookies. I swear, the moment the buttery, sweet aroma starts wafting from the oven, my whole family starts gathering in the kitchen, noses twitching. It takes me right back to Grandma Elsie’s house, her always-floured apron, and the way her eyes would twinkle when she’d let me press my thumb into the soft dough. They’re not complicated, not fancy, but oh, they are pure magic. If you’ve ever loved a classic sugar cookie but wanted something a little more… well, *special*, you’re going to adore these thumbprint cookies. They’re like the sophisticated cousin of a regular cookie, ready for a tea party but perfectly happy just hanging out with a glass of milk.
What is a thumbprint cookie?
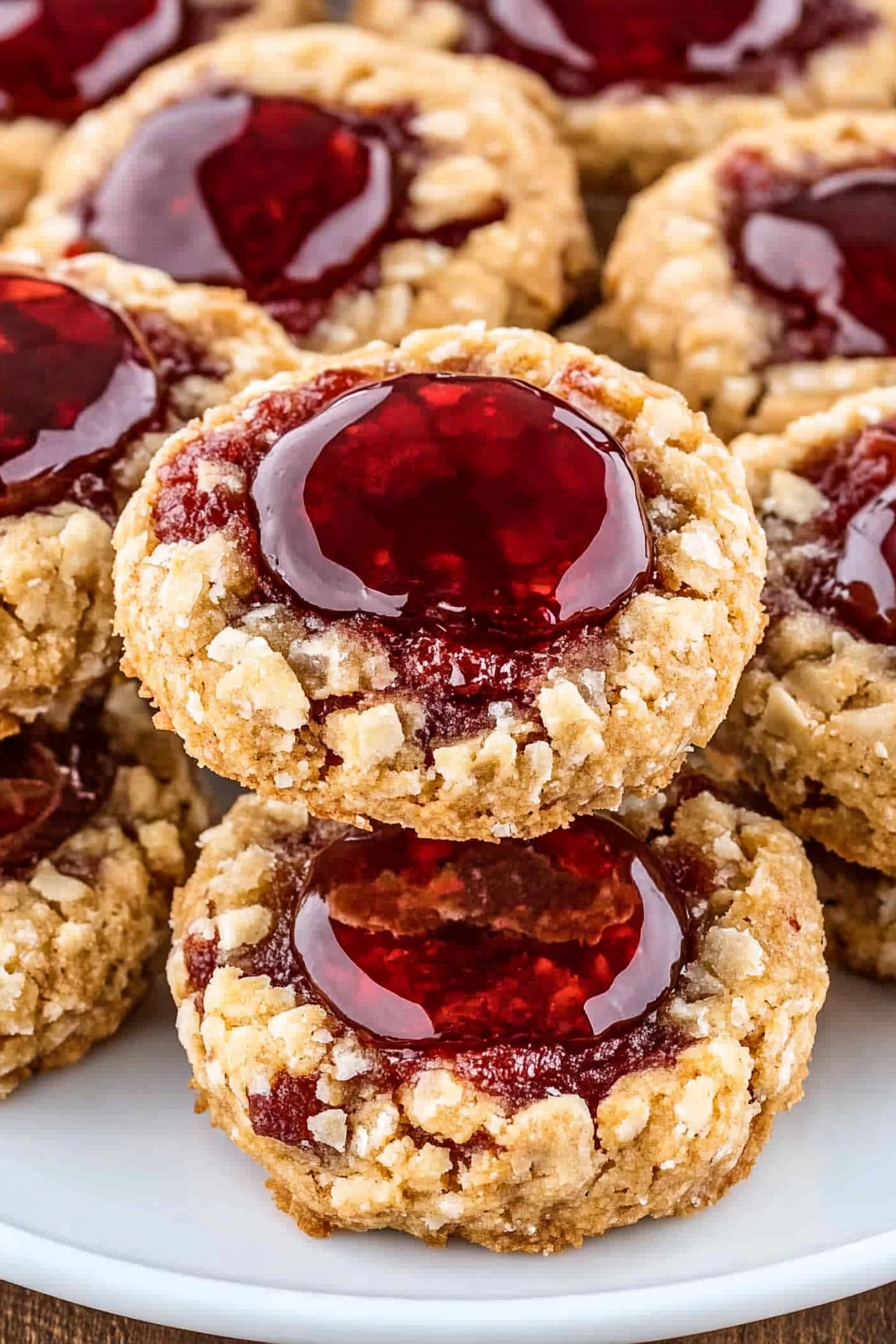
So, what exactly makes a thumbprint cookie a thumbprint cookie? It’s pretty much in the name! It starts with a wonderfully tender, buttery cookie dough that you roll into little balls. Then, here’s the fun part: you use your thumb (or the back of a small spoon, if you’re feeling fancy!) to make a perfect little indentation right in the center of each ball. This little dip is where all the deliciousness happens. It’s designed to hold a dollop of your favorite jam, preserves, or even a caramel sauce. As they bake, the cookie edges get golden and slightly crisp, while the center stays soft and the jam bubbles up, creating this irresistible sweet and slightly tart center. Think of it as a miniature cookie tart, a delightful bite-sized treat that’s just begging to be eaten.
Why you’ll love this recipe?
Honestly, I could go on and on about why I adore these thumbprint cookies, but let me try to narrow it down. First, the flavor is just sublime. It’s that perfect balance of sweet, buttery goodness with whatever delicious filling you choose. My go-to is always raspberry jam because I love that little tang it brings, but Grandma Elsie used to make a batch with apricot, and they were heavenly too. The texture is another big win – a delicate crispness around the edges that gives way to a soft, melt-in-your-mouth interior. And the best part? They’re surprisingly easy! I always thought making jam-filled cookies would be a hassle, but this recipe is so straightforward. Even on a busy weeknight, if a craving strikes, I can whip up a batch of these. They’re also incredibly budget-friendly; the ingredients are pretty standard pantry staples. And the versatility! You can switch up the jam, add a sprinkle of sugar on top before baking, or even try a chocolate ganache filling for a richer treat. What I love most, though, is the nostalgia. Every bite is a trip back in time, a reminder of simple joys and family love. It’s a cookie that truly brings people together.
How do I make thumbprint cookies?
Quick Overview
This recipe is all about simple steps leading to extraordinary flavor. We’ll mix up a buttery dough, create little wells, fill them with jam, and bake them until golden. The key is gentle handling of the dough and not overbaking. It’s a process that’s as enjoyable to make as it is to eat, and the results are always impressive, even though it feels like you’ve barely lifted a finger. Trust me, this is a keeper!
Ingredients
For the Main Dough:
This is the heart of our cookie, so we want it to be rich and tender. I always use unsalted butter, and make sure it’s softened, not melted! This really makes a difference in the texture. For the flour, all-purpose is perfect. I also like to add a touch of almond extract along with the vanilla for an extra layer of flavor, but that’s totally optional if you prefer just vanilla.
- 1 cup (2 sticks) unsalted butter, softened
- 1/2 cup granulated sugar
- 1 teaspoon vanilla extract
- 1/4 teaspoon almond extract (optional)
- 1 large egg yolk
- 2 1/4 cups all-purpose flour
- 1/4 teaspoon salt
For the Filling:
This is where you get to play! I love a good quality fruit jam or preserves. Raspberry, strawberry, apricot, or even a mixed berry blend all work beautifully. You want something that’s not too runny. If your jam is a bit thick, you can stir in a teaspoon of water or lemon juice to loosen it up slightly. You can also use fruit pie filling in a pinch! Just make sure it’s a nice, thick consistency.
- 1/2 cup fruit jam or preserves (your favorite flavor!)
For the Glaze (Optional but Highly Recommended!):
This adds a little something extra, a touch of sweetness and shine. It’s super simple to whip up. You just need powdered sugar and a liquid – milk or a little bit of fruit juice works great. If you use milk, it’s a nice clean sweetness. If you use raspberry juice, for example, it adds a lovely pink hue and a little extra fruity flavor. Aim for a drizzly, but not too thin, consistency.
- 1 cup powdered sugar
- 2-3 tablespoons milk or fruit juice
Step-by-Step Instructions
Step 1: Preheat & Prep Pan
First things first, get your oven all fired up to 350 degrees Fahrenheit (175 degrees Celsius). While that’s heating, grab a couple of baking sheets and line them with parchment paper. This is my favorite trick for easy cleanup and to make sure the cookies don’t stick. You don’t want to be scrubbing burnt sugar off your pans, trust me!
Step 2: Mix Dry Ingredients
In a medium bowl, whisk together the all-purpose flour and the salt. Just a quick whisk to make sure they’re evenly distributed. This helps prevent any pockets of salt in your finished cookies. Set this aside for now.
Step 3: Mix Wet Ingredients
In a large bowl, using an electric mixer (or a whisk and some elbow grease!), cream together the softened butter and granulated sugar until the mixture is light and fluffy. This usually takes a few minutes. It should look pale yellow and airy. Beat in the vanilla extract and almond extract (if using), then add the egg yolk and beat until well combined. It might look a little curdled at first, but keep mixing; it’ll come together.
Step 4: Combine
Now, it’s time to bring our wet and dry ingredients together. Gradually add the flour mixture to the butter mixture, mixing on low speed (or by hand) until just combined. Be careful not to overmix! Overmixing can lead to tough cookies, and we want these to be wonderfully tender. Stop mixing as soon as you don’t see any streaks of dry flour. The dough will be soft and a bit sticky.
Step 5: Prepare Filling
If you haven’t already, grab your favorite jam. If it’s a little too stiff to spoon easily, give it a good stir to loosen it up. You want it to be spreadable but not runny. This is what will fill those lovely little thumbprint wells we’re about to make!
Step 6: Layer & Swirl
Scoop rounded tablespoons of dough and roll them into balls. Place them about 2 inches apart on your prepared baking sheets. Now, take your thumb (I like to lightly flour mine or dip it in a bit of water to prevent sticking) and gently press an indentation into the center of each dough ball, making sure not to press all the way through to the bottom. Then, spoon about a teaspoon of your chosen jam into each indentation. You want it to be a nice, generous dollop!
Step 7: Bake
Pop those beautiful cookies into your preheated oven. Bake for 12-15 minutes, or until the edges are lightly golden brown and the centers are set. They might look a little soft, but they’ll firm up as they cool. Keep an eye on them, as oven temperatures can vary!
Step 8: Cool & Glaze
Let the cookies cool on the baking sheets for about 5-10 minutes before carefully transferring them to a wire rack to cool completely. This is super important – if you try to move them too soon, they can break. Once they are completely cool, whisk together the powdered sugar and milk or juice for the glaze. Start with 2 tablespoons of liquid and add more, a teaspoon at a time, until you reach a nice drizzly consistency. Drizzle the glaze over the cooled cookies. Let the glaze set before serving.
Step 9: Slice & Serve
These are best served at room temperature. The glaze will have firmed up a bit, and the jam will be wonderfully soft. They’re perfect just as they are, or you can serve them with a cup of tea or a glass of milk. Enjoy every delightful bite!
What to Serve It With
These thumbprint cookies are wonderfully versatile, making them a hit for any occasion. For a cozy breakfast, I love pairing them with a strong cup of coffee. The sweetness of the cookie is a lovely contrast to the bold coffee flavor. Just one or two with my morning brew feels like a special treat. For brunch, they add a touch of elegance. I’ll arrange them on a pretty platter alongside some fresh fruit and maybe a yogurt parfait. They look so inviting! As a dessert, they’re a lighter option after a rich meal. A small plate of these with an espresso or a glass of dessert wine is just perfect. And of course, for those spontaneous cozy snack moments? These are the ultimate comfort food. I’ll often just grab one (or three!) while I’m curled up with a book. My kids absolutely adore them after school with a big glass of cold milk – it’s their favorite way to wind down. Sometimes, for holidays, I’ll even arrange them on a platter with some chocolate chip cookies and shortbread for a cookie buffet that disappears in minutes!
Top Tips for Perfecting Your Thumbprint Cookies
Over the years, I’ve picked up a few tricks that make these thumbprint cookies consistently amazing. So, let’s dive into some wisdom gained from countless batches! For the dough, the most crucial thing is the butter temperature. Make sure it’s truly softened, not melted. If it’s too cold, it won’t cream properly, and if it’s melted, your cookies will spread too much. When you’re combining the wet and dry ingredients, stop mixing the moment you no longer see dry flour. I know it’s tempting to mix a bit more, but that’s the secret to a tender crumb. Overmixing develops the gluten, which can make your cookies tough. When making the thumbprint indentation, a lightly floured thumb works best, or you can use the end of a wooden spoon. Don’t press too hard – you want a nice well, not a hole that goes all the way through, or your jam will leak out during baking. Speaking of jam, if you’re using a very firm jam, a tiny splash of water or lemon juice can help make it more spoonable without making it too runny. If your jam does leak out a bit, don’t panic! It still tastes delicious. For baking, I always rotate my baking sheets halfway through the baking time. This ensures even browning, especially if your oven has hot spots. Also, trust your eyes more than the timer; ovens can be so different! For the glaze, consistency is key. If it’s too thick, it’ll be hard to drizzle; too thin, and it’ll run right off. Aim for something that flows but still has some body to it. If you accidentally make it too thin, just whisk in a little more powdered sugar. If it’s too thick, add liquid a drop at a time. I’ve also experimented with different extracts, and while vanilla is classic, a tiny bit of orange extract in the dough pairs beautifully with apricot jam, or a hint of lemon zest can brighten up raspberry.
Storing and Reheating Tips
One of the best things about thumbprint cookies is how well they store! Once they’ve cooled completely, I like to store them in an airtight container at room temperature. They’re usually at their best for about 3-4 days. If I’ve made a big batch and I know we won’t eat them all that quickly, I’ll pop them in the refrigerator. Stored in the fridge, they’ll keep well for about a week, although they can sometimes get a little softer due to the humidity. For longer storage, freezing is your best friend! I’ll freeze them in a single layer on a baking sheet until they’re solid, then transfer them to a freezer-safe bag or container. They’ll stay delicious for up to 2-3 months. When you want to enjoy them, just let them thaw at room temperature for a few hours. If they seem a little dry after thawing, you can gently warm them in a low oven (around 250°F or 120°C) for a few minutes. For the glaze, I always recommend adding it *after* the cookies are fully cooled and *before* you store them, especially if you’re eating them within a day or two. If you plan to freeze them, it’s actually better to glaze them *after* they’ve thawed. This prevents the glaze from getting sticky or cracking in the freezer. Just whisk up a fresh batch of glaze and drizzle away once they’re ready to be enjoyed!
Frequently Asked Questions
Final Thoughts
There you have it – Grandma Elsie’s famous thumbprint cookies! I really hope you give these a try. They’re more than just a recipe to me; they’re a connection to my past and a way to create new memories with my own family. They’re proof that sometimes, the simplest things are the most delicious and the most meaningful. If you love these, you might also enjoy my classic shortbread recipe or my super fudgy brownies – both are family favorites! I can’t wait to hear what you think of these thumbprint cookies. Please leave a comment below and let me know how yours turned out, what jam you used, or any fun variations you tried! Your feedback truly makes my day. Happy baking, everyone!
Thumbprint Cookies
Ingredients
Method
- Preheat your oven to 350°F (175°C).
- In a large bowl, beat together the brown sugar, shortening, softened butter, vanilla extract, and egg yolk until creamy.
- Gradually stir in the flour and salt until a soft dough forms.
- Roll the dough into 1-inch balls. Place the egg white in one shallow bowl and the finely chopped pecans in another. Dip each dough ball first into the egg white, then roll it in the chopped pecans to coat evenly.
- Place the coated balls about 1 inch apart on an ungreased cookie sheet. Using your thumb, gently press an indentation into the center of each cookie, being careful not to press all the way through.
- Bake for 13 minutes, or until the edges are lightly golden. Immediately transfer the cookies from the cookie sheet to a wire rack to cool for 30 minutes.
- Once cooled, fill each cookie's indentation with approximately 0.5 tsp of your chosen jam.