Easy Chocolate Pie Recipe You’ll Love
Okay, so, I have a confession to make. If there’s one thing that can instantly transport me back to my grandma’s kitchen, it’s the rich, decadent aroma of a perfectly baked chocolate pie. It’s that deep, dark, almost mysterious scent that just screams comfort and pure, unadulterated joy. And you know what? This chocolate pie? It’s that pie. But here’s the kicker: it looks like it took hours of painstaking effort, but it’s actually ridiculously simple. I’m talking “weeknight-wonder” simple. It’s one of those recipes that makes you feel like a baking superhero, even if you just threw it together while half-watching your favorite show. Forget those complicated layered cakes that require a degree in pastry arts; this chocolate pie is your crowd-pleasing, smile-inducing, no-fuss hero.
What is Heavenly Chocolate Pie?
So, what exactly *is* this magical chocolate pie I’m raving about? Think of it as the most luscious, fudgy chocolate filling you can imagine, nestled in a tender, buttery crust, all crowned with a silky smooth chocolate glaze. It’s not a dense, heavy flourless chocolate cake, nor is it a light and airy mousse pie. It’s somewhere in the perfect middle – rich enough to feel truly indulgent, but with a texture that’s delightfully tender and melt-in-your-mouth. The name itself, well, I just call it “The Ultimate Chocolate Pie” because, honestly, that’s what it is for me. It’s the kind of pie that makes people ask for the recipe immediately, and then you get to smile and say, “Oh, it was nothing!” It’s essentially a hug in pie form, made with simple ingredients that come together to create something truly extraordinary.
Why you’ll love this recipe?
What is the secret behind this delicious chocolate pie?
The Flavor Explosion: What is the Flavor Explosion? Oh, the flavor! It’s a deep, rich chocolate experience that’s not overly sweet. We’re talking pure cocoa bliss that coats your tongue and makes you close your eyes in delight. It has just the right balance of sweetness and intense chocolate notes, making every bite pure heaven. It’s the kind of chocolate pie that makes you forget all your troubles for a glorious moment.
Unbelievable Simplicity: I’ve already said it, but it bears repeating. This pie is shockingly easy to make. The crust is no-fuss, and the filling comes together in a single bowl. No fancy techniques, no special equipment – just good old-fashioned mixing. It’s perfect for when you’re craving something spectacular but don’t have a lot of time or energy. My kids can even help with some of the steps, which always makes it more fun!
Budget-Friendly Bliss: You’d think a pie this decadent would require expensive ingredients, right? Wrong! The beauty of this chocolate pie is that it relies on pantry staples. Good quality cocoa powder, some sugar, flour, butter, eggs – these are things most of us already have on hand. It’s proof that you don’t need to break the bank to create something truly special for your family or guests. It’s a win for your taste buds and your wallet!
Versatile Darling: While it’s a showstopper on its own, this chocolate pie is also wonderfully versatile. Serve it slightly warm with a dollop of whipped cream, or chilled with a scoop of vanilla ice cream. It’s fantastic for holidays, birthdays, potlucks, or just because it’s Tuesday. I’ve even made mini versions in muffin tins for individual treats, and they were a huge hit! It truly adapts to whatever you need it to be.
What I love most about this recipe, beyond all those amazing points, is how reliable it is. I’ve made this chocolate pie countless times, for every occasion imaginable, and it *never* fails to impress. It’s become my go-to for last-minute dessert emergencies, and it always gets rave reviews. It’s the kind of recipe that makes you feel confident in the kitchen.
How to Make This Dreamy Chocolate Pie
Quick Overview
This chocolate pie is all about achieving that perfect balance of rich, moist filling and a tender crust, topped off with a glossy glaze. The magic happens in a few simple stages: preparing a quick and easy pie crust, whipping up a luscious chocolate filling in one bowl, baking it until just set, and finishing it with a decadent chocolate glaze. The key is not to overcomplicate things; each step is designed to be straightforward, leading you to a stunning dessert without the stress. Seriously, it’s so easy, you’ll wonder why you ever bought pie from a store!
Ingredients
For the Crust:
2 ½ cups all-purpose flour
1 teaspoon salt
1 cup (2 sticks) unsalted butter, very cold and cut into cubes
½ cup ice water
Tip: Using very cold butter and ice water is crucial for a flaky crust. I always keep my butter in the freezer for about 15 minutes before I start, and I measure my water and pop it in the ice tray.
For the Chocolate Filling:
1 ½ cups granulated sugar
¾ cup unsweetened cocoa powder (Dutch-processed gives a deeper color and flavor, but natural works too!)
1 teaspoon baking soda
½ teaspoon salt
2 large eggs, at room temperature
1 cup buttermilk (if you don’t have buttermilk, you can make your own by adding 1 tablespoon of lemon juice or white vinegar to 1 cup of milk and letting it sit for 5-10 minutes)
½ cup vegetable oil (or other neutral oil like canola)
2 teaspoons pure vanilla extract
1 cup hot brewed coffee (this is my secret weapon for intensifying the chocolate flavor!)
Tip: Room temperature eggs emulsify better, leading to a smoother filling. And that hot coffee? It dissolves the cocoa powder beautifully and makes the chocolate flavor sing without making the pie taste like coffee. Trust me on this one!
For the Chocolate Glaze:
½ cup unsalted butter, melted
⅓ cup unsweetened cocoa powder
2 cups powdered sugar, sifted
¼ cup milk (or heavy cream for extra richness)
1 teaspoon vanilla extract
Tip: Sifting your powdered sugar is key for a lump-free glaze. If it seems too thick, add a splash more milk; if too thin, add a bit more powdered sugar. You want it pourable but not watery.
Step-by-Step Instructions
Step 1: Preheat & Prep Pan
Preheat your oven to 375°F (190°C). Lightly grease a 9-inch pie plate. If you’re using a store-bought pie crust, follow package directions. For a homemade crust, we’ll get to that in a moment!
Step 2: Mix Dry Ingredients
In a large bowl, whisk together the flour and salt. If you’re making a homemade crust, you’ll cut in the cold butter here until the mixture resembles coarse crumbs with some pea-sized pieces of butter remaining. Then, gradually add the ice water, mixing until just combined. Don’t overwork the dough! Gather it into a ball, flatten into a disc, wrap in plastic wrap, and refrigerate for at least 30 minutes. Once chilled, roll it out to fit your pie plate, crimp the edges, and prick the bottom with a fork several times. Blind baking isn’t strictly necessary for this recipe as the filling helps it bake through, but if you prefer a firmer bottom crust, you can blind bake it for about 15 minutes at 375°F (190°C) with pie weights or dried beans, then remove them and bake for another 5 minutes until lightly golden. If not blind baking, just proceed with the chilled crust.
Step 3: Mix Wet Ingredients
In a separate, large mixing bowl (this is where the one-bowl magic happens for the filling!), whisk together the granulated sugar, cocoa powder, baking soda, and salt. Make sure there are no lumps of cocoa. Then, add the eggs, buttermilk, vegetable oil, and vanilla extract. Whisk until everything is thoroughly combined and smooth. It will look a bit thick at this point, and that’s totally normal.
Step 4: Combine
Now, carefully pour the hot brewed coffee into the wet and dry mixture. Whisk gently until the batter is smooth and just combined. Don’t overmix! The hot coffee will thin out the batter to a pourable consistency, and you’ll notice the chocolate flavor really deepening. It should smell amazing already!
Step 5: Prepare Filling
This is less of a “prepare” step and more of a “pour” step. Once your crust is ready (chilled, or blind-baked if you chose to do so), pour the luscious chocolate batter into the prepared pie crust. Fill it all the way to the top; it won’t overflow because it doesn’t rise dramatically.
Step 6: Layer & Swirl
Wait, swirl? For a chocolate pie? Not in this recipe! This step is actually about ensuring the filling is evenly distributed in the crust. Make sure the batter fills the crust evenly. If you’re using a blind-baked crust, gently place it on a baking sheet before pouring in the filling. This makes it easier to transfer in and out of the oven.
Step 7: Bake
Bake in the preheated oven for 35-45 minutes, or until a toothpick inserted into the center comes out with moist crumbs attached, but no wet batter. The top should look set and slightly puffed. Keep an eye on it in the last 10 minutes to make sure the crust doesn’t get too dark. If it starts browning too quickly, you can loosely tent it with aluminum foil.
Step 8: Cool & Glaze
Let the pie cool completely on a wire rack. This is crucial! If you try to glaze a warm pie, the glaze will just melt off. Once the pie is completely cool (I usually let it sit for at least 2-3 hours, or even overnight), whisk together the melted butter, cocoa powder, sifted powdered sugar, milk, and vanilla extract for the glaze until smooth and glossy. If it’s too thick, add a tiny bit more milk; if too thin, add a bit more powdered sugar. Pour the glaze evenly over the top of the cooled pie, letting it drip down the sides. Let the glaze set for about 30 minutes before slicing.
Step 9: Slice & Serve
Once the glaze has set, use a sharp knife to slice the pie. For the cleanest slices, you can dip your knife in hot water and wipe it dry between cuts. Serve at room temperature or slightly chilled. It’s divine on its own, but a little dollop of freshly whipped cream or a scoop of vanilla bean ice cream takes it to another level of spectacular.
What to Serve It With
This chocolate pie is a chameleon, working beautifully for pretty much any occasion. I’ve got a few favorite pairings that I’ve tested and can vouch for!
For Breakfast: Now, I know what you’re thinking – pie for breakfast? Hear me out! A small slice of this chocolate pie, perhaps with a hint of that beautiful glaze, paired with a strong, hot cup of black coffee or a creamy latte? It’s like a decadent brunch treat that will power you through your morning. I sometimes toast a thin slice just slightly, and it’s almost like a fancy brownie. My kids, of course, think this is the ultimate breakfast treat, and who am I to argue?
For Brunch: For a more elegant brunch spread, this chocolate pie is a fantastic addition. Serve it with a side of fresh berries – raspberries and strawberries are particularly good with chocolate. A glass of sparkling cider or even a mimosa complements the richness without being too heavy. I like to serve it sliced on pretty individual plates, maybe with a tiny dusting of cocoa powder or a delicate swirl of whipped cream artfully placed beside it.
As Dessert: This is where it truly shines! After a nice dinner, a slice of this chocolate pie is the perfect finale. It pairs wonderfully with a rich espresso or a port wine. For an extra indulgence, try it with a scoop of high-quality vanilla bean ice cream – the contrast of hot and cold is divine. Or, get fancy with a drizzle of raspberry coulis or a sprinkle of sea salt flakes on top of the glaze.
For Cozy Snacks: Sometimes, you just need a little pick-me-up, right? This chocolate pie is perfect for those moments. A warm mug of hot chocolate alongside a slice, or even just a glass of cold milk, is pure comfort. It’s the kind of treat you can enjoy curled up on the couch with a good book or while catching up with a friend. It’s my go-to when I’m craving something sweet late at night but don’t want to bake a whole cake.
My personal family tradition is to have this for the first real chilly day of autumn. It just feels like the perfect warm hug in dessert form, and the smell fills the whole house with coziness. We usually serve it with a generous helping of whipped cream and everyone digs in with a spoon.
Top Tips for Perfecting Your Chocolate Pie
I’ve made this chocolate pie more times than I can count, and over the years, I’ve picked up a few tricks that I think make all the difference. These are my tried-and-true tips to ensure your pie turns out absolutely perfect every single time:
Crust Perfection: The key to a fantastic crust is keeping everything cold – the butter, the water, even your hands if it’s a warm day! Don’t overwork the dough once you add the water; just bring it together until it holds. Overworking develops gluten, which makes the crust tough. And when you’re rolling it out, don’t stress too much about a perfect circle; the rustic crimped edges add to its charm. If you’re blind baking, make sure to prick the bottom thoroughly with a fork so it doesn’t puff up like a balloon.
Mixing Advice: When you’re combining the wet and dry ingredients for the filling, whisk until *just* combined. Overmixing can lead to a tougher cake-like texture. The hot coffee step is crucial for dissolving the cocoa and creating that incredibly smooth, rich batter. Make sure to use good quality cocoa powder; it really makes a difference in the depth of flavor. I’ve found that Dutch-processed cocoa gives a smoother, less acidic taste and a darker color, which is what I prefer for this particular chocolate pie.
Baking Tips: Ovens can be tricky, so it’s always good to know your oven. The baking time is a guideline, so use the toothpick test to check for doneness. You’re looking for moist crumbs, not wet batter. If the crust edges start to brown too quickly, don’t be afraid to loosely tent them with aluminum foil. It’s better to cover them and let the center bake through than to have a burnt crust and a runny middle. I always bake my pies on the middle rack to ensure even heat circulation.
Glaze Consistency is Key: The glaze might seem simple, but getting the consistency right is important. If it’s too thick, it’ll be hard to spread and might crack. If it’s too thin, it’ll run off the sides. My rule of thumb is to aim for a consistency like thick pancake batter. Start with the recommended amounts, and then adjust by adding a teaspoon of milk at a time if it’s too thick, or a tablespoon of sifted powdered sugar if it’s too thin. And remember, the pie needs to be *completely* cool before glazing, otherwise, you’ll have a melty mess. I’ve made that mistake before and learned my lesson!
Ingredient Swaps & Additions: While this recipe is perfect as is, feel free to experiment! I’ve tried using almond milk instead of buttermilk in a pinch, and it worked surprisingly well, making the filling even creamier. You can also add a pinch of instant espresso powder to the dry ingredients to further boost the chocolate flavor. For a little twist, a tablespoon of finely chopped bittersweet chocolate can be stirred into the batter before pouring it into the crust for extra pockets of melted chocolate.
Cooling Patience: I know it’s tempting to dive right in, but letting the pie cool properly is non-negotiable, especially before glazing. This allows the filling to set up completely. If you rush it, you’ll end up with a soupy center. Trust me, the wait is worth it for that perfect slice!
Storing and Reheating Tips
Knowing how to store your delicious chocolate pie properly ensures you can enjoy it for days to come, and it stays tasting as wonderful as the day you made it. I’ve got this down to a science:
Room Temperature: If your chocolate pie has a glaze that has set and isn’t made with perishable ingredients like cream cheese, it can usually be stored at room temperature for up to 2 days. Make sure to cover it loosely with plastic wrap or a pie keeper to prevent it from drying out or picking up any odors from the kitchen. Keep it out of direct sunlight, as that can melt the glaze. This is perfect for when you know you’ll be finishing it off quickly!
Refrigerator Storage: For longer storage, or if your pie contains ingredients that require refrigeration (like if you chose to add a cream cheese swirl), it’s best to store it in the refrigerator. After the glaze has set, cover the pie tightly with plastic wrap or transfer it to an airtight container. It will stay fresh and delicious for up to 4-5 days in the fridge. I find that the flavors actually meld even more beautifully after a day or two in the fridge. It’s also wonderful served chilled!
Freezer Instructions: Yes, you can freeze this chocolate pie! To do this, bake and cool the pie completely, but *don’t* glaze it yet. Wrap the unglazed pie tightly in a layer of plastic wrap, followed by a layer of aluminum foil. You can also place it in a freezer-safe container. It can be frozen for up to 2-3 months. To thaw, remove it from the freezer and let it thaw overnight in the refrigerator. Once thawed, you can prepare and apply the glaze as usual.
Glaze Timing Advice: As I mentioned, for the best results when storing, it’s ideal to glaze the pie *after* it has completely cooled and just before you plan to serve it, or at least after it has been stored at room temperature for a day or two. If you’re freezing the unglazed pie, you’ll glaze it after it thaws. If you refrigerate a glazed pie, the glaze might become slightly sticky or develop a bit of condensation, but it’s still perfectly edible and tasty!
Frequently Asked Questions
Final Thoughts
So there you have it – my absolute favorite chocolate pie recipe! It’s honestly one of those recipes that I’m almost hesitant to share because it feels like such a treasured secret, but it’s just too good not to. It’s the kind of dessert that brings people together, sparks smiles, and makes everyone feel a little bit happier. I truly believe that everyone deserves to experience this level of chocolatey bliss without the stress of complicated baking. If you’re looking for a reliable, incredibly delicious, and surprisingly easy chocolate pie, please give this one a try. It’s the perfect balance of rich flavor and comforting familiarity, and I just know you’re going to love it as much as my family and I do.
If you give this chocolate pie a whirl, I’d be absolutely thrilled to hear all about it! Please leave a comment below to share how it turned out, any tweaks you made, or even your favorite way to serve it. Your feedback means the world to me! And if you’re a fellow chocolate lover, you might also enjoy my recipe for the Ultimate Fudgy Brownies or my Easy Chocolate Mousse. Happy baking, and I can’t wait to see your beautiful chocolate pies!
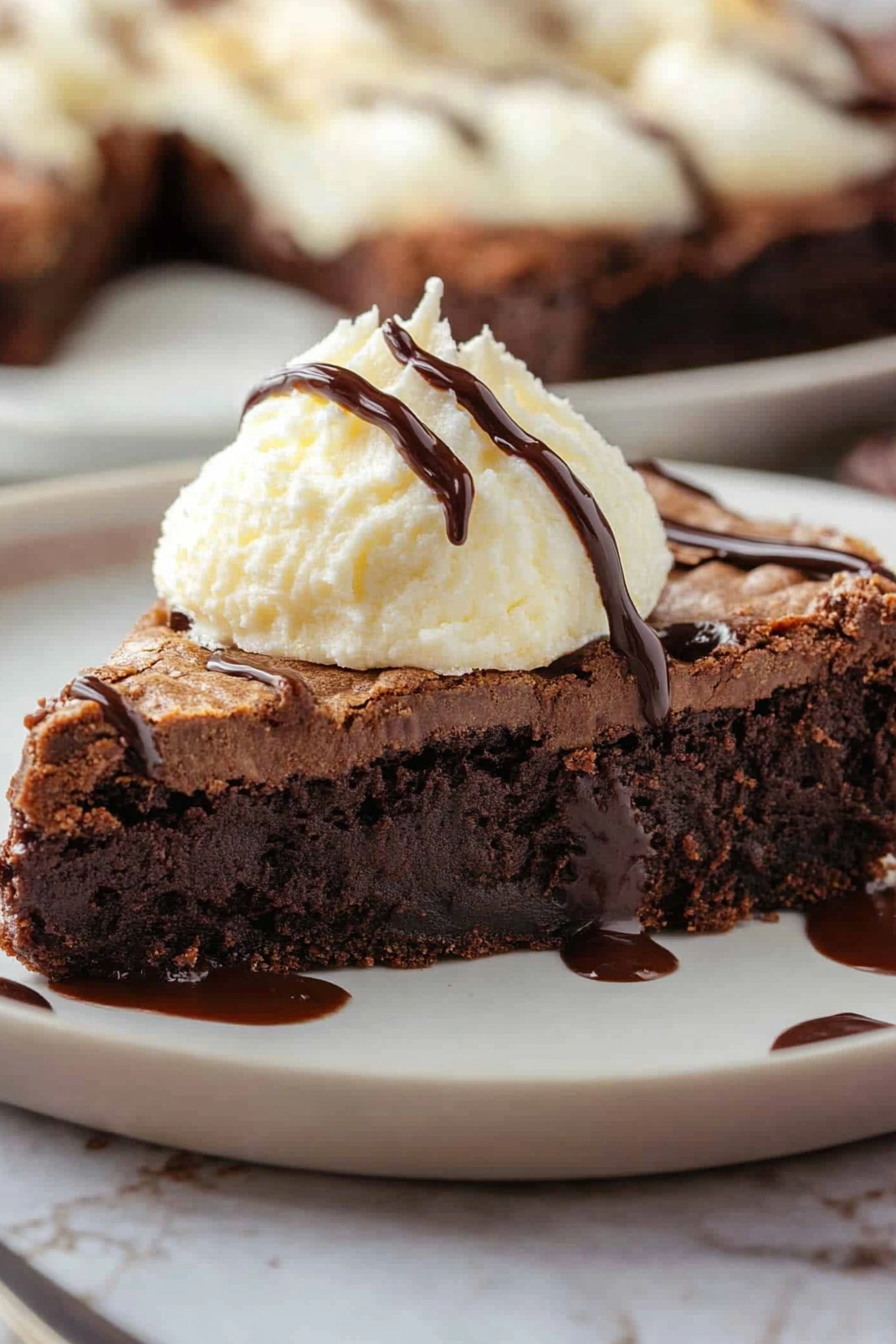
Easy Chocolate Fudge Pie
Ingredients
Method
- Preheat your oven to 350°F (175°C). Lightly grease a 9-inch pie pan.
- In a medium saucepan over low heat, combine the unsweetened chocolate and butter. Stir constantly until both are completely melted and smooth. Remove from heat.
- Whisk in the granulated sugar, all-purpose flour, and vanilla extract until well combined.
- Add the eggs one at a time, whisking well after each addition until the batter is smooth and glossy.
- Pour the batter into the prepared pie pan, spreading it evenly.
- Bake for 27 to 30 minutes, or until the edges are set and the center is still slightly fudgy.
- Let the pie cool slightly before serving warm. Serve with chocolate sauce and vanilla ice cream, if desired.