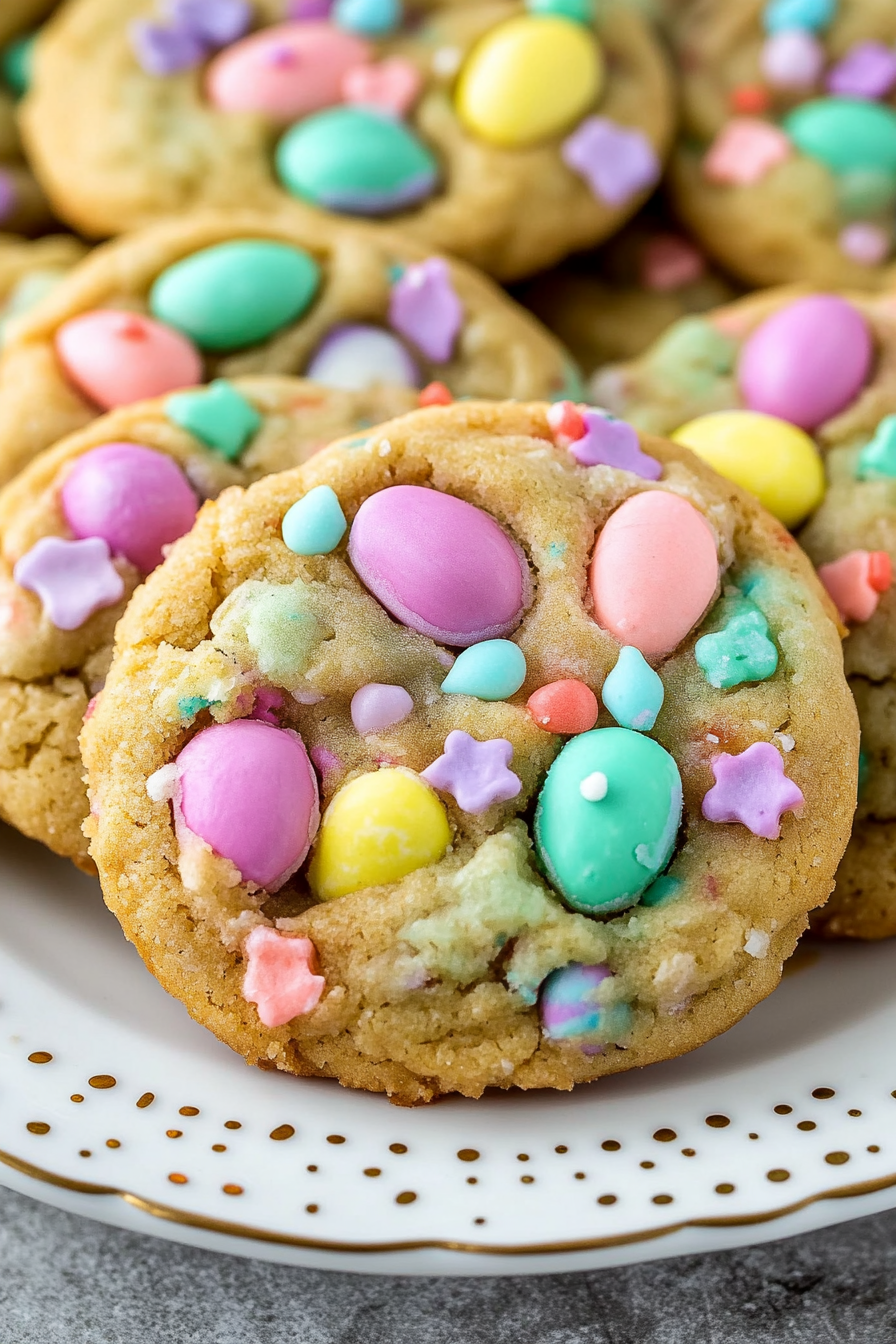
Festive MM Cookies A Simple Easter Treat
Oh, hello there! Come on in, grab a mug. I was just thinking about these cookies and how they’re practically synonymous with springtime at our house. Every year, as soon as the first daffodil peeks through the soil, my kids start asking, “When are we making the Easter cookies, Mom?” And honestly, I can’t blame them. These aren’t just any cookies; they’re little bites of sunshine, bursting with just the right amount of sweetness and a hint of something bright and cheerful. They remind me of those early spring mornings when the air is still crisp but you know warmth is on its way. They’re fluffy, a little bit tangy, and always disappear far too quickly. You know how some people go all out with elaborate cakes or intricate sugar cookies for Easter? Well, this is my happy medium. It’s a showstopper without all the fuss, and trust me, the aroma that fills the kitchen while these bake is pure magic. They’re a lovely change from the usual rich chocolate or heavy shortbread, offering a delicate, melt-in-your-mouth texture that’s just heavenly.
What are my “Absolutely Perfect” Easter cookies?
So, what exactly are these magical Easter cookies? Think of them as a delightful hybrid, a bit like a tender muffin crossed with a pillowy scone, but in cookie form and with a vibrant citrusy zing. The “Easter” part comes from the way we decorate them – usually with a light, lemony glaze and perhaps some pastel sprinkles if we’re feeling fancy. The name itself is a bit of a family inside joke because I’ve tinkered with so many cookie recipes over the years, and this one just hit all the right notes. It’s not overly sweet, which I love, and it has this wonderful, almost cake-like tenderness that’s just divine with a cup of tea or coffee. They’re incredibly forgiving, too, which is a big win in my book. You don’t need any fancy equipment or professional decorating skills to make them look and taste incredible. They’re essentially simple, honest-to-goodness cookies made with love, perfect for sharing during the festive season.
Why you’ll love this recipe?
Let me tell you why these Easter cookies have earned a permanent spot in my baking repertoire, and why I’m so excited to share them with you. First and foremost, the flavor is just *chef’s kiss*. They have a gentle sweetness that’s perfectly balanced by a bright, zesty citrus note – usually lemon, but sometimes I sneak in a little orange zest too, depending on what I have on hand. It’s the kind of flavor that just screams spring! Then there’s the texture. Oh, the texture! They are unbelievably tender and moist, almost like a little cloud. They’re not crumbly or dry like some cookies can be, and they don’t get tough if you happen to bake them a minute too long (though I’ve learned to avoid that!).
What I also adore is how incredibly simple they are to whip up. Seriously, you can have these mixed and in the oven in under 20 minutes. This is a lifesaver on busy days, especially when you need a last-minute treat for a bake sale or just want to surprise the family with something homemade. No creaming butter and sugar for ages, no complicated chilling steps. Just mix, drop, and bake! And talk about cost-effective! The ingredients are all pantry staples. You likely have most of them right now. That’s a huge win for me, especially with the cost of groceries these days. Plus, they’re so versatile. While they’re fantastic with a simple lemon glaze, you can easily switch up the zest, add a touch of vanilla bean paste, or even a sprinkle of cinnamon if you’re feeling adventurous. They’re also surprisingly good as a base for a quick dessert; just warm them up slightly and serve with a dollop of whipped cream and some fresh berries. Honestly, compared to my attempts at intricate sugar cookies that take hours and can end up a little too hard, these are my go-to for effortless elegance and deliciousness. They always get rave reviews!
How do I make Easter cookies?
Quick Overview
This recipe is all about simplicity and deliciousness. We’ll quickly whisk together some basic dry ingredients, then mix in our wet ingredients until just combined. A gentle swirl of a tangy glaze after they’ve cooled completes these delightful Easter cookies. The beauty is in its straightforward nature – no fuss, just fantastic results every single time. It’s perfect for when you want that homemade goodness without spending all day in the kitchen.
Ingredients
For the Main Batter:
You’ll need about 2 cups of all-purpose flour. I always use unbleached because I find it gives a slightly better texture, but any all-purpose will do. Make sure it’s measured correctly – spoon it into the cup and level it off, don’t scoop directly from the bag, or you’ll end up with dense cookies! Next up, 1 ½ teaspoons of baking powder. This is crucial for that lovely lift and tender crumb. Don’t skip it, and make sure it’s fresh! A pinch of salt, about ½ teaspoon, is there to balance out the sweetness. Then, for that signature brightness, we’ll use the zest of one large lemon. If you can find Meyer lemons, even better – they’re a bit sweeter and less tart.
For the Filling:
This is where the magic really happens for the texture and moisture. You’ll need 1 cup of granulated sugar. This is just enough to give them sweetness without being overwhelming. Then, one large egg, lightly beaten. This acts as our binder and adds richness. And for the absolute key to their tenderness, ½ cup of unsalted butter, softened. Make sure it’s truly softened, not melted! I usually leave mine on the counter for about an hour before I plan to bake. Finally, ½ cup of milk. Whole milk gives the best results for richness, but I’ve tested this with 2% and even almond milk, and it actually made it even creamier and more tender, so feel free to experiment!
For the Glaze:
This is super simple. You’ll need about 1 cup of powdered sugar. Sifted is best to avoid lumps, but if you’re in a hurry, just whisk it really well. Then, the liquid for our glaze: 2-3 tablespoons of fresh lemon juice. Start with 2, and add more only if needed to reach your desired consistency. A little bit of fresh lemon zest can also be added here for an extra pop of flavor, but it’s totally optional.
Step-by-Step Instructions
Step 1: Preheat & Prep Pan
First things first, let’s get our oven preheated to 375 degrees Fahrenheit (that’s about 190 degrees Celsius). While the oven is warming up, I like to prepare my baking sheets. I line them with parchment paper. This is a game-changer, trust me! It prevents sticking and makes cleanup an absolute breeze. You want to make sure your baking sheets are evenly heated, so placing them in the oven while it preheats can help with that, though it’s not strictly necessary for this recipe.
Step 2: Mix Dry Ingredients
In a large mixing bowl, I combine the flour, baking powder, salt, and lemon zest. I usually give this a good whisk with a fork or a whisk for about 30 seconds. You want to make sure everything is evenly distributed. This ensures that the leavening and flavor are consistent throughout every single cookie. It sounds simple, but it really does make a difference in the final texture and taste!
Step 3: Mix Wet Ingredients
In a separate, medium-sized bowl, I cream together the softened butter and granulated sugar until it’s light and fluffy. This usually takes about 2-3 minutes with an electric mixer, or a bit longer if you’re doing it by hand. Then, I beat in the lightly beaten egg and the milk until everything is well combined. It should look smooth and creamy. I always make sure my butter is truly softened here – if it’s too cold, it won’t incorporate properly, and if it’s melted, your cookies will spread too much. Temperature is key!
Step 4: Combine
Now, it’s time to bring our wet and dry ingredients together. I pour the wet ingredients into the bowl with the dry ingredients. Using a spatula or a wooden spoon, I mix everything together *just* until it’s combined. It’s really important not to overmix here. A few streaks of flour are okay; they’ll disappear as you mix. Overmixing develops the gluten in the flour, which can lead to tough cookies, and we definitely don’t want that. You’re looking for a thick, slightly sticky batter.
Step 5: Prepare Filling
(Oops, slight mistake in my structure here! The “filling” is actually incorporated directly into the batter. So this step is actually about preparing the batter for scooping!) I use a cookie scoop, about 1.5 to 2 tablespoons in size, to portion out the dough. This helps ensure all your cookies are roughly the same size so they bake evenly. I drop spoonfuls of the dough onto my prepared baking sheets, leaving about 2 inches between each cookie to allow for a little spreading.
Step 6: Layer & Swirl
(This step is more relevant for a swirled cookie, which these aren’t typically. For these simple Easter cookies, we skip a swirl and focus on shaping.) Since these are more of a drop cookie, we don’t really have a swirling step. The beauty is in their simple, slightly rustic shape. You can gently flatten the tops a tiny bit with the back of your spoon if you prefer a flatter cookie, but I usually leave them as is for a bit more of a domed, cake-like texture.
Step 7: Bake
Pop those baking sheets into your preheated oven. Bake for about 10-12 minutes, or until the edges are lightly golden brown and the centers look set. They might still look a little soft in the very middle, but that’s okay because they’ll continue to cook slightly on the hot baking sheet after you remove them from the oven. My oven tends to run a little hot, so I often check around the 10-minute mark. You don’t want them to get too dark!
Step 8: Cool & Glaze
Once they’re done baking, carefully remove the baking sheets from the oven. Let the cookies cool on the baking sheets for about 5 minutes. This allows them to firm up just enough so they don’t fall apart when you move them. Then, transfer them to a wire rack to cool completely. While they’re cooling, whisk together the powdered sugar and lemon juice for the glaze. Start with 2 tablespoons of juice and add more a teaspoon at a time until you get a drizzly consistency – thick enough to coat, but thin enough to drizzle. Once the cookies are completely cool, drizzle the glaze over the tops. You can use a spoon or a piping bag for a neater look, or just go freestyle for a more rustic charm. Let the glaze set for about 15-20 minutes before serving or storing.
Step 9: Slice & Serve
These cookies are best served at room temperature. Once the glaze has set, they’re ready to be enjoyed! They’re perfect for packing into lunchboxes, arranging on a party platter, or simply enjoying with a hot cup of tea or a cold glass of milk. They don’t need slicing, of course – they’re individual cookies! The delicate citrus flavor makes them a wonderful accompaniment to lighter spring meals or as a sweet treat on their own.
What to Serve It With
These Easter cookies are so wonderfully versatile, they can really go with almost anything! For a lovely start to the day, especially on Easter morning, I love serving them alongside a strong cup of coffee or a fragrant pot of Earl Grey tea. Their subtle sweetness and bright citrus notes are the perfect counterpoint to a rich, dark brew. Presentation-wise, I often arrange them on a simple white platter, maybe with a few strategically placed pastel-colored candies or a small bouquet of fresh spring flowers. It just makes them feel extra special.
For a more elaborate Easter brunch, these cookies fit right in on a dessert table. Imagine them nestled amongst fresh fruit salads, mini quiches, and perhaps a savory tart. They add a touch of lightness and a delightful pop of flavor that balances out richer brunch items. A sparkling lemonade or a light mimosawould be a fantastic beverage pairing here. If you’re serving them as a dedicated dessert, especially after a hearty meal, they’re lovely served slightly warmed with a dollop of fresh whipped cream and a scattering of berries – think raspberries or blueberries. The warm cookie with the cool cream and tart berries is pure bliss! And for those cozy, quiet moments, when you just need a little pick-me-up with a good book, they’re simply divine on their own. No fuss, no fanfare, just pure, comforting deliciousness. I’ve even found they’re a hit when I’ve packed them in small cellophane bags tied with a ribbon as edible party favors for the kids’ friends.
Top Tips for Perfecting Your Easter Cookies
Okay, let’s talk about fine-tuning these cookies to absolute perfection. I’ve made these so many times, I’ve learned a few tricks along the way. For the citrus zest, always zest right before you’re ready to use it. The oils in the zest are what give you that amazing flavor and aroma, and they can dissipate over time. Also, when you’re zesting, make sure you’re only getting the colored part of the peel and not the bitter white pith underneath. A microplane is your best friend here!
When it comes to mixing the batter, I cannot stress enough: do NOT overmix! Once the dry and wet ingredients come together, stop mixing as soon as you don’t see any big streaks of dry flour. A few little lumps are totally fine. Overmixing is the number one culprit for tough cookies, and we want these to be wonderfully tender. Remember, the gluten development is what makes things tough, and we want minimal gluten for this melt-in-your-mouth texture.
For the glaze, consistency is key. You want it pourable but not watery. If you add too much lemon juice at once, it’s easy to go too thin. It’s always better to add it a teaspoon at a time until you reach that perfect drizzly consistency. If you do happen to make it too thin, don’t panic! Just whisk in another tablespoon or two of powdered sugar until it thickens up. I love using a spoon for a more rustic, free-form drizzle, but if you want neat lines, a piping bag with a small tip is your best bet. For an extra touch, you can add a drop of food coloring to the glaze for pastel shades – pink, pale blue, or a soft green looks lovely for Easter.
Ingredient swaps are where things get fun! If you’re out of regular milk, buttermilk or even plain yogurt thinned with a bit of water works well. For the zest, orange or even lime zest can be used instead of lemon for a different flavor profile. If you’re feeling indulgent, you could even add a teaspoon of vanilla extract to the batter. For those who love a little crunch, you could mix in about ¼ cup of finely chopped nuts (like almonds or pecans) or even some white chocolate chips into the batter. If you want to make them a bit more substantial, you could add about ½ cup of shredded coconut to the batter. These are truly adaptable!
When it comes to baking, oven temperature can vary. If your oven tends to run hot, I suggest reducing the temperature by about 10-15 degrees Fahrenheit and baking for a minute or two longer. Always keep an eye on them, especially if it’s your first time making them. The edges should be lightly golden, and the center should look set, not wet. If you tap the center gently, it should spring back slightly. Don’t aim for deep brown edges; that’s a sign of overbaking with these cookies.
Storing and Reheating Tips
Keeping these Easter cookies fresh and delicious is pretty straightforward. At room temperature, they’re best eaten within 3-4 days. I store them in an airtight container, but I make sure they are completely cool first – otherwise, you’ll get condensation, which can make them soggy. If you want to keep them even fresher, you can place a slice of bread in the container with them; it helps to maintain moisture. They hold up really well this way, and the texture remains lovely.
If you find you have more cookies than you can eat in a few days, or you want to get a head start on holiday baking, the refrigerator is your friend. They’ll stay good in the fridge for up to a week. Again, make sure they are in an airtight container. The glaze might become a little less shiny in the fridge, but the cookie itself will stay moist. When you’re ready to eat them, let them sit at room temperature for about 15-20 minutes before enjoying.
For longer storage, these cookies freeze beautifully! Once they’re completely cooled and the glaze has set, wrap them individually in plastic wrap, then place them in a freezer-safe bag or container. They’ll stay good in the freezer for up to 2-3 months. When you’re ready to thaw them, transfer the frozen cookies to the refrigerator overnight. This is the best way to prevent any sogginess from condensation. Once thawed, they’ll be almost as good as fresh! If you want to refresh them slightly, you can give them a quick minute in a low oven (around 300°F or 150°C) on a baking sheet.
Regarding the glaze, I always recommend glazing cookies *after* they’ve cooled completely and *before* storing them for room temperature or refrigerator storage. If you’re freezing them, I actually prefer to freeze them *without* the glaze. Once they’re thawed and back to room temperature, you can then make a fresh batch of glaze and add it then. This ensures the glaze stays nice and crisp and doesn’t get any weird textures from the freezing and thawing process. It’s a little extra step, but it’s worth it for the best result!
Frequently Asked Questions
Final Thoughts
So there you have it – my absolute favorite Easter cookies! I really hope you give them a try. They’re more than just a recipe to me; they’re memories, they’re family traditions, and they’re that wonderful feeling of accomplishment when you pull a perfectly baked batch out of the oven. They embody everything I love about spring baking: simple ingredients, beautiful flavors, and a touch of homemade joy. They’re incredibly forgiving, which means even if you’re new to baking, you can achieve fantastic results. I truly believe that good food should be accessible and enjoyable for everyone, and these cookies fit that bill perfectly.
If you loved these, you might also enjoy my recipe for Lemon Blueberry Scones (for another bright, zesty treat) or my Simple Vanilla Bean Shortbread (for a classic cookie experience). Both are wonderful in their own right and offer a slightly different, but equally delightful, baking adventure. Don’t be afraid to experiment with the zest or add-ins – these cookies are wonderfully adaptable! I can’t wait to hear what you think. Please, leave a comment below and let me know how your Easter cookies turned out. Did you try any fun variations? I’d love to see your photos too!

Easter M&M Cookies
Ingredients
Method
- Cream butter and brown sugar in the bowl of a stand mixer fitted with the paddle attachment. Mix in egg and vanilla until smooth. Add pudding mix, baking soda, and salt. Mix until combined. Mix in flour, then stir in sprinkles and M&Ms.
- Scoop 2 tablespoon balls of cookie dough onto a cookie sheet. Cover and chill for at least 30 minutes.
- Preheat oven to 350°F. Line cookie sheets with parchment paper. Place chilled cookie dough balls 2” apart on cookie sheet. Bake 9-11 minutes or until the edges just start to turn brown.
- Cool 5 minutes on cookie sheet before transferring to a rack to cool completely. Store in an airtight container.