Easy Peanut Butter Dessert Pizza
Okay, so confession time: I’m a total sucker for anything that blends sweet and savory, and when you throw peanut butter into the mix, I’m practically sold before I even taste it. This peanut butter pizza isn’t just another dessert; it’s a delightful surprise, a bit of a culinary adventure that never fails to impress. It’s the kind of treat that makes you pause, close your eyes, and think, “Wow, where has this been all my life?” I remember the first time I whipped this up for a potluck, and people were genuinely bewildered, then utterly obsessed. They’d come up asking, “What *is* this magic?” It’s sort of like a decadent brownie crossed with a gooey cookie, all baked into a delightful, shareable pizza form. If you love peanut butter, and honestly, who doesn’t? Then you absolutely have to give this peanut butter pizza a try. It’s surprisingly simple, which is always a win in my book, especially on those nights when a sweet craving hits hard and baking a whole cake feels like too much of a production.
What is peanut butter pizza?
So, what exactly is this “peanut butter pizza” I’m raving about? Think of it as your favorite chocolate chip cookie dough, but made into a thick, gooey base, then swirled with even more peanut butter and baked to perfection. It’s not a savory pizza with peanut sauce, nope! This is pure dessert bliss. The crust is soft and chewy, almost like a giant, underbaked cookie, giving way to pockets of rich, melty peanut butter. It’s usually topped with a simple glaze that adds a touch of sweetness and shine, and sometimes a sprinkle of flaky sea salt to really make those peanut butter flavors pop. It’s essentially a giant, shareable cookie pizza where peanut butter is the undeniable star. The name itself is catchy and intriguing, isn’t it? It’s one of those recipes that sounds a little wild at first, but once you try it, you understand the genius behind it. It’s comfort food at its finest, but with a fun, unexpected twist!
Why you’ll love this recipe?
There are so many reasons why this peanut butter pizza has become a staple in my kitchen, and I just know you’re going to fall in love with it too. First off, the flavor is out of this world. It’s that perfect balance of sweet and salty, with the rich, creamy, nutty goodness of peanut butter taking center stage. It’s intensely satisfying without being cloyingly sweet, especially if you use a good quality peanut butter. Then there’s the simplicity. Seriously, this recipe is a lifesaver on busy weeknights or when unexpected guests pop over. You can have this delicious treat ready to go in less time than it takes to order takeout, and it’s way more impressive! Most of the ingredients are pantry staples, making it incredibly cost-efficient. You likely already have most of what you need. I always keep extra jars of peanut butter on hand just for this recipe! What I love most about this peanut butter pizza is its versatility. It’s perfect for a casual family dessert, a fun addition to a party spread, or even a decadent breakfast (don’t judge!). It’s like a pizza, but for dessert, and that concept alone is just plain fun. It’s more forgiving than a lot of baked goods, and even if it’s not perfectly shaped, it always tastes amazing. This recipe reminds me a bit of my favorite no-bake cookies, but with that wonderful chewy texture you only get from baking. It’s just pure joy in every bite.
How do you make a peanut butter pizza?
Quick Overview
Making this peanut butter pizza is surprisingly straightforward! You’ll basically mix up a simple, rich batter, then swirl in extra peanut butter for that extra punch of flavor. We’ll bake it until it’s golden and just set, then finish it off with a simple glaze. The whole process from start to finish takes under an hour, making it perfect for when you need a delicious dessert in a flash. The key is not to overmix the batter, which keeps it wonderfully tender and chewy.
Ingredients
For the Main Batter:
You’ll want to start with good quality ingredients here. Use unsalted butter, softened, for the best control over the saltiness. For the sugar, I like a mix of granulated and brown sugar; the brown sugar adds moisture and that lovely chewy texture. Make sure your eggs are at room temperature – they incorporate much better into the batter that way. And of course, a good quality creamy peanut butter is essential. I tend to go for the natural kind, but whatever your favorite smooth peanut butter is, it will work beautifully. You’ll need about 1.5 cups of all-purpose flour, 1 teaspoon of baking soda, and about 1/2 teaspoon of salt to balance out the sweetness. If you’re feeling adventurous, a tiny pinch of cinnamon can add a lovely warmth, but it’s totally optional!
For the Filling:
This is where the real peanut butter magic happens! You’ll need about 1 cup of creamy peanut butter. It’s important to use creamy here so it swirls easily into the batter. If you use crunchy, you might get chunks, which isn’t necessarily a bad thing, but for the smooth swirl effect, creamy is best. Some people like to add a tablespoon or two of melted butter to their peanut butter filling to make it even more luscious and easier to spread.
For the Glaze:
This is simple but makes a big difference. You’ll need about 1/2 cup of powdered sugar. For the liquid, I usually use milk, but heavy cream will make it extra rich, and even a little bit of water works in a pinch. A teaspoon or two of vanilla extract is a must for flavor. If you want a peanut butter glaze, you can whisk in a tablespoon of peanut butter here too!
Step-by-Step Instructions
Step 1: Preheat & Prep Pan
First things first, preheat your oven to 350°F (175°C). This is a pretty standard baking temperature, and it helps ensure even cooking. Grab a 9-inch or 10-inch round cake pan or a cast-iron skillet. I personally love using my cast iron for this because it gives it such a lovely, even crust. Lightly grease your pan with butter or cooking spray, and then dust it with a little bit of flour. This ensures your delicious peanut butter pizza won’t stick. You can also line the bottom with parchment paper if you’re worried about sticking – I always use it, it’s a lifesaver for easy removal!
Step 2: Mix Dry Ingredients
In a medium bowl, whisk together your all-purpose flour, baking soda, and salt. Whisking them thoroughly ensures that the leavening agent and salt are evenly distributed throughout the batter. This prevents pockets of saltiness or areas that don’t rise properly. You’re looking for a uniform mixture, no clumps of baking soda or flour. This step is simple, but it’s key to getting the right texture in the final pizza.
Step 3: Mix Wet Ingredients
In a larger bowl, cream together your softened unsalted butter with both granulated and brown sugars until light and fluffy. This can take a few minutes with an electric mixer, or a bit longer by hand, but it’s worth it for the texture. Beat in your room temperature eggs, one at a time, making sure each is fully incorporated before adding the next. Then, stir in your creamy peanut butter and vanilla extract until everything is well combined. This mixture should look smooth and delicious, almost like a frosting!
Step 4: Combine
Now, it’s time to bring it all together. Gradually add your dry ingredients to your wet ingredients, mixing on low speed or by hand until just combined. Be careful not to overmix! Overmixing develops the gluten in the flour, which can lead to a tough pizza. You want to mix until you no longer see streaks of dry flour. A few small lumps are perfectly fine. The batter will be thick and fudgy, almost like brownie batter.
Step 5: Prepare Filling
In a separate small bowl, gently stir your 1 cup of creamy peanut butter. If it’s been in the fridge and is a bit firm, you can microwave it for about 15-20 seconds to soften it slightly, making it easier to swirl. You can also stir in that tablespoon of melted butter here if you’re using it. This peanut butter mixture will be dolloped and swirled into the main batter.
Step 6: Layer & Swirl
Spoon your thick batter into the prepared pan and spread it out evenly. Now, take spoonfuls of your peanut butter filling and dollop them all over the batter. Don’t be shy! Once you have your peanut butter dollops, take a knife or a skewer and gently swirl the peanut butter into the batter. You want to create beautiful marble-like patterns. Don’t over-swirl, or you’ll lose the distinct swirls and just end up with peanut butter-colored batter. Aim for those lovely ribbons of peanut butter.
Step 7: Bake
Place your pan in the preheated oven. Bake for 25-35 minutes. The baking time will vary depending on your oven and the size of your pan. You’re looking for the edges to be golden brown and set, and the center to be mostly set but still a little soft and gooey. A toothpick inserted into the center should come out with moist crumbs attached, not wet batter. It’s better to slightly underbake it than overbake it for that perfect chewy texture.
Step 8: Cool & Glaze
Once it’s baked, let your peanut butter pizza cool in the pan for about 10-15 minutes. This allows it to firm up slightly. While it’s cooling, whisk together your powdered sugar, milk (or cream/water), and vanilla extract for the glaze. You want a consistency that’s thick enough to drizzle but thin enough to spread easily. Once the pizza has cooled for a bit, carefully invert it onto a wire rack to cool a little more, then flip it back over onto a serving plate. Drizzle the glaze all over the top. If you like a little crunch, sprinkle some flaky sea salt over the glaze right away.
Step 9: Slice & Serve
Once the glaze has set a bit, slice your peanut butter pizza into wedges, just like a regular pizza! It’s best served warm, when the center is still a little gooey and the peanut butter is melty. The smell alone will have everyone gathering in the kitchen, eager to get a slice. Enjoy every delicious bite!
What to Serve It With
This peanut butter pizza is truly a star on its own, but pairing it with the right accompaniments can elevate the experience even further. For a delightful breakfast, I love serving it warm with a strong cup of black coffee. The bitterness of the coffee beautifully cuts through the richness of the pizza. Sometimes, I’ll add a dollop of plain Greek yogurt or a few fresh berries on the side for a little freshness. When I’m serving this for brunch, I tend to go a bit more elegant. I’ll cut it into smaller, more delicate slices and arrange them on a tiered serving stand. A tall glass of cold milk or a sparkling rosé really makes it feel special. As a dessert, it’s fantastic on its own, but it’s also heavenly with a scoop of vanilla bean ice cream melting into the warm center. A dusting of cocoa powder or a few chocolate shavings on top can also be a wonderful addition. For those cozy snack moments, I usually just serve it straight from the pan with a glass of milk or even a cup of hot chocolate. My kids absolutely love it as an after-school treat with a glass of chocolate milk – they say it’s like the best part of a peanut butter cup, but in pizza form! We also love to have it as a “movie night pizza” where everyone gets their own slice and we just relax. It’s truly a crowd-pleaser, no matter the occasion.
Top Tips for Perfecting Your Peanut Butter Pizza
Over the years of making this peanut butter pizza, I’ve picked up a few tricks that I swear by, and I’m happy to share them with you! First off, when it comes to the peanut butter itself, use a good quality, creamy peanut butter that you love the taste of. Natural peanut butter can sometimes separate, so give it a really good stir before measuring if it has oil on top. For the batter, the absolute key is *not to overmix*. Mix the dry ingredients into the wet just until they disappear. Seriously, stop mixing as soon as you don’t see streaks of flour. A few lumps are better than a tough pizza! When you’re swirling the peanut butter filling, don’t go overboard. You want distinct ribbons of peanut butter, not one homogenous mass. Think of it as creating art! For baking, ovens can be tricky. My oven tends to run a little hot, so I sometimes have to reduce the temperature by 10 degrees or check it a few minutes early. The toothpick test is your friend here – moist crumbs, not wet batter, are what you’re looking for. If you want to experiment with ingredient swaps, I’ve found that using half whole wheat flour and half all-purpose flour can work, but it might make the pizza a little denser. For a richer glaze, substituting heavy cream for milk is divine. And if you’re feeling really decadent, try adding a handful of chocolate chips into the batter before baking! My absolute favorite addition, though, is a sprinkle of flaky sea salt on top of the glaze. It just makes all those peanut butter flavors sing. I also learned early on that letting it cool for at least 10-15 minutes in the pan is crucial; otherwise, it’s too fragile to handle properly and can fall apart.
Storing and Reheating Tips
This peanut butter pizza is so good, you might actually have leftovers – though I’m not sure how! If you do find yourself with some, storing it properly will keep it delicious. At room temperature, it’s best to keep it covered with plastic wrap or foil for up to 2 days. After that, the texture can start to change a bit. If you need to store it for longer, the refrigerator is your best bet. Wrap it tightly in plastic wrap, then place it in an airtight container. It should keep well in the fridge for up to 5 days. When you’re ready to enjoy it again, I highly recommend reheating it. A few minutes in a warm oven (around 300°F or 150°C) or even a quick zap in the microwave for about 15-20 seconds will bring back that wonderful gooey, warm texture. Honestly, a gently reheated slice is almost as good as fresh! For freezing, I usually slice it first, then wrap each slice individually and tightly in plastic wrap, followed by a layer of foil or a freezer bag. It can stay frozen for up to 3 months. Thaw it overnight in the refrigerator, and then reheat as usual. If you’ve glazed your pizza before storing, the glaze might become a little sticky when reheated, which is perfectly fine. Some people prefer to add the glaze *after* reheating for a fresher finish, especially if it’s going to be stored for more than a day.
Frequently Asked Questions
Final Thoughts
I truly hope you give this peanut butter pizza recipe a try. It’s one of those recipes that just brings joy, whether you’re making it or eating it. It’s the perfect blend of familiar comfort and exciting novelty, and it always feels like a special treat. If you’re someone who loves peanut butter as much as I do, this is going to be right up your alley. It’s easy enough for a beginner baker but impressive enough to serve to anyone. I’ve found that people are always delighted by this dessert, and it’s become a go-to for potlucks and family gatherings. If you enjoy this, you might also love my recipes for chewy chocolate chip cookies or my easy no-bake brownie bites – they share that same comforting, decadent vibe! I can’t wait to hear what you think of this peanut butter pizza. Please leave a comment below and let me know how yours turned out, and if you discovered any amazing variations of your own! Happy baking!

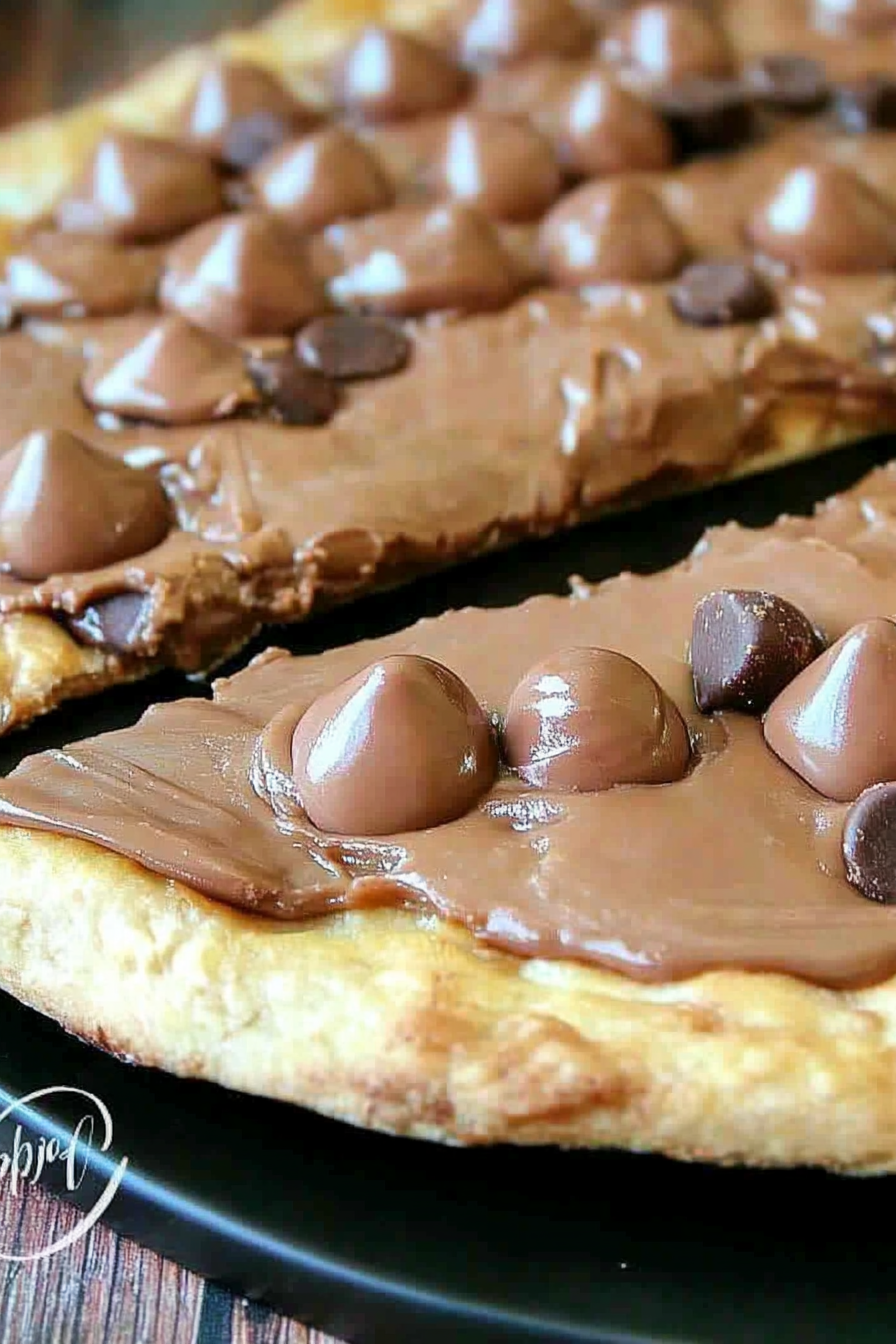
Peanut Butter Cup Pizza
Ingredients
Method
- Preheat oven to 400°F (200°C). Grease a pizza pan and spread out the pizza dough to fit.
- Bake for 12-15 minutes, or until golden brown and cooked through.
- Carefully remove the pizza crust from the oven. Immediately spread the chocolate peanut butter spread evenly over the hot crust, leaving a small border around the edges. The heat from the crust will help soften the spread.
- Sprinkle the chopped mini peanut butter cups over the chocolate peanut butter layer.
- Let the pizza cool for a few minutes before slicing and serving. Refrigerate any leftovers.