Easy Korean-Style Chicken for Dinner
You know those nights? The ones where the fridge looks a little sad, you’re craving something seriously satisfying, and the idea of complicated cooking just feels like too much? Yeah, I’ve been there a million times. And that’s exactly when my mind drifts to this Korean chicken. It’s not just any chicken, mind you. This is the kind that makes your eyes roll back in your head with pure joy. It’s got this incredible balance of crispy exterior, tender meat, and a glaze that’s just the perfect blend of sweet, savory, and a little bit of spice. Honestly, when people ask me for a go-to chicken recipe, this is the one that immediately comes to mind. It’s like a warm hug in food form, and it’s so much simpler than you might think. Forget those takeout menus; this homemade Korean chicken is about to become your new obsession, just like it is in my house!
What is Korean chicken?
So, what exactly *is* this magical Korean chicken I’m raving about? Think of it as Korea’s answer to your favorite crispy fried chicken, but with a flavor profile that’s totally its own. It’s not typically deep-fried in the traditional sense; we’re talking about achieving that irresistible crunch through a smart, pan-frying technique. The real star, though, is that incredible glaze. It’s usually a beautiful, sticky concoction made with gochujang (that amazing Korean chili paste), soy sauce, garlic, ginger, and a touch of sweetness. This dish is a cornerstone of Korean cuisine, often found at casual eateries, family gatherings, and even as a popular snack. It’s the kind of food that makes you want to gather everyone around the table and dig in. It’s comforting, it’s exciting, and it’s unbelievably delicious.
Why you’ll love this recipe?
Okay, let me tell you why this Korean chicken recipe is a total game-changer. First off, the FLAVOR. Oh. My. Goodness. You get that perfect crispy bite from the coating, followed by the juicy, tender chicken. Then comes the glaze – it’s this sticky, glossy masterpiece that hits all the right notes: sweet from honey or sugar, savory from soy sauce, with a pungent kick from garlic and ginger, and that characteristic warmth from the gochujang. It’s complex without being complicated, and it’s genuinely addictive. My family devours this like it’s going out of style, and the best part? It’s surprisingly SIMPLE to make. You don’t need a deep fryer or a whole afternoon. Most of the ingredients are probably already in your pantry, and the steps are straightforward enough that even if you’re not a seasoned chef, you’ll nail it. I’ve even made it on a weeknight when the craving struck HARD, and it was ready before takeout could even get here. Plus, it’s incredibly budget-friendly! Chicken thighs are usually super affordable, and the other glaze ingredients are pantry staples. And talk about VERSATILE! You can serve this over rice, with a side of kimchi, tucked into lettuce wraps, or even just straight out of the pan (no judgment here!). It’s one of those recipes that just keeps on giving. What I love most about this is that it feels restaurant-worthy but is totally achievable at home, making it perfect for impressing guests or just treating yourself to something truly special.
How do I make Korean chicken?
Quick Overview
This Korean chicken recipe is all about building layers of flavor and achieving that perfect crispy-chewy texture. We’ll start by coating tender chicken pieces, pan-frying them to golden perfection, and then tossing them in a quick, luscious glaze. It’s a dance of simple steps that results in an explosion of taste. The beauty is in the balance – the savory chicken, the crunchy coating, and that sweet, spicy, garlicky glaze all coming together harmoniously. It’s a weeknight wonder that tastes like a weekend treat.
Ingredients
For the Chicken & Marinade: For the Chicken & Marinade: For the Chicken & Marinade: For the Chicken
1.5 pounds boneless, skinless chicken thighs, cut into bite-sized pieces (I swear by thighs here – they stay so juicy! Thighs are a lifesaver for this reason)
1 tablespoon soy sauce (use a good quality one, it makes a difference!)
1 teaspoon grated fresh ginger (fresh is key for that zing!)
2 cloves garlic, minced
1/4 teaspoon black pepper
For the Crispy Coating:
1/2 cup all-purpose flour (or gluten-free blend if you need it)
1/4 cup cornstarch (this is the secret to extra crispiness!)
1/2 teaspoon salt
1/4 teaspoon garlic powder
1/4 teaspoon onion powder
For the Gochujang Glaze:
3 tablespoons gochujang (Korean chili paste – find this at an Asian market or most well-stocked grocery stores. The flavor is irreplaceable!)
2 tablespoons honey (or maple syrup for a vegan option, though chicken isn’t vegan!)
2 tablespoons soy sauce
1 tablespoon rice vinegar (for a little tang)
1 tablespoon mirin (sweet rice wine, adds depth; if you don’t have it, a pinch of sugar is okay)
1 tablespoon sesame oil (for that nutty aroma)
2 cloves garlic, minced
1 teaspoon grated fresh ginger
1/4 cup water (to thin it out a bit)
For Frying:
Vegetable oil or other neutral oil for frying (enough to coat the bottom of your pan generously)
For Garnish (Optional but highly recommended!):
Sesame seeds
Chopped green onions (scallions)
Step-by-Step Instructions
Step 1: Marinate the Chicken
First things first, let’s get that chicken flavorful. In a medium bowl, toss your bite-sized chicken thigh pieces with the soy sauce, grated ginger, minced garlic, and black pepper. Give it a good mix, making sure every piece is coated. Let this sit for at least 15 minutes while you prep everything else. If you have more time, popping it in the fridge for 30 minutes or even an hour will make it even tastier. I sometimes do this first thing in the morning if I know we’re having this for dinner.
Step 2: Mix the Dry Coating Ingredients
In a shallow dish or a resealable bag, whisk together the all-purpose flour, cornstarch, salt, garlic powder, and onion powder. This is your magic dust that’s going to give us that glorious crunch. Make sure it’s all well combined. Having the cornstarch in there is crucial – it’s what makes the coating super crispy and holds up to the glaze.
Step 3: Coat the Chicken
Now, grab those marinated chicken pieces and toss them into the dry coating mixture. You can do this in batches or all at once if you’re using a bag. Shake off any excess coating. You want a nice, even layer, but not so much that it’s thick and pasty. Just a good dusting. This step is where the real transformation begins!
Step 4: Prepare the Gochujang Glaze
While the chicken is getting coated (or just before you start frying), let’s whip up that incredible glaze. In a small saucepan, combine the gochujang, honey, soy sauce, rice vinegar, mirin, sesame oil, minced garlic, grated ginger, and water. Whisk it all together until it’s smooth. Place this saucepan over medium-low heat. We’re not boiling it, just gently warming it and letting the flavors meld together and the sauce thicken slightly. Stir it occasionally. It should become glossy and syrupy. This usually takes about 5-7 minutes. Once it’s looking thick and delicious, take it off the heat and set it aside. Trust me, the smell alone is enough to make you want to eat it with a spoon!
Step 5: Fry the Chicken
Time to get that crisp! Heat about 1/2 inch of vegetable oil in a large skillet or wok over medium-high heat. You’ll know the oil is ready when a tiny piece of chicken coating sizzles immediately when dropped in. Carefully add the coated chicken pieces to the hot oil in a single layer. Don’t overcrowd the pan, or your chicken will steam instead of fry! You’ll likely need to do this in two or three batches. Fry each batch for about 3-5 minutes per side, until they are golden brown and cooked through. Use tongs to flip them, and a slotted spoon or spider strainer to remove them from the pan. Place the fried chicken on a wire rack set over a baking sheet to drain any excess oil and keep them crispy while you fry the rest. This is the part where I usually have to tell my kids to stop trying to sneak pieces!
Step 6: Toss with Glaze
Once all your chicken is fried to perfection, it’s time for the grand finale. Pour your prepared gochujang glaze back into the (now empty, wiped clean if needed) skillet over low heat. Add the crispy fried chicken back into the pan with the warm glaze. Toss gently but thoroughly, making sure every single piece is coated in that beautiful, sticky sauce. You want it to coat the chicken like a beautiful, glossy shell. This should only take about 1-2 minutes. You don’t want to overcook it or let it sit in the glaze too long, or it might lose some of its crispiness.
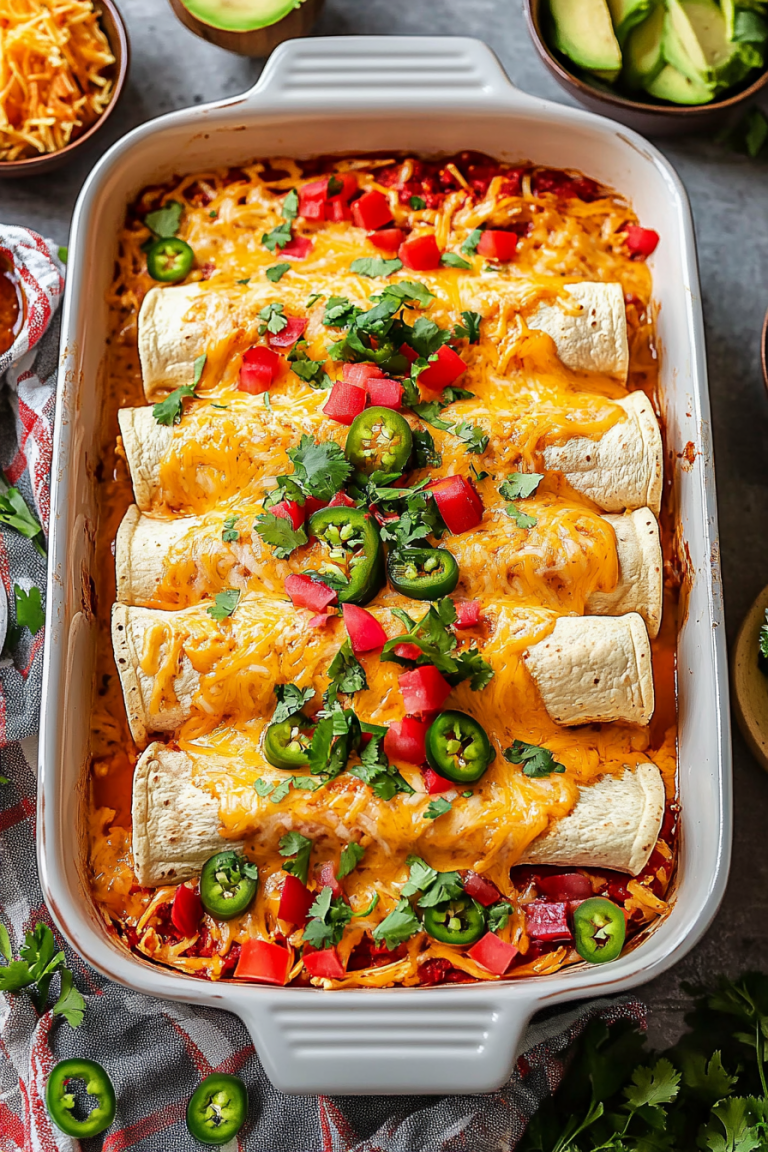
Step 7: Serve and Garnish
Transfer your glorious Korean chicken to a serving platter immediately. Sprinkle generously with sesame seeds and chopped green onions. This is where it goes from delicious to absolutely show-stopping. Serve it hot and watch it disappear! This is perfect for dinner, lunch, or even as an appetizer for a party. The contrast of the spicy glaze, the tender chicken, and the crunchy coating is just divine.
What to Serve It With
This Korean chicken is so versatile, it truly fits into almost any meal plan. For a classic **breakfast**, I sometimes just have a few pieces cold straight from the fridge – don’t knock it till you try it! But if you’re looking for something a bit more intentional, it’s fantastic alongside some fluffy scrambled eggs and a simple fruit salad. For **brunch**, I love plating it up with some kimchi fried rice or a delicate cucumber salad. It feels a bit more elegant, and the bright flavors cut through the richness of the chicken perfectly. A chilled bottle of makgeolli (Korean rice wine) or some iced green tea would be divine. As a main **dessert** course (yes, you heard me right!), it’s a fun, savory twist. Serve it with a small side of pickled daikon radish for a palate cleanser. It’s unexpected and always a hit. And for those **cozy snacks** or weeknight dinners, this is your best friend. Serve it over a bed of steamed white rice with a side of blanched broccoli or sautéed bok choy. It’s a complete meal in one bowl, and my kids ask for this all the time when they want something comforting and flavorful. We also love wrapping it in crisp lettuce leaves with a dollop of ssamjang, like a DIY lettuce wrap situation. It’s a family tradition!
Top Tips for Perfecting Your Korean Chicken
Over the years, I’ve learned a few little tricks that take this Korean chicken from good to absolutely spectacular. When you’re preparing the chicken, make sure the pieces are relatively uniform in size. This ensures they cook evenly, so you don’t have some overcooked and others undercooked. And about that coating: don’t skip the cornstarch! Seriously, it’s the secret weapon for that shatteringly crisp texture that holds up so well, even after it’s coated in the glaze. I learned this the hard way after a batch that wasn’t quite crispy enough, and adding cornstarch to my dry mix was a total revelation. When you’re frying, resist the urge to overcrowd the pan. It’s tempting to get it all done at once, but a crowded pan will lower the oil temperature, leading to greasy, sad chicken instead of beautifully crisp pieces. Patience is key here! For the glaze, always taste and adjust. Gochujang can vary in heat, so if you prefer it milder, you can always add a bit more honey or soy sauce. Conversely, if you like it spicier, a tiny pinch of cayenne pepper can be added, though the gochujang usually does the trick. I’ve experimented with different sweeteners; while honey is my favorite for its flavor and consistency, maple syrup works beautifully for a dairy-free option (though the chicken itself isn’t dairy-free). If you find your glaze is too thick after cooking, a tablespoon or two of warm water can help thin it out. And if it’s too thin, just simmer it for a few extra minutes until it reaches that perfect syrupy consistency. For the best results when glazing, make sure your fried chicken is still warm. This helps the glaze adhere beautifully and evenly. Don’t let it cool down too much before tossing it in the sauce. Finally, don’t be afraid to play with the garnishes! While sesame seeds and green onions are classic, a sprinkle of toasted chopped peanuts or even a few slivers of red chili can add an extra layer of texture and visual appeal. These small adjustments have made all the difference in my kitchen, and I hope they do for yours too!
Storing and Reheating Tips
This Korean chicken is best enjoyed fresh, piping hot off the pan, but let’s be real, sometimes there are leftovers! If you happen to have any (a rare occurrence in my house!), storing it properly is key to enjoying it later. For storing at **room temperature**, it’s best to keep it out for no more than two hours, especially if it’s warm where you are. If you know you’ll have leftovers, refrigerate them promptly. For **refrigerator storage**, let the chicken cool down completely before transferring it to an airtight container. It will stay good in the fridge for about 2-3 days. The glaze will solidify a bit, and the chicken might lose some of its crispiness, but it will still be delicious. When it comes to **freezer instructions**, I usually don’t freeze this particular dish because the crispiness is so central to its appeal, and it doesn’t always reheat perfectly. However, if you absolutely must, let it cool completely, wrap it tightly in plastic wrap, then in foil, and freeze for up to 1-2 months. For **reheating**, the stovetop is your best friend. Gently reheat the chicken in a skillet over medium-low heat, adding a splash of water or a little extra soy sauce to revive the glaze and prevent sticking. You can also reheat it in a preheated oven (around 350°F or 175°C) on a baking sheet for about 10-15 minutes, or until heated through. Microwaving is an option, but it will definitely make it less crispy. For **glaze timing advice**, if you know you’ll be refrigerating or freezing, it’s sometimes best to serve the glaze on the side or toss the chicken in a lighter coating of glaze before storing, then warm the extra glaze separately to pour over when reheating. This helps maintain some of that glorious crispness.
Frequently Asked Questions
Final Thoughts
So there you have it – my absolute favorite way to make Korean chicken! It’s a recipe that’s brought so much joy and deliciousness to my table, and I truly hope it does the same for yours. It’s proof that you don’t need a million fancy ingredients or hours in the kitchen to create something truly special and satisfying. The crispy chicken, the irresistible sticky glaze, and that wonderful balance of sweet, savory, and spicy – it’s just a winning combination every single time. If you’re a fan of bold flavors and comforting textures, you’ve got to give this one a try. It’s been a lifesaver on busy nights and a guaranteed hit for family dinners. Don’t be afraid to experiment with the spice level or even add a sprinkle of toasted nuts for extra crunch. I’d absolutely love to hear how yours turns out! Please leave a comment below with your thoughts, any variations you tried, or even your own personal tips. And if you made it, don’t forget to share a photo – I can’t wait to see your delicious Korean chicken creations! Happy cooking!

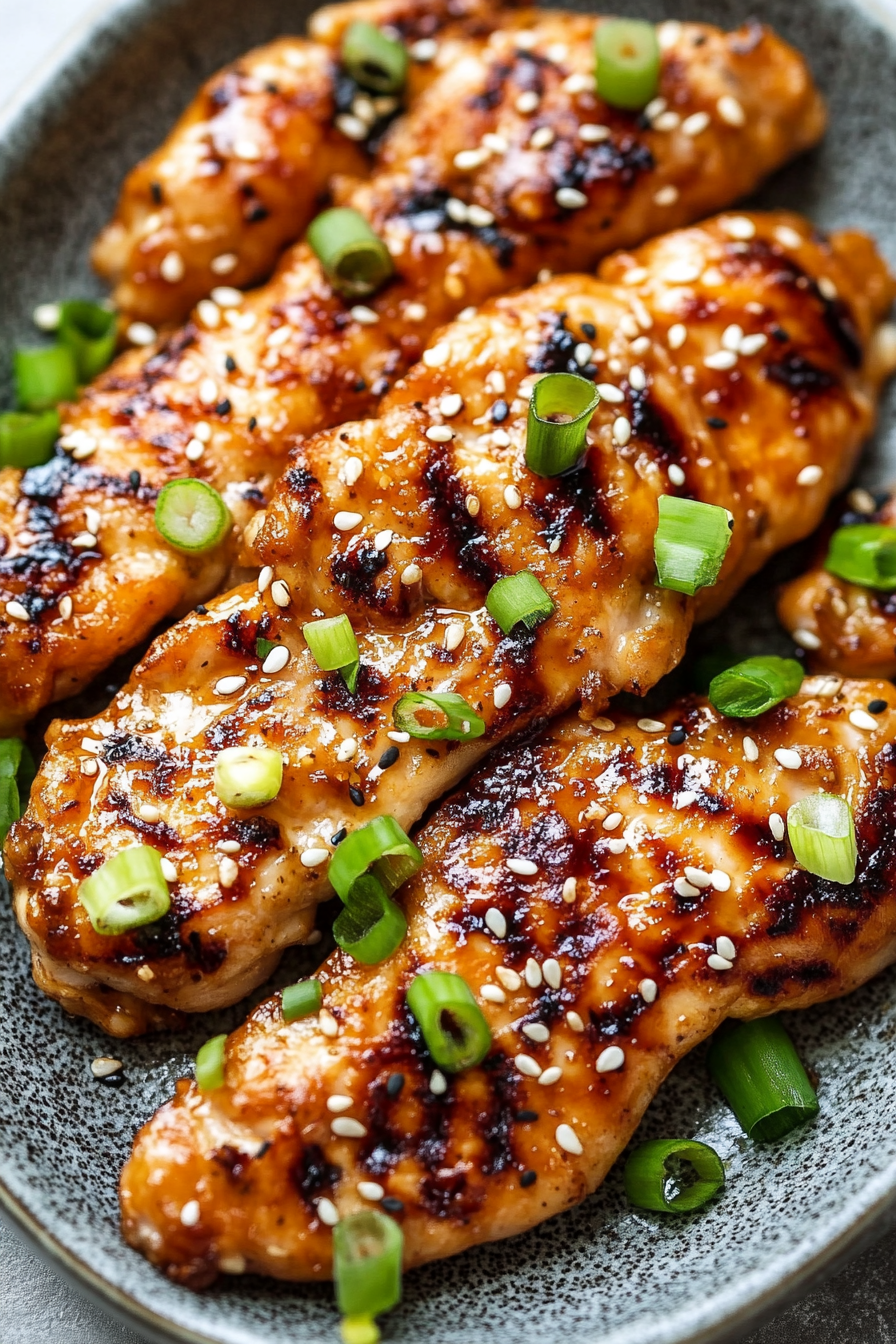
Juicy Korean Grilled Chicken Breasts
Ingredients
Method
- Place the chicken breasts, 1 at a time, in a Ziploc bag. Pound the chicken breast to an even thickness, about 0.5 inches thick, being careful not to puncture the bag.
- In a medium bowl, combine the soy sauce, apple sauce, onion, sesame oil, ginger, brown sugar, garlic, red pepper flakes (if using), and sesame seeds. Reserve 0.25 cup of the marinade and transfer the remainder to the Ziploc bag with the chicken. Refrigerate and marinate for at least 1 hour.
- Over medium-high heat, grill the chicken for 2 to 3 minutes or until it no longer sticks to the grill. Turn the chicken, spoon the reserved 0.25 cup of marinade over each breast and grill an additional 2 to 3 minutes.