Almond Joy Layer Cake
Almond Joy Layer Cake
If you’ve ever craved that sweet, nutty, coconut-kissed flavor of your favorite candy bar but in cake form—this Almond Joy Layer Cake is calling your name. I first made this for my mom’s birthday (and my blog’s 5th anniversary!) and honestly? It didn’t last a day. The moment I pulled it out of the fridge, the rich chocolate, chewy coconut filling, and toasted almond crunch hit every single one of my senses like pure joy. This isn’t just a dessert—it’s an experience. Whether you’re celebrating someone special or treating yourself after a long week, this cake delivers on every level.
What Is Almond Joy Layer Cake?
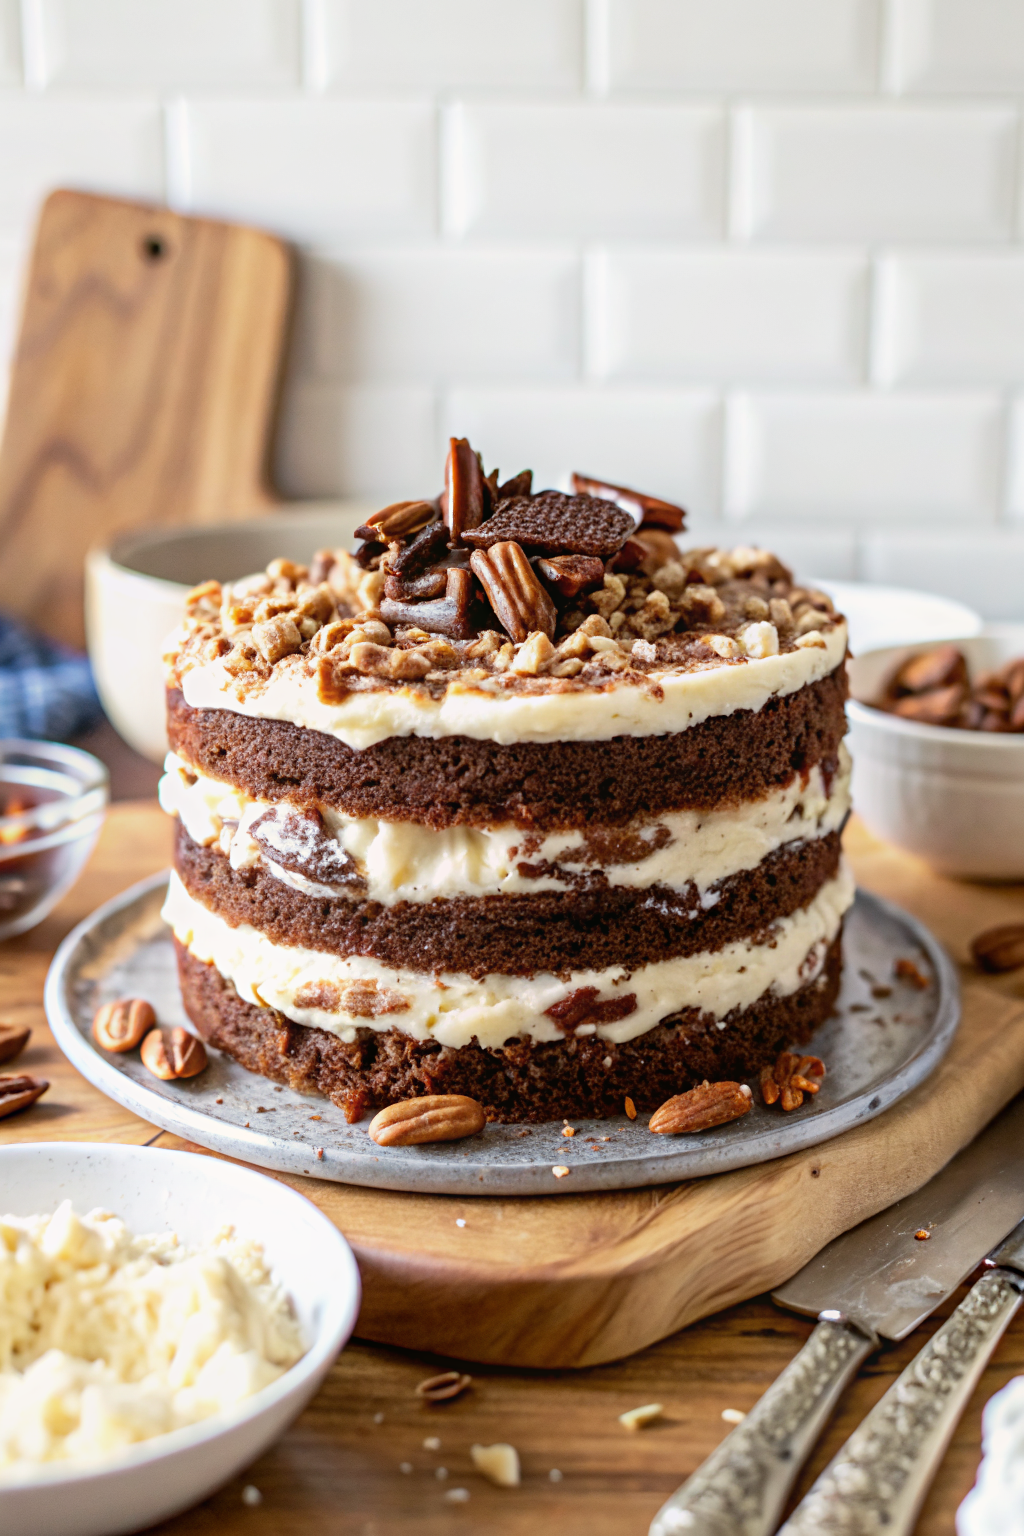
This decadent treat takes inspiration from the beloved Almond Joy candy bar but elevates it into a show-stopping three-layer masterpiece. Each tier is made with a moist, tender chocolate cake—so easy to whip up without any fancy techniques. Between those layers sits a fluffy, sweetened coconut filling that tastes exactly like biting into the candy itself: soft, chewy, and packed with flavor. Top it all off with a cloud-like coconut frosting and a glossy chocolate ganache drizzle, then garnish with more coconut, slivered almonds, and even whole Almond Joy bars if you’re feeling extra. It’s equal parts nostalgic and indulgent—perfect for birthdays, holidays, or anytime you need a little sweetness in your life.
Why You’ll Love This Recipe
Let me tell you why this cake has become such a staple in my kitchen. First off—the simplicity. No complicated creaming steps or temperamental batters. Just mix, bake, layer, and voilà. Second, the flavors are next-level. That coconut filling? It’s not just sweetened shredded coconut mixed with condensed milk—it’s got that perfect chewiness and depth that makes every bite addictive. And the frosting… oh, the frosting. It’s light, airy, and swirls around the edges like spun sugar, while the dark chocolate ganache adds a luxurious finish that ties everything together. Plus, it’s visually stunning—ideal for impressing guests or brightening up any table. Whether you’re a seasoned baker or just starting out, this recipe walks you through each step with clear instructions so you feel confident every time.
How to Make Almond Joy Layer Cake
Quick Overview
Bake three layers of rich chocolate cake, let them cool completely. While they chill, prepare a luscious coconut filling using sweetened condensed milk and shredded coconut. Assemble the cake by stacking each layer with a ring of frosting holding the filling in place. Frost the entire cake with fluffy coconut buttercream, then finish with a smooth chocolate ganache drizzle and decorative touches. Chill until ready to serve—best eaten at room temperature!
Ingredients
- CHOCOLATE CAKE:
- 1¾ cups (228g) all-purpose flour
- 2 cups (414g) granulated sugar
- ¾ cup (85g) unsweetened cocoa powder
- 2¼ tsp baking soda
- ½ tsp baking powder
- 1 tsp salt
- 1 cup (240ml) milk
- ½ cup (120ml) vegetable oil
- 1½ tsp vanilla extract
- 2 large eggs
- 1 cup (240ml) hot water
- COCONUT FILLING:
- 14 oz can sweetened condensed milk
- 3 cups (280g) sweetened shredded coconut
- 2–4 tbsp sliced almonds
- COCONUT FROSTING:
- 1¼ cup (280g) butter, softened
- 1¼ cup (237g) shortening
- 10 cups (1150g) powdered sugar
- 1½ tbsp coconut extract
- 5–6 tbsp (90–105ml) water or milk
- CHOCOLATE GANACHE:
- 6 oz (1 cup) semi-sweet chocolate chips
- ½ cup (120ml) heavy whipping cream
Step-by-Step Instructions
- Preheat oven to 350°F (176°C). Prepare three 8-inch cake pans with non-stick spray and parchment paper.
- In a large bowl, whisk together flour, sugar, cocoa, baking soda, baking powder, and salt.
- Add milk, oil, vanilla, and eggs to another bowl and mix well.
- Pour wet ingredients into dry and beat until combined. Slowly add hot water and mix until smooth.
- Divide batter evenly among pans and bake for 22–25 minutes, or until a toothpick comes out clean with a few crumbs.
- Cool cakes in pans for 2–3 minutes, then transfer to racks to cool completely.
- For the filling, combine shredded coconut and condensed milk in a bowl. Stir until thick and sticky.
- Make the frosting: Cream butter and shortening until smooth. Gradually add half the powdered sugar, then coconut extract and 4–5 tbsp liquid. Add remaining sugar and mix until fluffy; adjust consistency with more liquid if needed.
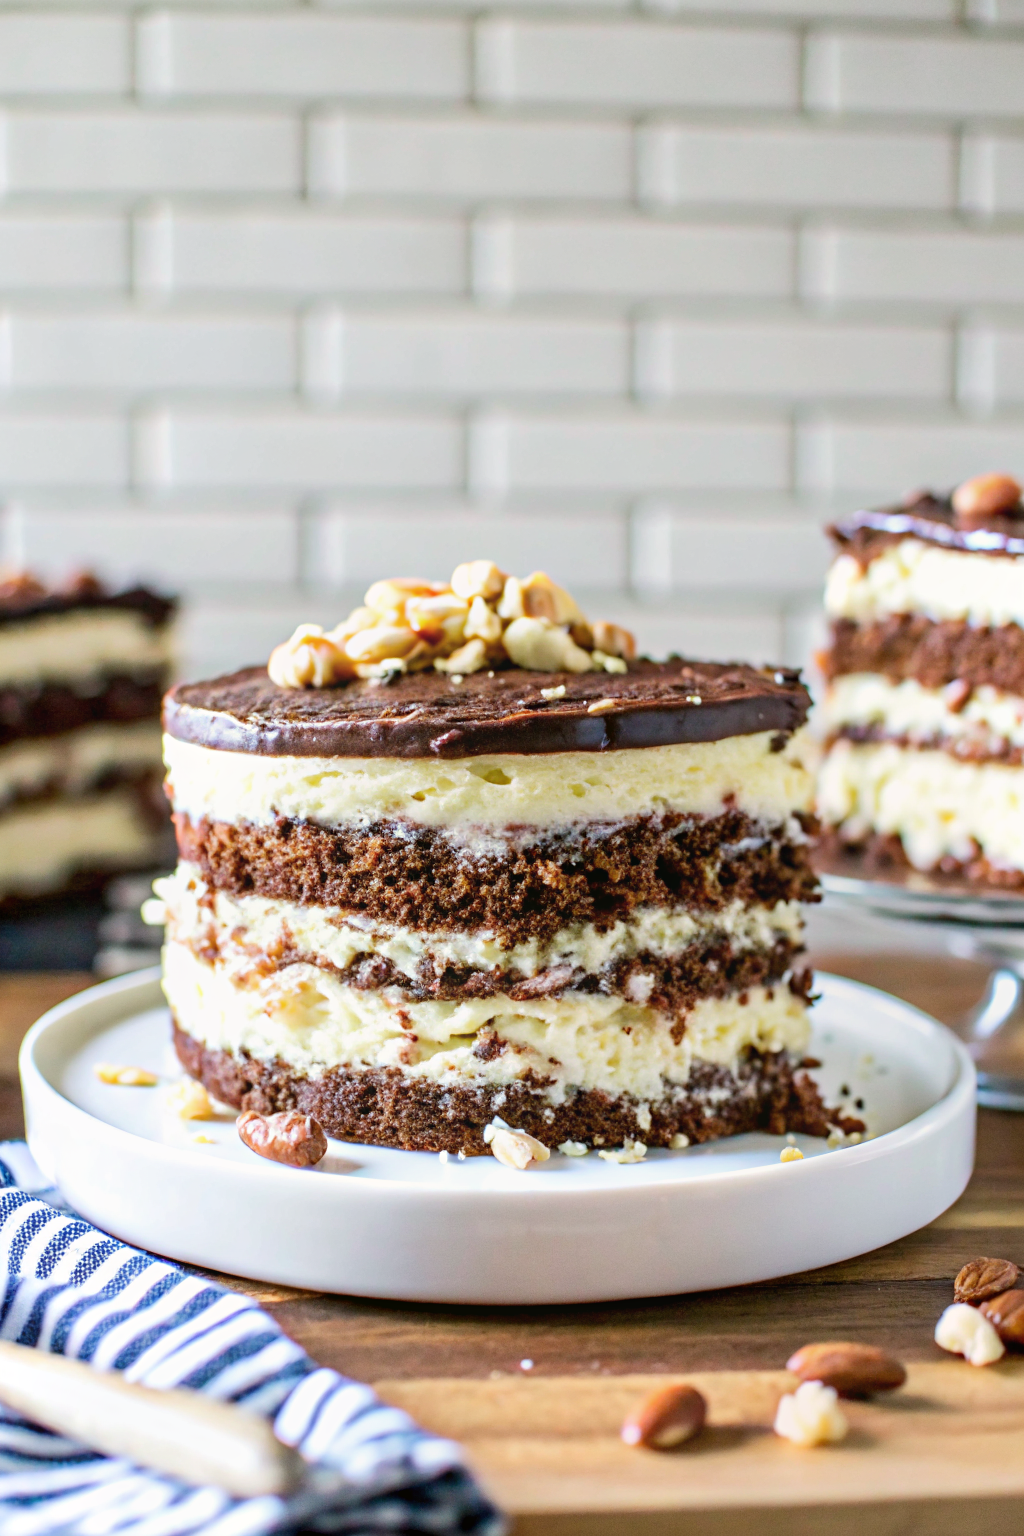
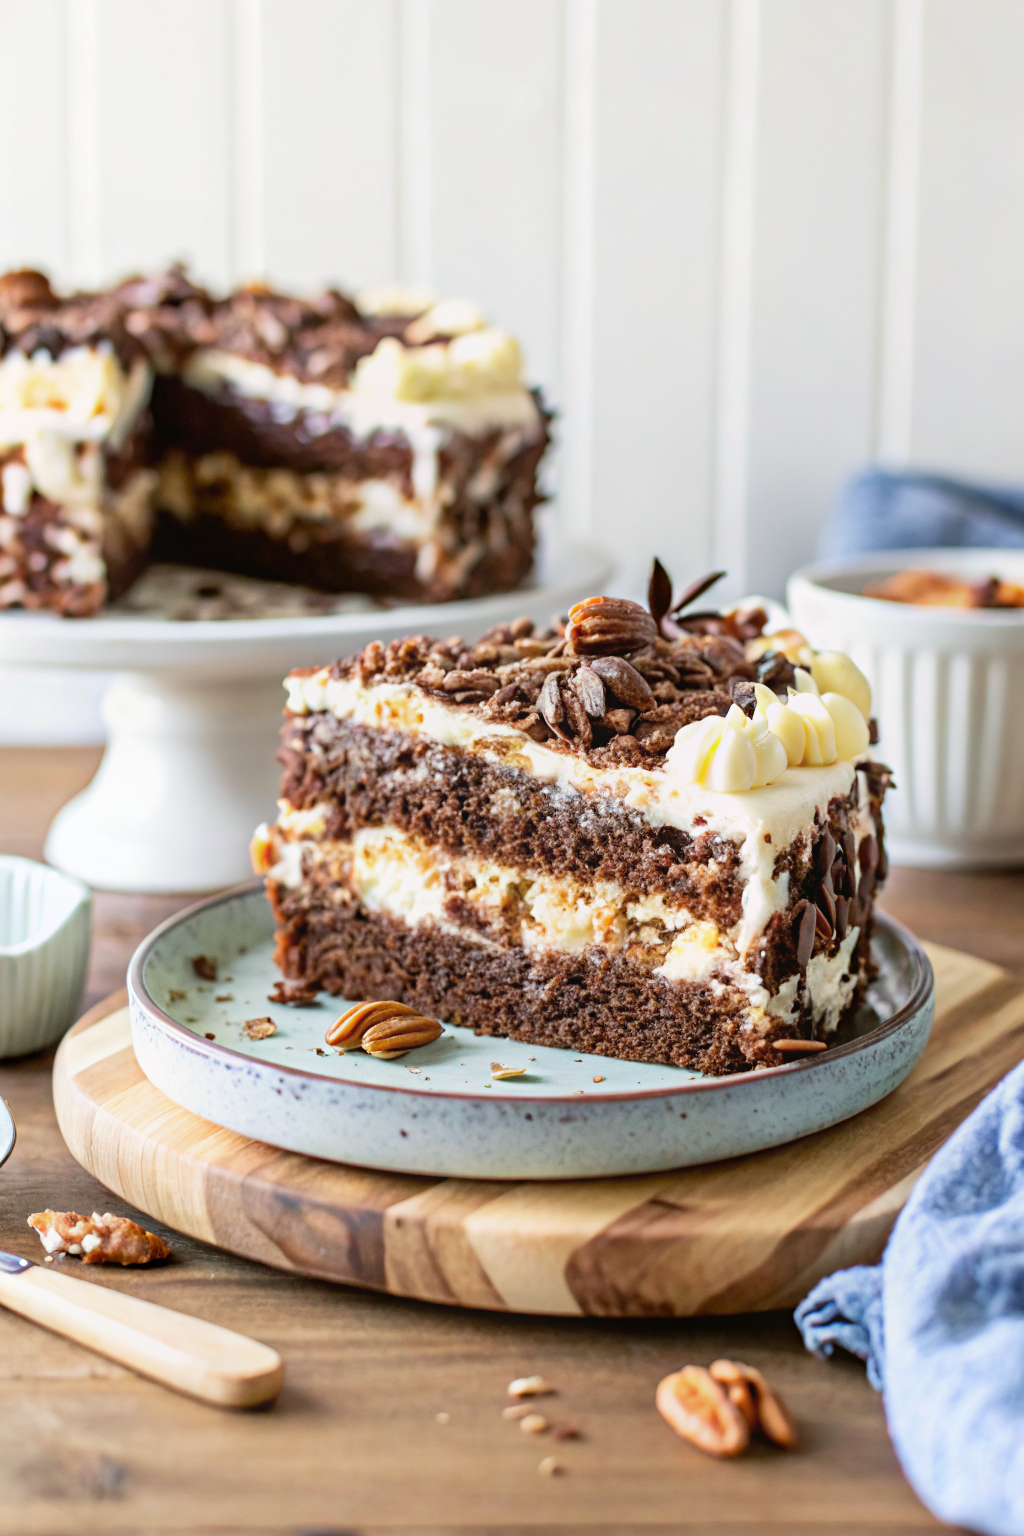
- Level the cooled cakes so they’re flat. Place first layer on a plate, pipe a ring of frosting around the edge, fill with half the coconut mixture, sprinkle with almonds, then repeat with second layer. Top with third cake.
- Frost sides with a thin crumb coat, refrigerate 15 minutes. Then frost top and sides smoothly. Use an offset spatula to create vertical stripes on the sides.
- Prepare ganache: Heat cream until steaming, pour over chocolate, wait 2 minutes, then whisk until silky smooth.
- Drizzle ganache over the top of the cake, letting it drip down the sides. Refrigerate 10 minutes to set slightly.
- Top with extra frosting, shredded coconut, almond slivers, and optional Almond Joy candy bars. Serve chilled but at room temperature for best texture.
What to Serve It With
This cake stands proudly on its own, but pairing it with something light really highlights its richness. I love serving slices alongside a tall glass of cold milk or a scoop of vanilla ice cream—the contrast cuts through the sweetness beautifully. If you’re hosting, consider offering it with coffee or tea; the bold chocolate and tropical notes complement both perfectly. For a festive touch, add fresh berries or edible flowers on the side. And don’t forget—this cake is especially magical when shared with loved ones during celebrations. Trust me, it’ll disappear fast!
Top Tips for Perfecting Your Almond Joy Layer Cake
Even though this recipe is foolproof, a few small tweaks can make it truly unforgettable. Always make sure your cake layers are completely cool before assembling—warm layers melt the filling and make frosting slide right off. Use a serrated knife to level the tops for a flat, professional look. When building the cake, pipe a sturdy dam of frosting around the edge of each layer before adding the filling—this keeps everything in place. For extra shine, chill the assembled cake for at least an hour before applying the final frosting and ganache. And if you’re short on time, prep the filling and frosting ahead—they keep well in the fridge for up to two days. Finally, never skip the ganache drizzle—it’s what turns this cake into a true centerpiece!
Storing and Reheating Tips
This cake stores beautifully! Once assembled and decorated, cover it tightly with plastic wrap and store in the refrigerator for up to 4 days. Let it sit at room temperature for about 30 minutes before serving—cold ganache and coconut frosting aren’t as enjoyable straight from the fridge. If you’re transporting it, keep it chilled until just before serving. To reheat gently, you can microwave individual slices for 10–15 seconds, but honestly, it tastes best at room temp. Freezing isn’t recommended due to the coconut filling and frosting, which can become too soft when thawed.
Frequently Asked Questions
Final Thoughts

There’s something so deeply satisfying about creating a dessert that brings people together—especially one that tastes like pure happiness. This Almond Joy Layer Cake isn’t just delicious; it’s full of love, memory, and a little bit of magic. Whether you’re baking it for a milestone or simply because you deserve a treat, I promise it will exceed your expectations. So grab your whisk, preheat that oven, and get ready to make someone smile. And hey—if you try it, let me know how it goes. Happy baking, and remember: life is sweeter when shared with cake.
Almond Joy Layer Cake
Ingredients
Method
- Preheat oven to 350°F (176°C). Prepare three 8-inch cake pans with non-stick baking spray and parchment paper.
- In a large bowl, combine flour, sugar, cocoa, baking soda, baking powder, and salt. Set aside.
- In another bowl, whisk together milk, vegetable oil, vanilla extract, and eggs.
- Add wet ingredients to dry ingredients and beat until well combined.
- Slowly add hot water to batter and mix on low until smooth.
- Divide batter evenly among prepared pans and bake for 22–25 minutes, or until a toothpick comes out clean.
- Cool cakes in pans for 2–3 minutes, then transfer to a wire rack to cool completely.
- Make the coconut filling by mixing sweetened condensed milk and shredded coconut in a bowl. Stir until combined.
- For the frosting, cream butter and shortening together until smooth.
- Gradually add half the powdered sugar and mix until incorporated.
- Add coconut extract and 4–5 tablespoons of water or milk; mix well.
- Add remaining powdered sugar and mix until fluffy. Adjust consistency with more liquid if needed.
- Level the cooled cake layers so they’re flat using a serrated knife.
- Place first layer on a serving plate and pipe a ring of frosting around the edge to hold filling.
- Spread half the coconut filling inside the frosting ring.
- Sprinkle 1–2 tablespoons of sliced almonds over the filling and press gently into place.
- Repeat with second cake layer, more filling, and almonds.
- Top with final cake layer.
- Frost the sides of the cake with a thin crumb coat and chill for 10 minutes.
- Frost the top and sides smoothly, creating decorative stripes with an offset spatula.
- Prepare chocolate ganache: microwave heavy cream until steaming, pour over chocolate chips, let sit 2–3 minutes, then whisk until smooth.
- Drizzle ganache around the edges and over the top of the cake. Smooth with an offset spatula.
- Let ganache set slightly (about 10 minutes), then add extra frosting, coconut, almonds, and optional Almond Joy candy bars.
- Refrigerate cake until ready to serve. Best served at room temperature. Keeps well for 3–4 days.