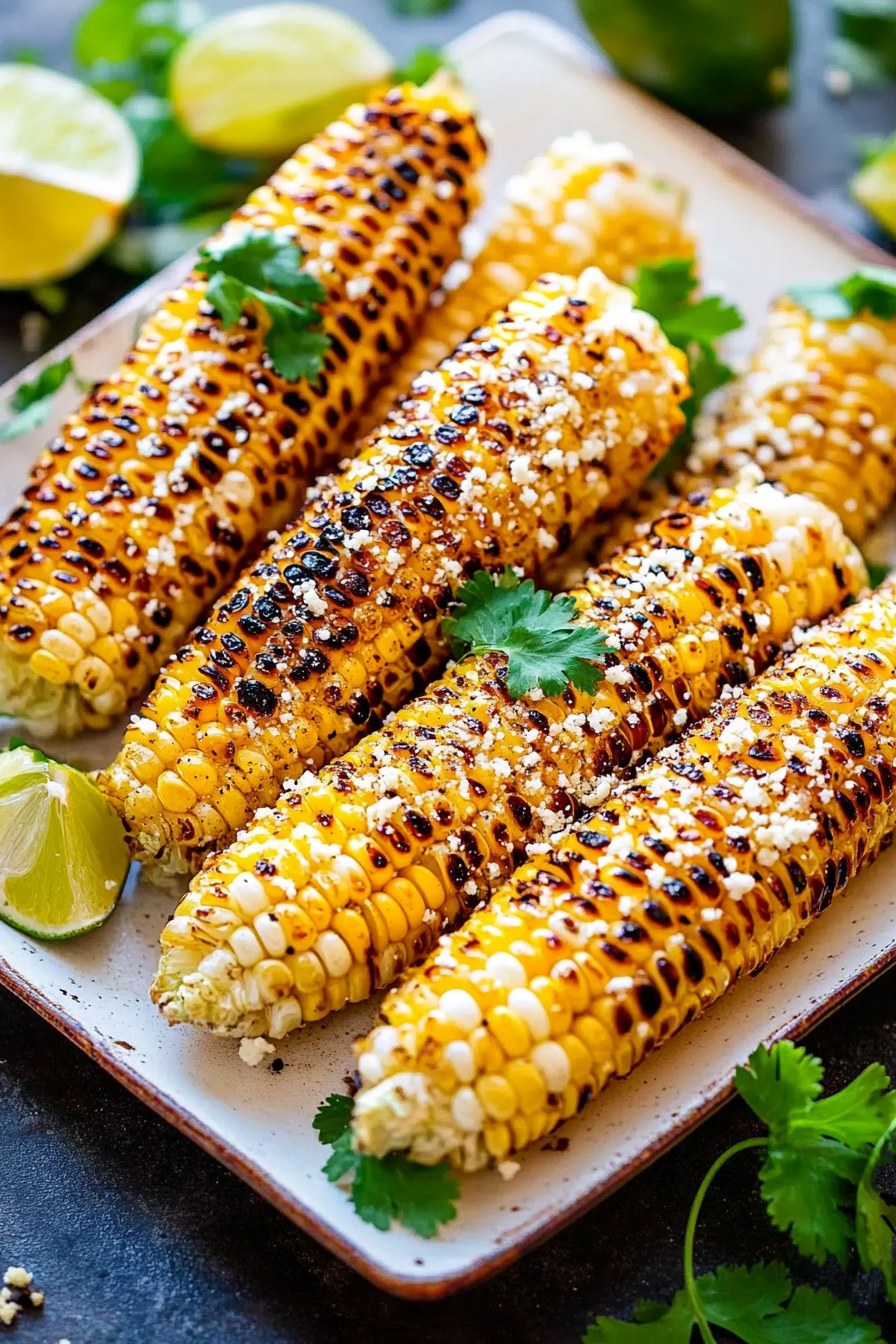
Charred Mexican Corn Awaits Your Grill
There’s something nostalgic about the smell of fresh corn on the grill, isn’t there? I remember summers at my grandma’s house, where she’d toss whole corn cobs straight onto the hot grill, their charred kernels bursting with smoky sweetness. It’s one of those recipes that feels like a warm hug in edible form — simple, honest, and totally crowd-pleasing. Honestly, I’d argue that grilled corn might be the ultimate easy side: no fancy ingredients, just a bit of patience and a splash of butter, and you’ve got a dish that disappears faster than you can say “summer feast.” My kids ask for this all the time — and I always do it when I crave that perfect balance of smoky and sweet. Plus, it’s a lifesaver on busy nights, when I want something flavorful but don’t want to fuss in the kitchen. The best part? It’s so forgiving — whether you’ve got a tiny backyard grill or a fancy smoker, this recipe works magic every single time. Trust me, once you’ve tasted it, grilling corn will become your go-to summer tradition.
What is grilled corn?
Think of grilled corn as that charming summer staple, embracing simplicity but delivering big flavor. It’s essentially fresh corn on the cob, cooked directly over flames or hot coals until charred, smoky, and irresistibly sweet. The name “grilled corn” is pretty straightforward — it’s corn cooked on a grill, of course — but it’s also a bit of a ritual. You can keep it classic with just butter and a sprinkle of salt, or amp it up with spices, herbs, or even a splash of lime. It’s one of those dishes that feels familiar and comforting, yet totally customizable. Whether you like plump, juicy kernels or a touch of crispiness around the edges, grilling helps bring out the corn’s natural sugars, caramelizing the surface and adding a smoky depth that just can’t be beat. Think of it as nature’s candy coated with a smoky embrace — perfect for summer barbecues or just a cozy night in when you really want that sun-kissed flavor.
Why you’ll love this recipe?
What I love most about this grilled corn is how effortlessly delicious it is. There’s a kind of magic in that first bite — the kernels are sweet and juicy, kissed by a smoky char that makes it taste like summer on a plate. And let’s be honest, it’s so simple that almost anyone can pull it off, even if you’re a beginner in the kitchen. No need for complex sauces or fancy techniques; just fresh corn, a hot grill, and a little patience. Plus, it’s budget-friendly — one humble ear can serve as a whole meal or a side for a crowd. I also love how versatile it is — sprinkle on chili powder, lime juice, or a dusting of Parmesan for a different flavor twist every time. This is one of those recipes that’s become a family tradition, especially at backyard cookouts, and I always find myself reaching for it when I want something that’s both satisfying and comforting. Honestly, once you try it, you’ll wonder why you ever bothered with boiled corn again!
How do I make Grilled Corn?
Quick Overview
Making perfect grilled corn is surprisingly easy. You start by preheating your grill until it’s nice and hot — think medium-high heat. While it heats up, shuck the corn, removing those tough outer leaves but leaving the husk somewhat intact if you want a bit of natural moisture and a gentle steaming effect. Brush the ears lightly with melted butter or oil, then place them directly on the grill grates. Turn frequently, about 2-3 minutes per side, until all sides are beautifully charred and the kernels look plump and glossy. Finish with a sprinkle of sea salt or your favorite seasonings, and if you’re feeling adventurous, a squirt of fresh lime. In just about 15-20 minutes, you’ve got that smoky, sweet aroma wafting around the backyard and a plate of irresistibly delicious grilled corn ready to serve!
Ingredients
For the Corn:
– Fresh ears of corn (preferably farm-fresh or organic if possible). About 4-6 ears, depending on your crowd.
– Optional: Husk, for natural steaming and protection from direct flame
– 2-3 tbsp melted butter or good-quality olive oil for brushing
– Sea salt, freshly cracked pepper, or spice blends for seasoning
– Lime wedges and chopped herbs (cilantro, parsley) for serving or a splash of hot sauce if you like it spicy
Step-by-Step Instructions
Step 1: Preheat & Prep Pan
Get your grill roaring to about 375-400°F (190-200°C). If you’re using a charcoal grill, pile the coals to one side so you can have a hot direct heat zone. For gas, turn all burners to medium-high. While it heats, shuck the corn: peel away the outer leaves, but leave a layer of husk on (optional — some love husk-less for a more intense char). Remove the silk threads with a brush — trust me, this is where patience pays off. Some folks soak the ears in water for 10 minutes beforehand to add moisture and prevent the husks from burning completely. I’ve tested both ways, and honestly, it’s all about the flavor you want — a little char or a more tender, steamed-out effect.
Step 2: Mix Dry Ingredients
If you’re adding seasonings, now’s the time to prep them! A pinch of smoked paprika or chili powder gives a lovely smoky punch. I love mixing a little sea salt with freshly cracked black pepper, maybe some garlic powder if I’m feeling fancy. Keep these nearby because that shot of flavor amps everything up once the corn is cooked.
Step 3: Mix Wet Ingredients
Melt your butter or oil in the microwave — super quick — and add a splash of lime juice or a sprinkle of herbs if you’d like. Brushing the corn with a little of this mixture just before grilling helps it caramelize and stick with flavor. I always do this—it’s like magic for that savory, buttery glaze.
Step 4: Combine
Brush the corn lightly with the seasoned butter or oil. Don’t go overboard — you just want a thin layer. Overly greasy ears tend to flare up on the grill, and nobody wants a burnt outer layer that masks the real sweetness of the kernels.
Step 5: Prepare Filling
Once on the grill, you can add flavor directly — sprinkle spices on before grilling or keep it simple. Some swear by adding a dash of hot sauce or tossing the cooked corn in a spicy butter mixture after grilling. I love experimenting with ingredients like cotija cheese or chopped herbs for extra richness and texture.
Step 6: Layer & Swirl
Place the corn cobs directly on the grates, turning gently every 2-3 minutes. Watch for those beautiful grill marks and listen for that faint sizzle — that sound means you’re doing it right. Keep an eye for any small flare-ups and move the corn if needed — safety first, and it’s all about gentle turning to get all sides evenly charred.
Step 7: Bake
It usually takes about 10-15 minutes, depending on the grill’s heat and corn size. You want the kernels to look plump and glossy, with some dark spots for that charred flavor. If you prefer softer corn, you can cover the ears with foil during part of the process, or rotate them more carefully for even cooking.
Step 8: Cool & Glaze
Once done, remove from the grill and let them sit for a few minutes. While still warm, brush them with a more seasoned butter or your favorite glaze. I love adding a squeeze of lime and a sprinkle of chopped cilantro for that fresh hit of brightness. Be careful not to overdo the glazing — a little goes a long way to highlight the smoky flavor.
Step 9: Slice & Serve
Cutting into that perfect charred surface reveals juicy, tender kernels that look almost too beautiful to eat. Serve hot, preferably with extra lime wedges, and watch your family gather around, eager to dig in. This dish is so good straight off the grill, but it also holds up well as leftovers — just reheat gently in the microwave or in a skillet. And trust me, it’s just as delicious the next day — if there’s any left.
What to Serve It With
This grilled corn is so versatile, it’s practically a blank canvas — perfect for any occasion. For a casual breakfast, serve it alongside scrambled eggs, or crumbled queso fresco. It’s a star at brunch, paired with fresh salads, grilled meats, or even a chilled white wine. As a dessert? Well, I won’t say no to sweetened grilled corn with a drizzle of honey and a sprinkle of cinnamon — it’s like a caramelized treat that’s surprisingly light. For a cozy snack, it’s fantastic just plain with a little sea salt and hot sauce, right out of the skillet. Honestly, I think the smell alone of grilled corn turns any day into a celebration. It’s become my family’s go-to summer side, and I love how it brings everyone to the table, smiling and chatting over those flavorful kernels. Plus, leftovers make a killer addition to salads or tacos the next day. It’s simple, satisfying, and best enjoyed outdoors, especially with friends or family gathered around the grill.
Top Tips for Perfecting Your Grilled Corn
Over the years of making this, I’ve learned quite a few tricks to keep the flavor on point. First, always select fresh, plump ears — the freshness really makes a difference. When shucking, don’t be discouraged if some silk stubbornly sticks; I’ve learned a trick to dampen the silk by gently brushing it with a damp cloth before peeling, which helps loosen everything up. Regarding seasoning, I tested several spice blends, and a hint of smoked paprika paired with chili powder is *chef’s kiss* — but feel free to switch it up depending on your mood. And a quick tip: soaking the husked ears in cold water for 10 minutes before grilling adds a little extra moisture and helps prevent burning. My biggest tip? Turn the corn gently and often; even heat and a light touch make for those beautiful grill marks and evenly cooked kernels. I also tested making a sweet-spicy glaze with honey and sriracha — so good — and I think everyone should have that option in their back pocket. The key is in the timing: don’t overcook, or the kernels can become mushy. Instead, look for that perfect, glossy appearance and some charred spots. Trust me, this little bit of effort pays off big time.
Storing and Reheating Tips
Leftover grilled corn? No problem! Wrap any cooled ears tightly in foil or store in an airtight container. In the fridge, it stays fresh for up to 2 days — just reheat gently in the microwave or on a warm grill, covered loosely with foil to preserve moisture. If you’re freezing leftovers, wrap each ear separately in plastic wrap and store in a zip-top bag — they should be good for about 2 months. To thaw, just leave them in the fridge overnight or reheat directly from frozen in a skillet. Aware that the texture might change slightly after freezing, I recommend adding a fresh brush of butter or a squeeze of lime to revive flavor when reheating. As for the glaze, if your corn is cold, wait until it’s just warm before brushing with melted butter or toppings — you don’t want the flavors to get lost or the toppings to slide right off. This way, you’ll keep that irresistible smoky-sweet profile intact, even days later.
Frequently Asked Questions
Final Thoughts
Honestly, nothing beats the joy of biting into a perfectly grilled ear of corn — the smoky aroma, those tender kernels bursting with sweetness, and that satisfying char. Over the years, I’ve made this countless times, and it never fails to bring smiles around my table. It’s one of those recipes that feels like a celebration of summer, but really, it’s good whenever you crave that warm, smoky comfort. I love experimenting with toppings and seasonings, and every time, it reminds me that cooking doesn’t have to be complicated to be special. So today, I encourage you to grab some fresh corn, fire up your grill, and create your own summer memories. Trust me, your taste buds will thank you! And I’d love to hear how yours turns out — leave a comment or share your favorite twists. Happy grilling!