Colorful Alphabet Cookies How to Bake Them
There’s nothing quite like the warm, inviting smell of freshly baked cookies filling my kitchen—especially when they’re the kind that spell out happiness letter by letter. I remember sitting at my grandma’s table as a kid, meticulously shaping tiny alphabet cookies, giggling as I tried not to eat the raw dough. Those crunchy, sweet bites with the slightly buttery flavor always felt like a little piece of magic. Now, years later, I still cherish that memory—and I’ve recreated the magic with a recipe that’s simple enough to make any day feel special. If you’re on the hunt for the perfect nostalgic treat that everyone can enjoy, these alphabet cookies will steal your heart. They’re just as fun to make as they are delicious to eat, and trust me, the kids (and adults) will ask for seconds—and maybe even thirds!
What is an Alphabet cookie?
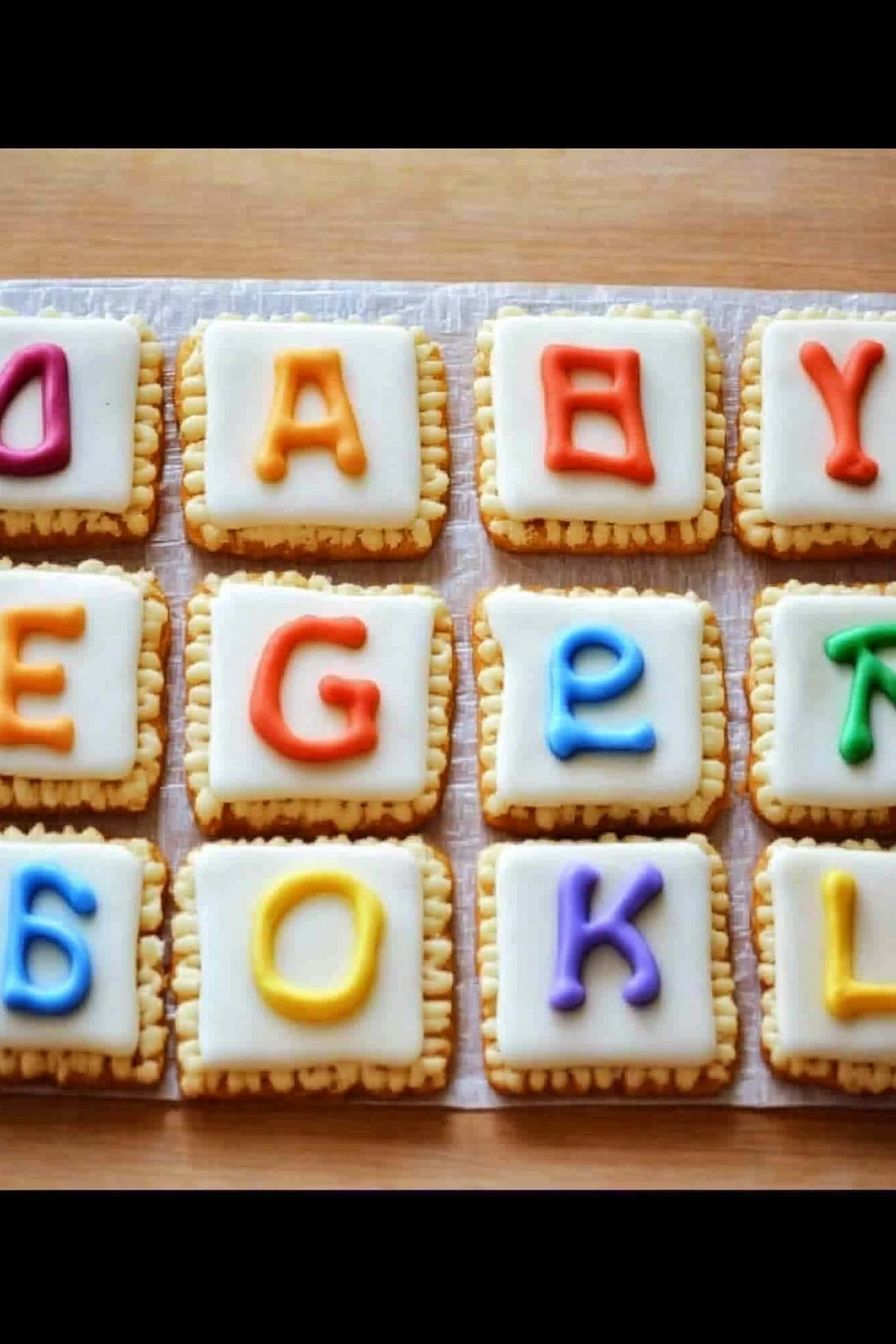
Think of alphabet cookies as a charming, edible alphabet puzzle that you bake right in your own kitchen. It’s essentially a buttery, sweet cookie dough pressed or rolled out, then cut into letters of your choice—usually the alphabet—so you can spell out words, names, or silly phrases. The name “alphabet cookies” comes from their main feature: the individual letters that make them so versatile and playful. They’re like childhood’s favorite snack, but with a little extra love and a personal touch. These cookies aren’t just snackable; they can be decorated, shaped, or dipped in chocolate—making every batch uniquely yours. The best part? You can customize them for birthdays, holidays, or just a fun afternoon of baking with loved ones. Think of it as an edible letter board that you get to eat at the end!
Why do you love this movie?
What I love most about these alphabet cookies is how incredibly versatile they are. They’re a blank canvas for creativity—searching for the perfect message, spelling out a sweet note, or just making the alphabet fun for the little learners in your life. The flavor? Oh, it’s pure buttery nostalgia with just the right balance of sweetness—think of it as a cookie version of comfort food. And let me tell you, these cookies are so straightforward to make, they’re practically foolproof. Even if you’re a baking newbie, you’ll find yourself impressing everyone with these charming treats. Plus, they’re budget-friendly—using pantry staples like flour, butter, and sugar—so there’s no need to splurge. They’re perfect for various occasions: breakfast treats, school snacks, party favors, or just a cozy weekend project. What I love most is how everyone, kids and adults alike, gets so excited about seeing their names or favorite words come to life in cookie form. They’re a true crowd-pleaser that’s fun to make and even better to eat!
How do I make Alphabet cookies?
Quick Overview
This recipe comes together surprisingly fast. You start by mixing up a buttery, tender dough, then chill it to make rolling easier. After that, it’s all about cutting out the letters—whether you’re using cookie cutters or freehand shaping with a knife. I recommend baking the cookies until just golden around the edges for that perfect crunch. Once cooled, you can decorate them with icing, sprinkles, or a simple drizzle of chocolate—whatever makes your heart happy. The magic happens when you see the little alphabet spell out words or names; it’s like edible literacy with a side of nostalgia. And don’t worry, the dough is forgiving and easy to work with, even if it’s your first time making letter-shaped cookies!
Ingredients
For the Main Batter:
– 2 ½ cups all-purpose flour (I always use unbleached for a richer flavor)
– ½ teaspoon baking powder (to give a tiny lift)
– ¼ teaspoon salt (brings out the sweetness)
– 1 cup unsalted butter (softened, of course! I tested this with salted butter and it’s still delicious, but I prefer unsalted)
– 1 cup granulated sugar
– 1 large egg
– 1 teaspoon vanilla extract (or almond extract if you’re feeling a little extra indulgent)
For the Filling (Optional, but fun):
– Jam, chocolate spread, or even Nutella
– Alternatively, you can keep it simple and fill the cookies with a sweet icing
For the Glaze:
– Powdered sugar mixed with a splash of milk or lemon juice
– Food coloring or extracts for added flavor
– Or melt some chocolate for a silky drizzle
Step-by-Step Instructions
Step 1: Preheat & Prep Pan
Set your oven to 350°F (175°C). Line baking sheets with parchment paper or silicone baking mats—they make cleanup so much easier and give you that evenly baked finish. Have your rolling pin ready, along with cookie cutters or a small knife if you’re shaping freehand. Make sure your butter is softened but not melted—that’s key for a tender cookie.
Step 2: Mix Dry Ingredients
In a small bowl, whisk together the flour, baking powder, and salt. This step ensures everything distributes evenly and prevents clumps, which is super helpful to get that smooth dough.
Step 3: Mix Wet Ingredients
In a larger bowl, beat the butter and sugar together until creamy and light—about 2-3 minutes. I always do this on medium speed; it just makes the dough fluffier. Add the egg and vanilla, mixing until fully incorporated. The smell of vanilla while mixing is a little slice of heaven.
Step 4: Combine
Gradually add your dry ingredients to the wet, mixing on low until just combined. Do not overmix! Overworking the dough makes cookies tough, and that’s the last thing you want for delicate alphabet shapes. You’ll have a soft, slightly crumbly dough, which is perfect for chilling.
Step 5: Prepare Filling
If you’re adding filling—like jam or chocolate spread—set it aside. If you’re just making plain cookies, skip to rolling out!
Step 6: Layer & Swirl
If you want to get fancy with filling, cut out your letters, then add a small dollop of jam or spread on the bottom of a matching letter, pressing gently. For added flair, fill one cookie with filling and top it with another, then gently press the edges to seal—kind of like a little cookie sandwich.
Step 7: Bake
After rolling out the dough to about ¼ inch thickness, cut out your alphabet letters. Transfer them to your prepared baking sheets. Bake for 8-10 minutes, until their edges turn golden. Keep an eye on them; every oven is a little different. Once done, let the cookies cool on the baking sheet for a few minutes before transferring to a wire rack. They’re fragile straight out of the oven!
Step 8: Cool & Glaze
Allow the cookies to cool completely—this takes about 15 minutes. Once cooled, you can glaze, decorate, or simply enjoy them plain. If you’re glazing, mix powdered sugar with milk or lemon juice until smooth—add food coloring or flavor extracts to customize. For a richer taste, melt some chocolate and drizzle over the cookies for an elegant finish.
Step 9: Slice & Serve
Here’s the fun part: spell out words! Whether it’s “LOVE,” “DAD,” or “YUM,” arrange the letters on a plate or a festive tray. These cookies taste just as good warm as they do at room temperature, but I love how the glaze adds a little extra shine and sweetness. Serve them with a glass of milk or a hot cup of tea and watch everyone’s face light up when they see what the cookie spell says!
What to Serve It With
This cheerful treat is incredibly versatile. For breakfast, pair them with a hot coffee or a glass of milk—my kids actually ask for these in their lunchboxes! During brunch, I love serving them with fresh fruit and whipped cream. As a dessert, they’re adorable atop a birthday cake or arranged on a platter with a drizzle of chocolate for a more indulgent vibe. If you’re just craving a cozy snack, these cookies with a mug of hot cocoa or tea are pure comfort. My family’s favorite is to make a little cookie message for special occasions—spelling out “HAPPY BIRTHDAY” or “WELCOME HOME.” It adds a personal touch and makes every gathering feel extra special. Trust me, once you start baking these, they’ll become a go-to treat for every celebration and lazy weekend afternoon.
Top Tips for Perfecting Your Alphabet Cookies
After making these countless times, I’ve picked up a few tricks that make all the difference. First, don’t skip chilling the dough — it firms up the butter and makes cutting out the letters so much easier. Roll the dough on a lightly floured surface to prevent sticking, but don’t over-flour; a dusting is perfect to keep the texture tender. When cutting out letters, I find that using a small sharp cookie cutter or a craft knife works best—be patient and gentle. For even more uniform shapes, refrigerate the cut cookies for 10 minutes before baking—they keep their shape much better. Want to get fancy? Mix in a tiny bit of cinnamon or add colored sprinkles into the dough for a fun twist. If your dough is feeling sticky, just pop it in the fridge for 15-20 minutes—the cold smooths out any tackiness. When decorating, I like to use piping bags for neat icing details, but a simple spoon works great for drizzling. Be creative with the fillings and glazes—adding a splash of almond extract or a pinch of sea salt can elevate the flavor. Honestly, I learned through lots of trial and error, and the biggest lesson? Don’t rush it. Good things are worth the wait, and these cookies will turn out just perfect every time.
Storing and Reheating Tips
These cookies are best enjoyed within a few days of baking. Store them in an airtight container at room temperature for up to 3 days—just make sure they’re completely cooled before sealing. To keep them fresh longer, pop them into a container in the refrigerator for up to a week; I recommend placing a sheet of parchment between layers to prevent sticking. If you want to make them ahead of time for a party, freeze the baked cookies in a properly sealed container for up to a month. When ready to serve, let them thaw at room temperature for about 30 minutes. If you glazed them, it’s best to add the glaze after they’ve fully cooled to avoid melting or smudging. For leftover glazed cookies, you can reheat them in a low oven (around 300°F) for a few minutes just to warm them slightly. Always check the appearance and smell—if they smell off or look crumbly, it’s time for another round of fresh cookies!
Frequently Asked Questions
Final Thoughts
These homemade alphabet cookies hold a special place in my heart—they bring back childhood memories and turn any occasion into a celebration. They’re easy enough to whip up on a weekday but fancy enough to impress at parties. Their versatility means you can customize flavors, fillings, and decorations to match any theme or mood, making them an endlessly delightful baking project. Everyone loves the surprise of seeing their name spelled out or a fun word emerge from the oven. Plus, the process itself is such a joy—rolling, cutting, and decorating with loved ones makes the experience all the more meaningful. So next time you’re craving something homemade and nostalgic, give these a try. I promise, once you bake your first batch, you’ll be hooked. Happy baking—and I can’t wait to see what words you create in your kitchen!
Alphabet and Rainbow Cookies
Ingredients
Method
- In a mixer, beat butter and sugar until well combined, about 2 minutes.
- Add in 2 eggs and 2 egg yolks and mix until combined.
- Add in vanilla and almond extract; mix until combined.
- In a separate bowl, sift together flour, salt, and baking powder. Slowly (about a cup at a time) add flour to butter mixture and combine.
- Mix ingredients until combined.
- Put dough in plastic wrap and refrigerate for at least one hour. When ready, heat oven to 350 degrees Fahrenheit.
- Roll dough out, cut out cookies in alphabet shapes, and bake for 6-8 minutes.