Cozy Chocolate Orbs How to Make Them
If you’ve ever watched a swirl of rich, chocolatey hot cocoa spill out of a pretty sphere and thought, “Wow, that looks way too fancy for me,” then I’m right there with you. Honestly, I used to think hot chocolate bombs were just a trend, something only bakers or fancy cafes would pull off. But let me tell you, I tested this recipe dozens of times — tweaking the size, flavors, and even the type of chocolate — and now I can confidently say these little magic spheres are my family’s absolute favorite way to indulge on chilly nights. They’re basically a hug in a cup, especially when you add a dash of whipped cream or marshmallows. And the best part? They’re surprisingly simple to make, once you get the hang of it. This one’s a lifesaver on busy nights or whenever I need a quick dose of comfort. Plus, watching someone’s face light up when they see the hot chocolate bomb melt is honestly priceless. Trust me on this—once you make these, they’ll become your go-to cozy treat too!’
What is hot chocolate bomb?
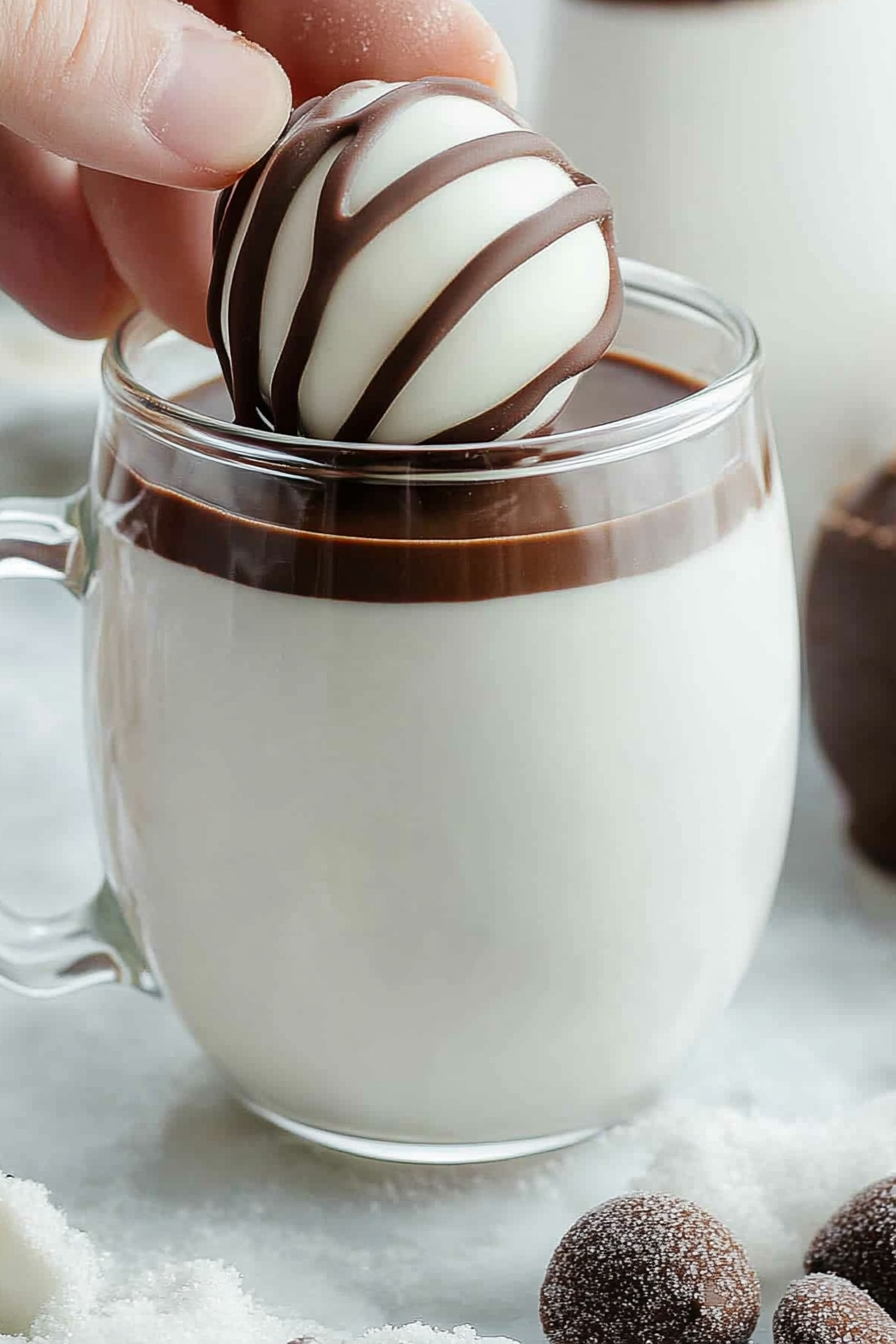
Think of hot chocolate bombs as a little chocolate shell filled with the goodness of hot cocoa mix, marshmallows, or even tiny candies. It’s essentially a chocolate sphere that, when dropped into hot milk or water, melts away to reveal a glorious, steaming cup of hot chocolate. The idea exploded in popularity a couple of years ago because it’s so fun and visually stunning — kind of like a mini magic trick in your mug. The name says it all: “hot chocolate bombs.” They’re made by melting high-quality chocolate, shaping it into a sphere, then filling it with your favorite hot cocoa essentials. Once assembled, you heat some milk, gently drop in the sphere, and watch the magic happen as it fizzes and melts into a rich, creamy drink. The beauty of these is that you can customize them with flavors, toppings, and even add a little splash of liqueur for an adult version. Think of it as a dessert and a drink rolled into one tiny, delicious package. Honestly, once you’ve tried one, you’ll get why people got so hooked — they’re just so much fun to make and even more fun to drink!
Why you’ll love this recipe?
What I love most about making hot chocolate bombs is how they turn an ordinary mug of cocoa into a little celebration. The moment the hot milk hits the shell, there’s that instant fizz and magical swirl — it’s like watching a tiny winter wonderland unfold right in your cup. And trust me, this isn’t just about looks; the flavor is insanely rich and creamy. Since you control the ingredients, you can make them as decadent or as light as you like. For instance, I tested this with both dark chocolate and milk chocolate, and honestly, the dark chocolate version kicked everything up a notch in terms of depth and richness. My kids ask for these all the time — especially on snowy weekends or when they need a special treat after school. Plus, I’ve learned that this recipe is surprisingly easy. Most of the work involves melting chocolate and filling it, which takes just a few minutes once you get the hang of it. And because you can fill them with anything—from mini marshmallows to crushed peppermint or even caramel bits—there’s endless room for creativity. This recipe is also super budget-friendly, especially if you buy chocolate in bulk or use leftovers from baking. It’s one of those classics that just never gets old, whether you’re having friends over, looking for a cozy night in, or just craving something sweet at the end of a busy day.
How do you make hot chocolate bombs?
Quick Overview
Making hot chocolate bombs sounds fancy, but it’s pretty straightforward once you know the steps. Basically, you melt high-quality chocolate, pour it into silicone molds to form perfect spheres, then let them set. After that, you fill each half with hot cocoa mix, marshmallows, or your favorite toppings, and seal the two halves together with melted chocolate. Once assembled, you can gently heat some milk, drop in your bomb, and watch it melt into a velvety hot cocoa — easy peasy. I love that you can customize each one with different flavors or toppings, making every batch unique. The process is surprisingly forgiving, and with a little patience, even beginners can nail it. Plus, once you see how adorable and impressive they look, you’ll be hooked. The real magic happens when you pour the hot milk — the sphere fizzes, the chocolate melts, and suddenly, you’re holding a warm, luscious mug of hot cocoa. Plus, cleanup is minimal, especially if you line your workspace with parchment paper. This is truly a fun project that everyone in the family can get involved with!
Ingredients
For the Main Shell:
– 12 oz high-quality chocolate (dark, milk, or white — I love doing a mix for presentation)
– Silicone sphere molds (these are lifesavers! Make sure they’re food-grade)
– Optional: a pinch of sea salt or vanilla extract for added flavor
For the Filling:
– 1/4 cup hot cocoa powder (choose your favorite brand)
– 2-3 marshmallows per sphere (mini or regular, depending on your preference)
– Extra fun fillings: crushed peppermint candies, caramel bits, hot fudge, or tiny chocolate chips
For the Glaze/Topping:
– Extra melted chocolate for sealing
– Sprinkles, crushed cookies, or edible glitter for decoration
– Whipped cream or mini marshmallows for serving
Step-by-Step Instructions
Step 1: Preheat & Prep Mold
First, set your oven to about 75°F (24°C) — if you’re using tempered chocolate or want a more controlled temp, that’s perfect. Line a baking sheet with parchment paper. Give your silicone molds a quick wash and dry thoroughly — no water, or the chocolate won’t set right. To prevent sticking, lightly dust the molds with a tiny bit of cornstarch or cocoa powder if necessary. Trust me, a clean, dry mold is the secret to shiny, seamless spheres.
Step 2: Melt the Chocolate
Break the chocolate into small pieces and melt gently in a microwave in 30-second bursts, stirring between each. Or, melt in a double boiler for smoothness. You want the chocolate smooth and pourable but not overheated. I always do this step over a bowl of warm water—slow and steady wins the race for glossy, crack-free shells. Let the chocolate cool slightly so it’s still pourable but not hot enough to melt the mold.
Step 3: Fill the Molds
Pour the melted chocolate into each cavity, using a spoon or brush to cover the sides thoroughly. I like to do a quick rotation to make sure every nook is coated — think of it like giving your mold a chocolate massage! Then, gently tap the mold on the counter to remove air bubbles. Chill in the fridge for about 10-15 minutes until the chocolate firms up and looks shiny.
Step 4: Recoat & Seal
Once the first layer hardens, give the shells a second coat if needed — this ensures they’re sturdy enough to hold the filling. Chill again. When they’re set and glossy, carefully pop them out of the mold — don’t rush, or they might crack. If any doesn’t come out cleanly, you can gently melt and patch it up later with a bit of leftover chocolate.
Step 5: Fill & Seal
Beat the top halves of the spheres with a little melted chocolate to serve as glue. Place a spoonful of hot cocoa mix, marshmallows, and any other goodies inside the bottom half. Don’t overfill — you want to leave room for sealing. Dot the edges of the top half with melted chocolate, then gently press onto the filled bottom. Hold a few seconds and give it a gentle twist if needed—this creates a nice seal. For extra durability and aesthetic appeal, pipe a line of melted chocolate around the seam.
Step 6: Decorate & Chill
This part is where your creativity shines! Drizzle melted chocolate on top, add sprinkles, or dust with cocoa powder. Place finished bombs on a parchment-lined tray and refrigerate for another 15 minutes to firm everything up. This makes sure they’re ready to melt perfectly in hot milk.
Step 7: Serve & Enjoy
Heat your milk to steaming hot but not boiling, about 150°F (65°C). Drop your hot chocolate bomb in, step back, and wait for that spectacular fizz — it’ll start melting away to reveal the filling inside. Stir gently, top with whipped cream if you like, and devour. The smell alone will have everyone rushing to the table — warm, chocolatey, and just cozy enough to make you feel like winter has officially arrived.
Step 8: Store & Keep Fresh
If you can resist snacking on these right away, keep them stored in an airtight container in the fridge for up to a week — degrees of firmness may vary. For longer storage, freeze them wrapped tightly in plastic wrap and then foil, and thaw at room temperature. Just remember, if you plan to serve them with a glossy glaze or toppings, add those right before serving. Otherwise, they’ll stay beautiful and fresh for when your craving hits again.
Step 9: Slice & Serve
While these are designed to be whole spheres, some like to cut them in half to show off the pretty layers inside — it’s great for sharing or just for that wow factor. Use a warm knife for clean cuts, and place your mug on a plate for easy presentation. Whatever way you serve them, one thing’s for sure — these hot chocolate bombs are bound to make your day a little sweeter!
What to Serve It With
This treat is pretty much a standalone star, but I do love pairing it with a cozy blanket and some holiday classics — think fuzzy slippers, a crackling fireplace, or even a good old Netflix binge. For breakfast (hey, no judgment!), it’s lovely alongside a warm croissant or a cinnamon roll. My kids ask for these on snowy Saturday mornings, and I always do a little happy dance when I see their faces light up. For a more elegant brunch, serve with a side of biscotti or hand-formed cookies, accompanied by a steaming pot of tea or coffee. When it’s dessert time, I love spooning whipped cream on top or adding a dusting of cocoa powder — just like a fancy hot cocoa from a French café. For casual nights, I set out a tray of mini bombs and let everyone indulge at their own pace. Honestly, these are so versatile — they make any occasion special, even a simple weeknight. I swear, once you make them, your house will smell like a chocolate palace, and everyone will be asking for seconds.
Top Tips for Perfecting Your Hot Chocolate Bombs
From years of trial and error, I’ve gathered a few tips to make sure your bombs turn out picture-perfect every time:
- Choosing Chocolate: Quality matters. Good couverture or baking chocolate melted properly makes a huge difference. Skip the cheap stuff; your shell will be shinier and less prone to cracking.
- Temperature Control: Let your melted chocolate cool just a bit before working with it to prevent melting the silicone mold or causing cracks. If it’s too hot, it’ll be sticky and hard to work with.
- Handling Shells: Patience is key when popping the shells out of the mold. If they’re stubborn, pop the mold back in the fridge for a couple of minutes. Cold shells are easier to handle.
- Filling Variations: Don’t be afraid to customize! I love adding a caramel chunk or a sprinkle of cinnamon to some bombs for a spicy twist. Just keep the fillings dry and small enough to fit inside comfortably.
- Sealing & Decoration: When sealing, use melted chocolate liberally but carefully — too little, and the bombs may open during melting; too much, and you get thick seams. Practice makes perfect here. I also learned that decorating with sprinkles or edible gold dust on the seams adds a fun, festive touch.
- Baking & Storage: Always store in a cool, dry place. If your house is humid, keep the bombs in an airtight container in the fridge. When ready to serve, add toppings just before melting for the best appearance and texture.
I’ve tested these tips many times — and trust me, they’ll help you create show-stopping hot chocolate bombs that taste as good as they look. The key is patience and a little loving care. Once you master the technique, you’ll be making these holiday classics all year round, experimenting with flavors, colors, and fillings.
Storing and Reheating Tips
If you want to make these ahead of time, just store them properly to keep their shine and shape. Keep in an airtight container in the fridge if you plan to enjoy them within a week. For longer storage, wrap each bomb tightly with plastic wrap, then freeze for up to three months. When you’re ready to use, let them thaw at room temperature — no rushing! Reheating isn’t necessary because the shell is already melted when dropped into hot milk. Just add the bomb, pour your steaming milk, and watch the magic happen. If you want to store leftovers after melting — which is rare, because they disappear quickly — keep any unused melted chocolate in the fridge and reheat gently in short bursts. Remember, the fresher the bomb, the prettier the swirl and the fresher the flavor.
Frequently Asked Questions
Final Thoughts
There’s something endlessly satisfying about creating these hot chocolate bombs — it’s a fun project that feels a little magical, especially when you watch it fizz and melt before your eyes. Over the years, I’ve learned that the magic lies in simple ingredients and a touch of patience; once you master the basics, the possibilities are endless. Whether you’re making them for family, friends, or just for yourself on a chilly evening, these little spheres of comfort are bound to become a staple in your kitchen. They remind me of childhood snow days, cozy pajamas, and sitting around the fireplace with a warm mug in hand. So go ahead, gather your ingredients, and get ready to enjoy a delicious swirl of chocolatey happiness. I can’t wait to hear how yours turn out! Drop a comment below, share your favorite fillings, and happy baking!’
Homemade Hot Chocolate Bombs
Ingredients
Method
- Chop the chocolate chips finely to ensure even melting.
- Place 5 ounces of chopped semi-sweet chocolate in a microwave-safe bowl. Microwave in 15-second intervals, stirring between each until most of the chocolate is melted. Avoid overheating.
- Add remaining chocolate and stir until mostly melted and cooled to about 85°F.
- Reheat the chocolate for 15 seconds to bring it to a fluid consistency suitable for molding.
- Use a brush to coat the inside of silicone molds with a thin layer of melted chocolate. Chill in the refrigerator for 3-5 minutes.
- Pop out the chocolate shells carefully. Fill half with hot cocoa mix and mini marshmallows.
- Heat a plate in the microwave for about a minute. Lightly melt the rim of each chocolate half.
- Press the rims together quickly to seal the sphere. Use melted white chocolate to decorate if desired.
- Store in a cool, dry place until ready to serve.