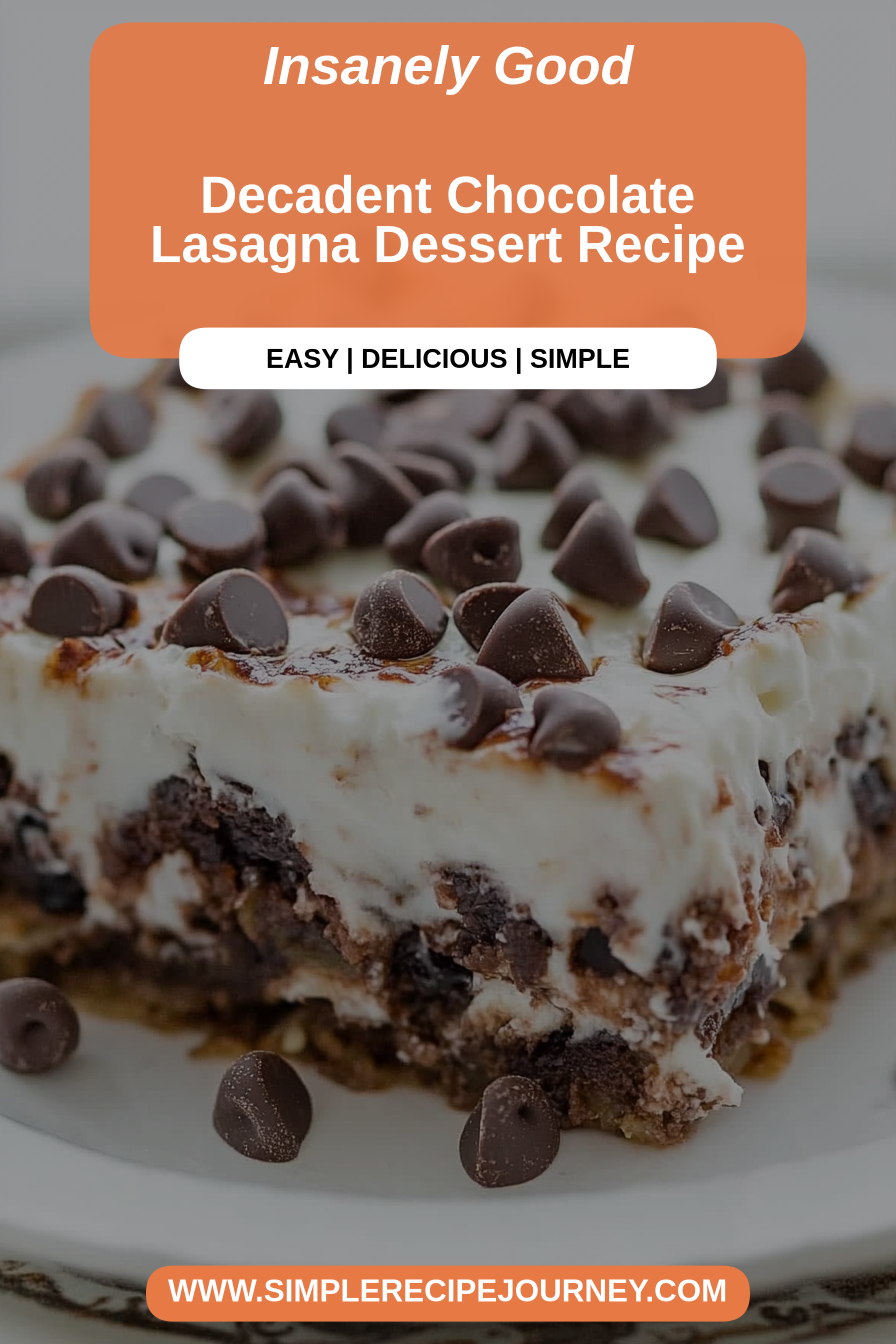
Decadent Chocolate Lasagna Dessert Recipe
You know, some recipes just stick with you. They become a part of your kitchen’s soul, a go-to for comfort, celebration, or just those moments when only something deeply decadent will do. For me, that recipe is this chocolate lasagna. I’m not kidding when I say it’s a game-changer. I first stumbled upon something similar years ago, looking for a unique dessert that wasn’t the usual cake or pie. This version, though, this is the one I’ve refined, tweaked, and perfected over countless family dinners and potlucks. It’s rich, it’s surprisingly easy, and it always, *always* disappears in minutes. Forget your standard brownies or cookies; this chocolate lasagna takes dessert to a whole new, glorious level. It’s like a decadent dream layered into reality, and I’m so excited to share it with you!
What is chocolate lasagna?
So, what exactly is chocolate lasagna? It’s not what you might initially think! There’s no pasta involved, promise. Think of it more as a no-bake, layered dessert that uses a cookie crumb base, a rich chocolate cream cheese filling, and a creamy, dreamy chocolate pudding or mousse topping. It’s a symphony of textures and flavors that come together in a way that’s just… magic. The name “lasagna” comes from the way it’s layered in a rectangular dish, much like its savory counterpart, but trust me, the taste profile is worlds apart. It’s the ultimate crowd-pleaser, and once you try it, you’ll understand why it’s become my absolute favorite way to satisfy a serious chocolate craving.
Why you’ll love this recipe?
Okay, let me tell you why this chocolate lasagna is more than just a dessert; it’s a culinary hug. First off, the flavor. Oh, the flavor! We’re talking deep, intense chocolate goodness that’s perfectly balanced by the creamy filling. It’s not overly sweet, which is something I really appreciate. Then there’s the simplicity. Seriously, this is a lifesaver on busy nights or when unexpected guests pop over. No baking required means less fuss, less cleanup, and more time enjoying the process (and the result!). It comes together in stages, and you can even prep parts of it ahead of time, which is a huge win in my book. Budget-wise, it’s also pretty sensible. The ingredients are mostly pantry staples, making it an affordable way to create something truly special. And its versatility? It’s perfect for everything from a casual family dessert to a show-stopping centerpiece at a holiday gathering. What I love most about this is how it consistently wows people. They take one bite and are like, “What *is* this?!” It’s that kind of reaction that makes me feel so good about sharing it. It’s like my chocolate lava cake or my famous triple chocolate cookies, but with its own unique charm.
How do I make chocolate lasagna?
Quick Overview
Making this chocolate lasagna is wonderfully straightforward. You’ll start by creating a simple, buttery cookie crust that gets pressed into the pan. Then, you’ll whip up a luscious chocolate cream cheese filling that’s incredibly smooth and rich. The final layer is a decadent chocolate pudding or mousse that sets up beautifully. It all comes together with chilling time, allowing the flavors to meld and the layers to set perfectly. It’s all about simple steps leading to an extraordinary dessert, and honestly, it’s hard to mess this one up!
Ingredients
For the main battery (crust):
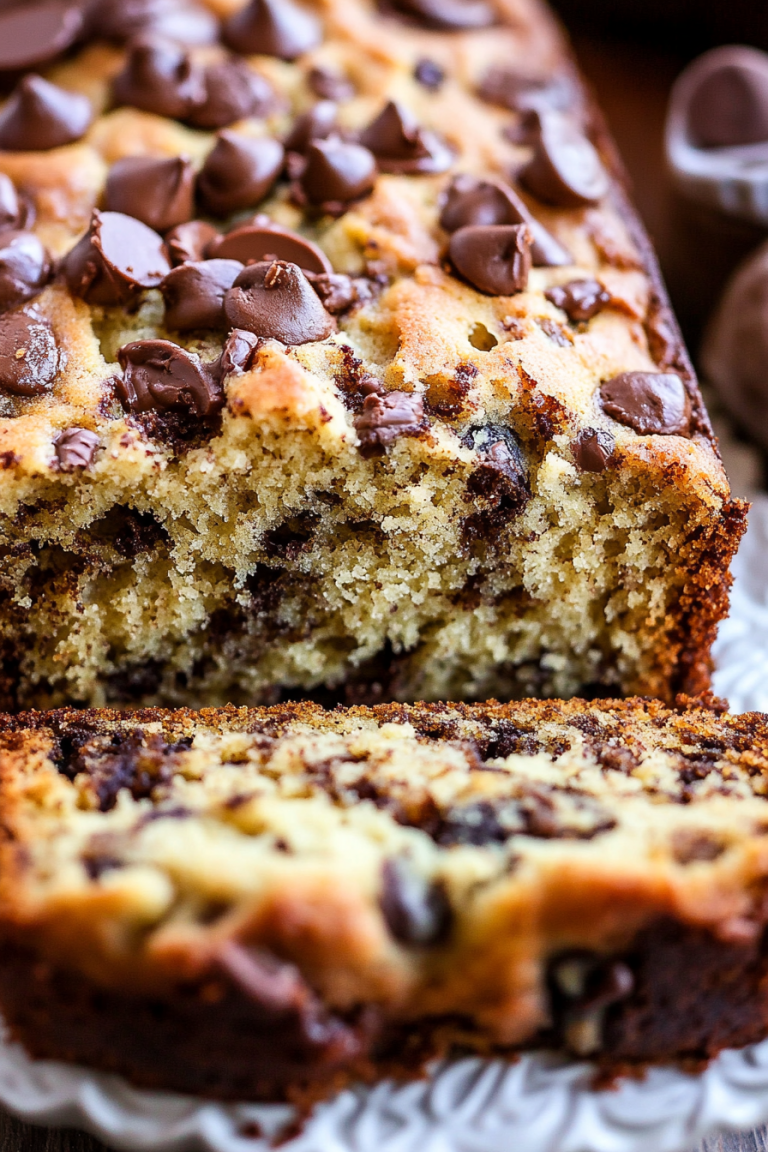
2 cups finely crushed chocolate sandwich cookies (like Oreos) – You want them really fine, almost like sand. I usually pulse mine in a food processor. If you don’t have a food processor, just pop them in a zip-top bag and go to town with a rolling pin! It’s surprisingly therapeutic. Make sure you’re getting the whole cookie, cream filling and all – that’s where a lot of the magic happens!
1/4 cup granulated sugar – Just a touch to sweeten the crust a bit and help it bind.
1/2 cup unsalted butter, melted – This is what holds the crust together. Make sure it’s fully melted so it distributes evenly.
For the Filling:
8 ounces cream cheese, softened – This is key for a smooth, lump-free filling. Leave it out on the counter for at least an hour before you start. Cold cream cheese is the enemy of creamy fillings!
1 cup powdered sugar – For sweetness and that silky texture. Sift it if you’re worried about lumps, though I often just whisk it well.
1 teaspoon vanilla extract – A classic for a reason, it just enhances all the chocolatey goodness.
2 cups prepared chocolate pudding – You can use store-bought instant pudding (make it according to package directions, but use milk for that rich flavor), or even better, make your own from scratch. I sometimes use a combination of milk and half-and-half for an extra creamy pudding. Make sure it’s thoroughly chilled before you use it.
For the Glaze (Topping):
8 ounces semi-sweet chocolate chips – Good quality chips make a difference here. If you prefer a richer flavor, you can use dark chocolate chips. I often use a mix!
1/4 cup heavy cream – This is what makes the glaze smooth and pourable. You can substitute with half-and-half in a pinch, but the glaze might be a little less rich.
Optional: 1 tablespoon unsalted butter – For an extra glossy finish, but it’s not strictly necessary.
Step-by-Step Instructions
Step 1: Preheat & Prep Pan
First things first, grab a 9×13 inch baking dish. You don’t need to grease it, as the crust will provide plenty of fat. If you’re using a glass dish, make sure it’s one that can handle being chilled. I always give my pan a quick wipe down just to make sure there’s no dust from sitting in the cabinet.
Step 2: Mix Dry Ingredients
In a medium bowl, combine the finely crushed chocolate sandwich cookies and the granulated sugar. Give it a good stir with a fork or whisk until everything is well incorporated. This ensures that the sugar is distributed evenly throughout the crumbs, which helps create a cohesive crust.
Step 3: Mix Wet Ingredients
Pour the melted butter into the dry ingredients. Stir with a fork until all the cookie crumbs are moistened. It should look like wet sand. This is the point where you can really smell the chocolate starting to come alive!
Step 4: Combine
Press the crumb mixture evenly into the bottom of your prepared 9×13 inch baking dish. I like to use the bottom of a measuring cup or a flat-bottomed glass to get it nice and compact. This helps create a sturdy base that won’t crumble when you slice into it. Make sure you go all the way to the edges!
Step 5: Prepare Filling
In a large bowl, beat the softened cream cheese with an electric mixer until it’s smooth and creamy. Add the powdered sugar and vanilla extract, and beat again until well combined and no lumps of cream cheese remain. This is your luscious cream cheese layer. Now, gently fold in the prepared chocolate pudding until it’s just combined and you have a beautiful, rich chocolate mixture. Don’t overmix at this stage; you want to keep it light and airy.
Step 6: Layer & Swirl
Carefully spread the cream cheese and pudding mixture evenly over the cookie crust. Use a spatula to smooth the top. This is where the “lasagna” look really starts to come into play! It should be a beautiful, uniform layer of chocolatey goodness.
Step 7: Bake
Okay, so here’s the part where I used to get a little confused. This chocolate lasagna doesn’t actually get baked! That’s right, no oven needed. Instead, you’ll cover the dish tightly with plastic wrap and refrigerate it for at least 4 hours, or preferably overnight. This chilling time is crucial for the layers to set up properly and for the flavors to meld together. Patience is key here, my friends!
Step 8: Cool & Glaze
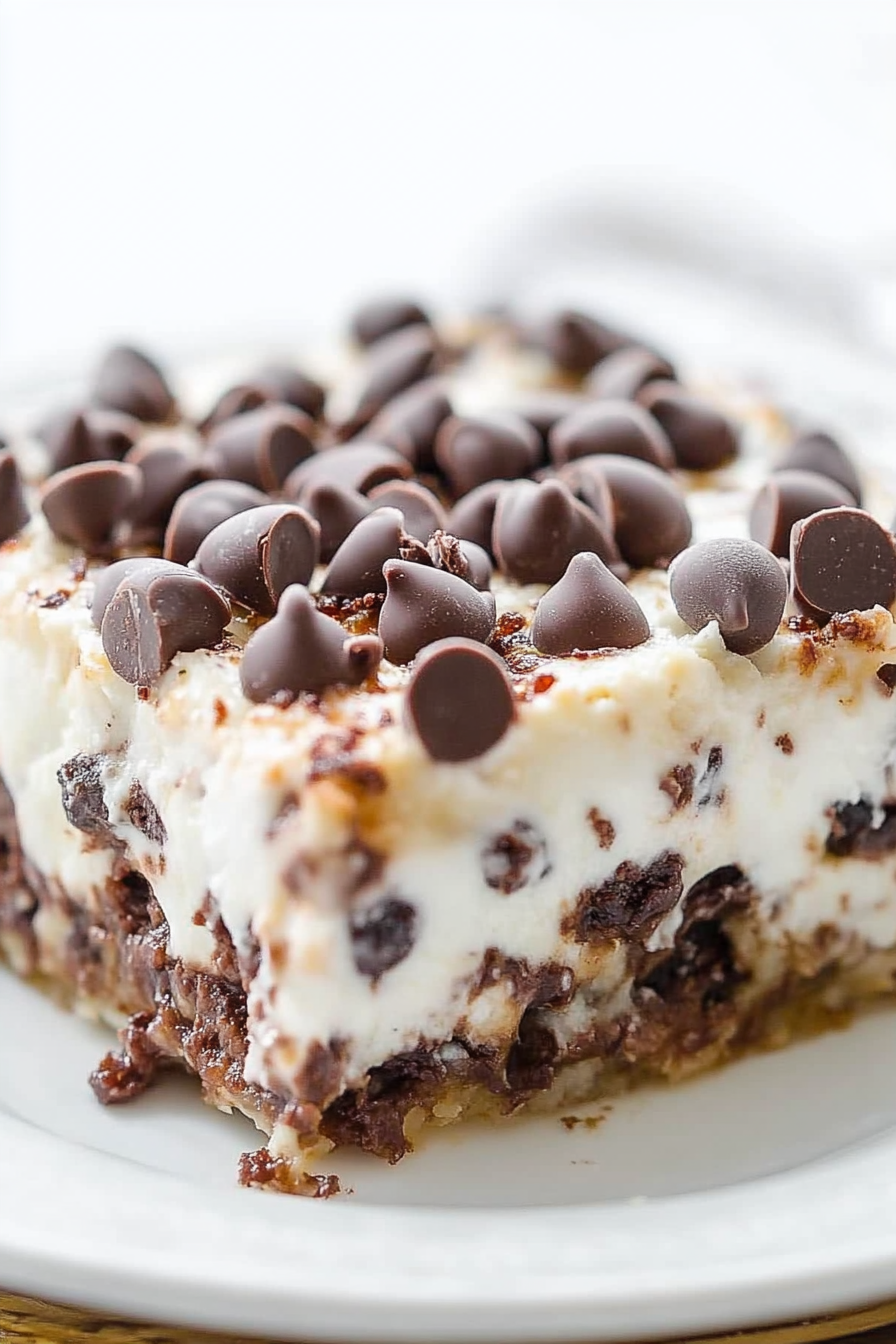
Once the lasagna is thoroughly chilled and set, it’s time for the glaze. In a heatproof bowl, combine the semi-sweet chocolate chips and heavy cream. Microwave in 30-second intervals, stirring between each, until the chocolate is melted and the mixture is smooth. If you’re adding the butter, stir it in now until melted and glossy. Alternatively, you can do this in a small saucepan over low heat, stirring constantly. Once smooth, let the glaze sit for a few minutes to cool slightly, then pour it evenly over the chilled chocolate lasagna. Spread it out gently with a spatula, ensuring a nice, even coating.
Step 9: Slice & Serve
Return the chocolate lasagna to the refrigerator for at least another 30 minutes to allow the glaze to set. Once it’s firm, slice it into squares. A warm knife can help make clean cuts, especially through the cookie crust. Serve chilled and prepare for the accolades!
What to Serve It With
This chocolate lasagna is so versatile, it can be enjoyed at almost any meal or occasion. For a truly indulgent breakfast (because why not?), a small square paired with a hot cup of strong black coffee is absolute heaven. The richness of the chocolate cuts through the bitterness of the coffee beautifully, and it feels like such a special treat to start the day. For brunch, I love to serve it with a dollop of fresh whipped cream and a scattering of fresh raspberries or strawberries. The tartness of the berries is a wonderful contrast to the deep chocolate. For a more formal dessert setting, it’s spectacular served alongside a scoop of high-quality vanilla bean ice cream or a drizzle of raspberry coulis. My family often requests this for dessert after a Sunday roast, and it’s always a hit. For those cozy, late-night cravings, a small sliver is the perfect comfort food. You can even serve it with a warm mug of hot chocolate if you’re feeling extra festive. I’ve found it pairs wonderfully with a mild red wine like a Zinfandel if you’re serving it as part of an adult dessert spread, though it’s just as delightful on its own.
Top Tips for Perfecting Your Chocolate Lasagna
Over the years, I’ve picked up a few tricks that make this chocolate lasagna truly spectacular. For the cookie crust, really aim for those fine crumbs; the finer they are, the more compact and less crumbly your base will be. If you’re pressing it in by hand, dampen your fingers slightly – it helps prevent sticking and makes it easier to get an even layer. When it comes to the cream cheese filling, don’t rush the softening process. Room temperature cream cheese is non-negotiable for achieving that super smooth, silky texture. I’ve had to learn that the hard way with lumpy fillings! For the chocolate pudding layer, using a good quality instant pudding mix or, even better, a homemade chocolate pudding really elevates the flavor. If you’re making your own, make sure it’s completely cooled before folding it into the cream cheese mixture, otherwise, you might end up with a messy, unmanageable consistency. When it’s time to spread the filling, be gentle. You don’t want to disturb the crust too much. I usually use an offset spatula for this. Now, for the glaze: the key to a shiny, smooth finish is using good quality chocolate chips and not overheating them. Microwave in short bursts and stir frequently. If it looks too thick, you can always add another tablespoon of cream. If you prefer a darker, more intense chocolate flavor for the glaze, use dark chocolate chips or even a good quality bittersweet chocolate. For ingredient swaps, I’ve found that using chocolate wafers instead of sandwich cookies for the crust works well, though you might need slightly less butter as they can be denser. If you’re out of heavy cream for the glaze, full-fat coconut milk can work in a pinch, though it will impart a subtle coconut flavor. When it comes to chilling, overnight is truly best. It allows everything to firm up perfectly and the flavors to meld. Rushing this step is the most common mistake I see, and it can lead to a softer dessert than you’d ideally want. Trust me on this one – the wait is worth it!
Storing and Reheating Tips
This chocolate lasagna is fantastic because it keeps well, making it perfect for making ahead. Stored properly, it stays delicious for days. At room temperature, it’s best to keep it covered tightly with plastic wrap or in an airtight container. I wouldn’t leave it out for more than a couple of hours, especially in warmer weather, as the cream cheese and pudding layers can spoil. In the refrigerator, this is where it truly shines. Make sure it’s well-covered to prevent it from absorbing any odors. It will stay wonderfully fresh in the fridge for up to 3-4 days. I usually find it tastes even better on the second day! If you need to store it for longer, freezing is an option. You can freeze the entire unglazed lasagna, or individual slices wrapped tightly in plastic wrap and then in aluminum foil. It can be kept in the freezer for up to 2-3 months. To thaw, transfer it to the refrigerator overnight. If you’ve frozen the glazed version, the glaze might crack slightly upon thawing, but it will still taste amazing. For reheating, this dessert is best served chilled, so I don’t recommend traditional reheating. However, if you want to take the chill off a slice slightly, you can leave it at room temperature for about 15-20 minutes before serving. The glaze is best applied just before serving or after the lasagna has chilled completely. If you’re freezing, I’d recommend adding the glaze *after* thawing for the best texture and appearance.
Frequently Asked Questions
Final Thoughts
Honestly, this chocolate lasagna is one of those recipes that just makes me happy. It’s proof that you don’t need complicated techniques or fancy ingredients to create something truly spectacular. It’s a dessert that brings smiles, prompts conversations, and satisfies even the deepest chocolate cravings. It’s perfect for those moments when you want something impressive but don’t have hours to spend in the kitchen. If you love rich, decadent, layered desserts, you are going to adore this. It’s truly a labor of love, but in the best possible way – the kind of love that results in pure deliciousness. For those who’ve enjoyed my no-bake cheesecake recipes or my layered brownie delights, I think you’ll find this chocolate lasagna hits all the right notes and then some! I can’t wait for you to try it and experience the magic for yourself. Let me know in the comments below how yours turns out, or if you’ve got any fun variations to share!
Chocolate Chip Cookie Chocolate Lasagna
Ingredients
Method
- Preheat oven to 350°F. Line a 9x9-inch pan with foil and spray with cooking spray.
- Press cookie dough into the prepared pan to form an even crust layer. Bake for 13-15 minutes, or until lightly golden brown. Let cool completely on a wire rack.
- In a large bowl, beat softened cream cheese and confectioners' sugar with an electric mixer until smooth.
- Add 1 cup of thawed whipped topping to the cream cheese mixture and beat until combined. Spread this mixture evenly over the cooled cookie crust.
- In the same bowl (wiped clean), whisk together the cold milk and instant chocolate pudding mix on high speed for 2 minutes until thickened.
- Spread the chocolate pudding evenly over the cream cheese layer.
- Evenly top with the remaining 1 cup of thawed whipped topping.
- Sprinkle the miniature chocolate chips over the top. Cover the pan and refrigerate for at least 4 hours, or until firm and set.