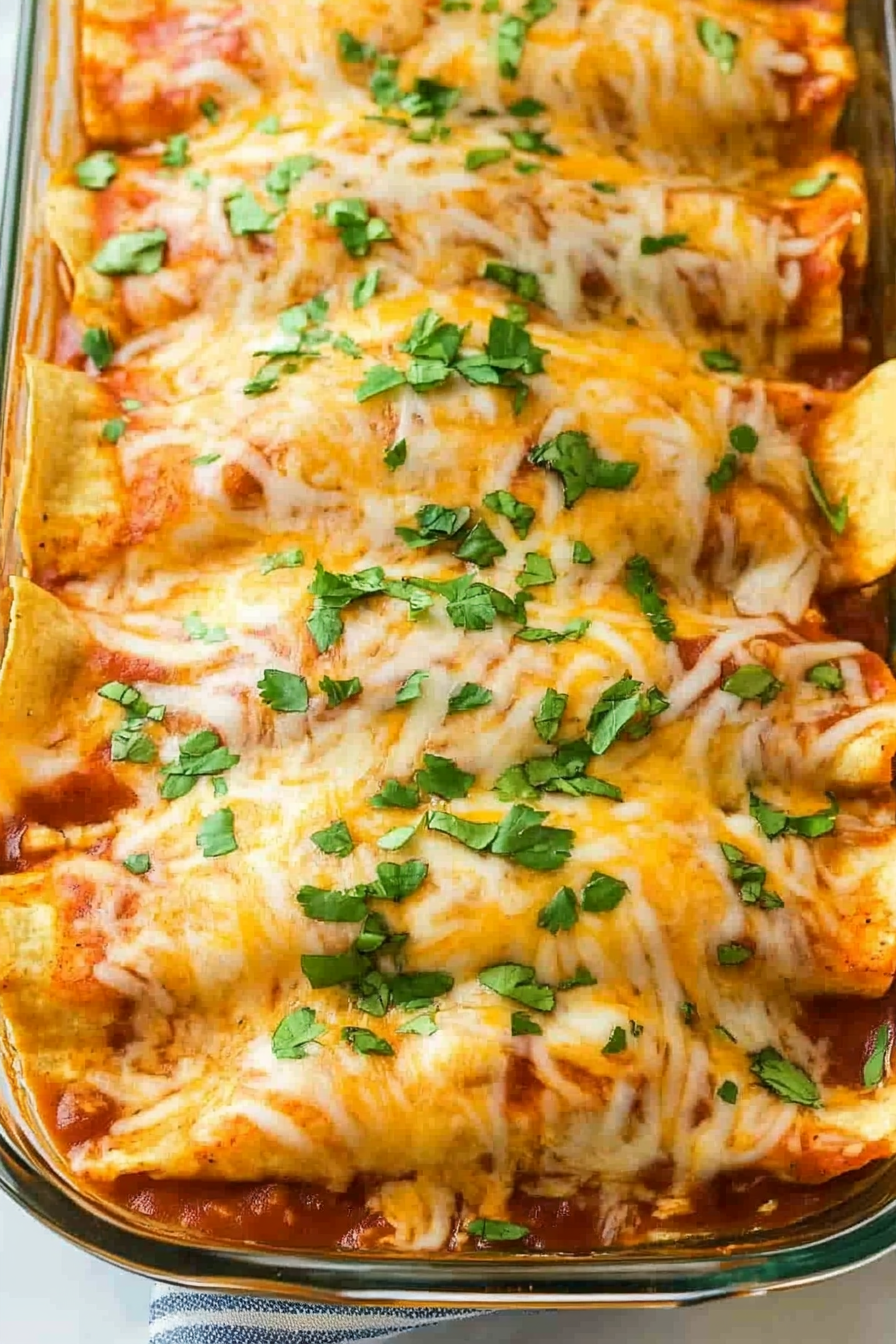
Delicious Chicken Enchiladas Recipe
There’s something about sinking your fork into a warm, cheesy chicken enchilada that just hits all the right spots, right? I still remember the first time I made these for my family — I was trying to recreate a dish I had at a tiny Mexican cafe during a trip to Santa Fe. The smell alone brought everyone to the kitchen, chatting about how none of us could wait to dig in. And honestly? It’s become our go-to comfort food on busy weeknights because it’s simple, hearty, and downright satisfying. I’ve tested this recipe a dozen ways—the secret is in the sauce and how you roll everything up. Trust me, once you get the hang of it, you’ll be making this in your sleep — and your family will be asking for seconds every single time. Plus, it’s perfect for making ahead or even freezing for those days you just don’t have the energy to cook from scratch. My kids especially love how cheesy it gets, and I love how quick it is to pull together when we’re craving something warm and cheesy after a long day.
What is chicken enchiladas?
Think of chicken enchiladas as a cozy Tex-Mex hug in every bite. It’s essentially tender shredded chicken wrapped in soft corn tortillas, smothered in a rich, flavorful chili sauce, and then topped with cheese before baking until bubbly. The name “enchilada” actually comes from the Spanish word “enchilar,” meaning “to chili,” which makes perfect sense because it’s all about that bold, spice-infused sauce. These aren’t fancy, complicated dishes — they’re everyday comfort food that’s totally customizable. You can add beans, corn, spinach, or whatever you love in your enchiladas. It’s like building your own flavor masterpiece with ingredients you probably already have on hand. Think of it as a weekend family dinner that’s both laid-back and totally delicious. You can bake them in individual portions or slice a big pan and serve everyone hot from the oven. Either way, they’re a guaranteed crowd-pleaser that never fails to bring smiles around the table.
Why do you love this movie?
What I love most about these chicken enchiladas is how they make my house smell like a cozy Mexican calle, even when I’m just throwing ingredients together on a weeknight. The rich aroma of simmering chili sauce, bubbling cheese, and roasted chicken is pure comfort. Plus, they’re surprisingly easy to make — I can whip up a batch in under an hour, and they always turn out moist and cheesy. If you’re watching your budget, you’ll be happy to know that this dish uses simple ingredients — chicken, tortillas, canned sauce, and cheese — that you probably already have lying around. And the best part? It’s endlessly versatile. Want to make it vegetarian? Swap the chicken for black beans or roasted veggies. Want a spicier kick? Boost the chili powder or add a dash of cayenne. I’ve served these for family dinners, potlucks, and even Thanksgiving leftovers — and they always disappear in minutes. What I love most about this recipe is its forgiving nature and how it invites you to put your personal spin on it. It’s comfort food that feels like a warm hug from the inside out.
How do I make chicken enchiladas?
Quick Overview
This dish is all about assembling layers of soft, shredded chicken wrapped in tortillas, smothered in flavorful enchilada sauce, sprinkled with cheese, and baked until golden and bubbly. The beauty is how adaptable it is — you can prep everything ahead of time, pop it in the oven, and have a hot meal ready in under an hour. I do recommend simmering the sauce on the stove to deepen the flavors, but if you’re in a rush, store-bought sauce works beautifully. The key is in the rolling — don’t overstuff your tortillas and be gentle as you roll to keep everything neatly enclosed. Trust me, once you’ve mastered the layering and baking, this dish becomes an easy family favorite. I usually serve it with a simple side salad or some Mexican rice, but honestly, it’s hearty enough on its own.
Ingredients
For the Main Filling:
- 3 cups cooked, shredded chicken (rotisserie chicken works great!)
- 1 cup diced onion (fresh, sweet onions are the best)
- 2 cloves garlic, minced
- 1 teaspoon cumin
- 1 teaspoon chili powder
- Salt and pepper to taste
- 1/2 cup chopped cilantro (optional but recommended!)
For the Sauce:
- 2 cups red enchilada sauce (store-bought or homemade, your choice)
- 1 tablespoon olive oil
- 1 teaspoon smoked paprika (adds depth)
For the Assembly & Topping:
- 8-10 corn or flour tortillas (choose your favorite)
- 2 cups shredded cheese (Mexican blend or cheddar, whatever melts best)
- Fresh cilantro and sliced jalapeños for garnish (optional but fun!)
Step-by-Step Instructions
Step 1: Preheat & Prep Pan
Set your oven to 375°F (190°C). Grease a 9×13-inch baking dish with a little butter or cooking spray — don’t skip this part or you’ll end up with a sticky mess. Keep your tortillas warm for easy rolling — I like to microwave them covered with a damp paper towel for about 30 seconds, so they don’t crack when you roll them up.
Step 2: Mix Dry Ingredients
In a small bowl, combine cumin, chili powder, salt, and pepper. This seasoning blend will boost the flavor of your chicken and give your sauce that authentic kick. I always do this step first — it makes the filling taste so much more vibrant.
Step 3: Mix Wet Ingredients
In a large bowl, toss your shredded chicken with the diced onion, minced garlic, chopped cilantro, and the spice mixture. I’ve tested this with different herbs, but cilantro is just the right fresh note here. It’s a simple yet flavor-packed combo that comes together quickly.
Step 4: Combine
Warm your enchilada sauce in a saucepan on the stove or microwave. Pour about 1 cup of sauce into your shredded chicken mixture, stirring to keep everything moist and flavorful. Be gentle — you don’t want to turn your chicken into mush but just evenly coat it.
Step 5: Prepare Filling
Dipping your tortillas into the sauce makes them nice and pliable and ensures each bite is flavorful. Fill each tortilla with about 2-3 tablespoons of the chicken mixture, then roll tightly. Keep a gentle hand for neatness — it’s all about that perfect roll.
Step 6: Layer & Swirl
Lay the rolled tortillas seam-side down in your baking dish. Pour the remaining enchilada sauce over the top, then sprinkle generously with cheese. Feel free to swirl the sauce slightly for a marbled look — it’s not just pretty, it helps the tortillas absorb even more flavor as they bake.
Step 7: Bake
Pop it in your preheated oven for about 20-25 minutes until the cheese bubbles and turns golden. Keep an eye out — every oven bakes just a bit differently. If you want a crispier top, broil for a minute or two, but watch carefully so it doesn’t burn. Let it cool slightly before slicing.
Step 8: Cool & Glaze
Allow your enchiladas to rest for about 5 minutes after baking. This helps everything set and makes slicing easier. If you’re feeling extra fancy, sprinkle some chopped cilantro and sliced jalapeños on top. A drizzle of sour cream or guacamole completes the picture beautifully, but honestly, these look gorgeous just on their own.
Step 9: Slice & Serve
Using a sharp knife, cut into squares or triangles. Serve hot, straight from the dish. I like to add a little extra sprinkle of cheese and fresh herbs on top for presentation. These go great with a side of Mexican rice, black beans, or just a simple green salad — whatever feels right for your mood!
What to Serve It With
When I make these chicken enchiladas, I like to keep things relaxed. For breakfast or brunch, pair them with a fresh fruit salad and a steaming cup of coffee — trust me, a little crispy bacon on the side never hurts. For a casual dinner, I serve them with a side of cilantro-lime rice or simple black beans simmered with garlic and spices. Sometimes I even set up a little topping station with sour cream, sliced avocados, and extra hot sauce — my kids love customizing theirs. If I have leftovers, I love reheating them in the oven with a touch of extra cheese on top; it tastes just as good, if not better, the next day. These enchiladas are a whole vibe — cozy, satisfying, and versatile enough to suit any craving or occasion. And don’t forget the salsa or a squeeze of fresh lime for that bright, fresh finish. Your family will thank you!
Top Tips for Perfecting Your Chicken Enchiladas
Over the years, I’ve gathered a few tricks that make my chicken enchiladas consistently amazing. First, always shred your cooked chicken by hand — it’s more tender and easier to distribute evenly than pre-shredded stuff from the store. I’ve learned that squeezing a bit of lime juice over the shredded chicken before filling makes a big flavor difference. When it comes to the sauce, I highly recommend simmering a store-bought enchilada sauce with a splash of cumin and smoked paprika — it deepens the flavor and makes it taste homemade, even if you’re in a pinch. For the tortillas, I prefer corn for authenticity, but flour works just fine — just look for softer ones to prevent tearing. A common mistake I made early on was overfilling the tortillas — trust me, less is more, or you’ll end up with messy bites. Also, layering with a sprinkle of cheese between the rolls helps keep everything together and gives that cheesy stretch in every bite. One unexpected trick? I tested adding a few roasted poblano peppers into the filling — it adds a smoky flavor that elevates the dish beautifully. Finally, don’t skip letting the dish rest a few minutes after baking; it makes slicing so much neater and helps everything stay in place. Oh, and if you want a spicier kick, sprinkle some sliced jalapeños on top before baking or serve with hot sauce on the side. I’ve made these for friends’ gatherings, and everyone asks for the recipe — so go ahead, put your spin on it, and enjoy!
Storing and Reheating Tips
This dish keeps well, which is a lifesaver after a busy day. You can store leftovers in an airtight container in the fridge for up to 3 days. When reheating, I prefer covering the dish with foil and popping it in a 350°F oven for about 20 minutes until thoroughly heated and the cheese is melty again. For a quicker option, use the microwave — just be cautious not to overheat or the tortillas may become soggy. If you want to freeze leftovers, wrap individual portions tightly in plastic wrap and then foil — they stay good for up to 3 months. To reheat from frozen, let them thaw overnight in the fridge or microwave on low power, then reheat as above. One thing to note: if your enchiladas have a lot of sauce, the texture can change slightly — I find reheating in the oven with extra cheese helps restore that fresh-out-of-the-oven appeal. For storing the sauce separately, keep it in another container and pour over the reheated dish just before serving, so everything stays fresh and saucy.
Frequently Asked Questions
Final Thoughts
There’s a reason chicken enchiladas have become a staple in my kitchen — they’re warm, inviting, and surprisingly forgiving. Whether I’m whipping them up for family dinner, a quick lunch, or a gathering with friends, they never let me down. The combination of tender chicken, spicy sauce, and gooey cheese makes every bite addictive. Plus, they’re a great way to use up leftovers or give new life to cooked chicken. Once you’ve made these once, I promise, they’ll be a regular in your recipe rotation. Play around with the fillings and toppings — like adding roasted peppers or swapping out the cheese — and make it your own. The best part? No matter how you customize it, everyone leaves the table happy and full of smiles. Can’t wait to hear how yours turns out, and I hope this dish brings your loved ones as much comfort as it’s brought mine!

Homemade Chicken Enchiladas
Ingredients
Method
- Preheat the oven to 350 degrees Fahrenheit.
- In a large bowl, mix shredded chicken, black beans, corn, diced tomatoes with chiles, cumin, garlic powder, and onion powder.
- Pour 1/2 cup of enchilada sauce into the bottom of a 9x13 inch baking dish and spread evenly.
- Dip each tortilla into the enchilada sauce, covering both sides, then spoon about 1/3 cup of chicken mixture onto the center. Top with a sprinkle of cheese, roll up, and place seam-side down in the dish.
- Repeat with remaining tortillas and filling. Cover the assembled enchiladas with remaining enchilada sauce and sprinkle with remaining cheese.
- Bake uncovered for 20 minutes, or until cheese is bubbly and browned. Garnish with chopped cilantro before serving.