Easy Dark Chocolate Brownies Recipe
If I had to pick one dessert that my family always asks for when the weekend rolls around, it’s definitely these dark chocolate brownies. Honestly, they remind me of my childhood, baking in my grandma’s cozy kitchen while the smell of melted chocolate and vanilla wafted through the air. This recipe? It’s simple, rich, and oh-so-decadent — perfect when you’re craving something sweet but want to keep it cozy and homemade. My kids ask for these all the time, and I can’t blame them — there’s just something about that fudgy, intense dark chocolate flavor that hits different. Plus, I love how I can whip these up during a busy weeknight when a sweet treat is desperately needed. Trust me, this one’s a lifesaver on those evenings when you want something satisfying but don’t want to fuss in the kitchen for hours. The best part? They disappear in minutes at my house, especially if I don’t cut big pieces! Maybe I should stop baking so big… but then again, who’s counting? Anyway, grab your apron — we’re making these dark chocolate brownies together, and I promise they’ll become your new go-to comfort food. Grab a glass of milk, and let’s get started!
What is dark chocolate brownie?
Think of dark chocolate brownies as the most luscious, intensely chocolatey version of your classic brownie. They’re essentially a rich, fudgy square of heaven, but with a deeper cocoa flavor that makes each bite feel like a mini chocolate indulgence. The name “dark chocolate” is pretty straightforward — it refers to using high-quality dark chocolate or cocoa in the batter, which brings a slightly bitter, more complex flavor compared to milk chocolate. These brownies are the kind you cut into thick squares and savor slowly, maybe with a dusting of powdered sugar or a drizzle of caramel if you’re feeling fancy. They’re the perfect treat to serve after dinner, sliced thick with a scoop of vanilla ice cream or simply enjoyed by themselves. Once you try these, you’ll understand why I keep coming back to this recipe — it’s got a rustic charm but feels indulgent enough to impress anyone. They’re all about that deep chocolate flavor that hits just right, unlike lighter or cakier brownies. And trust me, once you master making these, you’ll want to keep them on hand for everything from lazy Sunday afternoons to special family gatherings. It’s honestly a dessert that feels like a warm hug with every bite.
Why you’ll love this recipe?
What I love most about these dark chocolate brownies is how deeply satisfying they are — they’re fudgy, dense, and so chocolate-forward that my taste buds do a little happy dance. The flavor is intense without being overpowering, thanks to the generous use of high-quality dark chocolate. This recipe is also remarkably easy; I’ve made it countless times and never once needed fancy ingredients or complicated techniques. It’s pretty budget-friendly, too — most of what you need are pantry staples like cocoa powder, butter, and sugar. Plus, the basic batter is versatile enough to customize. Want more crunch? Toss in some chopped walnuts or pecans. Feeling decadent? Add a splash of espresso or a pinch of sea salt on top. What sets this apart from other brownies is how reliably they turn out every time. I’ve experimented with baking times and found that a slightly underbaked brownie is the secret to that irresistibly gooey center. Honestly, these are a crowd-pleaser, whether I bake them for friends or just enjoy them myself with a cup of coffee. They’re rich enough to satisfy a serious chocolate craving but simple enough for a casual bake when you need a quick, comforting treat. And can we talk about how beautifully they hold their shape but still melt in your mouth? That’s the magic right there.
How do I make dark chocolate brownies?
Quick Overview
If I had to sum it up, making these brownies is about mixing a rich, chocolatey batter, layering a luscious filling, swirling it all beautifully, then baking it until it’s just perfect. The whole process takes about 45 minutes from start to finish — less time than going out for coffee! What makes this method special is how I layer and swirl the filling — it adds a lovely marbled effect and extra depth of flavor. The ingredients are straightforward, and I always keep my pantry stocked with good-quality dark chocolate. Once you’ve mixed everything, the batter comes together quickly, and baking is a breeze. Seriously, these brownies are foolproof — once you get the hang of the timing, you’ll be making them in your sleep. The smell alone during baking is enough to make everyone come running to the kitchen. Let’s break down exactly how to get that perfect fudgy, chocolatey goodness in every bite.
Ingredients
[Organized for simplicity and clarity.]
For the Main Batter:
– 1 cup (2 sticks) unsalted butter, melted — use good butter for richness
– 1 ½ cups granulated sugar — the sweeter, the fudgier
– 3 large eggs — room temp keeps everything smooth
– 2 teaspoons vanilla extract — amplifies that deep chocolate flavor
– ¾ cup unsweetened cocoa powder — high-quality, Dutched cocoa recommended
– 1 cup all-purpose flour — a basic necessity, but don’t overmix
– ½ teaspoon Baking Powder — just a little to help with rise
– Pinch of salt — enhances the chocolate taste
For the Filling:
– ½ cup dark chocolate chips or chopped dark chocolate — use 70% or higher for that intense flavor
– ¼ cup heavy cream — optional but makes the filling extra silky
– 1 tablespoon butter — for richness
For the Glaze:
– ½ cup melted dark chocolate or chocolate ganache — optional but makes it extra fancy
– A pinch of sea salt or a sprinkle of flaky sea salt for contrast
Step-by-Step Instructions
Step 1: Preheat & Prep Pan
Fan your oven to 350°F (175°C). I like to line an 8-inch square pan with parchment paper, leaving a little overhang — makes slicing so much easier. Grease the sides lightly if you’re not using parchment. It’s all about getting that perfect crackly crust on top while keeping the inside gooey.
Step 2: Mix Dry Ingredients
In a small bowl, whisk together the cocoa powder, flour, baking powder, and salt. This step ensures everything’s evenly distributed and prevents clumps. Trust me, this little step makes a big difference in the texture!
Step 3: Mix Wet Ingredients
In a large bowl, whisk the melted butter and sugar until smooth. Beat in the eggs one at a time, making sure each is fully incorporated before adding the next. Stir in vanilla. The mixture should be glossy and slightly thickened — that’s when I know I’m on the right track.
Step 4: Combine
Gradually add the dry mixture to the wet, folding gently with a spatula. Take your time and don’t overmix; just fold until combined. Overmixing can lead to tough brownies, and we want them tender and fudgy, right?
Step 5: Prepare Filling
In a small saucepan, warm the heavy cream and butter until just simmering. Pour over the dark chocolate chips, let sit for a minute, then stir until smooth. This makes a luscious, pourable chocolate filling. For a tweak, add a splash of espresso or a pinch of chili powder to spice things up!
Step 6: Layer & Swirl
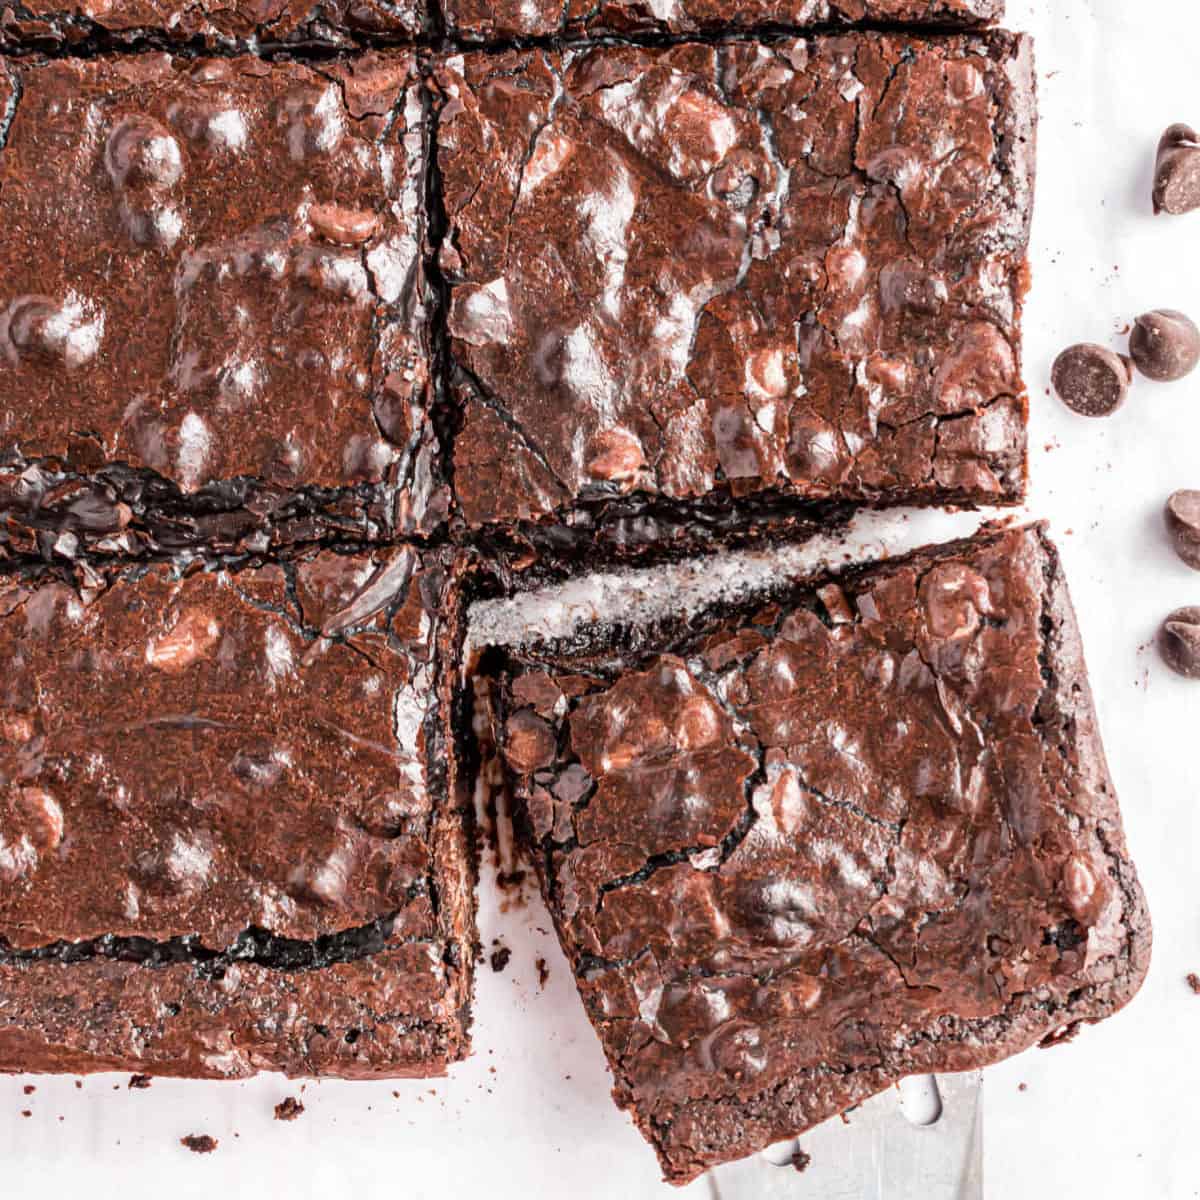
Pour half of your brownie batter into the prepared pan, then evenly spread the chocolate filling over it. Finally, dollop the remaining batter on top. Use a toothpick or skewer to swirl the batter and the filling together in gentle circles — don’t overmix, just create a marbled effect. It’s not about perfect patterns but about that beautiful, messy swirl that surprises everyone when you cut into it.
Step 7: Bake
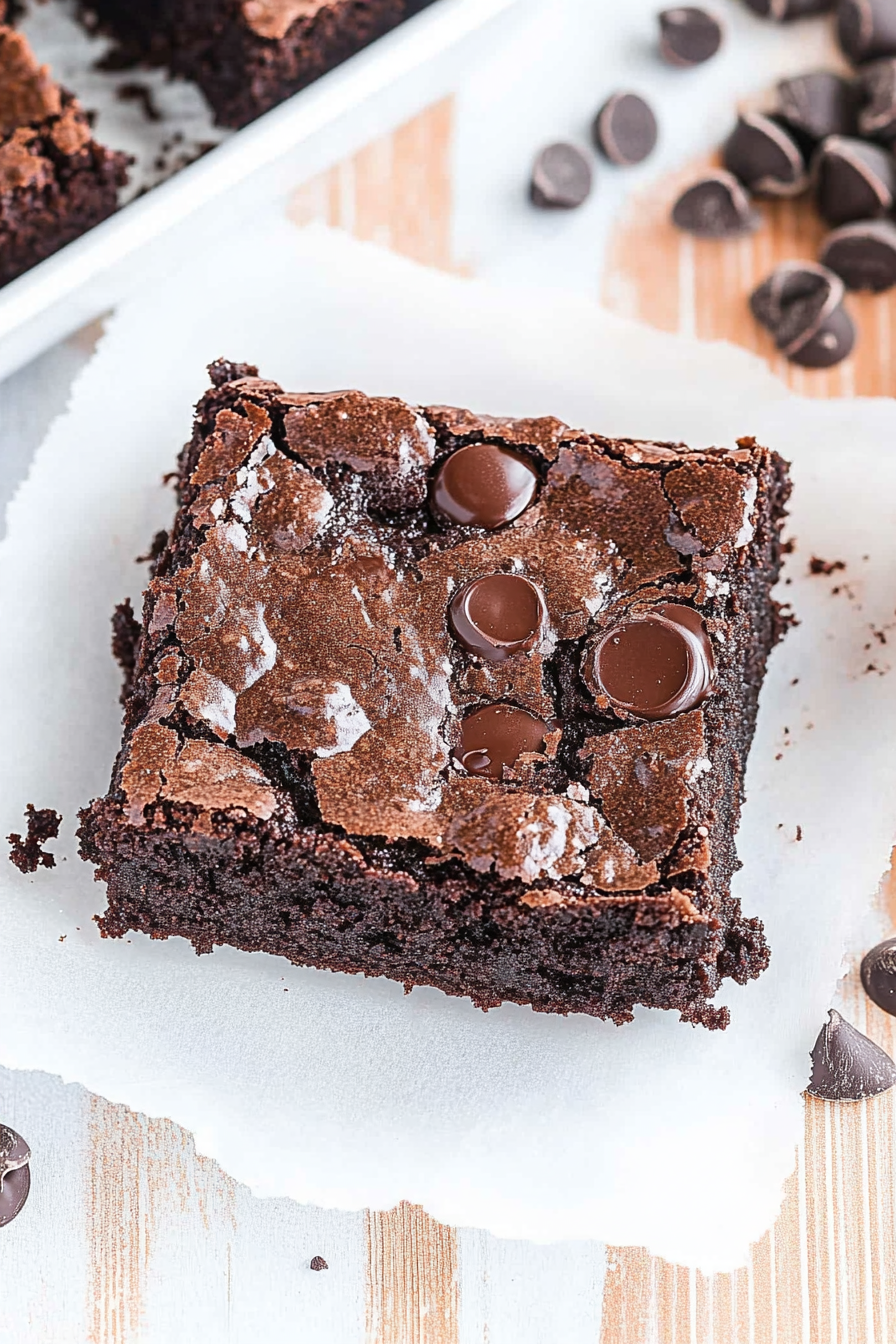
Place the pan on the middle rack and bake for 25-30 minutes. The edges should be set, but the center still a bit fudgy — that’s what makes it special. Test with a toothpick inserted near the center — it should come out with moist crumbs, not wet batter. If it’s too wet, give it a few more minutes; if it’s crackly on top and slightly gooey inside, you’re there.
Step 8: Cool & Glaze
Allow the brownies to cool in the pan for at least 20 minutes — patience is key here! Once cooled, drizzle with melted dark chocolate or ganache if desired. Sprinkle a tiny bit of flaky sea salt on top for that perfect sweet-salty bite. The cooling helps set everything, so don’t rush slicing into them too early.
Step 9: Slice & Serve
Using a sharp knife, cut clean squares. Warm a bit before serving if you like your brownies gooey, or enjoy them at room temperature for that perfect fudge consistency. I usually serve these with a side of vanilla ice cream or a cup of black coffee to balance the richness. My family loves some extra whipped cream or a dusting of powdered sugar too — don’t be shy with your toppings!
What to Serve It With
Honestly, these brownies are pretty much a dessert all on their own, but I love pairing them with different accompaniments depending on the occasion:
- For Breakfast: Serve a warm brownie piece with a shot of coffee or a glass of cold milk — it’s like a chocolate-y breakfast treat that feels indulgent but totally acceptable!
- For Brunch: Place a brownie slice alongside fresh berries and a dollop of whipped cream. Add a splash of Bailey’s or coffee liqueur for a boozy brunch spin.
- As Dessert: Cut into generous squares and serve with vanilla bean ice cream or a drizzle of caramel sauce. My kids love these topped with extra chocolate chips—no shame in that!
- For Cozy Snacks: Warm a piece in the microwave for 10 seconds and enjoy with a mug of hot milk or herbal tea. Instant comfort food, right there.
These brownies are flexible — they taste incredible just plain, but I find that adding a scoop of vanilla ice cream or a sprinkle of sea salt elevates them to something special. They’re such a hit during family gatherings, and honestly, I don’t think I’ve ever met someone who didn’t ask for seconds.
Top Tips for Perfecting Your Dark Chocolate Brownies
Over the years, I’ve learned a few tricks to make these brownies even better. Here’s what I swear by:
- Zucchini Prep: I sometimes add finely grated zucchini for extra moisture, but I always squeeze out excess water so the batter isn’t too wet. It adds tenderness without overpowering the chocolate flavor.
- Mixing Advice: Be gentle when folding the batter — overmixing is the enemy of fudgy brownies. A few lumps are okay, really!
- Swirl Customization: To get a pretty marbled effect, I use a skewer or toothpick to swirl the filling in just two or three gentle strokes. Overdoing it flattens the swirl and looks less charming.
- Ingredient Swaps: I’ve tested coconut oil instead of butter, and it actually adds a subtle tropical note — delicious! Also, swapping in almond flour makes these gluten-free, but they’re a little crumbly, so watch the baking time.
- Baking Tips: Ovens vary, so start checking your brownies at 25 minutes. The edges should pull away ever so slightly from the pan, and the top should look shiny and crackly, but the center still a little soft.
- Glaze Variations: I love experimenting with different toppings — from a dusting of cocoa powder to crushed peppermint or even a sprinkle of flaky sea salt for that perfect sweet-salty combo. Just keep the consistency semi-thick so it doesn’t slide off.
This recipe has been through a lot of tweaks, and I’ve found that patience and quality ingredients really make all the difference. Once you nail the technique, you’ll have a finger-licking, melt-in-your-mouth brownie every single time. The secret is in the careful folding, modest baking time, and that little swirl of gooey chocolate at the center. Trust me, it’s worth every second.
Storing and Reheating Tips
Leftovers? Absolutely. Here’s how I keep these brownies fresh and tasty:
- Room Temperature: Keep them in an airtight container for up to 2 days — if they last that long! I usually put a paper towel underneath to absorb any excess moisture and keep them from getting sticky.
- Refrigerator Storage: Wrap the brownies tightly in plastic wrap or place in an airtight container for up to a week. They stay fudgy and fresh, and I love to reheat a slice for 15 seconds in the microwave for an even gooier bite.
- Freezer Instructions: For longer storage, wrap tightly in plastic, then foil, and freeze for up to 3 months. Thaw at room temperature or warm in the microwave when the craving hits again.
- Glaze Timing: If you’re adding a glaze or chocolate topping, do so once the brownies are completely cooled — otherwise, it might melt into the warm batter. For a fudgy center, the cooler temperature helps set everything nicely.
I’ve done all of these and honestly, reheated brownies never quite taste the same as fresh. But if you seal them well, they’re still delicious and perfect for a quick treat when you’re short on time.
Frequently Asked Questions
Final Thoughts
If you’re anything like me, baking these dark chocolate brownies will quickly become your favorite way to indulge. They’re easy, deeply chocolatey, and perfect for sharing (or not sharing — I won’t judge). Over the years, I’ve perfected the balance of richness and fudginess, and each batch reminds me why I fell in love with baking in the first place. Sometimes, the simplest recipes deliver the biggest smiles, and this one definitely does that. I encourage you to experiment — add a pinch of spice, mix in some chopped nuts, or swirl in a spoonful of peanut butter for fun variations. The key is to enjoy the process and savor every bite. Happy baking! And I can’t wait to hear how yours turns out — leave a comment or share your tweaks with me. After all, the best part of sharing recipes is connecting over delicious food. Cheers to warm, gooey, dark chocolate dreams!
Rich Dark Chocolate Brownies
Ingredients
Method
- Melt the butter in a microwave-safe bowl for 30 seconds to one minute. In a mixing bowl, combine the melted butter, sugar, flour, cocoa powder, and eggs. Stir until smooth. Fold in the chocolate chips.
- Line a 9-inch square baking dish with parchment paper. Pour the batter into the dish and spread evenly. Bake in a preheated oven at 350°F for 25 minutes or until a toothpick inserted in the center comes out with moist crumbs.
- Allow the brownies to cool completely. Optionally, dust the top with powdered sugar before serving.