Easy Hazelnut Brownies A Simple Treat
Oh, where do I even begin with these Nutella brownies? Honestly, if there’s one recipe that has saved my life (and my sanity) during countless busy weeknights and sudden dessert cravings, it’s this one. I remember the first time I made them, years ago. I was so nervous because my usual go-to brownie recipe felt a little… predictable. I wanted something that had that extra “wow” factor, something that felt a little decadent but still totally doable. And then I thought, why not incorporate that magical hazelnut spread? The result? Pure bliss. These Nutella brownies are so incredibly fudgy, intensely chocolatey, and have this subtle, delightful nutty undertone that just makes them sing. They’re not your average box mix brownies, not by a long shot, but they’re surprisingly simple. They’re the kind of treat that makes your house smell heavenly and brings a smile to everyone’s face the moment they take a bite. If you’re a chocolate lover, or a Nutella enthusiast (and who isn’t, really?), you are going to fall head over heels for these. They’ve become a staple in my baking repertoire, a guaranteed crowd-pleaser that I can whip up with minimal fuss.
What is Nutella Brownies?
So, what exactly are Nutella brownies? Think of them as your classic, intensely chocolatey, super-fudgy brownies, but with a delightful twist. We’re essentially amping up the flavor profile by swapping out some of the traditional chocolate or cocoa powder for a generous swirl of everyone’s favorite hazelnut spread. It’s not that we’re completely abandoning chocolate, mind you – oh no, that would be sacrilege! – but the Nutella adds this wonderful depth of flavor, a creamy richness, and a subtle, comforting hazelnut essence that complements the dark chocolate perfectly. It’s like giving your favorite brownie a luxurious, creamy hug. The texture is phenomenal, too. They’re dense, moist, and incredibly satisfying. They’re essentially the dreamiest, fudgiest brownie you can imagine, elevated by the magic of Nutella. It’s a simple addition that makes a world of difference, transforming a good brownie into an unforgettable one.
Why you’ll love this recipe?
Honestly, the list of reasons why you’ll adore these Nutella brownies is practically endless, but let me hit you with the highlights. First off, the FLAVOR. It’s just… divine. You get that deep, dark chocolate richness that you crave in a good brownie, but then there’s this underlying sweetness and nutty aroma from the Nutella that just elevates everything. It’s not overpowering, it’s just right – like a perfect harmony. Then there’s the SIMPLICITY. I’m serious, these come together so quickly. You don’t need a stand mixer, you don’t need a million bowls, and you don’t need to be a baking pro. If you can melt butter and stir things, you can make these. This recipe is an absolute lifesaver for those moments when a dessert craving hits hard and you don’t have hours to spare. And let’s talk COST-EFFICIENCY. While Nutella itself might feel like a treat, the other ingredients are all pantry staples – flour, sugar, eggs, butter, cocoa powder. So, for the incredible flavor and fudgy texture you get, it’s a very budget-friendly indulgence. Finally, the VERSATILITY. These are fantastic on their own, of course, but they’re also brilliant served warm with a scoop of vanilla ice cream, drizzled with a little extra Nutella, or even as the base for a more elaborate dessert. What I love most about this recipe is that it feels special enough for guests, but it’s also humble enough for a quiet night in. It’s that perfect sweet spot that makes it a go-to for me, time and time again.
How do I make Nutella Brownies?
Quick Overview
This recipe is all about achieving that perfect fudgy texture without any fuss. We’ll melt some butter, whisk in sugar and eggs until they’re just right, then fold in the dry ingredients and, of course, plenty of Nutella. The key is not to overmix, which keeps them tender. We’ll then swirl in extra Nutella for those irresistible pockets of creamy goodness before baking. It’s a straightforward process that delivers seriously impressive results. This method guarantees that moist, dense texture that we all dream of in a brownie, all with minimal effort and maximum deliciousness.
Ingredients
For the Main Batter:
2 cups (400g) Granulated Sugar: This provides sweetness and helps create that lovely crackly top. Don’t be tempted to cut back too much here; it’s crucial for texture!
1 cup (227g) Unsalted Butter, melted: Using good quality butter makes a difference. It’s the base for that rich, fudgy texture. Make sure it’s melted but not piping hot when you add it.
4 Large Eggs: These bind everything together and add richness. I usually use room temperature eggs, as they incorporate more smoothly.
1 teaspoon Vanilla Extract: This little boost of flavor enhances all the chocolate and hazelnut notes.
1 cup (100g) Unsweetened Cocoa Powder: The foundation of our deep chocolate flavor. I prefer Dutch-processed cocoa for a richer, darker color and smoother taste, but natural works too.
1 ½ cups (190g) All-Purpose Flour: Just enough to give the brownies structure without making them cakey. Spooned and leveled is best!
½ teaspoon Baking Powder: A tiny bit for lift, but we’re not aiming for cakey here!
¼ teaspoon Salt: Balances the sweetness and brings out the chocolate flavor.
For the Filling:
1 cup (280g) Nutella: The star of the show! Make sure it’s a good quality one that you love the taste of. It needs to be scoopable, not rock hard.
For the Glaze: (Optional, but highly recommended!)
½ cup (140g) Nutella: Yes, more Nutella! We can never have too much.
2 tablespoons Vegetable Oil (or other neutral oil): This helps the glaze become smooth and spreadable without hardening too much.
Step-by-Step Instructions
Step 1: Preheat & Prep Pan
First things first, get that oven preheating to 350°F (175°C). You’ll want to grab an 8×8 inch or 9×9 inch baking pan. I like to line mine with parchment paper, leaving some overhang on the sides. This makes lifting the brownies out so much easier, and cleanup is an absolute breeze. Lightly grease the parchment paper too, just to be extra safe!
Step 2: Mix Dry Ingredients
In a medium bowl, whisk together your cocoa powder, flour, baking powder, and salt. Give it a good whisk to make sure everything is well combined and there are no lumps of cocoa powder hiding anywhere. This step ensures even distribution of ingredients, which is key for consistent texture and flavor throughout your brownies.
Step 3: Mix Wet Ingredients
In a large bowl, combine the melted butter and granulated sugar. Whisk them together until they’re well combined and look a bit glossy. Then, add in your eggs, one at a time, whisking well after each addition until it’s all smooth and emulsified. Stir in the vanilla extract. This mixture should look rich and luscious.
Step 4: Combine
Now, pour the dry ingredients into the wet ingredients. Gently fold them together using a spatula or a wooden spoon. Mix *just* until you no longer see streaks of flour. Seriously, don’t overmix! Overmixing develops the gluten in the flour, which can lead to tough, cakey brownies, and we want fudgy, dense goodness here.
Step 5: Prepare Filling
While the batter is resting for a minute, grab your cup of Nutella for the filling. If it’s too stiff, you can gently warm it for about 10-15 seconds in the microwave, just enough to make it more pourable and swirlable. You don’t want it hot, just soft enough to work with.
Step 6: Layer & Swirl
Pour about half of your brownie batter into the prepared pan and spread it evenly. Dollop spoonfuls of the Nutella filling over the batter. Then, carefully pour the remaining brownie batter on top of the Nutella. Now for the fun part: take a knife or a skewer and gently swirl the top layer of batter into the Nutella filling. Don’t overdo it; you want distinct swirls and pockets of Nutella, not a uniform muddy mess. Aim for beautiful marbling!
Step 7: Bake
Pop the pan into your preheated oven. Bake for 25-30 minutes. The edges should look set, and a toothpick inserted into the center should come out with moist crumbs attached, not wet batter. If it comes out completely clean, they might be a bit overbaked and less fudgy, so err on the side of slightly underdone for that ultimate gooey texture. Ovens vary, so keep an eye on them!
Step 8: Cool & Glaze
This is the hardest part: let them cool! I know, I know. But they need to cool in the pan for at least 15-20 minutes before you even think about lifting them out. This allows them to set up properly. While they’re cooling, you can whip up the glaze. Gently warm the ½ cup of Nutella with the vegetable oil until it’s smooth and pourable. Once the brownies are mostly cool, drizzle or spread the glaze over the top. Let the glaze set a bit before slicing.
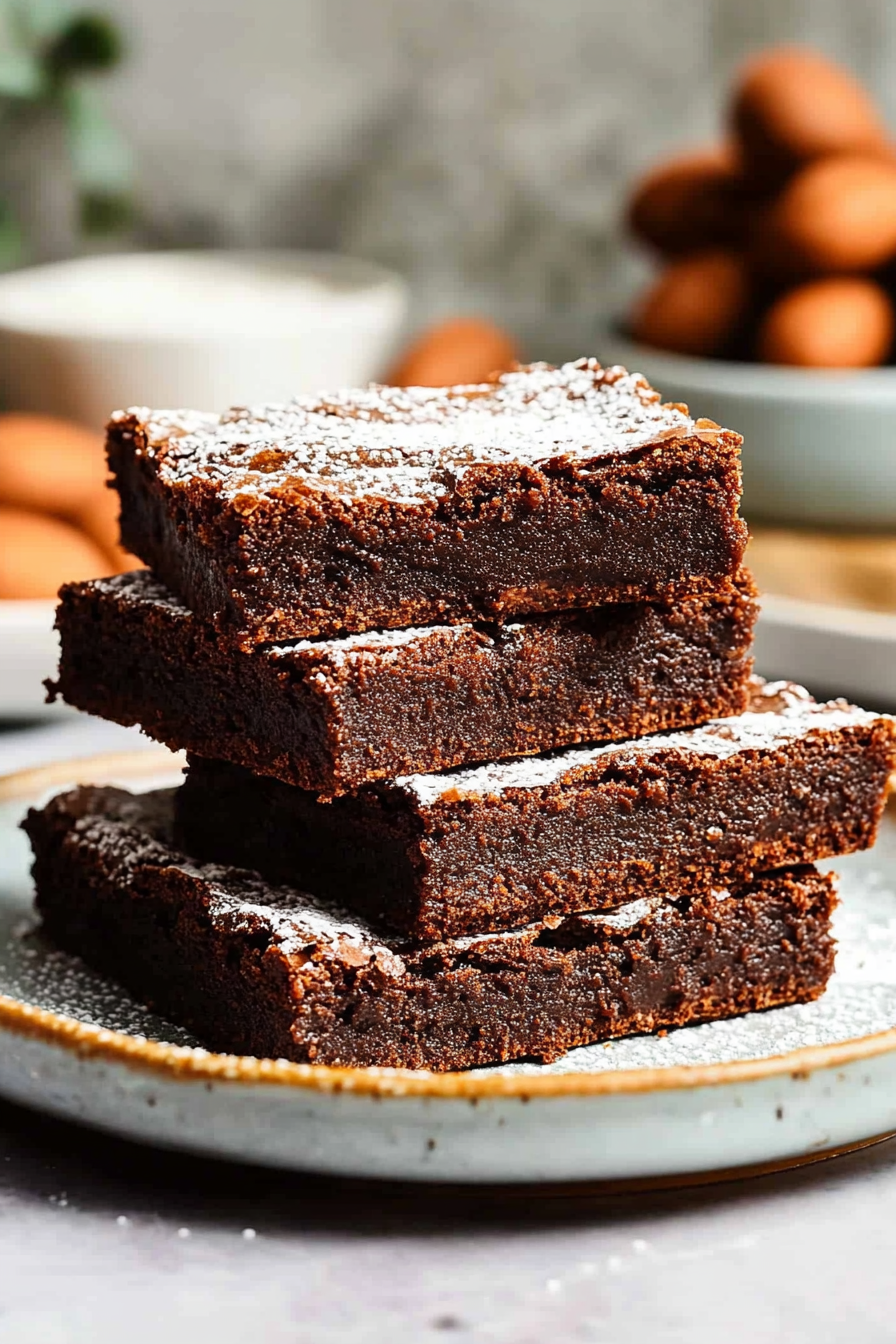
Step 9: Slice & Serve
Once the glaze has set (or if you skipped it!), use the parchment paper overhang to lift the entire slab of brownies out of the pan onto a cutting board. For the cleanest slices, use a sharp knife that you’ve wiped clean between cuts. Serve them at room temperature, or slightly warm for an extra gooey treat. They are pure decadence!
What to Serve It With
These Nutella brownies are wonderfully versatile and can elevate any meal or occasion. For Breakfast? Believe it or not, a small piece alongside a strong cup of coffee is absolute heaven. The richness of the brownie cuts through the bitterness of the coffee beautifully. For Brunch, I love to serve them cut into small, elegant squares, perhaps with a dollop of fresh whipped cream or a few fresh berries on the side to add a touch of color and freshness. They look so sophisticated! As a Dessert, well, this is where they truly shine. Serve them warm with a scoop of high-quality vanilla bean ice cream – the contrast of hot and cold is divine. A drizzle of extra warm Nutella or a raspberry coulis also pairs wonderfully. For Cozy Snacks, they’re perfect just as they are, maybe with a tall glass of cold milk. My kids always ask for them after school, and honestly, so do I! We also have a family tradition of having them as a “treat” on movie nights, cut into generous squares. They just make everything feel a little more special.
Top Tips for Perfecting Your Nutella Brownies
After making these Nutella brownies more times than I can count, I’ve picked up a few tricks that I think really make a difference. First, regarding the Nutella itself: when you’re swirling it in, don’t be afraid to get a good amount in there! Those pockets of melted Nutella are pure gold. Also, if your Nutella is very stiff, warming it *very gently* in the microwave for just 10-15 seconds can make it much easier to swirl without pulling the batter apart too much. For the batter consistency, the goal is thick and fudgy, not runny or cake-like. If your batter feels too thin, don’t panic; it’s usually the right consistency for this fudgy texture. It’s the overmixing that turns them cakey, so really, really treat the flour gently. Fold it in until *just* combined. I’ve learned this the hard way, trust me! When it comes to baking, I always recommend the toothpick test. You’re looking for moist crumbs, not completely clean. A little bit of moist batter clinging to the toothpick is exactly what you want for that gooey center. If it’s dry, they’re likely overdone. Oven temperatures can be wildly different, so if you know your oven runs hot, bake for a couple of minutes less. For ingredient swaps, I’ve experimented! If you don’t have all-purpose flour, a good gluten-free blend that contains xanthan gum usually works quite well, though you might need a tiny bit more liquid. I’ve also found that adding a few chocolate chips to the batter along with the flour can take them to another level of chocolatey goodness. Don’t be afraid to experiment with adding a pinch of espresso powder to the dry ingredients – it really deepens the chocolate flavor without making it taste like coffee. And for the glaze, if you want it a little thicker, just use less oil. If you want it thinner and more drizzly, add a touch more oil. It’s very forgiving!
Storing and Reheating Tips
Storing these delicious Nutella brownies properly is key to keeping them at their absolute best. At Room Temperature, they’re usually good for about 2-3 days, especially if kept in an airtight container. I like to make sure they’ve completely cooled before putting the lid on to prevent any condensation. If you’ve added the glaze, it helps seal in some moisture. For Refrigerator Storage, they can last for up to a week. The cold can make them a bit firmer, but they’re still incredibly delicious. Just make sure they’re in an airtight container or well-wrapped. When you’re ready to eat them from the fridge, I highly recommend letting them come to room temperature for about 20-30 minutes, or you can gently warm them in the microwave for about 10-15 seconds for that wonderfully gooey texture. For Freezer Instructions, these brownies freeze exceptionally well! You can wrap individual portions tightly in plastic wrap, then place them in a freezer-safe bag or container. They’ll keep their quality for up to 2-3 months. To thaw, just transfer them to the refrigerator overnight, and then let them sit at room temperature for a bit. The Glaze Timing Advice is simple: if you’re planning to freeze them, it’s best to glaze them *after* thawing. This prevents the glaze from cracking or getting sticky during the freezing and thawing process. If you’re just storing them for a day or two at room temp, glazing them before storing is perfectly fine.
Frequently Asked Questions
Final Thoughts
So there you have it – the recipe for my absolute favorite Nutella brownies! I really hope you give these a try. They’re more than just a dessert; they’re a little slice of happiness, a guaranteed mood booster, and a fantastic way to show someone you care (or just to treat yourself!). The combination of that intense chocolate flavor with the creamy, nutty goodness of Nutella is simply divine. They’re proof that you don’t need a fancy pastry chef to create something truly spectacular in your own kitchen. They are so forgiving, incredibly satisfying, and I promise, they’ll disappear faster than you can say “more brownies, please!” If you enjoyed these, you might also love my fudgy chocolate chip cookies or my decadent chocolate lava cakes – they’re in a similar vein of pure chocolate indulgence. I can’t wait to hear what you think of these Nutella brownies! Please feel free to leave a comment below with your thoughts, any variations you tried, or how quickly they vanished from your own kitchen. Happy baking, and enjoy every single fudgy, chocolatey bite!