Easy Nutty Berry Muffins How to Make Them
You know those days? The ones where the world feels a little too hectic, and you just need something warm, comforting, and utterly delightful? That’s exactly when I reach for these peanut butter jelly muffins. Honestly, they’re like a little slice of childhood heaven, all wrapped up in a perfectly moist, flavour-packed muffin. My mom used to make something similar when we were kids, and every time I bake these, I’m transported right back to her kitchen, the air thick with that sweet, nutty aroma. They’re so much simpler than a full-blown cake but deliver that same soul-soothing satisfaction. If you’ve ever loved a good peanut butter and jelly sandwich, you are going to be absolutely obsessed with these peanut butter jelly muffins. They’re a game-changer, I promise!
What is peanut butter jelly muffin?
So, what exactly are peanut butter jelly muffins? Think of it as your favourite classic PB&J sandwich, but elevated into a tender, fluffy baked good. It’s essentially a delicious, slightly sweet muffin batter that has pockets of creamy peanut butter and swirls of your favourite jelly baked right in. The magic happens when you bite into it – you get that comforting, familiar flavour combination, but with the added texture and warmth of a freshly baked muffin. It’s not just a dessert; it’s an experience! We’re talking about that perfect balance of salty peanut butter and sweet, slightly tart jelly, all held together by a soft, buttery muffin crumb. It’s basically sunshine in edible form, perfect for breakfast, a snack, or even a light dessert.
Why you’ll love this recipe?
There are so many reasons why I keep coming back to this peanut butter jelly muffin recipe, and I have a feeling you’ll fall in love with it just as much. First off, the flavour combination is just unbeatable. You get that rich, creamy peanut butter that’s slightly salty, perfectly complementing the bright, fruity burst of jelly. It’s a classic for a reason, right? But it’s not just about the taste. What I truly adore is how incredibly easy these are to whip up. Even if you’re not a seasoned baker, you’ll find this recipe to be totally foolproof. Most of the ingredients are probably already in your pantry, and there’s no complicated creaming or folding involved. Seriously, you can have these mixed up and in the oven in under 15 minutes! And the cost? Super budget-friendly. We’re talking basic pantry staples that don’t break the bank. Plus, these peanut butter jelly muffins are ridiculously versatile. They’re fantastic for a quick grab-and-go breakfast on busy mornings, a delightful addition to a weekend brunch spread, or even a comforting afternoon treat with a glass of milk. They’re so good, they’ll disappear in minutes at my house, and I’m betting the same will happen at yours!
How do I make peanut butter jelly muffins?
Quick Overview
The process is wonderfully straightforward: we’ll mix up a simple muffin batter, create little wells for our peanut butter and jelly, and bake them until golden. The beauty of this recipe lies in its simplicity and the guaranteed delicious outcome. It’s a stress-free bake that delivers maximum flavour and comfort, making it a true lifesaver when you need a sweet treat in a pinch. You really can’t go wrong!
Ingredients
For the Main Batter:
2 cups all-purpose flour: I find that a standard all-purpose flour works best here, giving the muffins a nice structure without being too heavy. Make sure it’s spooned and leveled, not scooped directly from the bag, for accurate measurements.
1 cup granulated sugar: This gives us that lovely sweetness and helps create a tender crumb. You could try reducing it slightly, but I find this ratio to be just perfect.
2 teaspoons baking powder: This is our leavening agent, crucial for getting those nice, tall, fluffy muffins.
1/2 teaspoon salt: Just enough to balance the sweetness and enhance all those delicious flavors.
1 large egg: Room temperature is best, it helps everything emulsify nicely.
1 cup milk: Whole milk will give you the richest flavour and most tender texture, but I’ve had success with 2% and even almond milk for a creamier result!
1/2 cup unsalted butter, melted and slightly cooled: Melted butter contributes to a wonderfully moist texture. Make sure it’s not piping hot when you add it to the other ingredients.
1 teaspoon vanilla extract: A must-have for rounding out the flavors.
For the Filling:
1/2 cup creamy peanut butter: Use your favorite kind! Natural or conventional, it all works. If it’s a very stiff natural peanut butter, you might want to give it a quick stir before measuring.
1/2 cup jelly or jam: Grape, strawberry, raspberry – whatever you love! A good quality jam will offer the best flavour.
For the Glaze (Optional, but highly recommended!):
1 cup powdered sugar: For that smooth, sweet glaze.
2-3 tablespoons milk: Add this a tablespoon at a time until you reach your desired drizzling consistency.
1/2 teaspoon vanilla extract: For a little extra flavour boost.
Step-by-Step Instructions
Step 1: Preheat & Prep Pan
First things first, preheat your oven to 375°F (190°C). This is the sweet spot for getting nicely domed, evenly baked muffins. Line a standard 12-cup muffin tin with paper liners or grease them well. I always find paper liners make for the easiest cleanup, which is a big win in my book!
Step 2: Mix Dry Ingredients
In a large bowl, whisk together the flour, sugar, baking powder, and salt. Give it a good whisk for about 30 seconds. This helps to aerate the flour and ensure the leavening agent is evenly distributed. No one wants a muffin with a dense bottom and a light top, right?
Step 3: Mix Wet Ingredients
In a separate medium bowl, whisk together the egg, milk, melted butter, and vanilla extract until everything is well combined. You want a smooth, homogenous mixture.
Step 4: Combine
Pour the wet ingredients into the bowl with the dry ingredients. Stir gently with a spatula or wooden spoon until *just* combined. It’s super important not to overmix here! A few lumps are perfectly fine. Overmixing develops the gluten too much and can lead to tough, chewy muffins, and nobody wants that. We’re going for tender and fluffy!
Step 5: Prepare Filling
While your batter is resting for a moment, have your peanut butter and jelly ready. If your peanut butter is very stiff, a quick stir can make it easier to dollop. If your jelly is very runny, you might want to chill it slightly to make it a bit more manageable.
Step 6: Layer & Swirl
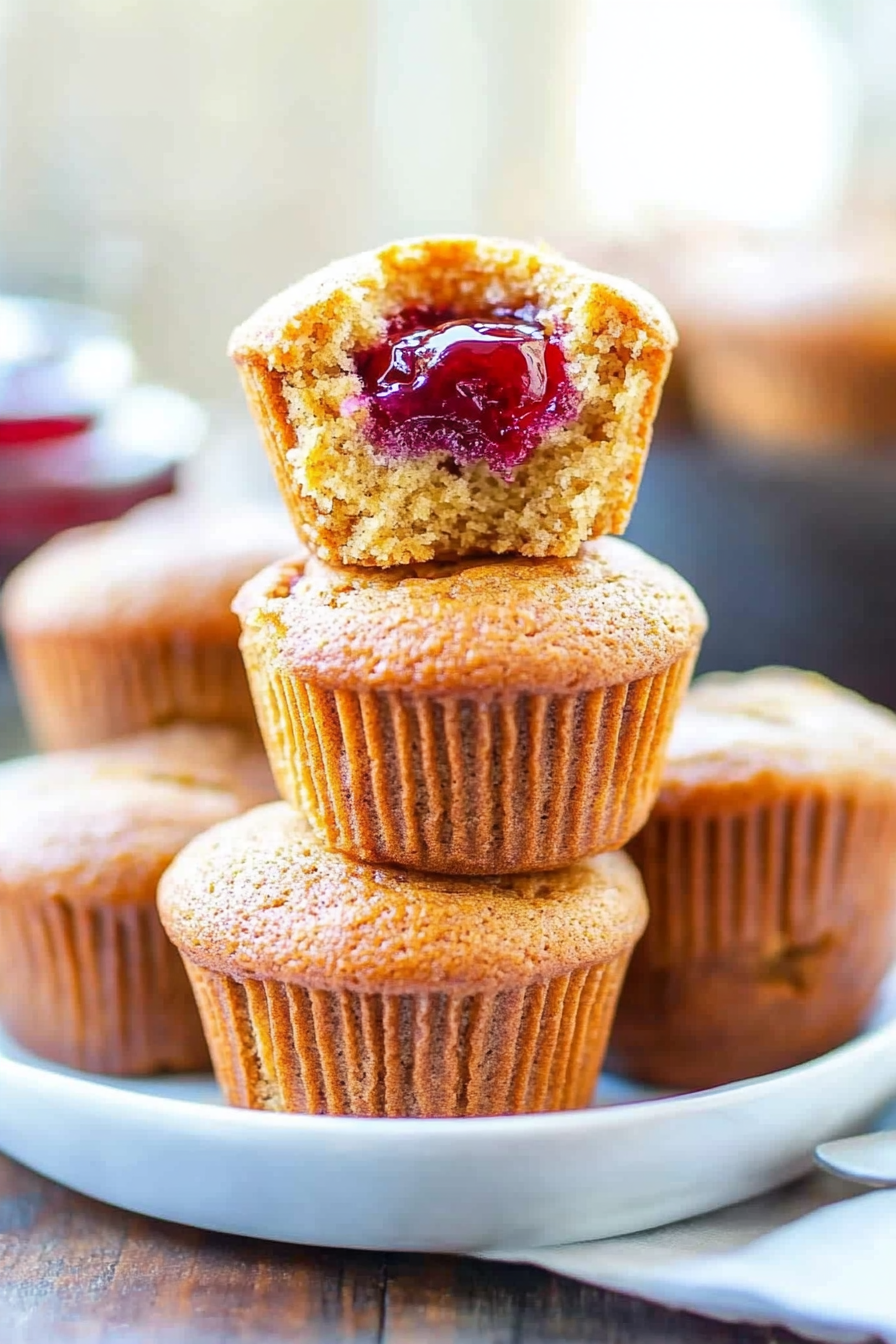
Spoon about half of the batter evenly into your prepared muffin cups, filling them about two-thirds full. Then, dollop about a teaspoon of peanut butter into the center of each muffin cup. Follow that with about a teaspoon of jelly. Now, spoon the remaining batter over the peanut butter and jelly, filling the cups about three-quarters to almost full. Using a toothpick or a skewer, gently swirl the peanut butter and jelly into the batter. Don’t over-swirl; you want distinct pockets of flavour, not a muddy mess!
Step 7: Bake
Bake for 18-22 minutes, or until a toothpick inserted into the center of a muffin (avoiding a direct hit of peanut butter or jelly!) comes out clean or with just a few moist crumbs attached. The tops should be golden brown and spring back slightly when gently touched. Ovens can vary, so keep an eye on them, especially the first time you make them.
Step 8: Cool & Glaze
Let the muffins cool in the muffin tin for about 5-10 minutes before transferring them to a wire rack to cool completely. This prevents them from getting soggy. Once they’re completely cool, you can whip up the glaze. Whisk together the powdered sugar, vanilla extract, and 2 tablespoons of milk. Add more milk, a teaspoon at a time, until you get a drizzly consistency. Drizzle generously over the cooled muffins.
Step 9: Slice & Serve
These are best enjoyed warm or at room temperature. If you’ve glazed them, wait for the glaze to set slightly before slicing. They’re perfect as is, but slicing them in half can sometimes reveal those beautiful peanut butter and jelly swirls inside – a delightful surprise!
What to Serve It With
These peanut butter jelly muffins are such a treat on their own, but they also pair beautifully with a few things, depending on the occasion. For a simple, cozy breakfast, I love them alongside a steaming mug of my favorite coffee or a nice big glass of cold milk. They’re comforting and filling enough to get your day started right without being too heavy. If you’re planning a more elaborate brunch, these muffins are a fantastic addition. They add a fun, playful touch to a spread of eggs, bacon, and fruit salads. For an extra special touch, serve them on a tiered stand. As a dessert, they’re surprisingly satisfying. Imagine serving one slightly warm with a small scoop of vanilla bean ice cream melting into it – pure bliss! Or, for a late-night craving that needs a quick fix, just grab one (or two!) with a glass of milk. My kids will happily devour these anytime, anywhere, and honestly, so will I. They’re just that versatile and always a crowd-pleaser.
Top Tips for Perfecting Your Peanut Butter Jelly Muffins
Over the years, I’ve learned a few tricks that help make these peanut butter jelly muffins absolutely perfect every single time. When you’re prepping the batter, the biggest thing is to avoid overmixing. Seriously, once those wet and dry ingredients meet, just stir until they’re *barely* combined. A few streaks of flour are okay; they’ll disappear as you layer in the PB&J. Overmixing is the quickest way to tough muffins, and we don’t want that! For the swirling, I’ve found that less is often more. You don’t need to go crazy with the toothpick; a few gentle stirs are enough to create those lovely marbled effects. If you stir too much, you’ll just end up with a brownish-purple batter, which, while still tasty, doesn’t have that same visual appeal. I’ve also experimented with different Jellies and jams, and while they all work, using a slightly thicker jam or jelly can prevent it from sinking too much into the bottom of the muffin. If you only have a runnier jelly, try chilling it in the fridge for about 30 minutes before you plan to use it. For the peanut butter, I tend to use a standard creamy peanut butter. If you’re using a natural peanut butter where the oil separates, give it a good stir before measuring to ensure it’s smooth and spreadable. Baking is always a bit of an art, and ovens differ. So, my best advice for baking is to trust your eyes and nose more than the clock, especially after the initial 18 minutes. Look for that beautiful golden brown color and the springy-back test. If they seem to be browning too quickly, you can always loosely tent them with foil. And for the glaze – this is totally optional but makes them extra special! I like a glaze that’s thick enough to drizzle but not so thin that it all runs off. Start with less milk and add more gradually. It should coat the back of a spoon nicely. If you accidentally make it too thin, just whisk in a bit more powdered sugar until it’s right.
Storing and Reheating Tips
These peanut butter jelly muffins are fantastic fresh out of the oven, but they also keep remarkably well. If you plan on eating them within a day or two, storing them at room temperature in an airtight container is perfectly fine. I usually just pop them into a zip-top bag or a plastic container, and they stay nice and moist. For longer storage, up to about 4-5 days, I’d recommend the refrigerator. Pop them into an airtight container and they’ll stay fresh. The glaze might get a little softer in the fridge, but the muffins themselves will be lovely. If you want to freeze these beauties for future cravings, they freeze wonderfully! Make sure they are completely cooled first. You can wrap them individually in plastic wrap, then place them inside a freezer-safe bag or container. They’ll keep well in the freezer for up to about 2-3 months. When you’re ready to enjoy them, you can either let them thaw overnight in the refrigerator, or if you’re in a hurry, pop them into the microwave for about 20-30 seconds. Reheating them gently in a toaster oven at a low temperature for a few minutes can also bring back that just-baked freshness. If you’ve glazed them, I’d recommend adding the glaze *after* reheating if you’re aiming for that fresh, drippy look. Otherwise, the glaze can get a bit sticky when stored or frozen.
Frequently Asked Questions
Final Thoughts
I really hope you give these peanut butter jelly muffins a try. They’re more than just a recipe to me; they’re a little bit of comfort, a reminder of happy times, and a delicious treat that always brings a smile. They manage to be both incredibly simple and wonderfully satisfying, and I truly believe they’ll become a favorite in your home too. They’re perfect for those moments when you crave something sweet and familiar but don’t want to spend hours in the kitchen. If you love this recipe, you might also enjoy my other muffin recipes like my classic blueberry muffins or my decadent chocolate chip banana muffins! I’d absolutely love to hear how yours turn out, so please feel free to leave a comment below and share your experience, or any fun variations you tried. Happy baking!
Chocolate Banana Muffins
Ingredients
Method
- Preheat oven to 375°F. Line a muffin tin with paper liners.
- In a large bowl, whisk together flour, cocoa powder, sugar, and baking soda.
- In another bowl, combine mashed bananas, eggs, vegetable oil, and vanilla extract. Mix well.
- Pour wet ingredients into dry ingredients and stir until just combined. Fold in chocolate chips.
- Divide batter evenly among muffin cups. Bake for 20 minutes or until a toothpick inserted into the center comes out clean.
- Allow muffins to cool in the pan for 5 minutes, then transfer to a wire rack to cool completely.