Easy Peppermint Candy Recipe
You know that rush of joy when you bite into something cool, minty, and just a little bit sweet? That’s exactly how I felt the first time I made peppermint patties at home. It’s funny—these little bites of heaven remind me of holiday cookie plates, my grandma’s candy jar, and those times I’d sneak a few before dinner when no one was looking. The best part? They’re so much simpler than they look. No fancy equipment, no complicated techniques—just a handful of ingredients and a little patience. I swear, everyone at my house asks for these all the time, especially around Christmas, but honestly, I make them year-round. They’re like a mini escape from the ordinary, and I think you’re going to love how easy they are to whip up. Trust me, once you try making peppermint patties yourself, the store-bought ones will never taste quite the same—and honestly, they’re just so much more satisfying when you make them with love.
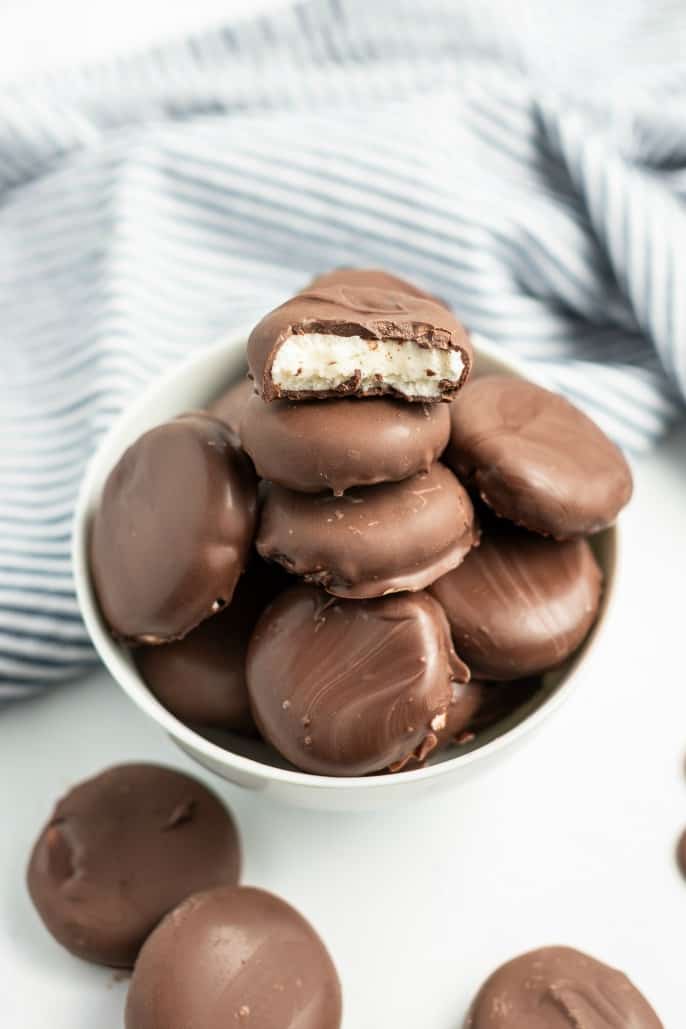
What is Peppermint Patties?
Think of peppermint patties as those delightful, bitesized candies with a dark chocolate shell and a cool, melt-in-your-mouth peppermint filling. They’ve been around forever, and you probably associate them with holiday tins or movie nights. The name “pattie” comes from the traditional shape—small, flat, and round, kind of like a mini cake. But really, they’re essentially a luscious peppermint-flavored center coated in rich, dark chocolate—think of it as a peppermint cream candy with a fancy twist. What makes them so addictive is that perfect combo of minty freshness and chocolate richness, which hits all the right notes on your taste buds. It’s no wonder my kids ask for these on their birthdays, and I always do this when I want a sweet little pick-me-up without baking a whole batch of cookies. Homemade peppermint patties feel special, but I promise—they’re way easier than you think!
Why you’ll love this recipe?
What I love most about making peppermint patties myself is how simple and satisfying they are. First off, the flavor—oh my gosh, that minty punch! It’s so refreshingly cool, and the dark chocolate adds a touch of elegance. Plus, these candies are surprisingly affordable, especially when you consider how much better they taste homemade compared to store-bought. I’ve tested this with different chocolate types—some with a little sea salt, some with a hint of vanilla—and honestly, they’re all just incredible. They’re super versatile, too. Want a little more chocolate? Double-dip them. Prefer a softer filling? I’ve got tips for that. And they’re perfect for gift-giving, party favors, or just keeping around for those late-night cravings—it’s such a comfort. One batch can be customized endlessly, and I find that once you get the technique, you’ll be cranking out these little bites whenever the mood hits. That’s why I keep them on hand—they’re my secret “I need a treat” remedy and so much fun to make with the family. Plus, did I mention they disappear in minutes at my house? Yeah, they’re dangerously good.
How do I make peppermint patties?
Quick Overview
This recipe is all about that perfect balance—you start by making a peppermint filling that’s silky, sweet, and bursting with flavor. Then, you shape it into little disks and pop them into the freezer for a bit to firm up. Meanwhile, you melt dark chocolate, and once your candies are firm, you dip, coat, or swirl them in chocolate. The final step? Let them set so that shell becomes glossy and crackly—like the real deal. Honestly, it’s a straightforward process, but a few little tricks make all the difference. Once you get the hang of it, you’ll see how quick and addictive making your own peppermint patties can be. And trust me, your friends and family will be asking for extras!
Ingredients
For the Main Filling:
– 1 ½ cups powdered sugar (sifted, to avoid lumps)
– 2 tablespoons unsalted butter, softened
– 2-3 teaspoons peppermint extract (adjust to taste)
– 2-3 tablespoons heavy cream or milk (I tested with almond milk and it made it even creamier!)
– A pinch of salt
For the Chocolate Coating:
– 1 cup dark or semi-sweet chocolate chips (quality matters—use good chocolate for better flavor)
– 1 teaspoon coconut oil or vegetable shortening (for gloss and easy dipping)
– Optional: a pinch of sea salt or a splash of vanilla for flavor variation
Step-by-Step Instructions
Step 1: Preheat & Prep Pan
Line a baking sheet with parchment paper or a silicone baking mat. This will be where your peppermint patties will set. No need to oil the sheet—just make sure it’s clean and ready. If you want, you can lightly dust with cocoa powder for a less sticky surface, but I usually skip it.
Step 2: Mix Dry Ingredients
In a small bowl, sift your powdered sugar—trust me, lumps are the enemy here! Mixing dry ingredients first helps give the filling a smooth, even texture. I always do this step first so everything mixes smoothly later.
Step 3: Mix Wet Ingredients
In a separate bowl, combine softened butter, peppermint extract, and a tablespoon of cream. Mix until smooth—your little bowl should smell super minty and deliciously fresh. If it feels too stiff, add a tiny splash more cream, but don’t go overboard.
Step 4: Combine
Gradually add the dry mixture into the wet and stir well. The goal is a dough that holds together but isn’t sticky. If it’s too crumbly, add a drop more cream. If it’s too sticky, sprinkle in a little more powdered sugar. Once your dough is manageable, roll it into a log or shape into a flat disk—you’ll cut into rounds later.
Step 5: Prepare Filling
Take small portions of your dough and roll into balls, then flatten into discs. If your dough is too soft or sticky, pop it into the fridge for 15 minutes—they firm up beautifully that way. For a fun twist, I sometimes tint part of the filling pink or add a tiny drop of green food coloring—think of it as edible Christmas decor!
Step 6: Layer & Swirl
If you’re feeling fancy, layer two different colors or add a swirl of food coloring before shaping. For marbling, roll two small pieces, twist them together, and flatten into a disk. The visual pattern inside makes these candies especially gift-worthy.
Step 7: Bake
Actually, you don’t need to bake these! They’re no-bake, so after shaping, just pop them into the freezer for 20-30 minutes until firm. This makes dipping much easier and prevents melting. If you’re in a hurry, a quick chill in the fridge works too.
Step 8: Cool & Glaze
Melt your chocolate with a teaspoon of coconut oil in short bursts in the microwave, stirring in between until glossy. Dip each peppermint patty carefully, or spoon chocolate over the top for a drizzled look. Place on your prepared sheet and let set at room temperature or in the fridge for about 15 minutes. If you want that shiny, professional-looking coating, make sure your chocolate isn’t too thick or too thin—aim for that smooth, pourable consistency.
Step 9: Slice & Serve
Once the chocolate has set, you can enjoy immediately or keep refrigerated. If you want sharp, clean edges, pop the candies in the fridge for 10 minutes before slicing. Because they’re so small, handling them gently is key. Arrange on a pretty plate, sprinkle with a tiny bit of sea salt, and get ready for oohs and aahs from everyone who tries them!
What to Serve It With
Honestly, these peppermint patties are pretty perfect all on their own, but here are a few ideas to elevate the experience:
– For a cozy breakfast, serve a mini patty alongside your morning coffee or hot cocoa—trust me, the minty freshness perks up any chilly morning.
– Brunch parties? Place them on a fancy platter with a sprig of fresh peppermint or holly for a festive touch. Pair with a peppermint mocha latte or a glass of sparkling water with a twist of lime.
– As a finishing touch after dinner, these candies make a lovely, light dessert. Serve with a cup of herbal tea or even a glass of dessert wine.
– And for those casual nights when you need a little comfort, these candies are perfect with a mug of hot chocolate or a scoop of vanilla ice cream—think of it as Christmas in every bite.
Top Tips for Perfecting Your Peppermint Patties
After making these dozens of times, I’ve learned a few tricks that’ll make your candies turn out flawless:
Zucchini Prep: Honestly, I don’t use zucchini here, but if you’re thinking ahead about adding something vegetable-y (say, for a healthy version), make sure to drain or squeeze out excess moisture. That way, your filling stays firm and doesn’t get too soft.
Mixing Advice: Overmixing can make your filling tough or waxy. Mix until just combined—you want a smooth, soft dough, not a stiff ball. It’s all about texture here.
Swirl Customization: For eye-catching patterns, layer different colors or flavors. Use a toothpick or skewer to swirl the layers before refrigerating for a stunning marble effect.
Ingredient Swaps: I’ve experimented with coconut oil instead of shortening, almond extract instead of peppermint, and even vegan chocolate—works great! Just keep the ratios consistent; too much liquid can mess with the consistency.
Baking Tips: Remember, these aren’t baked, but chilling is key. Don’t skip the freezing step, or dipping will be a mess—I learned that the hard way!
Glaze Variations: For a different flavor, try adding a dash of orange extract or a sprinkle of crushed peppermint candies on top before the chocolate sets. Play around and see what sticks.
Honestly, the biggest lesson I’ve learned is that patience makes perfect. Allow your candies enough time to set, and don’t rush the process. The result? Smooth, shiny chocolates with a burst of minty flavor that everyone will rave about. And trust me, once you’ve made these homemade peppermint patties, you’ll never go back to store-bought. They’re just too good—and way more fun to make, too.
Storing and Reheating Tips
These candies store beautifully, so don’t worry about making a big batch. Keep them in an airtight container—separating layers with parchment paper helps prevent sticking. At room temperature, they’ll stay fresh for about a week, but I find they taste best within the first few days, when the chocolate shell is still crackly and shiny. If it’s hot outside, refrigerate them to keep the chocolate from melting. When it’s time to reheat the chocolate for dipping or drizzling, do it in short bursts in the microwave, stirring often, to avoid scorching. Honestly, I usually melt it all at once, then keep it warm in a double boiler or a heat-safe bowl over simmering water. Want to freeze some for later? Wrap each piece tightly in plastic wrap and store in a freezer-safe bag. They can last for up to 3 months that way! Remember, if you’re adding fresh glaze later, it’s best to do it right before serving because refrigeration can sometimes make the chocolate a little dull or dull the gloss. But don’t worry—re-freezing is fine too, just give the candies a quick warm-up if the chocolate gets dull.
Frequently Asked Questions
Final Thoughts
If you’re into making sweets that feel special but don’t require a marathon in the kitchen, these homemade peppermint patties are your new best friend. They’re a cozy, nostalgic treat that’s surprisingly versatile—perfect for gifting, enjoying with loved ones, or just savoring solo when you need a mental escape. Once you’ve mastered the technique, I promise you’ll be reaching for the ingredients whenever the mood strikes. And honestly, the process of shaping and dipping them is almost therapeutic—something about working with your hands makes all the difference. Whether you’re celebrating the holidays, having a cozy night in, or looking for a last-minute gift, these candies come together quickly and impress everyone. I love how the smell alone fills my kitchen with peppermint goodness. I can’t wait to hear how yours turn out! Don’t forget to share your photos or variations in the comments—happy baking, everyone!
Homemade Peppermint Patties
Ingredients
Method
- In a large mixing bowl, beat marshmallow cream, butter, vanilla extract, and peppermint extract until fully combined. Add powdered sugar and mix on medium speed until well blended.
- Line a large baking sheet with parchment paper. Using about 1 tablespoon of filling, shape into a ball and flatten for traditional shape. For footballs, shape into a ball and pinch the ends. Freeze for about 2 hours.
- Melt dark chocolate wafers according to package directions. Dip frozen peppermint patties into chocolate using a toothpick, then tap to remove excess and place on parchment paper. Chill until set.
- Store at room temperature in a covered container.
- If making football-shaped patties, melt white chocolate and pipe laces onto the coated patties. Chill before serving.