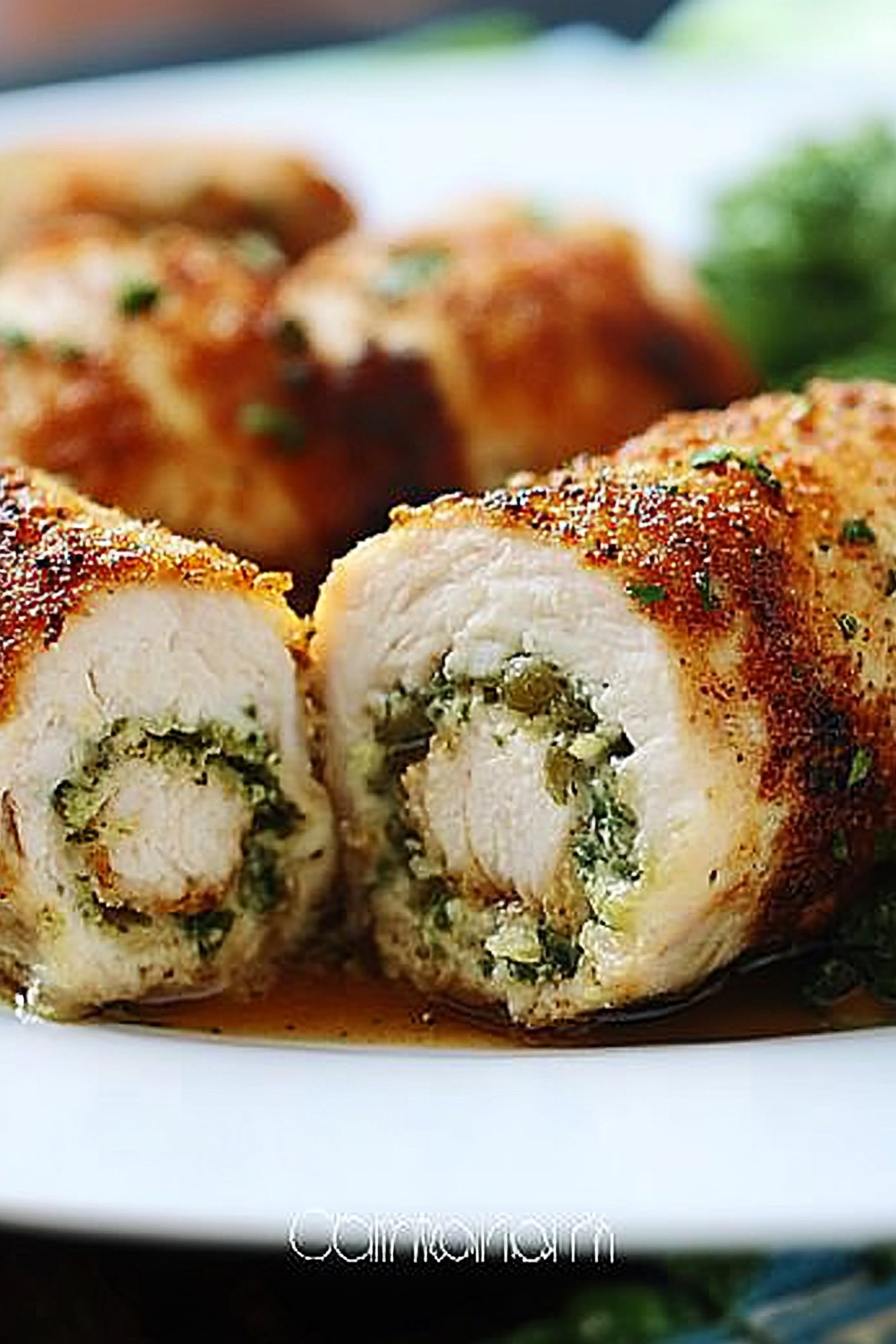
Easy Zucchini Chicken Rollatini Recipe
Oh, hello there! Come on in, grab a mug of something warm. I’ve been so excited to share this recipe with you. It’s one of those dishes that just feels like a hug in food form, you know? Whenever I make this Chicken Rollatini, it feels like a special occasion, but honestly, it’s surprisingly straightforward. It’s like a fancy restaurant dish, but I whip it up in my own kitchen, usually on a weeknight when everyone’s been asking “What’s for dinner?” for the last three hours. This Chicken Rollatini is a guaranteed crowd-pleaser, and the smell that fills the house while it’s baking? Pure magic. It reminds me a bit of my grandmother’s stuffed peppers, but with that tender chicken and creamy sauce, it’s got its own unique charm. You’re going to adore this one, I just know it.
What is chicken rollatini?
So, what exactly is Chicken Rollatini? At its heart, it’s a delightful way to prepare chicken that feels a little elegant without being fussy. We’re talking thin, tender pieces of chicken breast that are rolled up around a savory, often cheesy, filling. Think of it as a more sophisticated cousin to a chicken cordon bleu, but with a lighter touch and so much versatility. The name “Rollatini” itself hints at this rolling technique, and it’s just one of those dishes that sounds impressive but is totally doable for anyone who loves to cook. It’s essentially chicken breasts pounded thin, spread with a delicious filling, rolled up tight, and then usually baked in a luscious sauce. It’s this beautiful little package of flavor that’s always a hit at our table.
Why you’ll love this recipe?
There are so many reasons why this Chicken Rollatini has become a staple in my recipe rotation, and I’m convinced you’ll feel the same way. First off, the flavor is just out of this world. We’re talking tender, juicy chicken, a rich and creamy filling (I’ve got my favorite I’ll share, of course!), all nestled in a velvety sauce that just sings. It’s comforting, it’s satisfying, and it truly tastes like something special. But here’s the part that really seals the deal for me: it’s actually quite simple to make! I know, I know, it looks impressive, but once you get the hang of pounding the chicken thin and rolling, it’s a breeze. This recipe is also incredibly cost-effective. Chicken breasts are usually pretty budget-friendly, and the filling ingredients are simple pantry staples. You get a gourmet meal without the gourmet price tag, which is always a win in my book. And talk about versatility! You can swap out the filling ingredients, change up the sauce slightly, and it still works beautifully. What I love most, though, is the sheer joy on my family’s faces when they see this on the table. It’s a dish that always gets rave reviews and usually disappears in record time. It’s a lifesaver on those nights when you want to make something impressive but don’t have hours to spend in the kitchen.
How do I make chicken rollatini?
Quick Overview
Making this glorious Chicken Rollatini is a process of layering flavors and textures. We’ll start by prepping our chicken to be the perfect canvas, then whip up a dreamy filling, roll everything up snugly, and let it bake in a wonderfully rich sauce until it’s golden and bubbly. It’s a straightforward method that promises incredible results. The beauty is in its simplicity; each step builds on the last to create a harmonious and utterly delicious dish that’s perfect for any occasion.
Ingredients
For the Main Dish:
This is the heart of our rollatini! I always look for chicken breasts that are on the larger side so I can get nice, thin cutlets from them. If yours are smaller, you might just need an extra one. Pounding them thin is key for tenderness and even cooking, so don’t skip that step!
4 large boneless, skinless chicken breasts (about 1.5 lbs total)
Salt and freshly ground black pepper, to taste
1/2 cup all-purpose flour, for dredging
2 tablespoons olive oil
2 tablespoons unsalted butter
For the Filling:
This is where you can really play! My go-to is a creamy, cheesy mixture with a hint of garlic and herbs. It’s a classic for a reason, but feel free to experiment!
1 cup ricotta cheese (whole milk gives the creamiest texture, but part-skim works too)
1/2 cup grated Parmesan cheese
1/4 cup chopped fresh parsley
1 clove garlic, minced
1/4 teaspoon nutmeg (trust me, it adds a subtle warmth that’s amazing)
Salt and freshly ground black pepper, to taste
For the Sauce:
This sauce is what brings it all together. It’s simple but luxurious, and it coats everything beautifully. A good chicken broth is important here for the depth of flavor.
1 cup chicken broth
1/2 cup heavy cream
1 tablespoon Dijon mustard (adds a lovely tang)
1 tablespoon chopped fresh parsley, for garnish (optional, but pretty!)
Step-by-Step Instructions
Step 1: Preheat & Prep Pan
First things first, let’s get that oven warmed up to 375°F (190°C). While it’s heating, grab a nice large oven-safe skillet or a baking dish. If you’re using a skillet, make sure it’s one that can go from stovetop to oven – that makes cleanup so much easier! You want everything ready to go so your rollatini doesn’t sit around getting sad.
Step 2: Mix Dry Ingredients
In a shallow dish or a pie plate, we’ll mix up our flour with a good pinch of salt and pepper. This is our dredging station. We want to coat the chicken pieces evenly in this mixture. It helps create a beautiful golden crust and also thickens up our sauce a little, which is always a good thing.
Step 3: Mix Wet Ingredients
In a medium bowl, combine the ricotta cheese, Parmesan cheese, fresh parsley, minced garlic, nutmeg, salt, and pepper. Give it all a good stir until it’s well combined and creamy. Taste it! Does it need a little more salt? A touch more pepper? This is your chance to make it perfect for your palate. This filling is so good, you might be tempted to just eat it with a spoon. I won’t judge.
Step 4: Combine
Now, let’s get our chicken ready for its delicious filling. Place a chicken breast on a cutting board. If it’s super thick, carefully slice it horizontally almost all the way through, like opening a book, and then open it up. Or, if you’re feeling brave and have a good mallet, you can place it between two pieces of plastic wrap and pound it to about 1/4-inch thickness. The goal is to have a nice, thin, even piece of chicken. Season both sides of the pounded chicken with salt and pepper. Then, spoon about 2-3 tablespoons of the ricotta mixture onto one end of each chicken cutlet. Carefully roll up each piece of chicken, tucking in the sides a bit if you can, to keep the filling contained. Once rolled, lightly dredge each chicken rollatini in the seasoned flour mixture, coating all sides.
Step 5: Prepare Filling
This step is already done from Step 3! You’ve got your delicious ricotta mixture all ready to go. The key here is to make sure it’s well-seasoned and has that lovely creaminess from the ricotta and Parmesan. That little hint of nutmeg really does make a difference, adding a warmth that complements the chicken and cheese beautifully. It’s simple, but it’s the foundation of that incredible flavor!
Step 6: Layer & Swirl
Heat the olive oil and butter in your oven-safe skillet over medium-high heat. Carefully place the floured chicken rollatini seam-side down in the hot skillet. Sear them for about 2-3 minutes per side, just until they’re golden brown. This step is all about building flavor and color. Don’t overcrowd the pan; work in batches if needed. Once browned, remove the chicken to a plate. In the same skillet, whisk together the chicken broth, heavy cream, and Dijon mustard. Bring it to a simmer, scraping up any browned bits from the bottom of the pan – that’s pure flavor! Return the chicken rollatini to the skillet, nestling them into the sauce. Make sure they’re mostly submerged. If you’re using a baking dish, arrange the seared rollatini in the dish and then pour the sauce over them.
Step 7: Bake
Now, pop that skillet or baking dish into your preheated oven. Let it bake for about 20-25 minutes, or until the chicken is cooked through and the sauce is bubbly and slightly thickened. The best way to check for doneness is to use a meat thermometer; the internal temperature should reach 165°F (74°C). The sauce will continue to thicken as it cools slightly.
Step 8: Cool & Glaze
Once your Chicken Rollatini is out of the oven, let it rest in the skillet or dish for about 5 minutes before serving. This allows the juices to redistribute, making the chicken even more tender and moist. While it’s resting, you can give the sauce a final taste. Sometimes, a little extra salt or pepper is all it needs. If the sauce looks a bit too thin for your liking, you can gently simmer it on the stovetop for a few more minutes to reduce it down, but be careful not to scorch it.
Step 9: Slice & Serve
Serve your beautiful Chicken Rollatini hot, spooning extra sauce over each piece. Garnish with a sprinkle of fresh parsley if you like – it adds a lovely pop of color and freshness. I love to serve this with some crusty bread to sop up every last bit of that amazing sauce. It’s truly a dish that makes you feel like you’ve accomplished something truly special in the kitchen.
What to Serve It With
This Chicken Rollatini is so versatile, it can dress up for a fancy dinner or be perfectly at home on a cozy night in. For a classic breakfast or brunch, I love serving it alongside some fluffy scrambled eggs or a simple fruit salad. A mimosa or a fresh-squeezed orange juice just completes the picture. If you’re thinking of brunch with friends, plating this up with some roasted asparagus and a side of creamy polenta makes it feel incredibly elegant. As a dessert course? Well, this isn’t exactly a dessert, but the creamy, comforting nature of it makes it feel like a treat any time of day! For those lazy weekend afternoons or chilly evenings when you just want something comforting, it’s perfect with some garlic mashed potatoes or a big bowl of pasta. My kids also love it with simple buttered noodles. We’ve even had it as a “build-your-own-bowl” night with rice and steamed veggies. The possibilities are really endless!
Top Tips for Perfecting Your Chicken Rollatini
Over the years, I’ve learned a few tricks that really make this Chicken Rollatini sing. First, when you’re pounding the chicken, don’t be afraid to really get it thin, about 1/4 inch. This ensures it cooks through evenly and becomes wonderfully tender. If the chicken starts to tear, just patch it up with a bit of plastic wrap – it’s not about perfection, it’s about good eating! For the filling, make sure your ricotta isn’t too watery. If it seems a bit loose, you can strain it a bit through a fine-mesh sieve or even dab some of the excess moisture with a paper towel. This prevents your rollatini from getting soggy. When you’re rolling them up, try to make them snug but not so tight that the filling bursts out. A little bit of filling peeking out is fine, it just adds to the rustic charm! For the sauce, I’ve found that using a good quality chicken broth makes a noticeable difference in the depth of flavor. And don’t skimp on the butter; it adds that richness that makes the sauce so irresistible. If you find your sauce is a little too thin after baking, you can always carefully remove the chicken, place the skillet back on the stovetop, and let the sauce simmer and reduce for a few minutes until it reaches your desired consistency. For ingredient swaps, I’ve successfully used finely chopped spinach mixed into the ricotta filling, or even a bit of pesto for a brighter flavor. If you don’t have fresh parsley, dried works in a pinch, just use about a third of the amount. And when it comes to baking, remember that ovens can vary. Keep an eye on it during the last few minutes, and trust your instincts. If it looks golden and bubbly, it’s likely ready!
Storing and Reheating Tips
This Chicken Rollatini is fantastic for leftovers, which is a huge win in my house! If you happen to have any (which is rare!), let it cool completely before storing. At room temperature, it’s best to eat it within two hours. For refrigerator storage, pop the cooled rollatini into an airtight container. It will keep beautifully for up to 3-4 days. The sauce might separate a little when it’s cold, but don’t worry, that’s totally normal and it will come back together when reheated. If you want to freeze this for a rainy day, I recommend wrapping individual portions tightly in plastic wrap, then in aluminum foil, and placing them in a freezer-safe bag or container. It can stay frozen for about 1-2 months. When you’re ready to reheat, the best method is in the oven. If it’s refrigerated, place it in a baking dish with a little bit of extra chicken broth or water (just a splash!) to help keep it moist, cover with foil, and bake at around 350°F (175°C) until heated through, about 15-20 minutes. If it’s frozen, you can often reheat it directly from frozen, but it will take longer, perhaps 25-30 minutes. You can also reheat individual portions in the microwave, but the texture might be slightly softer. For the glaze, I like to add it fresh when serving or just before the final bake if reheating from the fridge. If reheating from frozen, you might want to add a fresh drizzle of sauce or a sprinkle of cheese after it’s heated.
Frequently Asked Questions
Final Thoughts
I really hope you give this Chicken Rollatini a try. It’s one of those recipes that feels so rewarding to make, and the look on people’s faces when they take their first bite is just priceless. It’s proof that you don’t need to be a gourmet chef to create something truly spectacular in your own kitchen. The combination of tender chicken, creamy filling, and that luscious sauce is just a winner, every single time. It’s become a dish that I know I can rely on to impress, whether it’s for a family dinner, a potluck, or even a special occasion. If you’re a fan of comforting, flavorful meals that have that “wow” factor without being overly complicated, this is absolutely for you. Don’t forget to check out some of my other weeknight wonders or special occasion dishes for more inspiration. I can’t wait to hear how yours turns out! Please leave a comment below and let me know your thoughts, or share any delicious variations you come up with. Happy cooking, everyone!