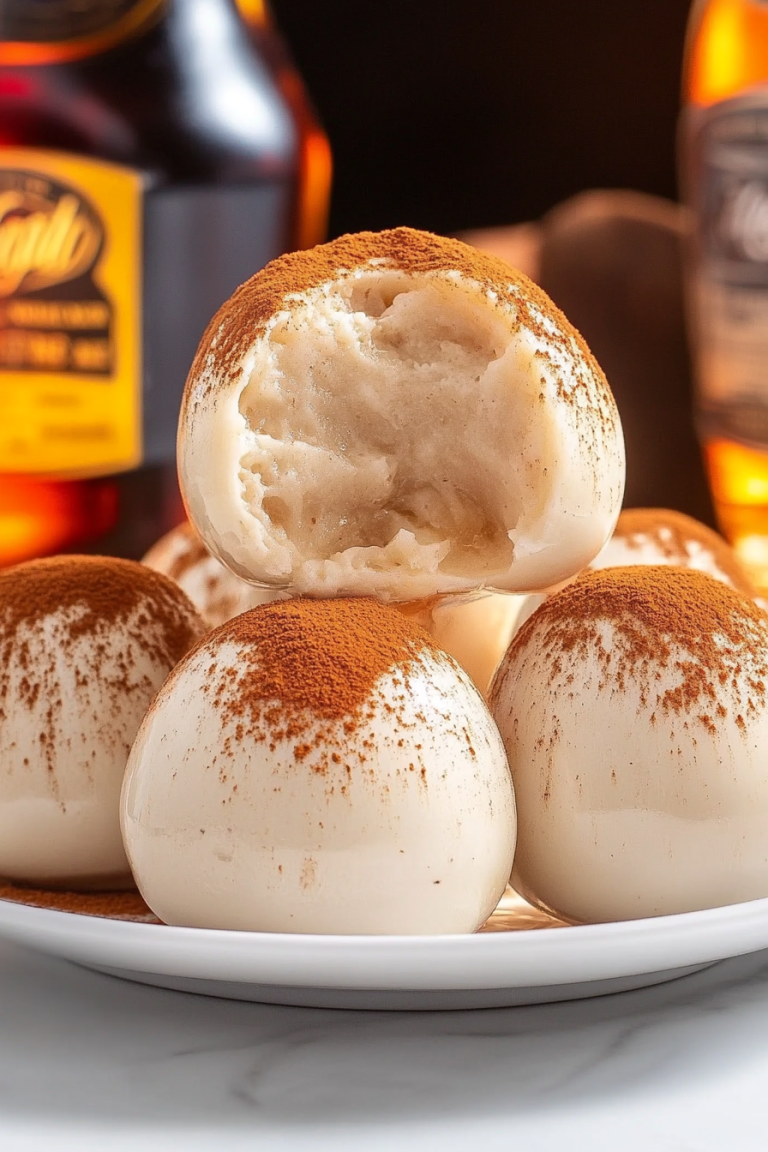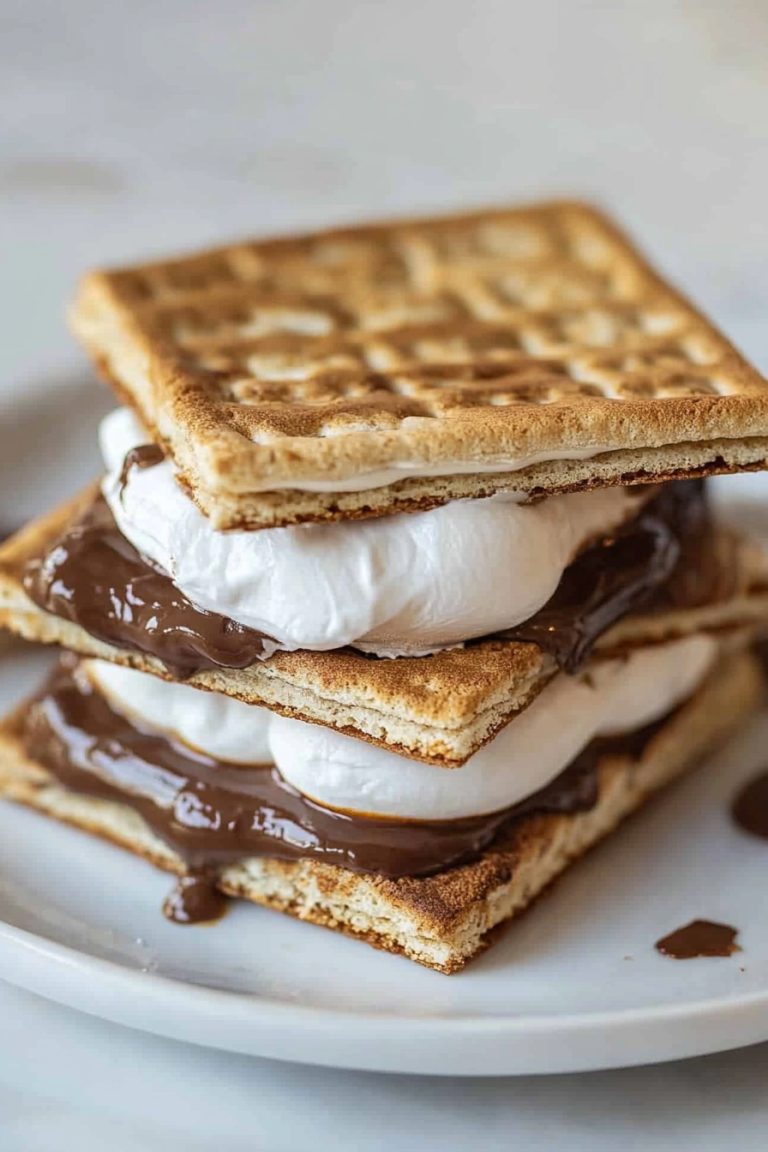
Festive Cocoa Bombs How to Make Them
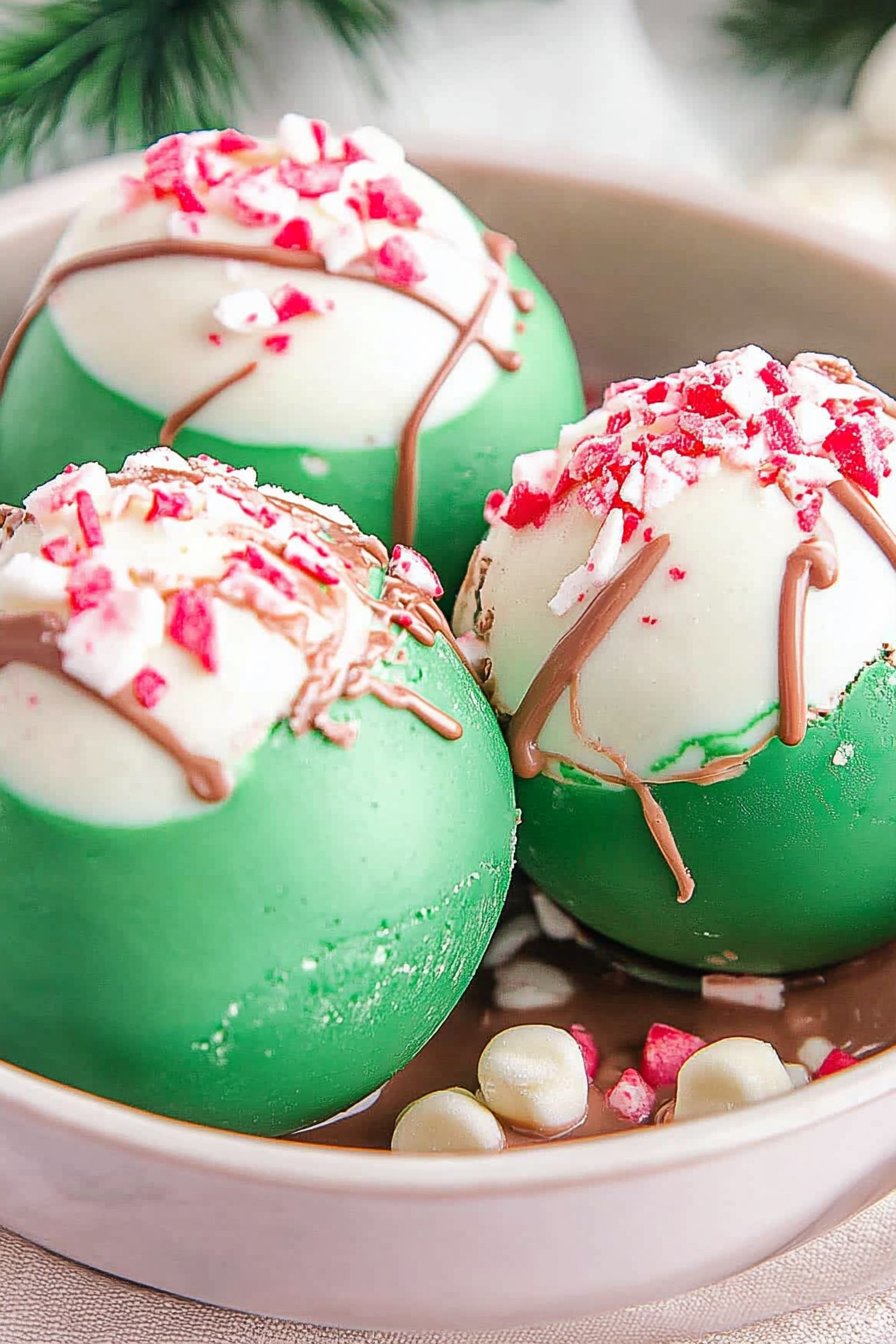
If you ask my kids what their favorite holiday treat is, they’ll proudly say “the Grinch hot chocolate bombs!” I’ve been making these for a few years now, and honestly, they’ve become a staple in our Christmas traditions. There’s just something so joyful about dropping a little green, fluffy, mischievous Grinch into a mug of hot milk and watching his tiny little eyes pop open as the chocolate melts around him. The smell alone brings the whole house to life — that warm, sweet cocoa, with just a hint of peppermint and fun. It’s like a cozy hug in a cup, but with a playful twist. Plus, they’re surprisingly easy to make, which means I can whip up a batch while the kids are busy doing their own holiday crafting. Trust me, once you get these made, they’ll disappear in minutes at my house. They’re a crowd favorite—and honestly, way more fun than just regular hot chocolate. I always do this when I want to surprise my family or make a cozy night extra special, especially when everyone needs a little holiday magic. It’s a simple recipe that packs a punch of flavor and fun — and it’ll have your kids (or your inner kid) smiling ear to ear.
What is Grinch Hot Chocolate Bombs?
Think of Grinch hot chocolate bombs as little chocolate spheres filled with marshmallows, cocoa, and a touch of peppermint — but with a whimsical, Grinch-inspired twist. It’s essentially a chocolate shell, shaped into a cute little Grinch face, that when dropped into hot milk, transforms into a rich, creamy hot cocoa explosion. The name comes from the beloved Dr. Seuss character, the green grump himself, with a mischievous smile and a heart that’s finally grown a size. These bombs are a fun spin on the classic hot chocolate, turning your favorite winter beverage into an interactive treat. They’re perfect for holiday parties, cozy nights in, or even as a thoughtful homemade gift. The best part? You get to personalize the face, adding silly eyes, a fluffy beard, or a bright red Santa hat. Think of them as tiny, edible holiday characters bringing cheer in the form of creamy, chocolatey goodness. And don’t worry—if you’re new to making these, I’ll walk you through all the little tricks I’ve learned over the years to make them look adorable and taste even better.
Why you’ll love this recipe?
What I love most about these Grinch hot chocolate bombs is how easy they are to whip up — they really don’t take long, but the wow-factor is huge. Plus, kids and adults alike get such a kick out of watching the little green Grinch dissolve and fill their mugs with luscious, steaming hot cocoa. The flavor? Oh, it’s pure holiday magic. The rich dark chocolate shell gives way to a sweet, minty, marshmallow-filled surprise with every sip. I’ve tested this with different kinds of milk — almond, oat, even coconut — and honestly, it kind of made it even creamier and more indulgent. These are budget-friendly, too, which is a bonus during the holiday crunch. And because you can customize the faces and decorations, no two batches are exactly alike — they’re almost like edible holiday art. What makes this extra special is how versatile they are. You can swap out the peppermint for caramel or vanilla, add a little red food coloring for a true “Grinch” look, or even toss in some crushed peppermint candy for a little extra crunch. It’s honestly one of those recipes that’s guaranteed to make everyone’s face light up — especially when you tell them you made the “Grinch” yourself!
How do you make Grinch Hot Chocolate Bombs?
Quick Overview
If you’re new to making hot chocolate bombs, don’t worry — it’s easier than you think. Basically, you melt chocolate, fill half spherical molds with marshmallows and cocoa powder, then seal them back together with a little more melted chocolate. To turn them into Grinch characters, you’ll add some fun decorating touches like edible eyes, a tiny red nose, and maybe even a cotton candy beard. Once finished, just pop one into a mug of hot milk, watch it melt, and stir for an instant, festive hot chocolate. This process is pretty forgiving, and I love that you can make it your own by customizing the faces and flavors, making it a perfect holiday handcraft. It takes about 30 minutes from start to finish — enough time to listen to holiday tunes and still have a batch ready for your family. My secret is to work in small batches and keep the melted chocolate at just the right temperature; too hot, and it’s hard to work with, but too cool, and it won’t hold the decorations well. Trust me, once you nail that part, the rest is smooth sailing. The kids love helping with decorating, and honestly, I think that’s what makes these so special — it’s a little family project that ends in a lot of smiles.
Ingredients
For the Main Shell:
– 1 1/2 cups high-quality melting chocolate or chocolate chips (semi-sweet or dark chocolate, I prefer Ghirardelli or Lindt for the smoothest shell)
– Edible eyes (or small candies to create eyes)
– Small red candies or red super-thin food coloring gel for the nose
– Optional: green food coloring or food-safe paint for decorating to match the Grinch’s face
For the Filling:
– Mini marshmallows (homemade or store-bought)
– Hot cocoa mix (your favorite brand, I love using a rich, smooth variety)
– Optional: peppermint candies, crushed cookies, or mini chocolate chips for extra texture
For the Glaze & Decoration:
– Extra melted chocolate for sealing and decorating
– White edible or melted chocolate for “fur” or accents
– Cotton candy or shredded coconut for the Grinch’s beard or hair-like effect
– Red food coloring or gel for the nose or additional details
Step-by-Step Instructions
Step 1: Preheat & Prep Pan
Start by warming your work area. I like to soften the chocolate in short bursts in the microwave, stirring in between, until smooth. Have your spherical molds cleaned and dried thoroughly — any moisture can cause the chocolate to seize or crack later. Lightly spray or brush the molds with a tiny bit of neutral oil if you want a perfectly smooth shell. Then, line a tray with parchment paper for the finished bombs. Doing this prep now will save you trouble when you assemble everything later.
Step 2: Melt the Chocolate
Melting chocolate carefully is key. I do this in short bursts in the microwave — about 20 seconds at a time, stirring between each session until silky smooth. Alternatively, a double boiler works beautifully. Make sure not to overheat, or your chocolate will be thick and difficult to work with. Once melted, let it cool slightly so it’s not too hot when you pour into the molds. A too-hot shell can melt the marshmallows or distort the shape.
Step 3: Fill the Molds
Pour the melted chocolate into the spherical molds, making sure to cover all sides evenly. I use a small spoon or a piping bag for accuracy, especially in the tricky edges. Then, flip the mold over onto parchment paper and gently tap to remove excess, leaving a nice thin layer. Chill in the fridge for about 10-15 minutes until the shells are firm but not brittle. Remember, the goal is a delicate but sturdy shell that will hold the filling without cracking!
Step 4: Assemble the Halves
Once the shells are ready, gently remove them from the mold. Place one half on your work surface and fill with a tablespoon of cocoa mix, some mini marshmallows, and crushed candies if you like. Be generous but mindful not to overfill, or sealing will be hard later. Top with a little more melted chocolate around the edges, then press the second shell on top, sealing everything together. This is where patience pays off — smooth the edges and hold for a few seconds. If any cracks appear, just patch them with a dab of melted chocolate.
Step 5: Decorate the Face
This is my favorite part! Use edible eyes, small candies, or even tiny Oreo bits for the eyes and nose. For the Grinch’s mischievous grin, I sometimes pipe on white chocolate or use colored gel. For the beard or hair, shredded coconut or cotton candy adds a fluffy, fun texture. If you want to get fancy, green food coloring mixed into a little white chocolate is perfect for face details. Just have fun with it — the messier, the better! These little DIY decorations make each one unique and adorable.
Step 6: Chill & Set
After decorating, give the bombs a gentle chill in the fridge for about 10-20 minutes. This helps everything set firmly and makes handling much easier. Make sure they’re cool to the touch before unwrapping or storing, so the decorations don’t fall off. Once you’re happy with how they look, carefully place each onto a parchment-lined tray. You don’t want them to get fingerprints or smudges, so handle with care.
Step 7: Add Glaze & Final Touches
If you want a shiny, polished look, melt some extra chocolate and gently drizzle or brush it onto the surface. You can also add little facial details now, like more eyes or a tiny red nose. For a snow-dusted effect, sprinkle with powdered sugar or cocoa before serving. Store them in an airtight container at room temperature if you’re using the same day, or refrigerate if making ahead — but bring back to room temp before serving. The glaze adds a professional touch and helps keep everything fresh and crisp.
Step 8: Serve & Enjoy
To serve, fill a big mug with warm milk (I love whole or even oat milk for extra creaminess). Drop in your Grinch hot chocolate bomb and wait patiently as it starts to melt. The kids love watching the green face slowly unveil itself! Stir gently to combine everything into a smooth, mocha-y, pepperminty wonder. Add whipped cream or extra marshmallows if you’re feeling fancy. I promise, it’s just as fun to make as it is to enjoy. Plus, it’s a delightful way to bring some holiday cheer to any chilly night.
What to Serve It With
This hot chocolate is such an easy crowd-pleaser, and you can elevate it with a few simple treats. For breakfast, serve alongside cinnamon-sugar toast or a warm biscotti — the richness pairs beautifully with a hot cup of coffee or tea. For a more decadent brunch, try mini pancakes topped with whipped cream and sprinkles or a peppermint mocha. When dessert-time hits, you can serve it with extra cookies, a scoop of vanilla ice cream, or even a cute little candy cane stirrer. On cozy nights, I just set the mug on a cute holiday placemat, add a cinnamon stick, and let everyone add their favorite toppings. My family usually asks for extra marshmallows or a drizzle of caramel on top — makes it feel even more festive. These bombs are such a hit because they’re fun and interactive, turning a simple cup of hot chocolate into a memorable holiday moment. Plus, they’re just the right size for kid-friendly sips or adult indulgence — honestly, I make a double batch and sneak a few bites myself!
Top Tips for Perfecting Your Grinch Hot Chocolate Bombs
After playing around with different techniques over the years, I’ve picked up a few tricks that make all the difference in how your bombs turn out. First, don’t rush melting the chocolate — patience is key. I like to use good-quality chocolate, and I melt it slowly to maintain a smooth consistency. For the shells, a thin layer is best — thick shells tend to crack or be difficult to melt evenly. When filling, avoid overstuffing; if you’re too generous, sealing can be tricky, and the chocolate may crack. For decorating, edible eyes should be pressed in gently after the shell is fully set; I learned the hard way that too much pressure can mess up the shape. If you want to customize the Grinch’s face, a touch of green gel mixed into melted white chocolate adds a nice pop of color—trust me on this, it makes a huge difference! For the finishing touches, a light drizzle of white chocolate creates a snowy effect, and a quick dusting of powdered sugar over the entire bomb adds a little magic. Lastly, store your bombs in a cool, dry space — I’ve made the mistake of refrigerating them too early and found the shells got sticky or cloudy. If you’re making these ahead, keep the decorations minimal until just before serving. They’re sturdy enough to hold up for a few days if stored properly, so I recommend making them a day or two in advance for maximum freshness.
Storing and Reheating Tips
These little guys can actually be made ahead, which is a huge time saver. Keep them in an airtight container at room temperature for up to 2 days — just be gentle when handling, especially if you’ve added delicate decorations. If you want to keep them longer, pop them into a well-sealed container and refrigerate for up to a week. Just remember to let them come back to room temp before dropping into hot milk, or the shells might crack. For freezing, wrap each bomb tightly in plastic wrap, then place in a zip-top bag or airtight container. They’ll stay good for up to a month, but I definitely recommend thawing them in the fridge overnight to prevent condensation from making the shells sticky. When reheating, it’s best to keep the bombs in their shells until just before use. If you notice any dullness or a slight crack after storage, a quick warm-up of the melted chocolate layer can usually fix it. If you’ve added fresh decorations like whipped cream or edible accents, do those just before serving — otherwise, they might melt or lose their shape. Lastly, if you want a shiny, fresh look, a quick brush of melted chocolate can give your bombs a professional finish and refresh their appearance.
Frequently Asked Questions
Final Thoughts
If you’ve read this far, I hope you’re as excited as I am to try making your own Grinch hot chocolate bombs. They’re such a little bundle of holiday joy, and honestly, once you get the hang of it, they’re super fun to customize — whether you want to make them extra mischievous, cute, or totally goofy. My kids ask for these during every holiday season, and honestly, they make me feel like a hero every time I surprise them with a tray full of green, grumpy faces waiting to melt into a creamy mug of chocolatey goodness. They’re perfect for gift-giving, parties, or just a cozy night in with a good book and a blanket. Don’t be afraid to play around with flavors — I’ve added caramel, peppermint, even a touch of vanilla — and the results are always delightful. If you try making these, I’d love to hear how your little Grinches turned out! Tag me in your photos or drop a comment below. Happy baking, and here’s to a wonderfully sweet holiday season filled with warmth, laughter, and a whole lot of chocolate.
Grinch Hot Chocolate Bombs
Ingredients
Method
- Line a baking sheet with parchment paper.
- Heat green candy melts in a microwave-safe bowl for 30-45 seconds, then stir well.
- Continue heating in 20-30 second intervals, stirring each time, until melted and smooth.
- Pour 1 heaping tablespoon of melted candy into each cavity of a 3-inch semi-sphere silicone mold. Swirl to coat the sides and turn the mold upside down onto the parchment-lined sheet.
- Refrigerate for 15-20 minutes until hardened.
- Gently remove the semi-spheres from the mold once set.
- Fill half of the spheres with 2 tablespoons hot chocolate, 1 tablespoon crushed candy cane, 1 tablespoon mini marshmallows, and 0.5 teaspoon heart sprinkles.
- Reheat remaining green candy melts if needed, then re-melt to smooth consistency.
- Seal the filled spheres with melted green candy melts, forming complete balls. Chill for 5-10 minutes.
- Melt white candy melts in short bursts, stirring until smooth.
- Drizzle or dip the bombs with melted white candy melts and decorate with additional sprinkles or candy canes, if desired.
- To serve, place a bomb in a mug and pour 1.25 cups hot milk over it. Stir to combine and enjoy!