Game Day Cupcakes How to Score Big
There’s just something about game day that gets everyone excited — whether it’s your favorite team winning or just the thrill of hanging out with friends and family. And honestly, one of my all-time favorite ways to bring everyone together is a tray of these adorable football cupcakes. They look super fancy, but I promise, they’re way easier to make than you’d think. Plus, the rich chocolatey flavor and that buttery frosting make them disappear in minutes at my house! I’ve made these countless times for potlucks, birthday parties, and especially during big games, and I can tell you, they never fail to get a smile or a cheer. My kids actually ask for these all the time — and I love that I can whip them up quickly when I need a fun, festive treat that everyone will love. Trust me on this — once you try these, they’ll be your go-to for every game day extravaganza or just a fun weekend snack. It’s like combining chocolate cupcakes and football season into one perfect bite!
What is a football cupcake?
Think of football cupcakes as your standard chocolate or vanilla cupcakes, but with a little sporty twist. It’s essentially a sweet, handheld dessert decorated to look just like a tiny football — a perfect little treat that screams “game day!” The name comes from the decorations, which mimic the laces and shape of a football, making them utterly irresistible. These cupcakes are all about blending playful presentation with delicious flavors. Whether you’re throwing a tailgate party or just want to surprise the kids with something fun, football cupcakes are a casual, charming way to celebrate the sport while satisfying that sweet tooth. They’re also great because you can make them ahead, decorate them easily, and serve them straight from the fridge or at room temp. Think of it as the perfect match between a childhood favorite and your love for sports — nostalgic, festive, and downright delicious.
Why you’ll love this recipe?
What I love most about these football cupcakes is how they’ve become a staple in my house whenever there’s a game on. The flavor? Pure chocolate heaven, with a touch of vanilla buttercream that’s seriously addictive. They’re incredibly simple to make, especially because the cupcake batter is foolproof — I’ve tested this with different brands of cocoa powder and even whole wheat flour, and it still comes out moist and rich every single time. Budget-wise, these are perfect because you probably already have most of the ingredients in your pantry — flour, sugar, cocoa, eggs, and butter. Plus, the decorations are super customizable, so you can get creative with colors and laces. I’ve even added a little crushed Oreo inside the batter for a cookies-and-cream twist, and it was a hit! Plus, these cupcakes are as fun to decorate as they are to eat. My kids ask for seconds every time, and I love how these turn a simple afternoon into a little celebration. They’re great for kids’ parties, football Sundays, or just when you want something festive to snack on. Truly, they’re a crowd-pleaser that feels special without hours of effort. I always do this when I need a quick, cheerful treat — and I promise, no one will guess how easy it was!
How do you make a football cupcake?
Quick Overview
This recipe is a breeze — you mix a simple chocolate cupcake batter, fill your liners, and bake until soft and fluffy. While they’re cooling, you whip up a smooth vanilla buttercream which you then pipe onto the cupcakes to resemble little footballs. The finishing touch is decorating the laces and seams with white royal icing or melted white chocolate. Honestly, it’s a fun activity for kids or to do with friends, and the whole thing takes less than an hour from start to finish. The cupcakes come out moist and chocolatey, with frosting that’s just sweet enough to balance the richness. The best part? You can customize the decorations with team colors or even make them look like mini soccer balls or basketballs — whatever floats your boat!
Ingredients
For the Main Batter:
– 1 ½ cups all-purpose flour (sifted, for a lighter texture)
– ½ cup unsweetened cocoa powder (Dutch-processed is my favorite)
– 1 ½ teaspoons baking powder
– ½ teaspoon baking soda
– ¼ teaspoon salt
– 1 cup granulated sugar
– ⅓ cup vegetable oil (or melted unsalted butter if you prefer a richer flavor)
– 2 large eggs
– 1 teaspoon vanilla extract
– ¾ cup whole milk (or almond milk for a dairy-free version)
– ½ cup hot water or strong brewed coffee (adds depth to the chocolate)
For the Filling (Optional – for extra flavor or surprise inside):
– Mini chocolate chips or crushed cookies (for mixing into batter)
For the Glaze or Decoration:
– 1 cup powdered sugar
– 1-2 tablespoons milk
– 1 teaspoon vanilla extract
– White royal icing or melted white chocolate (for the laces and seams)
– Black edible marker (optional, for fine details)
Step-by-Step Instructions
Step 1: Preheat & Prep Pan
Set your oven to 350°F (175°C). Line a cupcake tin with paper liners — I like classic white or beige because they make the decorations pop. If you’re feeling fancy, you can use green cupcake liners to resemble a football field. Make sure your oven rack is in the middle; this helps the cupcakes bake evenly. Give the pan a quick spray with non-stick spray or butter to ensure easy removal after baking. I always do this because a perfectly moist cupcake looks better when it comes out clean, and it saves me from any sticky mess.
Step 2: Mix Dry Ingredients
In a large bowl, sift together the flour, cocoa powder, baking powder, baking soda, and salt. Whisk until well combined. This step is super important because it prevents clumps and ensures your cupcakes have a smooth, even crumb. I’ve learned the hard way — skipping this step sometimes results in uneven pockets of flour or cocoa, which can make the texture less than ideal.
Step 3: Mix Wet Ingredients
In a separate bowl, whisk together the sugar, oil, eggs, and vanilla until smooth and slightly frothy. Then, add the milk and hot water (or coffee). The hot water heightens the chocolate flavor and gives the cupcakes a tender crumb. Be sure to temp the eggs if you’re using refrigerated ones so the mixture stays smooth. I like to do this because it makes the batter easier to pour, and I’ve found it helps the cupcakes rise better.
Step 4: Combine
Gradually add the wet mixture into the dry ingredients, folding gently. Do not overmix — just until combined. Overmixing can create dense cupcakes, and nobody wants that. When the batter is smooth and shiny, you’re ready to fill your liners.
Step 5: Prepare Filling (Optional)
If you’re adding mini chocolate chips or crushed cookies inside, fold them into the batter now. They add surprise bursts of flavor and texture. I love adding a handful of crushed Oreos — it’s like a cookies-and-cream cupcake! Just be careful not to overload, or it could sink to the bottom during baking.
Step 6: Layer & Swirl
Use an ice cream scoop or spoon to fill each cupcake liner about ¾ full. For the football look, I like to fill a piping bag with some frosting and pipe a small mound on top after baking. This helps create a more rounded, football-like shape when you add the fondant or icing decorations. Or, for a more rustic look, just bake and decorate once cooled.
Step 7: Bake
Pop the tray into the oven and bake for 18-22 minutes. Use a toothpick to check for doneness — it should come out clean. Every oven is a little different, so keep an eye on the cupcakes around the 18-minute mark. Cool in the pan for about 5 minutes, then transfer to a wire rack. Patience is key here; don’t frost them hot or the frosting might melt, but don’t wait too long or they’ll get sticky or dry.
Step 8: Cool & Glaze
Once cupcakes are at room temperature, it’s time to decorate. Mix the powdered sugar, milk, and vanilla until smooth — you want a slightly thick consistency that holds its shape. Spread or pipe the frosting onto each cupcake. For that football look, pipe a stripe of frosting lengthwise, then carefully pipe the laces using royal icing or melted white chocolate. I love using a piping bag fitted with a small round tip for this — it gives me control and makes the laces look neat. Let the laces set a few minutes before adding any finishing touches.
Step 9: Slice & Serve
These cupcakes are best served at room temperature, but I’ve also refrigerated them for a few hours to set the frosting. To serve, use a sharp knife or a cupcake slicer for clean cuts. I like to place mine on a big platter with some green sprinkles or mini footballs around for extra fun. Whether you’re serving these at a tailgate, a kids’ birthday, or just a casual watching party, they’re guaranteed to be a hit. Don’t forget to snap photos — they look adorable and will make your friends jealous!
What to Serve It With
These football cupcakes are pretty much a complete treat on their own, but pairing them with a few game-time favorites makes everything even better. For breakfast or brunch, serve with some fresh fruit and cold milk or coffee — these cupcakes are rich, so a little fresh contrast helps balance things out. When it’s time for a casual snack or dessert, I love setting out a tray of mixed nuts, popcorn, and mini sliders alongside. If you want to keep it simple, a pitcher of cold lemonade or bubbly sparkling water garnished with lemon slices makes the perfect refreshment. And if you’re feeling extra festive, arrange some football-themed decor and voilà — your spread is ready! For me, nothing beats sitting around with my family, munching on these sweet little footballs and cheering for our team. I’ve also made these for school parties, where they become the cutest centerpiece. The best part? These cupcakes not only look adorable but taste even better — and that’s a winning combo!
Top Tips for Perfecting Your Football Cupcakes
Over the years, I’ve picked up a few tricks for perfecting these little gems. First, when preparing your zucchini or vegetables for baking, I’ve found pressing out excess moisture really helps keep the cupcake moist without making it too dense. For the batter, always sift your dry ingredients first — it makes a noticeable difference in the final texture. When it comes to decorating, I recommend using royal icing for the laces because it dries hard and gives that crisp, detailed look. If you don’t have royal icing, melted white chocolate works like a charm — just be gentle with the piping, and let it set at room temperature. Want to make these cupcakes even more colorful? Use gel food coloring for your frosting or fondant accents. I tested egg-free options with applesauce substitutions, and while the flavor stayed great, the texture was slightly different — still delicious, but a little denser. Baking-wise, if your cupcakes aren’t browning evenly, rotate the tray halfway through cooking. Also, adjusting your oven rack slightly lower can help prevent the tops from over-browning before the insides are done. As for the glaze, I recommend adding a splash of vanilla or even a pinch of cinnamon to give it a unique twist — trust me on this one, it elevates the simple sweetness. Overall, don’t be afraid to experiment with colors, flavors, and textures. Baking is all about fun and making it your own!
Storing and Reheating Tips
If you’re making these cupcakes in advance, here’s how to keep them fresh. At room temperature, they’re good for about 24 hours, covered loosely with plastic wrap or stored in an airtight container. To keep them moist and prevent the frosting from drying out, I recommend refrigerating if you’re not eating them immediately, especially in warm weather. Just be sure to cover each cupcake well or store them in a cake carrier. If you need to freeze, wrap each cupcake individually with plastic wrap, then place in a resealable freezer bag — they’ll stay good for up to 3 months. When you’re ready to serve, thaw them overnight in the fridge and bring to room temperature before decorating or serving. As for the glaze, wait until the cupcakes are fully cooled before adding it to avoid melting or runoff. If they’ve been refrigerated, let them sit out for about 10 minutes before serving to restore their softness. This way, each bite is as fresh and delicious as when first made. I always find that the little extra effort to store them properly makes a huge difference in flavor and look!
Frequently Asked Questions
Final Thoughts
There’s just something so joyful about decorating and biting into these football cupcakes. They’re simple enough for a beginner baker, fun for kids, and stylish enough to impress your friends at your next game day gathering. Every time I make them, I feel a little bit of that childhood excitement — maybe it’s the smell of fresh-baked cupcakes or the joy of piping those tiny laces — but I know they bring a smile to everyone’s face. These cupcakes also remind me that sometimes, the best recipes are the ones that bring a little extra cheer into our busy lives. I hope you give this recipe a try and make some memories of your own. If you do, I’d love to hear about it — share your photos, customizations, or favorite game-day traditions in the comments! Happy baking, and here’s to many more sweet, sporty moments with your loved ones!
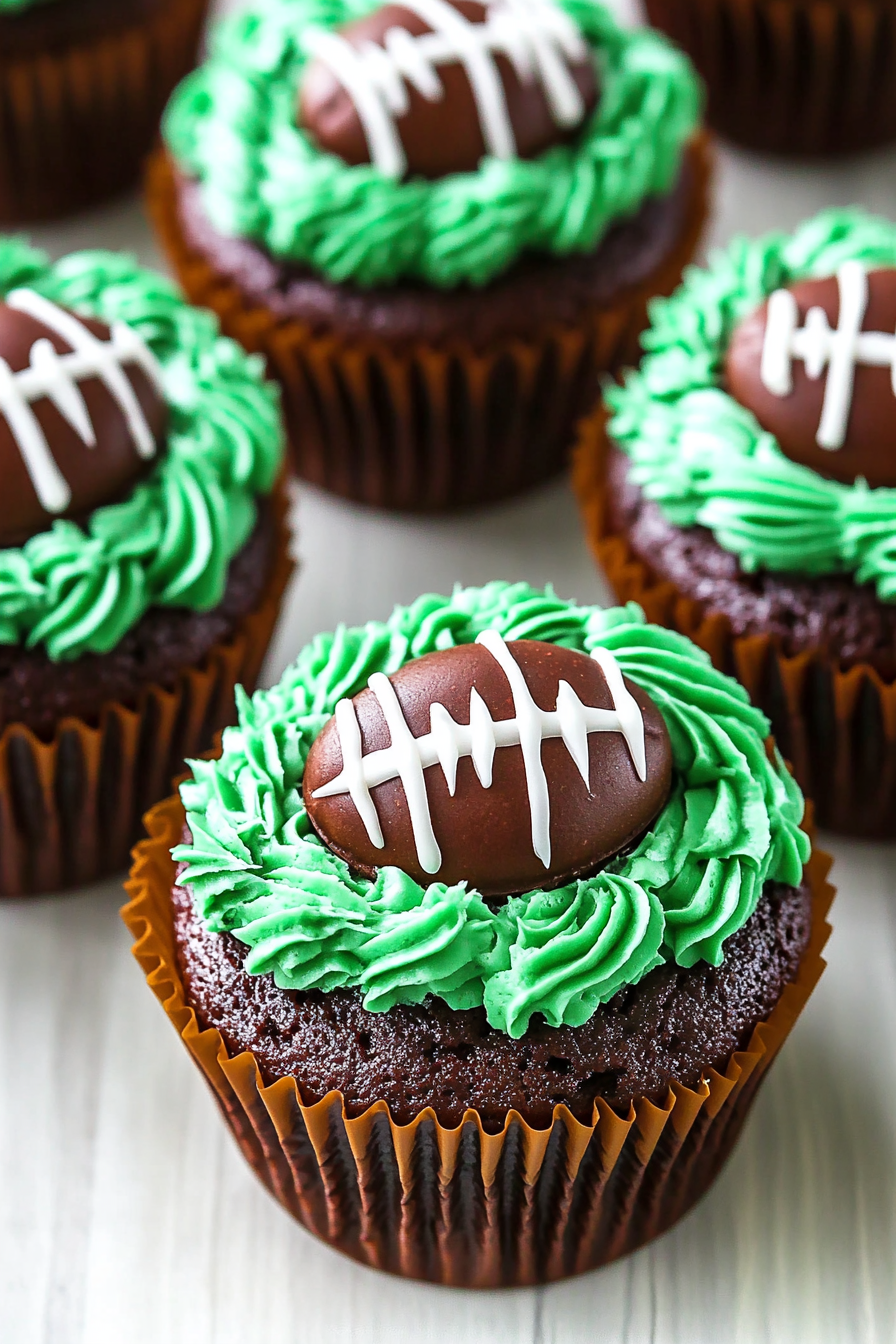
Football Cupcakes
Ingredients
Method
- Preheat oven to 300°F and prepare cupcake liners in a muffin tin.
- Combine flour, sugar, cocoa powder, baking soda, and salt in a large bowl and set aside.
- Whisk egg, milk, vegetable oil, and vanilla in a medium bowl until mixed.
- Add wet ingredients to dry and mix until smooth. Incorporate water until batter is thin.
- Fill cupcake liners halfway with batter and bake for 18-23 minutes; cool before frosting.
- Beat softened butter until creamy. Mix in half of powdered sugar and vanilla.
- Add remaining powdered sugar, heavy cream, and salt; beat until fluffy.
- Separate some vanilla buttercream for white color, dye remaining green.
- Mix cocoa powder into remaining buttercream for chocolate color.
- Fill piping bags with chocolate and green buttercream. Pipe football and grass decorations on cupcakes.
- Use white buttercream to pipe laces onto the footballs.
- Serve cupcakes immediately or store in airtight container for up to 4 days.