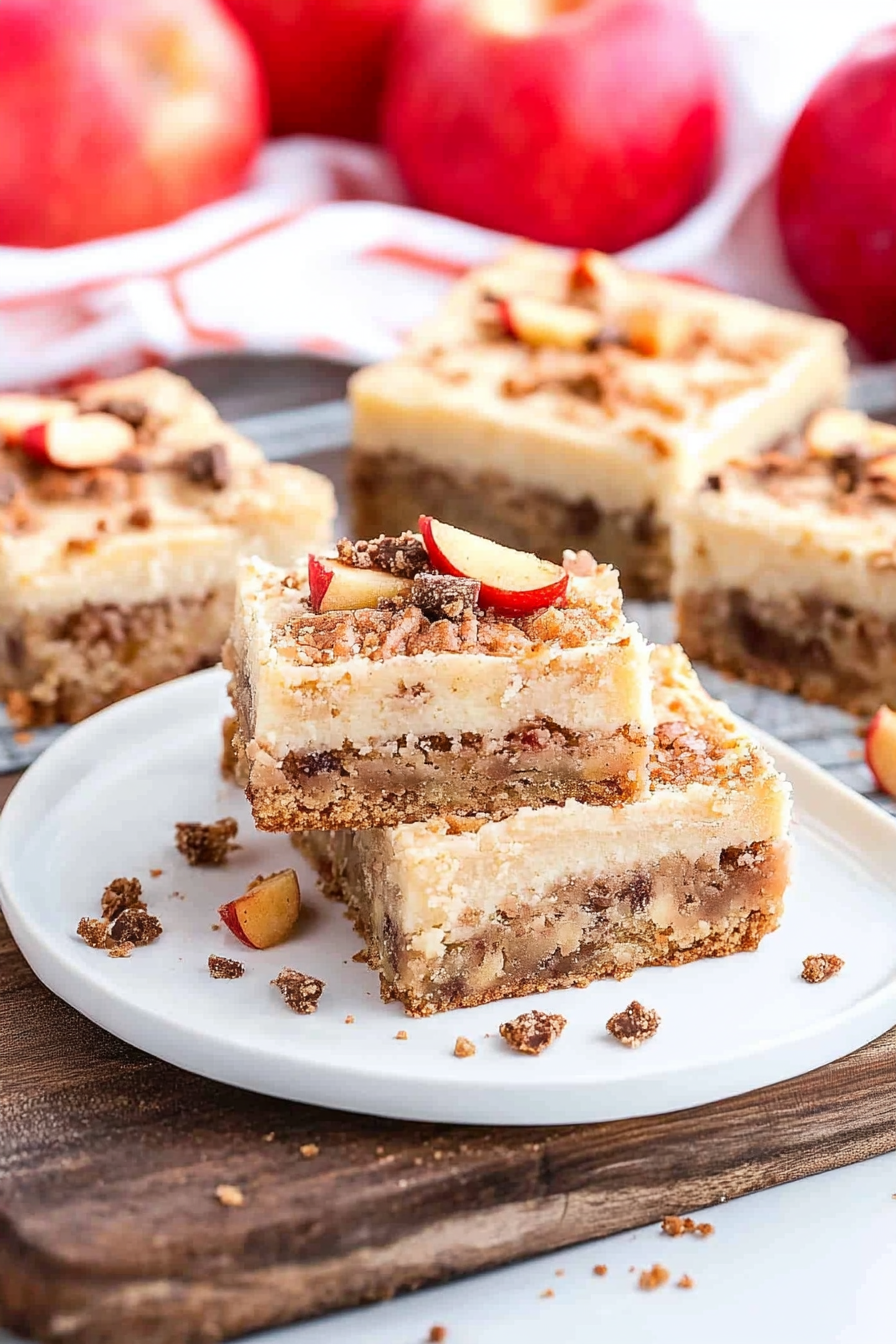
Golden Apple Blondies with Caramel Buttercream
Honestly, there’s something so comforting about crumbly, gooey, sweet treats that remind me of lazy weekend mornings or cozy afternoons spent baking with my kids. A few years ago, I stumbled upon this recipe for apple blondies, and I swear, it’s become one of those “go-to” desserts I love making when I need a quick comfort bite. The aroma of baked apples, cinnamon, and vanilla wafting through the kitchen as they come out of the oven? Pure magic. They’re kind of like a cross between apple crumble and a blondie, but way easier than pie and just as satisfying. Plus, I always do this when I want something sweet but don’t want to fuss with complicated layers or crusts. Honestly, this one’s a lifesaver on busy nights or when friends stop by unexpectedly. Trust me — once you try these apple blondies, they’ll be a family staple too. Just wait until you see how quickly they disappear!
What is an apple blossom?
Think of apple blondies as a soft, buttery bar cookie packed with chunks of fresh apples and a hint of cinnamon — it’s essentially a cozy, fruit-filled variation of the classic blondie. Unlike brownies, which are rich and chocolatey, blondies are more about vanilla, butter, and caramel undertones, making them lighter but no less indulgent. The idea behind apple blondies is simple: sweet, tender squares infused with chopped apples that add moisture and a slight tartness, balancing the sweetness beautifully. They’re kind of like a comforting apple cake but in a portable, bite-sized form that’s perfect for snacking or dessert. The name “blondie” comes from the caramel color, thanks to the brown sugar-viscous batter, and by adding apples, you get a fruity, farm-fresh twist. So, it’s really a blend of baked good love — soft, chewy, and full of flavor — with a little seasonal flair.
Why you’ll love this recipe?
First off, what I love most about these apple blondies is how instant the cozy factor is — one bite, and my whole kitchen smells like cinnamon-spiced apple heaven. The flavor? Absolutely divine — the caramel notes of the brown sugar, the tender bites of apple, and that warm hit of cinnamon creating a perfect harmony. And if you’re like me, you’ll adore how easy these are to whip up. No complicated layering or fancy techniques — just a simple batter, some chopped apples, toss it in a pan, and bake. Plus, the ingredients are pretty much staples in my pantry and fridge: butter, brown sugar, flour, apples, cinnamon, and a few extras. They’re budget-friendly, too, which is a bonus. Most of all, I love how versatile they are. You can dress them up with nuts or drizzles, or keep them simple and let the apples shine. My kids ask for these all the time, and I’ve even brought them to potlucks, where they disappear faster than I can say “delicious!” Honestly, they’re proof that simple ingredients can make something extraordinary.
How do I make Apple Blondies?
Quick Overview
This recipe is as easy as mixing a few staples, folding in chunks of fresh apple, and baking until golden. The batter comes together in minutes — no fancy gadgets required — then you layer in the chopped apples and swirl them into the batter. Baking at a moderate temperature ensures the blondies turn out moist on the inside with a slightly crisp edge. Once out of the oven, a drizzle of glaze or dusting of powdered sugar makes them irresistible. I’ve tested this countless times, and what makes this so great is that you don’t have to be a baking pro to get it right. It’s forgiving, adaptable, and perfect for those weekends when you want something homemade but don’t want to spend hours in the kitchen.
Ingredients
For the Main Batter:
– 1 cup unsalted butter, melted (trust me, real butter makes a difference)
– 1 cup packed brown sugar (the kind that’s slightly caramel-y)
– 2 large eggs
– 1 teaspoon vanilla extract
– 2 cups all-purpose flour
– 1 teaspoon baking powder
– ½ teaspoon salt
– 1 teaspoon ground cinnamon
For the Filling:
– 2 large apples, peeled and chopped (Granny Smith or Fuji work great)
– 1 tablespoon lemon juice (to keep the apples from browning)
– 2 tablespoons sugar (to toss with apples for extra sweetness)
For the Glaze:
– ½ cup powdered sugar
– 1-2 teaspoons milk or cream
– A splash of vanilla or a sprinkle of cinnamon (optional for added flavor)
Step-by-Step Instructions
Step 1: Preheat & Prep Pan
Set your oven to 350°F (175°C). Grease a 9×9-inch baking pan with butter or line it with parchment paper — trust me, parchment keeps things simple for cleanup. You want the pan ready so as soon as your batter’s mixed, you can pop it straight in. If I’m in a rush, I’ll even spray with cooking spray and sprinkle a tiny bit of flour — it’s foolproof every time.
Step 2: Mix Dry Ingredients
In a small bowl, whisk together the flour, baking powder, salt, and cinnamon. Doing this first evenly distributes the leavening and flavors, which helps prevent clumping and makes your blondies rise perfectly — nobody wants flat patches in their bars!
Step 3: Mix Wet Ingredients
In a large bowl, combine the melted butter and brown sugar. Whisk vigorously until smooth and slightly shiny — this helps dissolve the sugar and creates that beautiful caramel color. Add eggs one at a time, mixing well after each. Then stir in vanilla. The batter will be thick but silky — think of a soft, spreadable dough.
Step 4: Combine
Gradually add the dry ingredients to the wet mixture, folding gently to avoid overmixing. Overmixing can make the blondies tough, so just mix until everything is combined — it should be smooth but not gloopy.
Step 5: Prepare Filling
In a small bowl, toss chopped apples with lemon juice and sugar. The lemon keeps them from browning and brightens the flavor. If you want to add a little nutty depth, a handful of chopped pecans or walnuts stirred in works beautifully here, but I usually keep it simple so the apples stay the star.
Step 6: Layer & Swirl
Spread half of the batter into your prepared pan. Sprinkle half of the apple mixture over it, then add remaining batter on top. Use a butter knife or skewer to swirl the apples into the batter, creating marbled patterns that look as beautiful as they taste. This swirl technique helps everyone get a bit of apple in every bite!
Step 7: Bake
Pop into the oven and bake for about 25-30 minutes. You want the edges golden and a toothpick inserted into the center coming out with a few moist crumbs — not wet batter. Oven times can vary, so start checking around 25 minutes. I usually poke the center gently; if it feels set, they’re done!
Step 8: Cool & Glaze
Let the blondies cool in the pan for at least 15 minutes — this helps them set. Once cooled, drizzle your prepared glaze over the top. The sweetness of the glaze balances the tender apples and gives a lovely shine. If you prefer, dust with powdered sugar for a more rustic look.
Step 9: Slice & Serve
Use a sharp knife for clean cuts. I like to slice these into squares or rectangles, depending on my mood. Serve slightly warm or at room temperature — both are amazing, but I think warm with a scoop of vanilla ice cream is pure heaven. They’re great for breakfast, a snack, or dessert, and the cozy aroma alone will draw everyone into the kitchen.
What to Serve It With
For breakfast, pair a warm apple blondie with a strong cup of coffee or a cup of spiced chai — it’s like a slice of autumn morning. If I really want to elevate it for brunch, I’ll add a dollop of whipped cream or a drizzle of caramel sauce. As a dessert, it’s perfect with a scoop of vanilla or cinnamon ice cream, or even a simple dusting of powdered sugar. My kids love these slightly warmed, topped with a handful of crushed nuts or a drizzle of honey. They’re also perfect for a cozy night in — just grab a mug of hot cider or mulled wine, and you’re all set. I’ve made these for school potlucks and had to hide a couple away because everyone kept sneaking bites. No matter how you serve them, they bring a warm, comforting vibe that everyone appreciates.
Top Tips for Perfecting Your Apple Blondies
After baking these a hundred times, I’ve picked up a few tricks I swear by:
- Zucchini Prep: Not needed here, but if you want to add shredded zucchini for extra moisture, make sure to squeeze out as much moisture as possible — otherwise, your blondies could turn out too wet.
- Mixing Advice: Gently fold, don’t overmix. Overmixing develops gluten and can make your blondies dense instead of tender.
- Swirl Customization: For a prettier pattern, drop spoonfuls in alternate layers and swirl gently with a skewer. A little cinnamon or cocoa powder swirling can add visual interest too.
- Ingredient Swaps: Almond flour can substitute half of the all-purpose flour for a nutty flavor, or coconut sugar for a deeper caramel note. Adjust baking time slightly if using different flours.
- Baking Tips: Each oven is different — start checking at 25 minutes. If the top is browning too fast, loosely tent with foil.
- Glaze Variations: Mix in a pinch of cinnamon or a splash of bourbon for more depth. For a dairy-free option, use coconut milk in the glaze.
Honestly, my best advice is to taste as you go — the smell alone will tell you when they’re just right. I’ve learned to trust my instincts after years of making these. Small tweaks, like adding a dash of nutmeg or swapping out the apples for pears, can make this recipe uniquely yours. And don’t rush the cooling stage — patience makes these bars cut perfectly and look beautiful on your plate.
Storing and Reheating Tips
This is one of those treats that tastes almost better the next day. Store leftovers in an airtight container at room temperature for about 2 days, covered with a clean towel or plastic wrap. If you want to keep them longer, pop them in the fridge for up to 5 days — just bring them to room temp or microwave briefly for that fresh-baked feel. Storing in the fridge can sometimes make the glaze a little less shiny, so I like to add the glaze just before serving if I’ve stored them. For freezing, wrap tightly in plastic wrap and then foil, and they’ll stay good for up to 3 months. Thaw at room temp and reheat gently in the microwave if needed. Trust me, these blondies are hearty and resilient, and a quick warm-up makes them taste just baked.
Frequently Asked Questions
Final Thoughts
Honestly, I can’t emphasize enough how these apple blondies have become a little piece of my comfort food arsenal. They’re simple enough to whip up on a weekday but special enough to serve at family gatherings. The combination of tender apples, cinnamon, and buttery batter feels like a warm hug. One of my favorite parts is how adaptable they are — I’ve added raisins, swapped the apples for pears, and even experimented with a touch of ginger. Every time, they turn out delicious. If you give this a try, I’d love to hear how yours turned out! Leave a comment or share your twist — the kitchen’s always a little brighter with a good baking adventure. Happy baking, and don’t forget to savor every bite!
Apple Blondies with Caramel Glaze
Ingredients
Method
- Preheat oven to 350°F. Line a 9-inch square baking dish with parchment paper.
- In a small bowl, toss diced apples with ground cinnamon and a tablespoon of flour. Set aside.
- In a large bowl, mix melted butter and brown sugar until smooth. Add egg and vanilla, beat until combined.
- Gradually add remaining flour and salt into the wet mixture. Mix just until incorporated.
- Fold in diced apples and toffee bits. Pour batter into prepared pan and spread evenly.
- Bake for 25 minutes or until a toothpick inserted in the center comes out clean.
- Let blondies cool completely before preparing the glaze.
- For the glaze, beat softened butter, powdered sugar, caramel sauce, and heavy cream until smooth and creamy.
- Spread the caramel glaze over cooled blondies. Sprinkle additional toffee bits on top if desired.