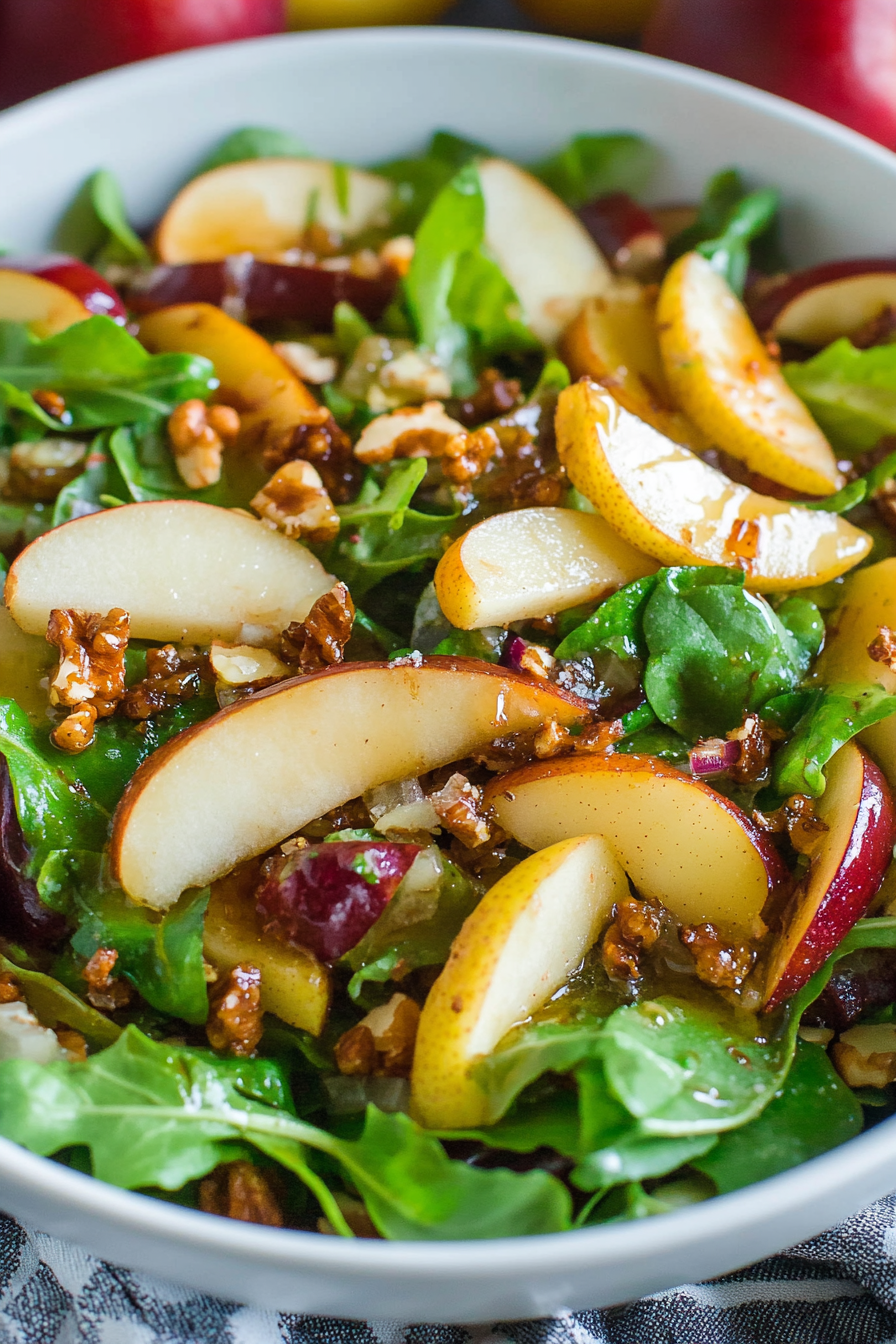
Harvest Pear Salad With Balsamic Dressing
Honestly, there’s something about a perfectly ripe pear that just makes my heart happy. I remember my grandma slicing cold pears over her breakfast cereal, the juice dribbling down her chin, that sweet, mellow aroma filling the kitchen. That simple moment stuck with me, and now every time I make this pear salad, I feel like I’m reconnecting with her in some quiet, comforting way. It’s funny how something so straightforward—just fruit and a few extras—can turn into a real showstopper on the table. It’s kind of my secret weapon when I want a fresh, impressive dish without spending hours in the kitchen. Plus, it’s undoubtedly one of those recipes that my kids ask for on repeat, especially when I want to sneak some crunch and freshness into their day. This pear salad is essentially that perfect balance of sweet and tangy with just enough crunch. It’s incredible how such simple ingredients can come together into something so memorable. I always do this when I want a light lunch or a quick side—trust me, once you try it, it’s going to be part of your regular lineup too.
What is a pear salad?
Think of pear salad as the elegant cousin of your everyday fruit bowl—it’s bright, fresh, and a little bit fancy. The name pretty much says it all: it’s a salad built around ripe, juicy pears, complemented by a mix of crunchy nuts, tangy cheese, and sometimes a pop of herbs or citrus. It’s essentially a celebration of textures and flavors—crisp, smooth, sweet, and savory, all in one bowl. The concept is pretty straightforward, but the magic really happens in how you combine your ingredients. Some people like to keep it super simple with just pears and arugula, while others love layering flavors with creamy cheese or a honey-balsamic drizzle. It’s a dish that’s as versatile as it is delicious—great for a quick lunch, a side at dinner, or even a pretty appetizer for friends. I love how it’s one of those recipes that feels both casual and elegant—perfect for when you want to impress without any fuss.
Why you’ll love this recipe?
What I adore most about this pear salad is how flexible and forgiving it is—it’s a real “grab-and-go” kind of dish, but it looks so refined. The flavor profile is just divine — sweet pears mingling with the nutty crunch of almonds or walnuts, sharp bites of cheese, and sometimes a hint of fresh herbs or citrus zest. The smell alone when you’re tossing everything together is enough to make everyone in the house come rushing to the kitchen. Plus, it’s super easy to put together; I’ve made this countless times on busy weeknights when I don’t want to fuss but still want something special. Ingredients are budget-friendly, and you probably already have most of them lurking in your fridge or pantry. What’s also fun — and actually quite clever — is the versatility: you can toss in cranberries for a touch of tartness, swap out the cheese for goat or blue, or add a sprinkle of pomegranate seeds for color and pop. This salad is such a wardrobe staple for me because it’s a fresh, vibrant way to elevate your meal—light, satisfying, and honestly, just really delicious.
How do I make a pear salad?
Quick Overview
Putting together this pear salad is honestly a breeze. You start by prepping your pears—simply slicing them into thin, bite-sized pieces—and then tossing them with your choice of greens or herbs. Next, you add crunchy nuts and crumbly cheese for texture and flavor. The dressing is a simple mix of olive oil, lemon juice, and a little honey, which you whisk up in a minute. Combine everything gently, add your favorite garnishes like pomegranate seeds or fresh herbs, and voilà — dinner or lunch is served! What makes this recipe special is how effortlessly it comes together while delivering maximum flavor. It’s perfect when you want something fresh but don’t want to spend ages chopping or cooking. Seriously, I always have these ingredients on hand, and once you see how quick it is, I bet it’ll become one of your go-to salads too.
Ingredients
For the main salad: What is the best way to prepare it?
– 3 ripe pears (Bartlett or Anjou work beautifully). Make sure they’re just soft enough to give a little when pressed but not mushy. I always do this when I want a nice balance of sweetness and texture.
– 4 cups mixed greens or arugula for a peppery punch
– ½ cup crumbled goat cheese or feta (for that creamy tang)
– ½ cup toasted nuts (like walnuts, pecans, or almonds—your choice!)
– ¼ cup pomegranate seeds or dried cranberries (optional, for a splash of color and tartness)
– Fresh herbs like mint or basil for an extra zing (if you’re feeling adventurous!)
For the Dressing:
– 3 tbsp olive oil (good quality, it makes all the difference)
– 1 tbsp lemon juice (fresh squeezed, always)
– 1 tsp honey or maple syrup (trust me on this, it balances everything perfectly)
– Salt and black pepper to taste
Step-by-Step Instructions
Step 1: Preheat & Prep Pan
No oven involved here — just grab your chopping board and a good sharp knife. I like to have everything within reach — pears sliced, nuts toasted, cheese crumbled — so the assembly goes quickly. If you want toasted nuts, I always do this in a dry skillet over medium heat for 3 minutes until fragrant. Keep an eye on them; burnt nuts are heartbreaking but easy to avoid with a quick stir!
Step 2: Mix Dry Ingredients
Since we’re assembling fresh, there’s not a lot of dry mixing involved—just see that your nuts are toasted and your cheese crumbled before you start. This step is mainly about prepping your ingredients for assembly—making sure the nuts are crunchy and cheese is ready to sprinkle.
Step 3: Mix Wet Ingredients
Combine the olive oil, lemon juice, honey, salt, and pepper in a small jar or bowl. Whisk vigorously or shake it up. It’s so simple but makes all the difference—bright, tangy, and slightly sweet. I like to taste it first and adjust—sometimes I add a little more honey or lemon depending on my pears’ sweetness.
Step 4: Combine
Gently toss your greens with the sliced pears and dressing. Be careful not to crush the pears—they’re the star, after all! I prefer to do this in a large bowl, then add the nuts and cheese last, so they stay crunchy and fresh.
Step 5: Prepare Filling
If you’re adding extras like cranberries or herbs, sprinkle them on now. If you want a little more tang or sweetness, a drizzle of honey or a sprinkle of lemon zest works wonders. This is your chance to customize based on what you love!
Step 6: Layer & Swirl
If you’re feeling fancy, try stacking ingredients to create layers or swirl the pears and cheese for a pretty marbled effect. Honestly, just tossing everything together works fine too! I sometimes do a quick swirl with a fork to get a nice mix of flavors with a beautiful look.
Step 7: Bake
No baking needed here—this salad is fresh! But if you’re adding roasted nuts or warm elements, you can toast the nuts in advance and add right before serving.
Step 8: Cool & Glaze
Again, no baking. Just serve immediately so everything stays crisp and vibrant. If you want a glossy finish, a quick drizzle of honey or balsamic glaze just before serving makes it look restaurant-perfect.
Step 9: Slice & Serve
The pears are best sliced just before serving to keep their shape and texture. I use a sharp knife, slicing thin or chunky — whatever you prefer. Plate it up nicely, maybe with a few extra herbs or a sprinkle of nuts on top, and enjoy!
What to Serve It With
This pear salad is so versatile, I often think of it as part of a larger meal or as its own shining star. For breakfast, serve it alongside a cup of strong black coffee and some crusty bread for a light yet satisfying start. On brunch days, I like making a platter with sliced baguette, some charcuterie, and this salad for a fresh, colorful spread—people always ask for the recipe! For dinner, it’s an excellent side to roasted chicken or fish; the sweetness of the pears pairs beautifully with anything savory. I love to sprinkle some toasted walnuts and serve it with a chilled glass of white wine for a casual evening. And when I want a quick dessert, I’ll just add a handful of pomegranate seeds and drizzle a little balsamic glaze. It’s such a fresh finish to any meal. Honestly, my family loves how the flavors burst in every bite—sometimes I even sneak it into school lunches or pack it for picnics because it’s portable and never gets soggy. The freshness and crunch always make it feel like a special treat, no matter the occasion.
Top Tips for Perfecting Your Pear Salad
These little tricks will make your pear salad truly shine. First, choose your pears wisely—firm but ripe is the way to go. I’ve made the mistake of using overly soft pears and ending up with mushy messes, so now I wait until they yield just slightly when pressed. When slicing, use a sharp knife to avoid squashing the fruit and make clean cuts—this keeps the pear slices beautiful and intact. Toast your nuts well—it really brings out the flavor; I do this in a skillet and keep stirring until golden. A tip I learned after a few failed attempts: add the nuts last to keep their crunch. For a more striking look, try layering the ingredients or swirling the dressing into the salad in a zig-zag pattern. When it comes to ingredient swaps, ricotta cheese can replace feta for a milder taste, while walnuts can be swapped for pecans for a richer flavor. I’ve also tested a version with balsamic vinegar instead of lemon, which is fantastic if you want a deeper, caramelized sweetness. Basing the salad on fresh, high-quality ingredients makes all the difference—trust me, a little goes a long way. And don’t forget—taste as you go, adjusting the acidity and sweetness. That’s how I learned to perfect my homemade version!
Storing and Reheating Tips
This salad is best fresh, but if you’ve got leftovers, don’t worry—there are ways to keep it tasty. For short-term storage, cover it tightly with plastic wrap or store in an airtight container in the fridge for up to a day. Just note that fresh pears can soften a bit over time, so I recommend adding extra lemon juice or a splash of vinegar to keep their color vibrant. If you want to make it ahead, keep the dressing separate until just before serving—this keeps everything crisp and fresh. For longer storage, I’ve frozen the toasted nuts and kept the cheese in a separate container—just a quick thaw before adding to the salad. As for reheating, I don’t really recommend tossing it back into the oven because it’s meant to be fresh and lightly assembled. If your pears have softened too much, a quick sprinkle of extra lemon juice or a dash of olive oil can perk it right back up. Honestly, I think the key is to enjoy it soon after it’s made—the vibrant flavors really shine at their best when fresh.
Frequently Asked Questions
Final Thoughts
This pear salad is one of those recipes I turn to when I want something that’s fresh, satisfying, and a little bit special, without fussing over complicated steps. The beauty is how you can customize it—more cheese, more nuts, extra herbs—making each batch your own. It’s a comforting dish that reminds me of lazy, sunny afternoons or family dinners when everyone goes for seconds. Once you’ve got the hang of it, I bet it’ll become a regular in your meal rotation too. I always say the best recipes are the ones you can tweak and make your own, and this one definitely hits that mark. So go ahead—grab some ripe pears, toss everything together, and enjoy the burst of flavors. Happy eating, and I’d love to hear how yours turns out—share your tweaks and pictures below! Eating good food should always be a little celebration, and this pear salad is pure joy on a plate.
Pear Salad with Balsamic Vinaigrette
Ingredients
Method
- Add olive oil, balsamic vinegar, honey, dijon mustard, diced shallot, salt, and pepper to a blender and blend until well emulsified.
- Cook butter with light-brown sugar in a skillet over medium heat until melted, then add walnuts and cook until caramelized, about 2 minutes. Transfer to a plate to cool.
- Layer lettuce and sliced pears in a large bowl. Toss with dressing, then top with shaved parmesan, dried cranberries, and candied walnuts before serving.