Haunted Marble Cake How to Bake It
You know, I was trying to think about what makes a perfect Halloween treat. It’s not just about the spooky decorations, right? It’s about that feeling of cozy excitement, that little thrill of anticipation. This year, I really wanted to nail that feeling with a cake that’s not just a showstopper but also ridiculously delicious and, honestly, not a total nightmare to make. I’ve tried so many Halloween cake recipes over the years, from super elaborate tiered wonders that took me days (and nearly cost me my sanity) to simple sheet cakes that felt… well, a bit too simple. This one, though? This Halloween cake strikes that perfect balance. It’s got that rich, comforting flavor that makes you want to curl up with a mug of cider, but it also has this fun, festive flair that my kids absolutely adore. It’s the kind of cake that makes everyone ask for the recipe, and I’m so excited to finally share it with you!
What is this Spooky Delight?
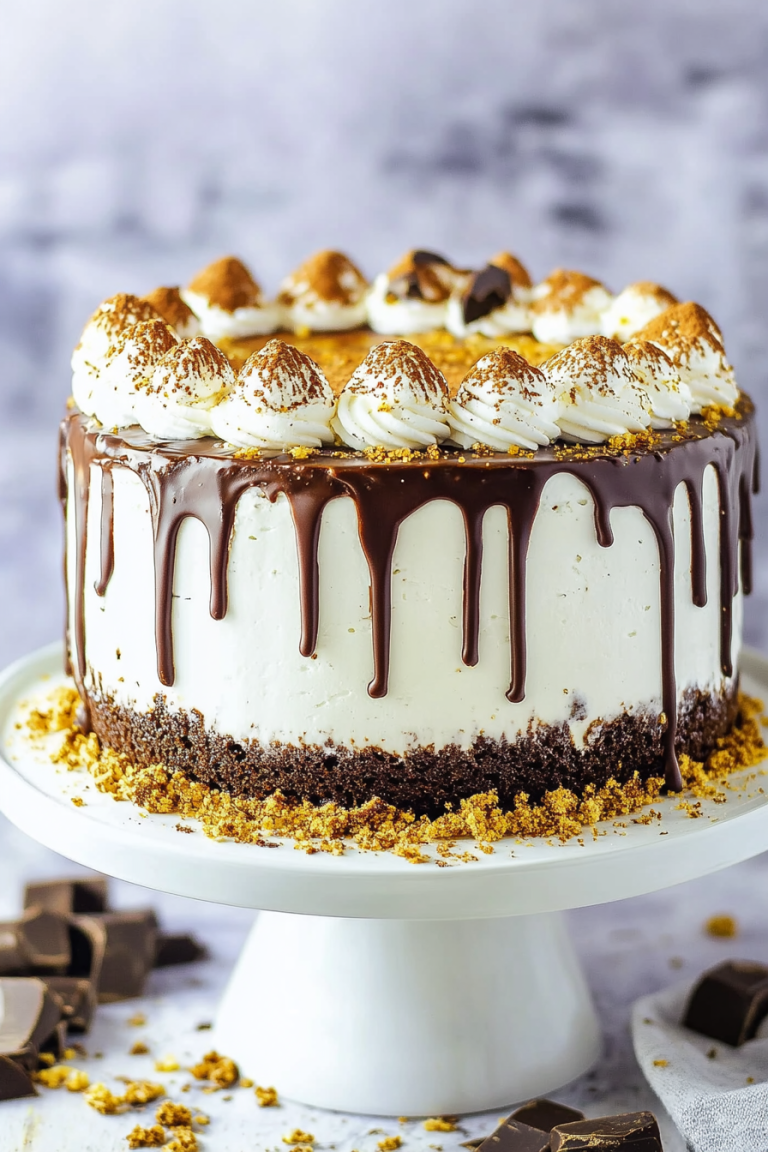
So, what exactly is this magnificent creation I’m calling my Ultimate Halloween Cake? Think of it as a deeply flavored, moist chocolate cake that’s kissed with just a hint of something unexpected – a touch of cinnamon and maybe even a whisper of coffee that just makes the chocolate sing. It’s not overly sweet, which I love, so you can really taste the quality of the cocoa. We’ll then add a luscious, creamy filling that’s reminiscent of a rich chocolate ganache but with a delightful twist that makes it even more spreadable and decadent. And to top it all off, a dark chocolate glaze that’s glossy and utterly irresistible. The “Halloween” part really comes alive with how we assemble and decorate it. It’s designed to be a bit dramatic, a bit mysterious, and totally delightful to look at, making it the star of any Halloween gathering or even just a fun weekend baking project. It’s essentially a crowd-pleasing chocolate cake elevated for the season!
Why you’ll love this recipe?
What is the secret behind this delicious cake?flavor. This isn’t just any chocolate cake; it’s a rich, deeply satisfying chocolate experience. The subtle notes of cinnamon and espresso powder aren’t overpowering; they just enhance the chocolate, giving it an incredible depth that you just don’t find in many homemade cakes. It’s the kind of flavor that makes you close your eyes and savor every bite. Then there’s the simplicity. I know, I know, “Halloween cake” can sound intimidating. But trust me, this recipe is designed for real life. The batter comes together in one bowl (yes, one bowl!), and the filling is just as straightforward. Even the decorating is more about rustic charm than perfect precision. It’s surprisingly easy to achieve a stunning result. And let’s talk about Cost-efficiency: What is the best way to measure cost-efficiency?. I’ve made this with pantry staples I always have on hand, and even the special touches feel incredibly budget-friendly. You don’t need fancy, expensive ingredients to make something truly spectacular. Plus, the versatility is amazing. While it’s perfect for Halloween, the base cake is so good, you could easily adapt it for any occasion – add sprinkles for a birthday, a different frosting for Christmas. You can serve it as is, or get creative with your decorations. What I love most about this cake is that it feels special enough for a party but comforting enough for a quiet night in. It’s a reliable recipe that always gets rave reviews, and honestly, that’s priceless.
How to Make My Halloween Cake
Quick Overview
This cake is all about building layers of deliciousness with minimal fuss. We’ll start by whipping up a wonderfully moist chocolate cake batter in just a few easy steps. While that bakes to perfection, we’ll prepare a rich, spreadable chocolate filling. Then, the magic happens as we layer these components and create a beautiful, swirled effect before baking it all together. Finally, a simple yet elegant chocolate glaze finishes it off, making it ready for its spooky debut. It’s designed to look impressive without requiring advanced pastry skills, making it perfect for beginners and seasoned bakers alike.
Ingredients
For the Main Chocolate Cake Batter:
2 ½ cups all-purpose flour (I always use unbleached for a better texture)
1 ½ cups granulated sugar (you can reduce this by ¼ cup if you prefer it less sweet)
¾ cup unsweetened cocoa powder (Dutch-processed is my favorite for a deeper color and smoother flavor)
1 ½ teaspoons baking soda
1 teaspoon baking powder
½ teaspoon salt
1 teaspoon ground cinnamon (don’t skip this, it’s the secret!)
1 tablespoon instant espresso powder (enhances chocolate without making it taste like coffee)
2 large eggs, at room temperature
1 cup buttermilk, at room temperature (if you don’t have buttermilk, you can make your own by adding 1 tablespoon of white vinegar or lemon juice to 1 cup of milk and letting it sit for 5-10 minutes)
½ cup vegetable oil (or any neutral-flavored oil)
1 teaspoon pure vanilla extract
1 cup hot water or hot brewed coffee (this really blooms the cocoa and makes it moist!)
For the Luscious Chocolate Filling:
8 ounces cream cheese, softened (full-fat is best for richness)
½ cup unsalted butter, softened
1 cup powdered sugar, sifted
½ cup unsweetened cocoa powder, sifted
1 teaspoon pure vanilla extract
2-3 tablespoons milk or heavy cream (for adjusting consistency)
For the Dark Chocolate Glaze:
1 ½ cups powdered sugar, sifted
⅓ cup unsweetened cocoa powder, sifted
4-6 tablespoons milk or heavy cream
½ teaspoon vanilla extract
Pinch of salt
Step-by-Step Instructions
Step 1: Preheat & Prep Pan
First things first, let’s get our oven preheated to 350°F (175°C). This is crucial for an even bake. Now, grab a 9×13 inch baking pan. I like to grease it really well with butter or cooking spray and then dust it lightly with cocoa powder instead of flour. This gives the cake a richer color on the edges and prevents any white powdery residue. You can also line the bottom with parchment paper for extra insurance, but I usually find a well-greased and dusted pan does the trick.
Step 2: Mix Dry Ingredients
In a large mixing bowl, whisk together the flour, granulated sugar, cocoa powder, baking soda, baking powder, salt, cinnamon, and espresso powder. Whisk them really well – this is your chance to ensure everything is evenly distributed, which means no surprises like a salty bite or a patch of unmixed cocoa in your final cake. You want a homogenous mixture that’s ready to embrace the wet ingredients.
Step 3: Mix Wet Ingredients
In a separate medium bowl, whisk together the eggs, buttermilk, oil, and vanilla extract until they’re well combined. Don’t over-beat, just get them incorporated. Having your eggs and buttermilk at room temperature really helps everything emulsify smoothly, leading to a more tender cake crumb.
Step 4: Combine
Now, pour the wet ingredients into the bowl with the dry ingredients. Using a whisk or a spatula, mix until just combined. Don’t go crazy here; a few lumps are perfectly fine. Overmixing can develop the gluten too much, resulting in a tougher cake. Then, carefully pour in the hot water or hot coffee. This will seem like a lot of liquid, and the batter will become quite thin – that’s exactly what you want! It’s this hot liquid that blooms the cocoa and creates that incredibly moist, tender texture we’re after. Mix until everything is just smooth.
Step 5: Prepare Filling
While the cake batter is resting for a moment, let’s make that dreamy filling. In a medium bowl, beat the softened cream cheese and softened butter together with an electric mixer until they are light and fluffy. Gradually add the sifted powdered sugar and sifted cocoa powder, mixing on low speed until just combined. Then, mix in the vanilla extract. If the mixture seems a little too stiff, add the milk or cream, one tablespoon at a time, until it reaches a smooth, spreadable consistency. You want it to be thick but not stiff, so it swirls beautifully.
Step 6: Layer & Swirl
Pour about half to two-thirds of the cake batter into your prepared baking pan, spreading it evenly. Then, dollop spoonfuls of the cream cheese filling evenly over the batter. Don’t worry about making it perfect; that’s part of the charm. Now, pour the remaining cake batter over the filling. To create that gorgeous swirl effect, take a butter knife or a skewer and gently swirl it through the layers. Don’t over-swirl; you just want to create patterns, not completely mix everything together. A few figure-eights or random strokes will do the trick!
Step 7: Bake
Pop the pan into your preheated oven. Bake for 30-40 minutes, or until a wooden skewer or toothpick inserted into the center comes out with moist crumbs attached, not wet batter. The baking time can vary depending on your oven, so keep an eye on it after the 30-minute mark. You want the edges to be set and slightly pulling away from the sides of the pan.
Step 8: Cool & Glaze
Once baked, let the cake cool in the pan on a wire rack for about 20-30 minutes. This allows it to set up properly. While it’s cooling, whisk together the sifted powdered sugar and sifted cocoa powder for the glaze in a medium bowl. Add the vanilla extract and a pinch of salt. Then, stir in the milk or cream, one tablespoon at a time, until you reach a smooth, drizzle-able consistency. You want it thick enough to coat but thin enough to pour. Once the cake has cooled a bit, pour the glaze over the top, spreading it gently to cover the surface. Let it set slightly before slicing.
Step 9: Slice & Serve
This cake is divine when served warm or at room temperature. I like to let the glaze set for about 15-20 minutes after glazing. Then, using a sharp knife, cut it into squares. For an extra festive touch, you can add some Halloween sprinkles or even some chocolate spiderwebs made with melted white chocolate before the glaze sets completely. It’s already so decadent, but a scoop of vanilla ice cream or a dollop of whipped cream never hurts!
What to Serve It With
This Halloween cake is pretty much a meal in itself, but here are some ways I love to serve it, depending on the occasion:
For Breakfast: Yes, I said breakfast! If you’re feeling indulgent or have a special weekend morning, a small slice of this cake alongside a strong cup of coffee is pure bliss. The chocolate and cinnamon feel surprisingly comforting in the morning. Or, if you want something slightly lighter, try a plain slice with a glass of cold milk. It’s a treat, but a substantial one.
For Brunch: For a more festive brunch spread, I’ll slice this cake and arrange it on a nice platter. It looks fantastic next to fresh fruit like berries or sliced oranges, which cut through the richness beautifully. A small bowl of lightly sweetened whipped cream on the side is always a hit. For beverages, a spiced apple cider or a pumpkin spice latte complements the flavors perfectly.
As Dessert: This is its natural habitat! After dinner, I’ll serve a generous slice, perhaps with a scoop of vanilla bean ice cream or a drizzle of raspberry coulis for a pop of tartness. A small dusting of powdered sugar or some edible Halloween-themed sprinkles on top can elevate it even further. It’s the perfect end to a spooky feast.
For Cozy Snacks: My absolute favorite way to enjoy this cake is during those chilly autumn evenings. I’ll cut a warm-ish slice, snuggle up on the couch with a good book, and pair it with a steaming mug of hot chocolate or a chai tea. It’s pure comfort food, and the rich flavors are just what you need to unwind.
My family has a tradition of making this the night before Halloween, and we always have a “pre-trick-or-treating fuel-up” with a slice. It’s something we look forward to every year!
Top Tips for Perfecting Your Halloween Cake
After making this cake more times than I can count, I’ve picked up a few tricks and learned from a few kitchen oopsies. Here are my top tips to ensure your Halloween cake turns out absolutely perfect:
Zucchini Prep: Wait, zucchini? Oh, my apologies! I was thinking of another recipe for a second there. For THIS Halloween cake, there’s no zucchini involved, which is part of what makes it so straightforward! Just follow the batter steps as written, and you’ll be golden.
Mixing Advice: The biggest pitfall with any cake batter is overmixing. When you combine the wet and dry ingredients, stop mixing as soon as you don’t see streaks of dry flour. A few small lumps are much better than a tough cake. That thin batter with the hot liquid? Resist the urge to add more flour! It’s meant to be that way and creates the magic.
Swirl Customization: For the most striking swirls, don’t overdo it. You want distinct ribbons of the cream cheese filling visible against the chocolate cake. Think of it as painting; gentle strokes are better than vigorously mixing everything together. If you want more contrast, you could even add a tiny drop of orange or green food coloring to a small portion of the cream cheese filling before swirling. But honestly, the plain chocolate swirl is stunning on its own.
Ingredient Swaps: If you’re out of buttermilk, remember that milk with vinegar or lemon juice is a fantastic substitute. For the hot liquid, using coffee truly enhances the chocolate flavor without making it taste like coffee, but hot water works perfectly well too. If you don’t have espresso powder, you can omit it, but it does add a lovely depth. For the filling, if you find your cream cheese or butter isn’t softening properly, a few seconds in the microwave on low power can help, but be careful not to melt it!
Baking Tips: Always use the oven rack in the center of your oven. This ensures even heat distribution. I’ve learned that ovens can run hot or cold, so using an oven thermometer is a lifesaver. If your cake is browning too quickly on top before the center is cooked, you can loosely tent it with foil during the last 10-15 minutes of baking. To test for doneness, a toothpick should come out with moist crumbs, not wet batter. If it comes out completely clean, it might be slightly overbaked, but it will still be delicious!
Glaze Variations: The key to a perfect glaze is achieving the right consistency. Start with the minimum amount of liquid and add more gradually until it’s pourable but not runny. If you accidentally make it too thin, you can whisk in a little more sifted powdered sugar. If it’s too thick, add a tiny splash of milk. For a darker, richer glaze, you can use dark cocoa powder. And for a real treat, a few drops of peppermint extract can add a wonderful seasonal twist!
Storing and Reheating Tips
This Halloween cake is a fantastic make-ahead treat, and thankfully, it stores beautifully. Here’s how I usually handle leftovers (if there are any!):
Room Temperature: If the cake is glazed and the glaze has set, you can store it at room temperature, covered tightly with plastic wrap or in an airtight container, for up to 2 days. Keep it in a cool spot, away from direct sunlight or heat. I’ve found it stays wonderfully moist and delicious this way, and the flavors actually meld even more.
Refrigerator Storage: For longer storage, or if your kitchen tends to be warm, the refrigerator is your best bet. Store the cake, covered tightly, in an airtight container. It will keep well in the fridge for up to 5 days. The texture might firm up a bit in the fridge, which brings me to reheating.
Freezer Instructions: If you’ve made this ahead of time or have a lot of leftovers, you can absolutely freeze it! Once the cake is completely cooled and the glaze is set, wrap it tightly in a couple of layers of plastic wrap, then a layer of aluminum foil. It can be frozen for up to 2-3 months. To thaw, remove the foil and plastic wrap and let it thaw overnight in the refrigerator. You can then bring it to room temperature before serving.
Glaze Timing Advice: If you plan to store the cake for more than a day or two, I sometimes recommend glazing it closer to serving time, especially if it’s very warm. However, this recipe’s glaze is quite stable. If freezing, it’s best to glaze *after* thawing. The cream cheese in the filling holds up really well to refrigeration and freezing, which is another reason I love this recipe.
When reheating a slice that’s been refrigerated or frozen, you can gently warm it in the microwave for 15-20 seconds. It just takes the chill off and makes it extra gooey and delicious again. Enjoy!
Frequently Asked Questions
Final Thoughts
So there you have it – my go-to Halloween cake recipe! I truly believe this cake captures the spirit of the season with its deep, comforting chocolate flavor and its fun, festive presentation. It’s not just about looking spooky; it’s about tasting incredible and being a joy to bake. It’s the kind of recipe that makes your kitchen smell amazing and brings a smile to everyone’s face. Whether you’re baking for a party, a family get-together, or just because, I promise this Halloween cake will be a hit. If you enjoyed this recipe, you might also love my Spiced Apple Crumble Bars or my Easy Pumpkin Bread – they’re perfect for fall baking too! I can’t wait to hear how your cake turns out, so please leave a comment below and share your creations. Happy baking, and have a wonderfully spooky Halloween!
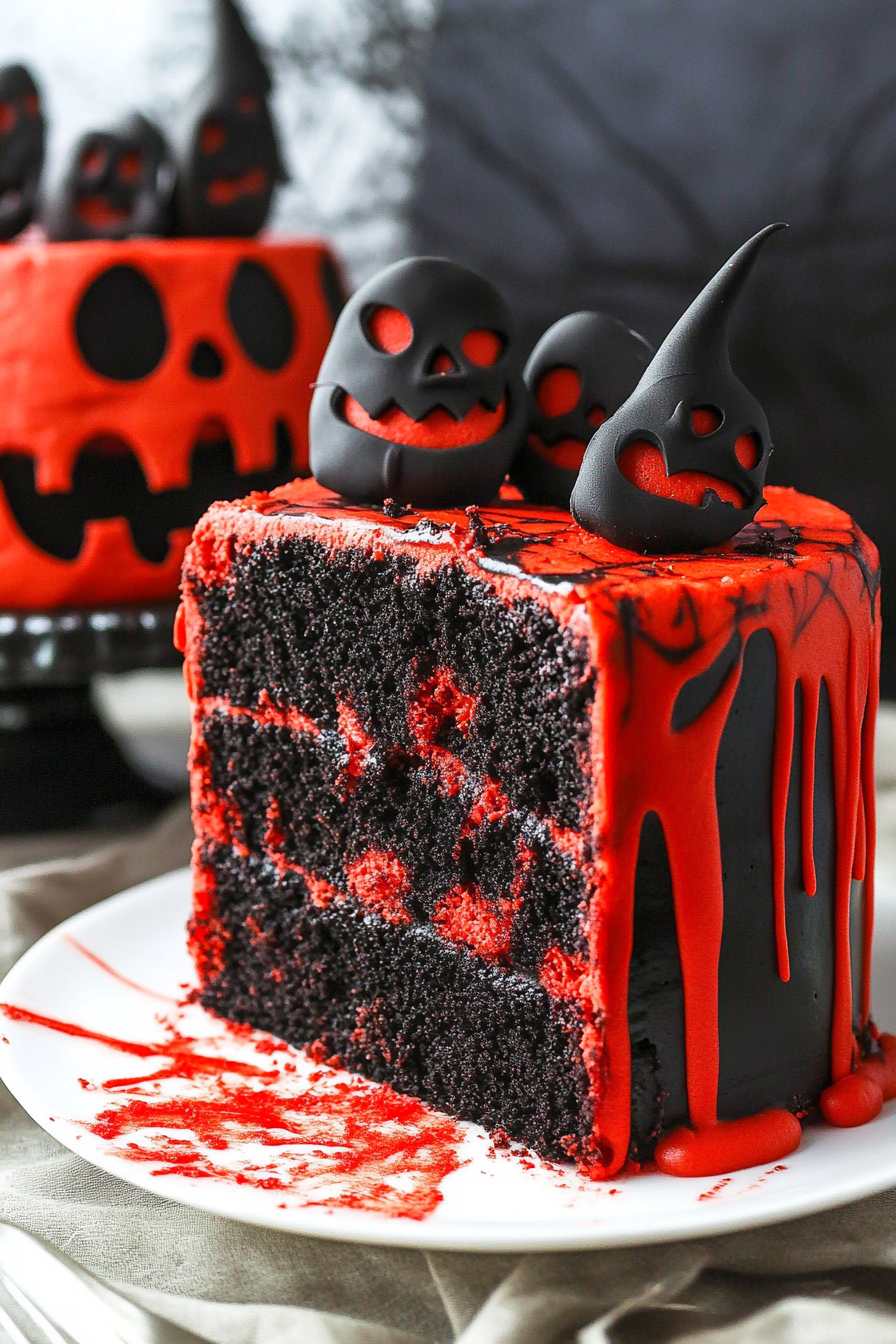
Spooky Halloween Marble Cake
Ingredients
Method
- Preheat oven to 350°F. Prepare three 8-inch cake pans with parchment paper circles and grease the sides.
- Mix dry ingredients: flour, baking powder, baking soda, and salt in a medium bowl. Set aside.
- Cream butter, oil, sugar, and vanilla until fluffy, about 3-4 minutes. Add eggs one at a time, mixing well after each addition.
- Alternate adding dry ingredients and buttermilk to the batter, beginning and ending with dry ingredients. Divide batter evenly into two bowls.
- Color one bowl with red gel icing and fold in chopped chocolate and black gel color. Fold black gel into the other bowl.
- Drop alternating spoonfuls of each batter into pans and swirl gently to create marbled effect.
- Bake for 20-25 minutes until a toothpick comes out clean. Cool completely.
- Prepare frosting: Beat butter, add powdered sugar, cocoa powder, vanilla, and water to achieve desired consistency. Mix in black gel for a dark frosting.
- Assemble cake: Level layers, frost between each, and use a piping bag for blood drip effect with melted red candy melts mixed with heavy cream.
- Decorate with sprinkles such as bones, bloody eyeballs, and blood drips. Chill until ready to serve.