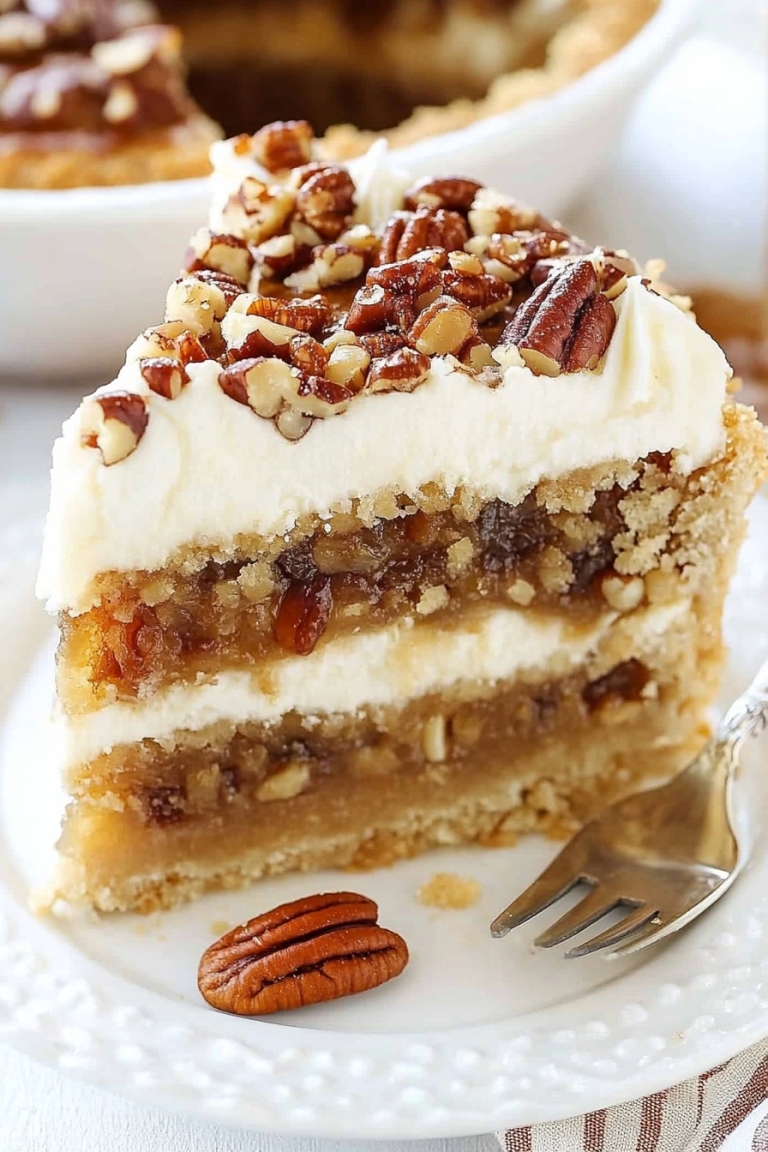
How to Bake a Nutty Pecan Layer Cake
You know those moments when the smell of something sweet drifts through the house, and suddenly everyone’s in the kitchen, noses pressed to the glass of the oven door? That’s exactly how I feel every time I make my pecan pie. It’s one of those recipes that’s been in my family for generations—an absolute classic but with a little twist of my own over the years. I always do this thing where I sneak an extra handful of pecans into the filling when no one’s looking (because, honestly, what’s a pecan pie without plenty of those buttery, crunchy nuts?). This pie’s warm, gooey, and seriously addictive—I swear, it’s like eating a slice of autumn in every forkful. And trust me, it’s so simple to make that even on my busiest days, I’ve got time to whip this up. It’s one of those comforting desserts that everyone requests, especially my kids, who ask for seconds—and thirds. I’ve tested this with different types of syrup and even a touch of bourbon, but honestly, the classic version is still my favorite. I can’t wait to share it with you—you’ll find it hard to resist, I promise!
What is pecan pie?
Think of pecan pie as the cozy, sweet hug you didn’t know you needed. It’s essentially a buttery, flaky crust topped with a rich, caramel-like filling filled with whole or chopped pecans. The name alone conjures images of fall gatherings and holiday tables, but honestly, I make this pie year-round—because if you love nuts, caramel, and that deep, toasted flavor, it’s a dessert that never gets old. The origin of pecan pie is a bit fuzzy, but it’s long been a Southern favorite—thanks to the abundant pecan trees and a tradition of warm, comforting baking. The filling, usually made of brown sugar, corn syrup, and eggs, creates that luscious, gooey texture that pairs so perfectly with the crunch of the pecans on top. Think of it as a caramel nut tart, but way more irresistible because of that nostalgic, home-baked goodness. Whether it’s for Thanksgiving, a family get-together, or just because you’re craving something sweet, pecan pie fits right in—no fuss needed, just good ingredients and a little love.
Why do you love this movie?
What I love most about this pecan pie is how it combines simple ingredients into something so utterly satisfying. The flavor? Rich, buttery, with a toasty sweetness that makes you close your eyes and savor every bite. There’s a depth that comes from the caramel notes and that nutty crunch—that perfect balance of gooey filling contrasting with crisp, toasted pecans. Plus, this recipe is a lifesaver on busy nights because it’s straightforward but looks so impressive. I’ve made it countless times, and every single time, I get that warm feeling when I slice into it—like a little slice of happiness. The best part? It’s budget-friendly; no fancy ingredients needed. I always keep a bag of pecans in my freezer because I know I’ll be reaching for this pie whenever I want a comforting treat. And let me tell you, it’s incredibly versatile—serve it warm with a scoop of vanilla ice cream, or cold with a cup of coffee. Either way, it’s a crowd-pleaser that feels indulgent but is surprisingly easy to whip up. Honestly, what I love most about this is how it makes my house smell like Thanksgiving every time I bake it, even if it’s just a regular Tuesday.
How do I make pecan pie?
Quick Overview
This pecan pie is all about simple, honest ingredients coming together in one glorious dessert. You start by making a flaky, buttery crust—nothing fancy, just enough to hold the sweet, chewy filling. Then, you whisk together a caramel-y mixture of brown sugar, corn syrup, eggs, and a splash of vanilla—adding a little bourbon if you’re feeling extra daring. Pour that luscious filling into your prepared crust, sprinkle with a generous layer of pecans, and bake until golden and set. The magic happens as the filling bubbles up and those pecans toast to perfection on top. The best part? This pie doesn’t require any fancy equipment—just your mixing bowls and a trusty oven. I love how forgiving it is, too; no need for perfect precision, just honest baking that yields stunning results every time.
Ingredients
For the Main Batter:
– 1 cup packed brown sugar (the darker, the richer the flavor)
– 1/2 cup corn syrup (light or dark—both work fine)
– 1/2 cup unsalted butter, melted (trust me, this makes it extra creamy)
– 3 large eggs (preferably at room temp)
– 1 teaspoon vanilla extract (fresh or imitation, both good)
– Optional: 1-2 tablespoons bourbon or whiskey (for a deeper flavor)
For the Filling:
– 1 1/2 cups pecan halves (fresh or toasted for extra flavor)
– Extra pecans for topping, if you like a thicker, crunchier top layer
For the Glaze (Optional):
– A simple glaze made of powdered sugar and milk, or a drizzle of chocolate for a decadent twist.
Step-by-Step Instructions
Step 1: Preheat & Prep Pan
Set your oven to 350°F (175°C). Line a 9-inch pie dish with your favorite flaky pie crust—store-bought is totally fine, but homemade always feels special. Press it gently into the dish, and trim any excess edges. Wrap the edges with foil or use a pie shield to prevent burning. That way, you get a beautiful, golden crust without overbaking. Trust me, peace of mind is crucial here, especially if you’re pressed for time or oven space.
Step 2: Mix Dry Ingredients
While your crust preps, grab a medium bowl and combine the brown sugar and corn syrup. Whisk them together until smooth—kind of like a thick caramel sauce. This step ensures the sugar dissolves evenly, preventing any graininess from sneaking into the filling later. It’s a simple step, but it makes all the difference.
Step 3: Mix Wet Ingredients
In a separate large bowl, beat the eggs gently—use a fork or a whisk. Add the melted butter, vanilla, and bourbon if you’re using it. Whisk until everything’s silky and combined. I always do this second, because it’s easiest to pour into the dry ingredients without clumping. Plus, I like to taste a little bit of the batter to check the sweetness—trust your taste buds here!
Step 4: Combine
Slowly pour the wet mixture into the dry ingredients, stirring gently to combine. Don’t overmix; just fold until you get a smooth, thick batter. Overmixing can make the filling tough, and that’s no fun. It should be thick enough to mound slightly when you lift your spoon. If it’s too runny, a teaspoon more of cornstarch stirred in at this point can help. Just trust your instincts.
Step 5: Prepare Filling
Pour your batter into the prepared crust, smoothing the top with a spatula. Now, sprinkle the pecans evenly over the filling—feel free to press some in if you want a more nutty crunch in every bite. For a prettier presentation, I like to reserve a few pecans to scatter on top after baking for that picture-perfect look.
Step 6: Layer & Swirl
If you’re feeling fancy, you can swirl a bit of extra syrup or melted chocolate into the filling before baking, creating pretty marbled patterns. With pecan pie, I think simple is best, but a little artistic touch never hurts! Just a gentle swirl with a toothpick or skewer does the trick.
Step 7: Bake
Pop your pie into the oven and bake for about 50-60 minutes. Keep an eye on it—look for a golden crust and bubbling filling. The filling should jiggle a little in the center but isn’t completely liquid. If the edges brown too quickly, tent them with foil. Every oven is different, so my tip is to start checking around 45 minutes. When it’s done, turn off the heat and let it cool for at least 2 hours. Resist the urge to cut too soon; the filling needs to set properly.
Step 8: Cool & Glaze
Once cooled, I love adding a simple glaze—powdered sugar mixed with just enough milk to make a thick drizzle. It adds a lovely glossy finish and a touch extra sweetness. Alternatively, a drizzle of dark chocolate adds a decadent layer. Either way, this step enhances that rich, inviting look.
Step 9: Slice & Serve
Use a sharp knife dipped in hot water for clean cuts, and serve slices slightly warm or at room temperature. A dollop of whipped cream or a scoop of vanilla ice cream really elevates the experience. Trust me: This pecan pie disappears in minutes at my house, and it’s usually the first thing gone on the dessert table. It’s one of those recipes that doesn’t last long because everyone—and I mean everyone—asks for seconds.
What to Serve It With
This pie is a star on its own, but if you want to make it extra special, serve it with a scoop of vanilla bean ice cream or a drizzle of caramel sauce. For brunch or a cozy family breakfast, pair it with a strong cup of coffee or a cinnamon-spiced latte. My family loves a big slice after dinner with a glass of milk or a little bourbon on the side—hey, don’t judge! This pie’s versatile enough to enjoy anytime you’re craving something sweet and nutty.
For holiday tables, I like to add a sprig of fresh mint or a dusting of powdered sugar for that festive touch. We often cut it into smaller slices and serve it with some hot tea or spiced cider—perfect for crisp fall afternoons or chilly evenings. Honestly, I’ve made this pie for picnics, potlucks, and quiet Sunday nights, and it always fetches oohs and aahs.
Top Tips for Perfecting Your Pecan Pie
Over the years, I’ve picked up a few tricks that make this pecan pie turn out just right every time:
- Zucchini Prep: Not relevant here, but for similar pies that include moisture-heavy ingredients, always squeeze out excess water. For this recipe, just make sure your pecans are fresh and toasted if you like a more pronounced flavor.
- Mixing Advice: Overmixing the filling can lead to a tough texture; fold ingredients gently and stop once combined.
- Swirl Customization: If you want pretty marbled effects, try swirling in melted chocolate or caramel before baking. Just a gentle touch with a skewer or toothpick does the trick.
- Ingredient Swaps: Honey or maple syrup can be used instead of corn syrup for a different flavor profile—just reduce the sugar slightly because they’re sweeter than corn syrup.
- Baking Tips: For even baking, position your oven rack in the lower third. Every oven bakes differently, so start checking around the 45-minute mark. When the filling is bubbling around the edges and the crust is golden, it’s ready!
- Glaze Variations: Add a splash of bourbon or coffee flavor to the glaze for a grown-up twist. Or, sprinkle the top with flaky sea salt right after glazing for a sweet-and-salty combo that’s out of this world.
Honestly, I’ve learned from a lot of trial and error—burned crusts, runny fillings, too-sweet layers. But patience and experience have made me confident to say: Just keep an eye on it, and trust your nose and eye for doneness. The smell alone will tell you when it’s close!
Storing and Reheating Tips
This pie keeps beautifully if stored properly. Cover it loosely with foil or plastic wrap and store at room temperature for up to 2 days—if it lasts that long! After that, pop it into the refrigerator to keep it fresh for up to a week. Just keep in mind, the filling can get firmer when chilled, so serve at room temp or gently warm slices for that perfect gooey texture.
If you want to freeze it, wrap the whole pie tightly in plastic wrap, then foil. It’ll keep well for up to 3 months. Thaw overnight in the fridge, then let it come to room temperature before serving. For the best flavor and texture, I recommend adding the glaze after reheating—no one wants a soggy crust or a dried-out filling.
Just a quick tip: if you’re making this ahead, skip glazing until just before serving—otherwise, the glaze can get sticky or slide off once refrigerated. Also, reheating slices in the microwave for about 15-20 seconds will bring back that warm, comforting sweetness.
Frequently Asked Questions
Final Thoughts
This pecan pie has become a staple in my kitchen, not just because it’s delicious but because it’s effortlessly cozy and inviting. Every time I whip one up, I’m reminded of family gatherings and lazy Sundays spent baking in pajamas. It’s a recipe that’s simple enough to make on weekdays but special enough to serve at big celebrations. Over the years, I’ve tweaked it to suit my taste—adding little touches like extra pecans, bourbon, or a sprinkle of sea salt—and it’s always a hit. Whether you’re new to pie baking or a seasoned pro, I hope you give this one a try. Trust me, your kitchen will fill with an irresistible aroma, and your loved ones will thank you for it. Can’t wait to hear how yours turns out—please share your variations or photos! Happy baking, friends!