How to Bake Delicious Cherry Brownies
There’s something about a warm brownie that instantly lifts my spirits—rich, fudgy, and just slightly crispy on the edges. But then I discovered cherry brownies, and let me tell you, they are a game-changer. The burst of juicy cherries in every bite gives that perfect balance of sweetness and tartness, making this treat both indulgent and refreshingly different. I always do this when I want something quick but special—a little pick-me-up after a long day or a fun weekend dessert that my kids ask for every time. Honestly, it’s like having a “grown-up” chocolate cherry dessert but perfect enough for the littles too. Trust me, once you make these, they disappear in minutes at my house, and everyone’s asking for seconds. They’re so easy to put together, and the aroma alone—think chocolate and cherries blending—fills the whole kitchen. Plus, you can switch things up with fresh or frozen cherries. This recipe truly feels like a warm hug with every bite, so I had to share it with my favorite fellow bakers!
What is a cherry brownie?
Think of cherry brownies as the sensory love child of a fudgy chocolate brownie and a cherry cordial. It’s essentially a rich, dense brownie base that’s got tiny pockets of juicy cherries hidden inside, giving every forkful a delightful surprise. The name is pretty straightforward—‘cherry’ because of the fruit, and ‘brownies’ because of the fudge-like texture we all crave from a good chocolate treat. This recipe is all about simplicity with a luxurious twist—perfect for those who love classic chocolate but crave a little fruitiness to shake things up. The cherry adds a pop of color, a little tang, and a whole lot of flavor—kind of like nature’s secret ingredient that elevates the usual brownie experience. It’s one of those recipes that’s versatile enough to be enjoyed warm out of the oven, or even chilled for a dense, chewy delight. I like to think of it as a dessert that makes everyone smile—quick, cozy, and just a little bit fancy.
Why you’ll love this recipe?
Let me tell you, what I love most about these cherry brownies is how they combine the best of two worlds—rich chocolate goodness and fresh, bright fruit. The first time I made these, my kids looked at me like I’d just handed them a treasure chest of flavors, and my friends couldn’t stop raving about that juicy surprise inside. They’re such an easy project, too—no complicated techniques or fancy ingredients needed. Just a handful of pantry staples, and you’re halfway to dessert heaven. Plus, these brownies are budget-friendly; I always have most of the ingredients sitting around, and that’s a huge win for me. They’re incredibly versatile, too—serve them warm with a big scoop of vanilla ice cream, or make them ahead of time for a snack that’s just as good cold. For me, what really sets these apart is just how satisfying and wholesome they feel — a little bit fudgy, a little bit fruity, and totally addictive. And the best part? The sweetness is just right; not overly sugary, so you can enjoy a couple without feeling guilty. It’s the kind of dessert I reach for when I want something comforting but with a little zing that wakes up my taste buds.
How do I make Cherry Brownies?
Quick Overview
This recipe comes together in less than an hour, with just a few simple steps. You start by mixing your rich, chocolate batter, then gently fold in the cherries—either fresh or frozen—making sure they’re evenly distributed. The batter is poured into a prep-treated baking dish, then baked until the edges are just set but the center still gives slightly under the touch—kind of like the perfect fudgy texture. Once cooled, a quick drizzle of glaze or dusting of powdered sugar makes these brownies look irresistible. What makes this method special is the way cherries are gently folded in last—preserving their juicy integrity and bursting flavor, especially if you use frozen cherries. They’re so forgiving, too—if you like yours extra fudgy, bake a little less, and if you want more of a cake-like crumb, just give it a couple of extra minutes. Basically, these brownies are foolproof and totally customizable!
Ingredients
For the Main Batter:
– 1 cup (2 sticks) unsalted butter, melted—trust me, real butter gives it that classic richness.
– 1 1/2 cups granular sugar—feel free to use raw sugar for a deeper flavor!
– 3 large eggs—room temperature if you can, for better blending.
– 1 teaspoon vanilla extract—vanilla enhances the chocolate and cherry flavor.
– 1 1/4 cups all-purpose flour—sifted if you want an ultra smooth batter.
– 1/2 cup unsweetened cocoa powder—preferably Dutch processed for a richer color and flavor.
– 1/2 teaspoon salt—brings everything into balance.
– 1 teaspoon baking powder—just enough to give a tiny lift if you want a touch lighter crumb.
For the Filling:
– 1 to 1 1/2 cups fresh or frozen cherries, pitted and halved—frozen work beautifully, just thaw and drain.
– Optional: 1 tablespoon cherry jam or preserves—to amplify the cherry flavor if you want more intensity.
For the Glaze:
– 1/2 cup powdered sugar
– 1-2 tablespoons milk or cream
– A splash of vanilla or cherry flavoring for extra punch
Step-by-Step Instructions
Step 1: Preheat & Prep Pan
Preheat your oven to 350°F (175°C). Line an 8-inch square baking pan with parchment paper or non-stick spray—trust me, this makes cleanup so much easier. If you want that perfect crackly top, a little sprinkle of sugar on top before baking works wonders too.
Step 2: Mix Dry Ingredients
In a medium bowl, whisk together flour, cocoa powder, salt, and baking powder. This step ensures even distribution of the leavening agents and prevents clumps—think of it as giving your dry ingredients a little spa day.
Step 3: Mix Wet Ingredients
In a large bowl, whisk together melted butter and sugar until smooth and creamy. Add the eggs one at a time, mixing well after each. Stir in vanilla. The mixture should be glossy and smooth—you want a silky batter that will hold those cherries in place.
Step 4: Combine
Gradually fold the dry ingredients into the wet mixture. Do this in stages, stirring gently just until combined—overmixing makes the brownies tough. The batter will be thick but smooth, ready for its fruity surprise.
Step 5: Prepare Filling
If using cherry jam or preserves, stir it into the halved cherries for an extra burst of cherry goodness. Gently toss the cherries in a little flour if you want them to stay suspended evenly, but it’s not necessary if you prefer them clustered.
Step 6: Layer & Swirl
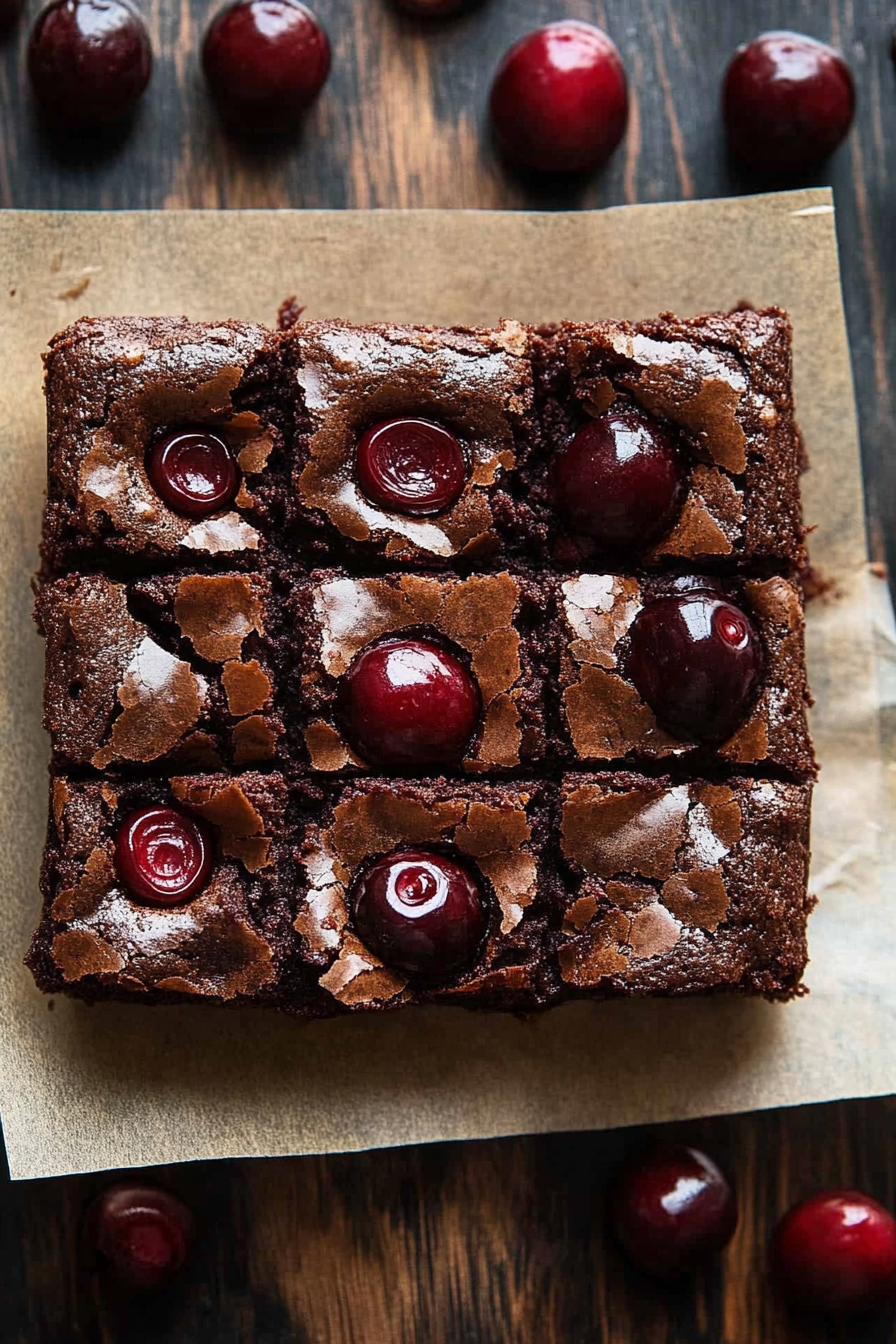
Pour about two-thirds of the batter into your prepared pan, spreading evenly. Scatter the cherries over this layer, then dollop the remaining batter on top. Use a toothpick or skewer to gently swirl the batter and cherries together—creating beautiful, marbled patterns that hide the fruit all throughout.
Step 7: Bake
Bake for 25-30 minutes, or until a toothpick inserted into the center comes out with a few moist crumbs. The edges should be set, and the top will be slightly cracked but fudgy inside. Every oven is a little different, so keep an eye on them after 25 minutes!
Step 8: Cool & Glaze
Let these brownies cool in the pan for at least 20 minutes. They firm up as they cool, making slicing much easier. Meanwhile, mix your powdered sugar glaze, adding milk until you get a pourable consistency. Drizzle over cooled brownies for that pretty finish. The glaze adds a little extra sweetness, but you can skip this if you want a more cake-like texture.
Step 9: Slice & Serve
Slice into squares with a sharp knife, wiping between cuts for clean edges. Serve warm with a scoop of vanilla ice cream or a dollop of whipped cream. These are also fantastic served chilled—just remember, the cherries stay juicy no matter what!
What to Serve It With
Cherry brownies are pretty versatile, and, honestly, I love them no matter how you slice it. For breakfast or brunch, serve a warm square with a hot coffee or your favorite chai latte—think of it as a grown-up chocolate cherry muffin in disguise. If you’re hosting a brunch, pair these with fresh fruit and a crisp sparkling cider or mimosa. For a more indulgent dessert, serve them topped with whipped cream, a cherry on top, or even a scoop of vanilla bean ice cream that melts into every fudgy corner.
When I make these for family movie nights, I often cut them into smaller bites and have a fruit and cheese platter with them. They’re perfect for casual gatherings because everyone loves that burst of cherry juice against the dark chocolate backdrop. A friend once told me she freezes slices and pops them into her lunchbox—just as satisfying cold as warm. This flexibility makes cherry brownies a true all-rounder on my dessert table!
Top Tips for Perfecting Your Cherry Brownies
After making these countless times, I’ve picked up a few tricks that make all the difference. First, when working with frozen cherries, always thaw and drain them really well. Excess moisture can make your brownies a little too gooey or cause the chocolate to seize. I learned this the hard way—trust me on this! If you want extra cherry flavor, add a tablespoon of cherry jam or preserves in the batter or sprinkle a few chopped cherries on top before baking for a visual pop and extra flavor punch.
Mixing is key—overmixing can lead to tough brownies, so combine your ingredients just until they’re incorporated. For the swirl pattern, I like to use a skewer or butter knife in a gentle figure-eight motion—it creates those beautiful marbled effects without mixing the flavors away. If you’re feeling adventurous, try adding a splash of kirsch or cherry liqueur into the glaze or batter for a boozy twist.
Finally, keep an eye on baking time—start checking at 25 minutes. The edges should be firm but not hard, and the center slightly soft. After cooling, I like to refrigerate leftovers for an hour. The flavors mellow and the texture gets extra fudgy. This step isn’t totally necessary but trust me, it’s worth it. If you want to get creative, swap dark chocolate for semi-sweet, or add some chopped nuts for crunch. Each tweak makes this recipe uniquely *your* cherry brownie!
Storing and Reheating Tips
These brownies store beautifully in an airtight container at room temperature for up to 2 days—if they last that long! Keep them covered loosely with foil or a cloth napkin to maintain that fudgy crust. For longer storage, pop them into a sealed container in the fridge—this keeps the cherries extra fresh and prevents the brownies from drying out. They’ll last up to a week chilled, but I prefer to enjoy mine warm or at least room temp to really get the full experience of fudgy richness and juicy cherries.
If you want to freeze them, wrap each brownie square tightly in plastic wrap, then store in a zip-top bag for up to 3 months. Thaw at room temperature or warm briefly in the microwave at 20-second intervals. I’ve done this countless times—frozen cherry brownies are a treat on busy mornings when you want something sweet without the fuss. Just add a quick drizzle of glaze once thawed for that freshly finished look and flavor.
And if you’re planning to add a glaze, do it just before serving or reheating. The moisture from the glaze can make the brownies a little messier if stored too long, so keep it simple if you’re planning for leftovers.
Frequently Asked Questions
Final Thoughts
Honestly, I can’t get enough of these cherry brownies—they’re like a little slice of happiness with every bite. The juicy cherries provide a fresh burst amidst the deep chocolate, making each piece feel special, whether you’re enjoying a quiet moment with tea or sharing with friends. Over the years, I’ve tried a few variations—adding a touch of liqueur here, swapping dark for semi-sweet chocolate there—and each time, they turn out divine. The beauty of this recipe is how forgiving and straightforward it is, so don’t be afraid to make it your own. I love that this feels both homemade and fancy at the same time, and I know once you try it, it’ll become a go-to for your family, too. So, gather your cherries, preheat that oven, and let’s get baking. Can’t wait to hear how yours turns out—share your photos and stories!
Cherry Brownies
Ingredients
Method
- Preheat the oven to 400°F. Line a baking sheet with parchment paper. Spread halved cherries over parchment, sprinkle with sugar, and bake for 10 minutes to roast. Set aside.
- Reduce oven temperature to 350°F. Grease a 9x9 inch baking dish with nonstick spray.
- In a microwave-safe bowl, melt 0.5 cup of chocolate chips with 0.75 cup oil in 15-second bursts, stirring until smooth.
- In a large bowl, beat granulated sugar, light brown sugar, eggs, and vanilla on high for 5-6 minutes until lightened and doubled in size.
- Turn mixer to low and slowly add melted chocolate mixture, beating just until combined.
- In a small bowl, whisk together flour, cocoa powder, and salt. Gradually add to wet mixture, mixing until just combined. Fold in remaining chocolate chips and roasted cherries.
- Pour batter into prepared baking dish. Bake for 30-35 minutes until a toothpick inserted comes out with crumbs but no wet batter.
- Top with fresh cherries. Let cool before slicing and serving.