How to Make Delicious Quinoa Stuffing
Ever have one of those moments where you’re standing in your kitchen, eyes wide as you take in the smell of something just bubbling away? That’s me every time I make this quinoa stuffing. It’s like a warm hug on a chilly evening, packed with flavor and a texture that’s just right—light but still satisfying. And honestly, it’s one of those recipes I always do on a whim when I want something nourishing but quick. My kids ask for this all the time, and I swear it’s become a family favorite that’s pretty much vanished in minutes every time I put it on the table.
This dish is surprisingly versatile—leftovers heat up beautifully, and it’s perfect for everything from a cozy weeknight dinner to festive holiday tables. Plus, I love how it’s a healthy twist on traditional stuffing that doesn’t feel like a compromise. Trust me, once you try this quinoa stuffing, you’ll be hooked. It’s so good I sometimes make a double batch just so I can have leftovers for lunch the next day—because, let’s be honest, anything with quinoa and loads of herbs is basically my idea of comfort food.
What is quinoa stuffing?
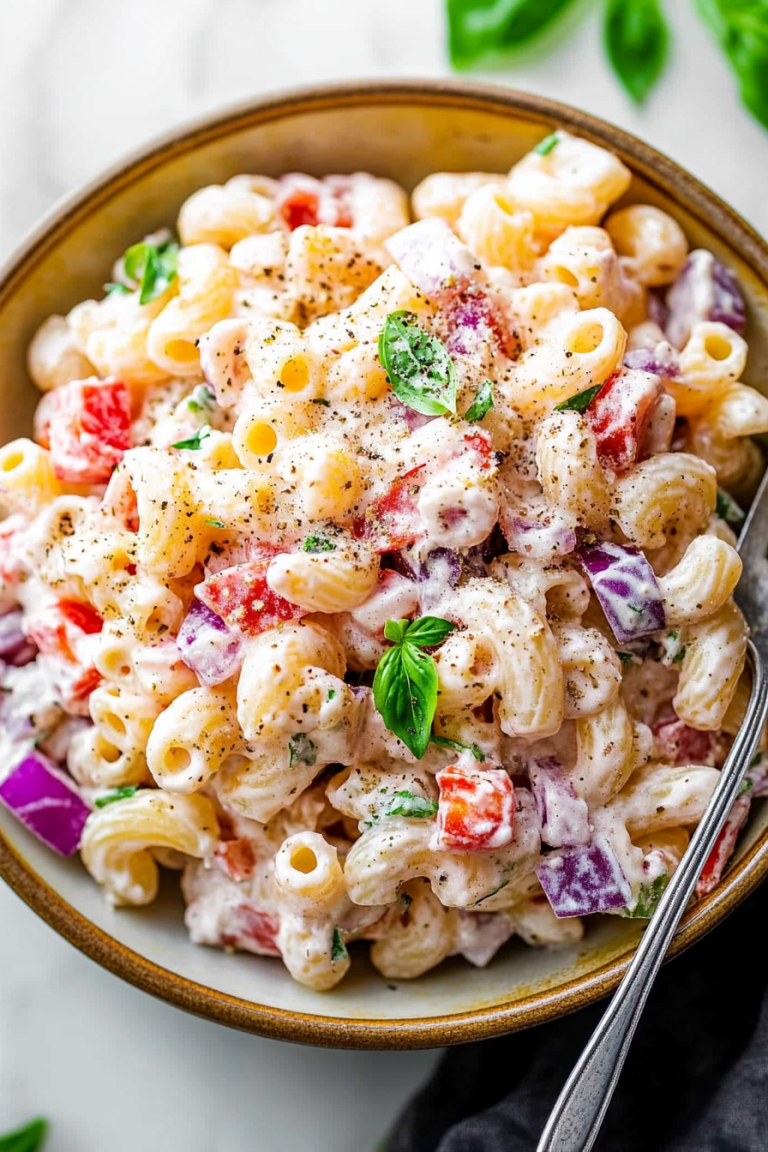
Think of quinoa stuffing as a wholesome, veggie-packed, savory casserole that uses fluffy quinoa instead of bread crumbs or traditional bread stuffing. It’s essentially a grain-based side dish that’s packed with sautéed vegetables, fragrant herbs, and maybe even a sprinkle of cheese or nuts for extra crunch. The name “stuffing” might make you think of that bread-y, oven-baked classic, but this version is lighter, more adaptable, and just as flavorful.
The best part? It’s a crowd-pleaser that doesn’t require any complicated techniques—just good ingredients, a few simple steps, and your favorite baking dish. It’s basically like your favorite house-made pilaf but with all the comfort and warmth of a proper stuffing. I love how hearty it is without feeling heavy—perfect for when you want something satisfying but not overly greasy or carb-heavy. It’s a perfect side or even a main if you’re keeping it plant-based. Think of it as healthy comfort food that everyone will ask for again and again.
Why you’ll love this recipe?
What I love most about this quinoa stuffing is how easy it is to whip up—and how incredibly flavorful it turns out. The aroma alone will have everyone in the house rushing to the kitchen. Since I used quinoa, it’s not just a side but a complete protein, making it perfect for vegetarians or anyone looking to boost their plant-based meals.
It’s surprisingly budget-friendly too. Quinoa is pretty affordable, especially when bought in bulk, and all the veggies are pantry staples or leftovers lurking in your fridge. Plus, this dish is flexible. You can add roasted nuts for crunch, dried cranberries for a touch of sweetness, or even crumble some feta on top for a salty surprise. It’s a real blank canvas that turns into something special with just a few tweaks.
Honestly, what makes this recipe stand out is how versatile it is. I’ve served it as a Thanksgiving side, a hearty lunch, or even topped with a fried egg for breakfast. My kids ask for this all the time—sometimes I make a big batch just for them to nibble on during movie night. It’s one of those recipes that’s become my go-to whenever I want something comforting, healthy, and packed with flavor without spending hours in the kitchen.
How do I make quinoa stuffing?
Quick Overview
This quinoa stuffing is all about simple, straightforward steps. Prepare your quinoa first—rinse it well and cook it until fluffy. Meanwhile, sauté some onions, garlic, and your favorite vegetables until fragrant and tender. Then, toss everything together with herbs, spices, and a splash of broth. Pop it into a baking dish, top with cheese if you like, and bake until everything is fragrant and slightly golden on top. That’s it! The magic is in the layers of flavor—no fancy gadgets required, just some patience and love in the kitchen.
Ingredients
For the Main Bulk:
- 1 cup quinoa (rinsed and drained) – trust me, rinsing removes that bitter saponin and makes it taste so much better
- 2 cups vegetable broth or water – for cooking quinoa, adds extra flavor
- 1 tablespoon olive oil – for sautéing veggies
- 1 medium onion, finely diced
- 3 cloves garlic, minced
- 2 carrots, grated or finely chopped
- 1 red bell pepper, diced
- 1 zucchini, grated or chopped
- 1 teaspoon dried thyme
- Salt and pepper to taste
For the Filling:
- Fresh herbs like parsley and cilantro – chop ‘em up good
- A handful of toasted nuts—almonds or walnuts work beautifully
- Optional: Dried cranberries or raisins for a little sweet contrast
- Crumbled feta or shredded cheese—cheddar or mozzarella are great options if you’re not vegetarian
For the Glaze (if desired):
- 1/4 cup olive oil or melted butter
- 1 teaspoon honey or agave syrup
- 1 teaspoon balsamic vinegar or lemon juice
- Minced herbs or spices for extra flavor
Step-by-Step Instructions
Step 1: Preheat & Prep Pan
Set your oven to 375°F (190°C). Lightly grease your baking dish with a bit of butter or oil. While the oven heats, rinse the quinoa really well in cold water. This step is crucial—trust me, it’s like removing a film that can make it taste bitter. Cook the quinoa in vegetable broth for extra flavor—bring the broth to a boil, then add quinoa, reduce to a simmer, and cover. Let it cook until it’s fluffy and tender, about 15 minutes.
Step 2: Mix Dry Ingredients
While the quinoa is cooking, prep your veggies. Dice, grate, or chop into small pieces—this ensures everything cooks evenly and melds together beautifully. Set aside. If using nuts, toast them in a dry skillet for a few minutes until fragrant—that’s how you get that extra crunch and flavor boost.
Step 3: Mix Wet Ingredients
In a large skillet, heat the olive oil over medium heat. Toss in the onions and garlic, cook until translucent and fragrant, about 3-4 minutes. Add the carrots, bell pepper, and zucchini, and sauté until soft and slightly caramelized—this brings out their natural sweetness and depth. Stir in thyme, salt, and pepper; let everything mingle for a couple of minutes.
Step 4: Combine
Once the quinoa is cooked, fluff it with a fork and transfer it to a big mixing bowl. Add the sautéed vegetables, fresh herbs, nuts, and dried fruit if using. Mix well, and taste—adjust seasoning as needed. This is your flavor base, so don’t be shy about seasoning generously.
Step 5: Prepare Filling
If you’re adding cheese, sprinkle it on now or fold it into the mixture. For a vegan version, skip the cheese or use a plant-based alternative. The mixture should feel moist but not soggy—if it’s too dry, splash in a little extra broth or olive oil. For a fun twist, try mixing in some lemon zest or smoked paprika to jazz things up!
Step 6: Layer & Swirl
Transfer everything into your prepared baking dish. For a pretty swirl effect, spoon some mixture into the dish and, using a spoon or spatula, gently swirl in some extra cooked quinoa or vegetables on top. This creates a layered look that’s gorgeous when served, but honestly, just mixing well works too. This step makes your dish look professionally crafted—just a little extra love.
Step 7: Bake
Pop it into the oven and bake for about 20-25 minutes, until the top is slightly golden and bubbly. If you’re using cheese, it should be melted and cheesy. Keep an eye toward the end—if it’s looking too brown, cover loosely with foil. Let it rest for 5 minutes before serving to allow the flavors to settle.
Step 8: Cool & Glaze
If you want to add a glaze, whisk together your oil, honey, and vinegar. Drizzle this over the hot casserole right out of the oven or serve on the side as a dipping sauce. It adds a delicious tang and shiny finish—the kind that makes even leftovers feel fancy.
Step 9: Slice & Serve
Use a sharp knife to cut into squares—clean slices make it look beautiful on the plate. Serve warm, garnished with extra herbs or a squeeze of lemon if you like. This dish pairs beautifully with a fresh green salad or roasted veggies for a well-rounded meal you’ll be proud of.
What to Serve It With
Honestly, this quinoa stuffing is pretty versatile. For breakfast, I love serving it with a fried egg on top—trust me, that yolk runny goodness takes it to another level. It’s also a real hit at brunch, especially with some fresh fruit and a splash of sparkling water or mimosas.
When I make it for dinner, I often pair it with roasted chicken or grilled fish—something simple that lets the flavors of the stuffing shine. And don’t forget, it’s delicious as a light lunch the next day—just microwave or reheat in a skillet to bring back that cozy, fresh-from-the-oven flavor. Sometimes I even add a dollop of tangy yogurt or a squeeze of lemon for extra brightness.
This dish is a crowd-pleaser, and my family loves it because it hits all the right notes—savory, slightly sweet, crunchy, and tender. Plus, it’s pretty forgiving; you can toss in whatever veggies or nuts are in your pantry, and it still turns out fantastic. It’s become my secret weapon when I want a healthy, filling meal that feels like a hug on your plate.
Top Tips for Perfecting Your Quinoa Stuffing
Okay, so after making this a dozen times, I’ve picked up some pro tips that might save you a little trial-and-error.
Zucchini Prep: When grating zucchini, I always sprinkle a bit of salt and let it sit for about 10 minutes. That way, you draw out excess moisture, which prevents your stuffing from turning mushy. Then, I squeeze out the water—this trick is a game-changer.
Mixing Advice: Don’t overmix once you combine everything—this keeps your stuffing light and prevents it from compacting into a dense block. Think gentle folding rather than vigorous stirring. Also, taste and adjust your seasoning before baking—sometimes a little more salt or herbs make all the difference.
Swirl Customization: I love creating beautiful swirls on top if I have extra quinoa or veggies. Use a spoon to gently layer and swirl, creating visual interest and little pockets of flavor. It’s a small touch, but it really makes the dish pop visually.
Ingredient Swaps: If you’re out of nuts, toasted seeds like pumpkin or sunflower also work well. For the dried fruit, cranberries give a nice tartness, but dried apricots or cherries are fun too. I tested this with nutritional yeast and a splash of soy sauce for a savory umami twist—it was a hit!
Baking Tips: If your oven runs hot or cold, adjust the timing accordingly. Check for doneness around the 20-minute mark—look for bubbling edges and a slightly browned top. If it’s not quite right, just give it a few more minutes.
Glaze Variations: Instead of honey, you can use maple syrup or agave for a vegan option. Mix with herbs like thyme or rosemary for an herby finish. Or, skip the glaze altogether and top with fresh herbs or a squeeze of lemon for brightness.
Throughout this journey, I’ve learned that patience is key—let everything cool just a bit before slicing, and never rush the baking. Sometimes, a little extra time makes all the difference in getting that perfect golden crust on top. And trust me, it’s so worth it. These little tweaks always elevate the dish with minimal effort but maximum impact.
Storing and Reheating Tips
This quinoa stuffing keeps well—here’s how I do it to make sure it stays fresh and tasty.
Room Temperature: If you’re not too far from eating, it’s fine to leave it covered on the countertop for up to 2 hours. Anything beyond that, I recommend refrigerating.
Refrigerator Storage: Store leftovers in an airtight container—this protects against fridge odors and keeps everything moist. It’s good for about 3-4 days. I’ve reheated it in the microwave, covered, for about 2 minutes, stirring halfway through—always comes out great.
Freezer Instructions: For longer-term storage, let it cool completely, then pack in freezer-friendly containers. It keeps for up to 3 months. To reheat, thaw overnight in the fridge and warm in the oven at 350°F (175°C) for about 20 minutes. Add a splash of broth or water if it feels dry when reheating. The texture might be a little softer, but flavor remains top-notch.
Glaze Timing: If you want to add the glaze, best to do so just before serving or right after reheating for maximum shine and freshness. Cold storage can diminish the glaze’s glossy appeal, so I prefer adding it fresh for a beautiful finish.
This system has honestly made reheating a breeze, and my family never complains about leftovers—they actually ask for more!
Frequently Asked Questions
Final Thoughts
If there’s one recipe I hope you try and love as much as I do, it’s this quinoa stuffing. It’s like that cozy sweater you throw on when you need a little extra comfort, only it’s on your plate. The flavors are simple yet so satisfying, and the flexibility means you can adapt it to whatever ingredients you have on hand—no stress, just good eating. I love making this dish when I want healthy comfort food without hours in the kitchen. Plus, it’s become a staple in my home, and honestly, I think your family will love it too! Once you master this, you’ll find yourself whipping it up for every occasion, from weeknights to holiday gatherings.
Don’t forget—recipes are all about family, flavor, and fun. So go ahead, get cooking, and let the aroma fill your home. I can’t wait to hear how yours turns out! And hey, share your favorite tweaks in the comments—I love hearing about the little touches that make it special for you. Happy baking!
Quinoa Stuffing with Mushrooms and Fennel
Ingredients
Method
- Cook rinsed quinoa in broth according to package directions.
- While the quinoa is cooking, in a large heavy sauté pan add olive oil to the pan, then the onion, sauté one minute.
- Add the fennel, celery, and carrots, salt and pepper to taste; cook about 12-15 minutes over medium heat, until vegetables are soft.
- Add the mushrooms to the pan, more salt and pepper if needed and cook, stirring 5 minutes, then cook covered for 2 minutes, or until the mushrooms have released their juice and are cooked through.
- Add the cooked quinoa to the pan and mix well.