Joyful Birthday Cake Recipe Simple & Sweet
There’s something about a Funfetti Cake that just makes me smile every time I see it. Maybe it’s the burst of color that seems to scream fun and joy, or maybe it’s because I grew up sneaking a few sprinkles before they even made it into the batter. I remember volunteering in my grandma’s kitchen when I was a kid, watching her carefully fold rainbow sprinkles into fluffy, buttery batter—her secret to the most delightful cake. Now, years later, I still turn to this recipe whenever I want to celebrate something special or just need a little pick-me-up. It’s surprisingly simple, incredibly nostalgic, and honestly, it’s one of those cakes that disappears in minutes at my house. I’ve tested this with almond milk and it actually made it even creamier—trust me on this one! Whether you’re baking for a birthday, a holiday, or just because you deserve a sweet treat, this Funfetti Cake is a guaranteed crowd-pleaser. Grab your sprinkles, and let’s get baking!
What is Funfetti Cake?
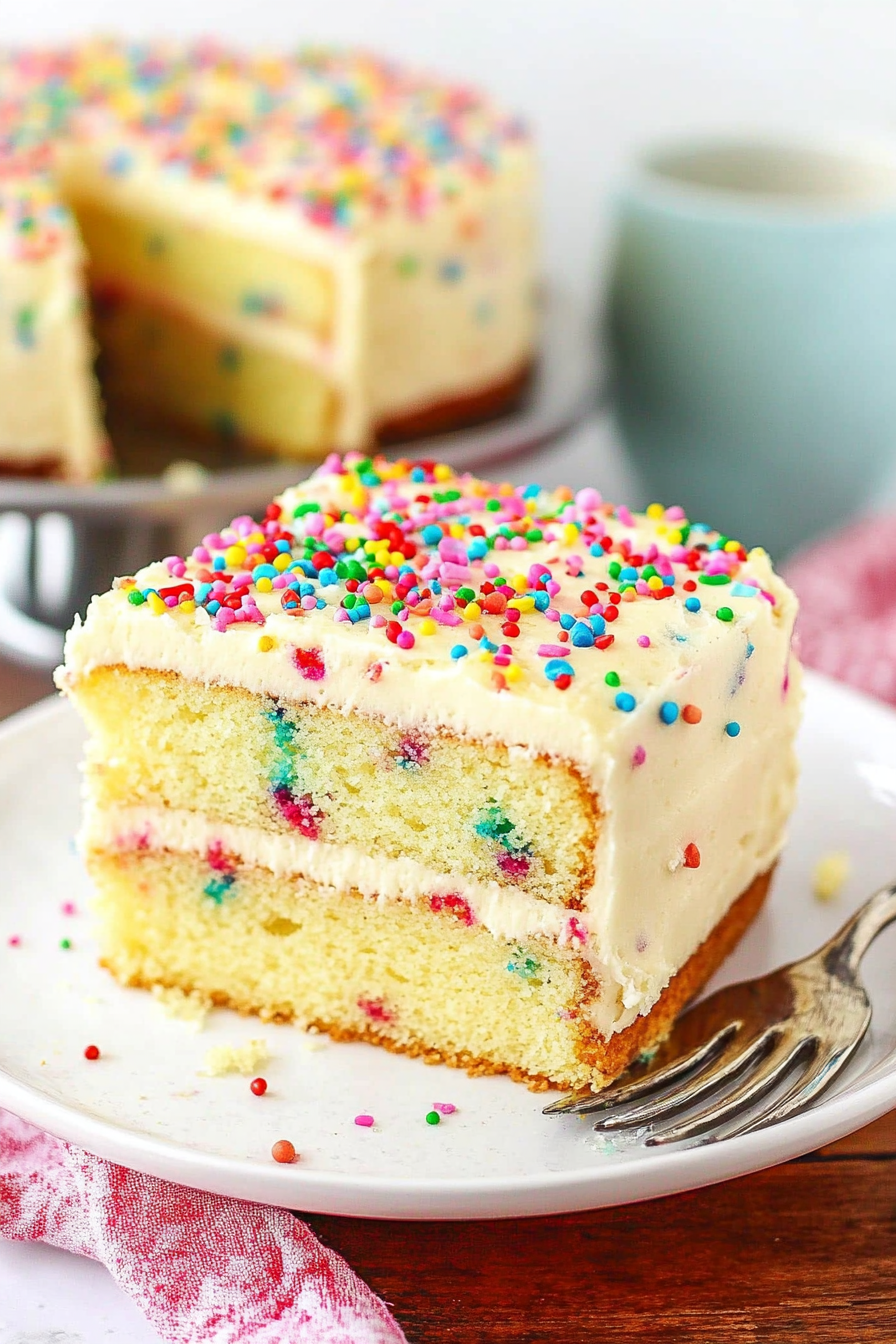
Think of Funfetti Cake as your classic vanilla sponge but with a playful twist — it’s essentially a party in cake form! The name “Funfetti” comes from the colorful sprinkles that are mixed into the batter, creating a joyful visual effect and a subtle crunch with every bite. It’s basically a celebration cake that’s perfect for kids and adults alike. The idea behind it is simple: fluffy vanilla cake loaded with vibrant rainbow sprinkles. The magic point is how the sprinkles stay colorful and bright after baking, giving the cake that signature look and vibe. It’s originated from a fun idea of making ordinary cake a little more festive, and honestly, it’s become a staple for birthdays, holidays, or just days when you want something cheerful. Think of it as a nostalgic throwback, but with a modern twist that screams, “Let’s have fun!” This cake is your go-to for easy, crowd-pleasing dessert that’s full of color and personality.
Why you’ll love this recipe?
What I love most about this Funfetti Cake is how effortlessly it combines simplicity with a total visual wow-factor. It’s a dump-and-mix kind of deal that hardly feels like work, yet the result looks like a masterpiece, perfect for Instagram or just impressing the kiddos. The flavor? Velvety vanilla with just enough sweetness to satisfy your craving without feeling heavy—plus those surprise pops of rainbow sprinkles that make every slice a celebration. This cake is incredibly forgiving, too, so even if you’re a beginner, you’ll feel like a baking pro. Plus, it’s budget-friendly—most of us have those ingredients lurking in the pantry. I especially love how versatile it is: you can turn it into a layer cake, sheet cake, or even cupcakes if you’re feeling extra playful. And trust me, the smell when it’s baking—warm vanilla with hints of sugary sprinkles—just fills the whole house with happiness. What’s more, it’s a bit nostalgic for me, reminding me of birthday parties and joyful childhood mornings. Honestly, it’s one of those recipes I keep coming back to because it’s simply joy in cake form. My kids ask for this all the time, and I have no trouble saying yes—especially when I see their bright eyes and messy faces!
How do I make Funfetti Cake?
Quick Overview
This cake starts with a basic vanilla cake batter—think butter, sugar, flour, eggs, and vanilla—all mixed together until smooth. Then, rainbow sprinkles are gently folded in right before pouring the batter into your prepared pan. It’s baked until golden and fluffy—usually about 30-35 minutes—and cooled slightly before topping with a simple glaze or frosting. The best part? The sprinkles stay bright, and every bite bursts with color and flavor. The whole process is straightforward enough for a weeknight but still feels special enough for parties. I love how flexible this recipe is—baked as a layer cake, sheet cake, or cupcakes—you really can’t go wrong. Plus, I always do this when I want a quick, crowd-pleasing dessert that doesn’t require fancy equipment or complicated techniques. Just a few humble ingredients, a little love, and you’re set for a funfetti celebration!
Ingredients
For the Main Batter:
– 2 12 cups all-purpose flour (I always use unbleached for a richer flavor)
– 1 tablespoon baking powder
– ½ teaspoon salt
– ¾ cup unsalted butter, softened (or use good-quality vegan butter if dairy-free)
– 1 ¾ cups granulated sugar
– 3 large eggs
– 1 tablespoon pure vanilla extract
– ¾ cup whole milk (or almond milk for a nutty undertone that works beautifully)
For the Filling (optional, but fun):
– Cream cheese frosting or vanilla buttercream (store-bought or homemade)
– Rainbow sprinkles for extra fun layered inside or on top
For the Glaze:
– 1 cup powdered sugar
– 2-3 tablespoons milk (or lemon juice for a tangy kick)
– a few extra sprinkles for decoration (because more is more!)
Step-by-Step Instructions
Step 1: Preheat & Prep Pan
Set your oven to 350°F (180°C) and grease your cake pan—either a 9-inch round or a rectangular one—then line it with parchment paper. Trust me, that parchment prevents the cake from sticking and makes cleanup way easier. If you’re making cupcakes, line your muffin tin. I always do this, especially with colorful sprinkles involved—they can be a little sneaky and stick to the pan otherwise.
Step 2: Mix Dry Ingredients
In a medium bowl, whisk together your flour, baking powder, and salt. This step ensures your dry ingredients are evenly distributed and helps prevent clumping. I usually do this first because it sets a good base for the fluffy batter. Keep an eye on that baking powder—freshness matters for that perfect rise!
Step 3: Mix Wet Ingredients
In a large mixing bowl, cream together the softened butter and sugar until the mixture is light and fluffy. I usually do this for about 3-4 minutes on medium speed—it’s like silky velvet. Then, add eggs one at a time, mixing well after each, and stir in the vanilla. When I do this step, I like to alternate adding the milk and dry ingredients, starting and ending with the dry. It keeps everything smooth and prevents the batter from curdling—trust me, it’s worth the little extra effort!
Step 4: Combine
Gradually add the dry ingredients to the wet, mixing on low to avoid overworking the batter. Overmixing can make the cake dense, so just mix until everything’s just incorporated. The batter should be thick but scoopable. Now, this is where the fun begins—fold in your rainbow sprinkles gently, just enough to distribute evenly without crushing them. I learned this trick after a few failed attempts—slow and steady wins the sprinkle race!
Step 5: Prepare Filling
If you’re adding a filling, mix up your frosting or cream cheese blend now. Keep it at room temperature so it spreads smoothly, and consider adding a dash of vanilla or a sprinkle of rainbow chips for extra color. I love a simple vanilla buttercream with lots of sprinkles pressed into the sides—so cheerful!
Step 6: Layer & Swirl
Pour about half the batter into your prepared pan, then spoon in dollops of the filling, followed by the rest of the batter on top. Use a toothpick or knife to swirl gently—this creates that gorgeous marbled effect that makes each slice unique. If you’re making cupcakes, just scoop batter into each wrapper, then sprinkle with a few more sprinkles on top before baking.
Step 7: Bake
Pop it into your preheated oven and bake for 30-35 minutes. Keep an eye on the color—golden edges are perfect—and always do the toothpick test: Insert in the center, and if it comes out clean, your cake’s ready. My oven runs a little hot, so I normally start checking around 28 minutes—every oven is a little different, after all. If you’re making cupcakes, they bake faster—about 18-20 minutes. Don’t rush this step; a moist, tender cake depends on timing.
Step 8: Cool & Glaze
Let the cake cool in the pan for about 10 minutes, then transfer to a wire rack. This cooling phase is key—if you glaze too early, the heat can melt your frosting or glaze, and that’s no fun. Once it’s just warm, drizzle over your glaze. I go for a simple powdered sugar and milk mix, but feel free to add lemon zest or vanilla for extra flavor. Sprinkle some more sprinkles on top while it’s still sticky—that’s the finishing touch that makes it look irresistibly festive.
Step 9: Slice & Serve
Once completely cooled, slice your cake with a sharp serrated knife. I like to wipe the knife clean between cuts to keep them neat and prevent crumbs from smudging the colorful layers. Serve slightly chilled or at room temperature—either way, this cake is a showstopper. My favorite way is with a tall glass of milk or a cup of tea—it’s savory comfort with a pop of sweet fun. And honestly, it’s a joy to see kids’ eyes light up the moment they see that rainbow explosion in each slice!
What to Serve It With
This Funfetti Cake is such a mood lifter, I like to pair it with simple, happy sides. For breakfast or brunch, I serve it with a dollop of whipped cream and fresh berries—nothing fancy, just bright and fresh. It’s pretty enough to stand alone, but a splash of vanilla ice cream or a dusting of powdered sugar takes it to the next level as dessert. When I’m feeling nostalgic, I’ll slice it thin and serve with coffee or tea—perfect for sharing on a lazy weekend morning. For an extra special touch, I love decorating the top with more sprinkles, edible glitter, or even small candies. It’s a party on a plate, and it’s guaranteed to bring smiles all around, no matter the occasion.
Top Tips for Perfecting Your Funfetti Cake
Over the years, I’ve picked up a few tricks to make sure my Funfetti Cake turns out perfect every time. First, don’t skip the step of sifting your dry ingredients—this keeps your batter light and prevents clumps. When mixing your wet ingredients, make sure your butter isn’t too cold; softened butter makes for a creamier, more cohesive batter. I’ve also learned that gently folding in the sprinkles last, just before pouring into the pan, helps keep their color vibrant and prevents them from sinking or bleeding. If you want extra color, you can toss your sprinkles in a little flour before adding—they won’t sink or bleed as much during baking. Feel free to customize the sprinkles—star shapes, metallic, or pastel—whatever matches your mood. Baked too long? The cake dries out, so keep a close eye after 30 minutes—every oven is different. If the edges start to brown but the center isn’t done, tent it with foil and let it finish baking without overdoing it. When it’s done, I always do the toothpick test and touch the top—if it springs back, it’s perfect. As for the glaze, keep it thick enough to coat but not so runny that it drips off—adjust with more powdered sugar or milk as needed. I’ve also tested different flavor add-ins, like almond extract or a splash of citrus, which lovely change-up the classic vanilla vibe. Honestly, the key is patience and tasting along the way—baking is an art, not a science, and that little bit of love makes all the difference.
Storing and Reheating Tips
This cake is pretty hardy—perfect for making ahead or leftovers. If you’re planning to serve it within a day or two, keep it covered loosely with plastic wrap at room temperature. It stays fresh for about 2-3 days, but I find that covering it tightly in airtight containers prevents it from drying out. For longer storage, wrap the whole cake or slices in plastic, then place in the fridge for up to a week—just give it a quick warm-up when you’re ready to enjoy. If it’s already glazed or frosted, refrigerate it and let it come to room temp before slicing for the best texture. Freezing? Absolutely! Wrap the cake tightly in foil and then in a zip-top bag. It’ll keep well for up to 3 months. Thaw at room temperature for a few hours before serving. When it comes to the glaze, I recommend adding it just before serving if you want that shiny, fresh look. If it’s been stored or frozen, I’d reapply a new layer of glaze or frosting after reheating to bring back that freshly baked feel. Nothing beats a slice of cake that’s still moist and vibrant, so proper storage is key. I’ve learned that patience is the secret—allowing it to come back to room temp preserves all that soft, fluffy goodness.
Frequently Asked Questions
Final Thoughts
There’s nothing quite like digging into a slice of homemade Funfetti Cake—every bite brings a little dash of childhood magic and celebration. I always say that the most memorable moments are lit up by shared favorites in the kitchen, and this cake is a shining example. It’s forgiving enough for beginners but fun enough for seasoned bakers to get creative with toppings and fillings. Whether it’s a birthday, a casual dinner, or just a craving for something sweet and colorful, this cake never disappoints. I love experimenting with different sprinkles or adding a splash of citrus zest to brighten the flavor. Honestly, once you’ve baked it, I’d love to hear how it turned out or how you customized it for your family. Happy baking, and may your days be filled with plenty of sprinkles and sweet smiles!
Easy Homemade Funfetti Cake
Ingredients
Method
- Preheat the oven to 325°F. Prepare a 9×13 inch baking pan with baking spray.
- Toss the sprinkles with 2 tablespoons of flour and set aside.
- Combine the remaining flour, baking powder, baking soda, and salt in a medium bowl.
- In a large mixer bowl, cream butter and sugar until light and fluffy, about 3 minutes.
- Add egg yolks one at a time, mixing well after each addition. Scrape down the sides of the bowl.
- Add the dry ingredients to the batter in thirds, alternating with milk, starting and ending with dry ingredients. Mix until just combined.
- Fold in sour cream until combined. Gently fold in the sprinkles.
- Pour batter into prepared baking pan and bake for 40-45 minutes. Cool before frosting.