Layered Boston Cream Pie Delight
There are some desserts that just hold a special place in your heart, aren’t there? For me, that’s always been Boston Cream Pie. It’s funny, because when you hear “pie,” you might picture crust, right? But this isn’t your grandma’s apple pie. This is something altogether more magical, a true celebration of moist cake, silky custard, and a luscious chocolate glaze. I remember the first time I ever tried a proper Boston Cream Pie; it was at a little bakery my parents took me to when I was a kid, and it was like a revelation. It wasn’t just dessert; it was an experience. It’s a classic for a reason, and while there are many versions out there, this one? This is the one I come back to, the one that gets rave reviews from everyone who tries it, and honestly, it makes me feel like a baking superstar every single time I pull it out of the oven. If you’ve ever felt intimidated by layered cakes or rich fillings, trust me, this Boston Cream Pie recipe is going to be your new best friend. It’s a showstopper that’s surprisingly manageable.
What is Boston Cream Pie?
So, let’s talk about what this wonder actually is. Boston Cream Pie is a beloved American dessert that, despite its name, is actually a cake! It’s composed of two layers of a tender yellow cake, generously filled with a rich vanilla pastry cream (or custard, depending on how you like to call it!), and then crowned with a smooth, decadent chocolate glaze. Think of it as a perfectly balanced symphony of textures and flavors: the soft, yielding cake, the creamy, dreamy filling, and the slightly firm, glossy topping. It’s the official dessert of Massachusetts, and you can totally see why. It’s got that perfect combination of comfort and elegance. It’s not overly sweet, which is something I really appreciate, allowing the vanilla and chocolate notes to really sing. It’s like a hug in cake form, truly!
Why you
Okay, let’s get down to the nitty-gritty of why this particular Boston Cream Pie recipe is a keeper. First off, the flavor is just out of this world. The cake is incredibly moist and tender, not too sweet, which is exactly what you want when you’re about to dive into a rich custard filling and a chocolate glaze. The pastry cream is smooth, velvety, and has that perfect vanilla bean essence that just makes your taste buds sing. It’s not overly complicated like some fancy patisserie desserts; it’s honest-to-goodness home baking at its finest. And the simplicity! Honestly, for how impressive this looks, it’s remarkably straightforward to make. Even if you’re a beginner baker, you can totally nail this. Plus, it’s surprisingly budget-friendly. You probably have most of the ingredients in your pantry right now! It’s also wonderfully versatile. While this is my go-to, you can easily tweak the filling or glaze. This recipe is perfect for birthdays, holidays, or just when you need a serious dose of comfort. What I love most about this recipe is that it always feels special, even when I whip it up on a Tuesday night because the craving hit. It’s a dessert that truly delivers on taste, ease, and sheer deliciousness.
How do I make Boston Cream Pie?
Quick Overview
Making this Boston Cream Pie is a three-part harmony: bake a delightful cake, whip up a luscious custard, and finish with a glossy chocolate glaze. The cake batter comes together in minutes, and the custard is a simple stovetop affair that thickens beautifully. The glaze is equally quick and sets up just right. You’ll bake your cake layers, let them cool while you make the filling, then assemble and glaze. It sounds like a lot, but each step is manageable and leads you closer to pure dessert bliss. This method ensures a perfectly moist cake and a creamy filling that holds its shape, so no messy spills!
Ingredients
For the Main Batter:
This is where the magic starts for our cake layers. I always opt for unsalted butter because it gives me more control over the saltiness of the final product, and good quality vanilla extract really makes a difference here. Make sure your eggs and milk are at room temperature; it helps everything emulsify beautifully and creates a lighter cake texture. You’ll need:
- 2 1/4 cups all-purpose flour
- 1 1/2 teaspoons baking powder
- 1/2 teaspoon salt
- 1 cup (2 sticks) unsalted butter, softened
- 1 3/4 cups granulated sugar
- 2 large eggs, at room temperature
- 1 teaspoon vanilla extract
- 1 1/4 cups milk, at room temperature
For the Filling:
This pastry cream is the heart of the Boston Cream Pie. Using cornstarch is key to getting that perfect, smooth, pudding-like consistency without any graininess. I love to use vanilla bean paste if I have it, for those lovely little flecks and intense flavor, but good quality vanilla extract works beautifully too. This is what makes it feel truly decadent!
- 2 cups whole milk
- 1/2 cup granulated sugar
- 1/4 cup cornstarch
- 2 large egg yolks
- 2 tablespoons unsalted butter
- 1 teaspoon vanilla extract (or vanilla bean paste)
For the Glaze:
A good chocolate glaze needs to be glossy and pourable, but also firm up just enough so it doesn’t slide off. Using a combination of cocoa powder and melted chocolate gives it a deeper flavor. Don’t skip the pinch of salt; it really enhances the chocolate! This is the crowning glory, so make it count!
- 1/2 cup unsalted butter
- 1/4 cup unsweetened cocoa powder
- 1 3/4 cups powdered sugar
- 1/4 cup milk or heavy cream
- 1 teaspoon vanilla extract
Step-by-Step Instructions
Step 1: Preheat & Prep Pan
Alright, first things first! Preheat your oven to 350°F (175°C). This is a standard baking temperature, but always remember your oven might run a little hotter or cooler, so get to know yours! I like to use two 8-inch round cake pans for this recipe. Grease them really well with butter or cooking spray, then dust them lightly with flour, tapping out any excess. You can also line the bottoms with parchment paper for extra insurance against sticking – I’ve learned that trick the hard way and it’s a lifesaver!
Step 2: Mix Dry Ingredients
In a medium bowl, whisk together the flour, baking powder, and salt. Whisking them together ensures the leavening agent and salt are evenly distributed throughout the flour, which means a more consistent rise and flavor in your cake. I usually give it a good minute of whisking just to make sure everything is well combined. This simple step prevents pockets of baking powder or salt.
Step 3: Mix Wet Ingredients
In a separate large bowl, cream together the softened butter and granulated sugar until light and fluffy. This is usually done with an electric mixer, but you can do it by hand if you’re feeling ambitious! Then, beat in the eggs one at a time, making sure each is incorporated before adding the next. Stir in the vanilla extract. This process incorporates air, which contributes to the cake’s tender crumb.
Step 4: Combine
Now for the fun part – bringing it all together! Gradually add the dry ingredients to the wet ingredients, alternating with the milk, beginning and ending with the dry ingredients. Mix on low speed (or stir gently by hand) until just combined. Don’t overmix! Overmixing develops the gluten in the flour, which can lead to a tough cake. A few streaks of flour are okay; they’ll disappear as you gently fold the batter.
Step 5: Prepare Filling
While the cake layers are baking, let’s get our custard ready. In a medium saucepan, whisk together the sugar and cornstarch until no lumps remain. In a separate small bowl, whisk the egg yolks lightly. Gradually whisk the egg yolks into the sugar and cornstarch mixture until smooth. Then, slowly whisk in the milk. Place the saucepan over medium heat and cook, stirring constantly, until the mixture thickens and bubbles. This usually takes about 5-8 minutes. Once it’s thick, remove from heat and stir in the butter and vanilla extract until smooth and glossy. Pour this into a bowl, cover the surface directly with plastic wrap (this prevents a skin from forming), and let it cool to room temperature, then chill it in the refrigerator.
Step 6: Layer & Swirl
Once your cake layers are completely cool – and this is important, you don’t want them warm or they’ll melt the filling! – carefully place one layer onto your serving plate. Spoon the chilled pastry cream evenly over the cake layer, spreading it almost to the edges. Don’t worry if it’s not perfectly smooth; it’ll all be covered. Then, gently place the second cake layer on top of the cream. At this stage, it’s ready for the glaze!
Step 7: Bake
Bake the cake layers for about 25-30 minutes, or until a wooden skewer inserted into the center comes out clean. If you see any wet batter on it, it needs a little more time. The tops should be golden brown and spring back lightly when touched. Keep an eye on them in the last 10 minutes of baking. If they’re browning too quickly, you can loosely tent them with foil.
Step 8: Cool & Glaze
Let the cake layers cool in their pans for about 10 minutes before inverting them onto a wire rack to cool completely. While the cake cools, make your glaze. Melt the butter in a saucepan over low heat. Stir in the cocoa powder and cook for 1 minute, stirring constantly. Remove from heat and whisk in the powdered sugar, milk, and vanilla extract until smooth and glossy. If it’s too thick, add a tiny bit more milk; if it’s too thin, add a bit more powdered sugar. Once the cake is completely cool and assembled, pour the warm glaze over the top, letting it drip down the sides. Work quickly as the glaze will start to set!
Step 9: Slice & Serve
This is the moment of truth! Let the glaze set for at least 15-20 minutes before slicing. Use a sharp knife dipped in hot water for the cleanest cuts. Serve each slice of Boston Cream Pie with pride! It’s best served at room temperature, so the custard is soft and yielding. I find it’s absolute perfection just as it is, no accompaniment needed, but a little whipped cream or a fresh berry on the side never hurt anyone!
What to Serve It With
Boston Cream Pie is pretty much a standalone star, but if you’re looking to create a whole dessert experience, I’ve got a few ideas that I’ve tried and loved. For a simple morning treat, a slice with a hot cup of coffee is pure bliss – the slightly bitter coffee cuts through the sweetness beautifully. Imagine a lazy Saturday morning, a good book, and a slice of this… heaven! For a more elegant brunch, I love to serve it on a pretty cake stand with a few fresh raspberries or a sprinkle of edible flowers for a pop of color. It looks so sophisticated, and nobody needs to know how easy it was! As a dessert, it’s obviously a winner. It’s fantastic after a hearty meal. I’ve also found that it makes for a truly comforting late-night snack. When you need something sweet but don’t want a whole fuss, a small sliver of this Boston Cream Pie is incredibly satisfying. My family also has a tradition of having it for special occasions, like birthdays, and it always feels like a real treat. I’ve even paired it with a small scoop of vanilla bean ice cream on occasion, though I swear it doesn’t need it!
Top Tips for Perfecting Your Boston Cream Pie
Over the years, I’ve picked up a few tricks and learned a thing or two about making Boston Cream Pie absolutely perfect. For the zucchini, if you decide to go that route for extra moisture (though this recipe doesn’t call for it, it’s a common variation!), make sure you squeeze out as much liquid as possible after grating. Moisture is the enemy of a good cake crumb. When mixing your batter, remember that “just combined” is your mantra. A few tiny lumps are better than a tough cake. Seriously, don’t go crazy with the mixer once the flour is in. For the swirl, if you’re doing a marbled cake variation (which is lovely!), use a light hand to avoid muddying the colors. For ingredient swaps, I’ve found that using buttermilk instead of regular milk in the cake batter can add an extra layer of tenderness, but you might need a tiny pinch more baking soda to compensate. And for baking, always do the skewer test! It’s the most reliable way to know your cake is done. If your glaze seems too thick or too thin, don’t panic! A splash more milk or a bit more powdered sugar can usually fix it. I’ve also learned that letting the glaze set properly is crucial. Don’t rush that part; it makes all the difference to the final presentation. And if your custard seems a little lumpy, a quick whisk while it’s still warm can often smooth it out beautifully. Trust me, these little adjustments make a world of difference!
Storing and Reheating Tips
Knowing how to store your Boston Cream Pie is key to enjoying it over a few days. If you happen to have any leftovers, which is rare in my house! you can keep it covered at room temperature for up to a day. The cake itself is pretty stable. For longer storage, I always opt for the refrigerator. Make sure it’s in an airtight container; this prevents it from drying out or picking up any weird fridge odors. It’ll stay delicious for about 3-4 days in the fridge. Reheating isn’t really necessary for Boston Cream Pie, as it’s best served at room temperature or slightly chilled, but if you prefer it warmer, you can gently warm individual slices in the microwave for a few seconds. Be careful not to overheat, or your custard could get a weird texture. If you’re planning to freeze it, I’d recommend freezing the un-glazed cake layers separately, well-wrapped in plastic wrap and then foil. Thaw them in the refrigerator overnight, then assemble and glaze once they’re at room temperature. Glazing it before freezing can sometimes affect the texture of the glaze, so I prefer to do it fresh.
Frequently Asked Questions
Final Thoughts
I truly hope you give this Boston Cream Pie a try. It’s more than just a dessert; it’s a little slice of happiness that’s surprisingly achievable for any home baker. The combination of that tender, moist cake, the luxuriously creamy vanilla custard, and the smooth, rich chocolate glaze is just pure perfection. It’s the kind of recipe that makes you feel incredibly proud when you present it, and it always disappears fast! If you love this classic, you might also enjoy my recipe for Classic Chocolate Eclairs or my Easy Vanilla Bean Panna Cotta for more creamy, dreamy delights. Don’t be shy about sharing your own creations or any questions you have in the comments below – I absolutely love hearing how your baking adventures turn out! Happy baking, and enjoy every single delicious bite!

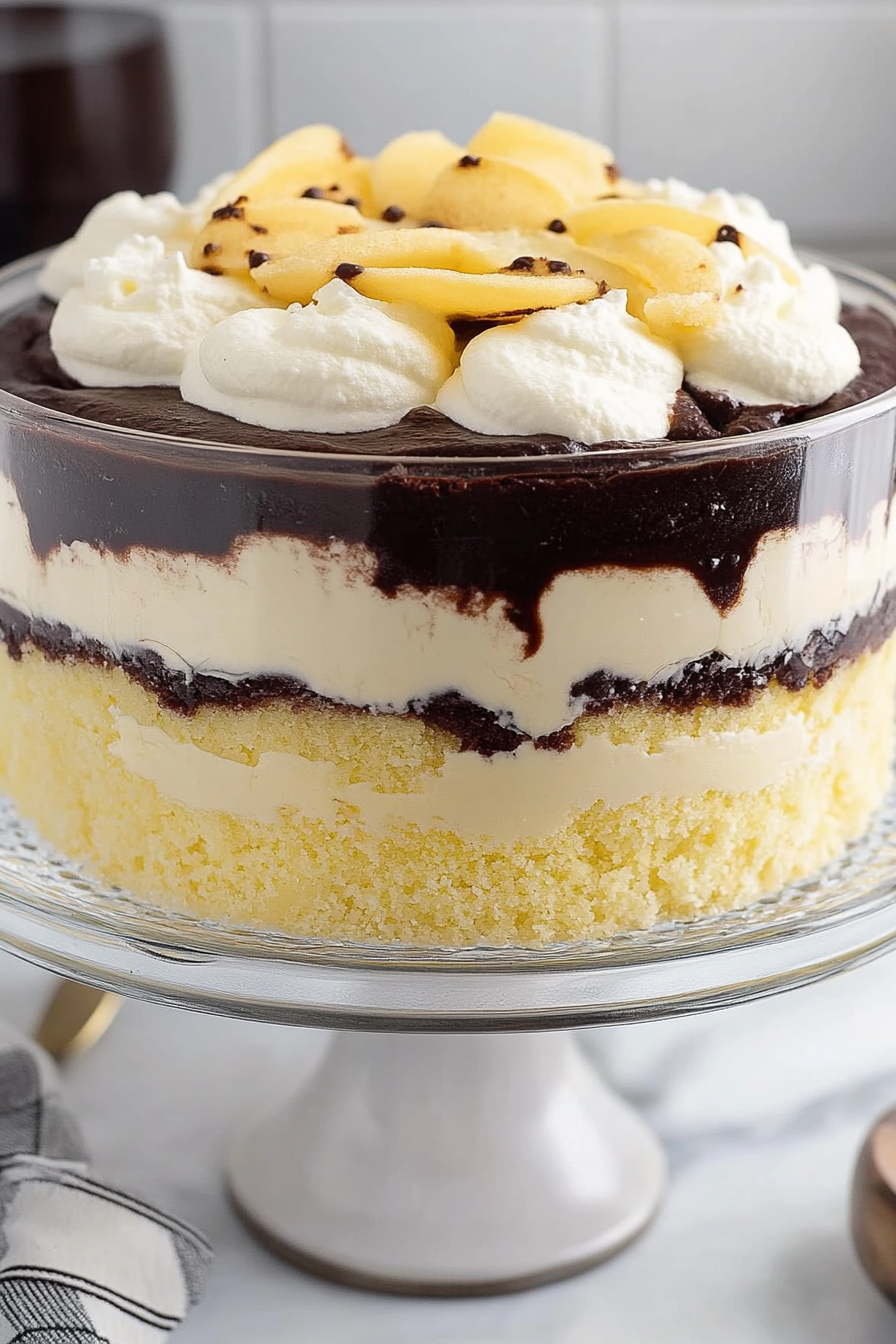
Boston Cream Pie Trifle
Ingredients
Method
- Bake the yellow cake according to the package instructions. Let it cool completely, then cut into 1-inch cubes.
- In a medium mixing bowl, whisk together the French vanilla pudding mix and cold milk according to package directions. Let it chill in the refrigerator for 30 minutes to 1 hour, until set.
- For the chocolate ganache, heat the heavy cream in a saucepan over medium heat until simmering (do not boil).
- Place the chocolate chips in a heatproof bowl. Pour the hot cream over the chocolate and let sit for 1 minute. Add the butter and vanilla extract.
- Stir the chocolate mixture until smooth and glossy. Let it cool slightly.
- In a trifle dish or large glass bowl, add a layer of cubed cake.
- Spread half of the prepared vanilla pudding over the cake layer.
- Drizzle a layer of the chocolate ganache over the pudding.
- Repeat the layers: add another layer of cake cubes, the remaining pudding, and finish with the remaining chocolate ganache.
- Loosely cover and refrigerate for at least 2 hours, or until chilled and set. The longer it chills, the better the flavors will meld.
- Before serving, pipe or dollop the whipped topping around the edge of the chocolate layer. Serve immediately.